使用Spring Boot和AspectJ实现方法跟踪基础结构
了解如何使用Spring Boot和AspectJ实现方法跟踪基础结构!最近在优锐课学习收获颇多,记录下来大家一起进步!
在我们的应用程序中,获取方法的堆栈跟踪信息可能会节省很多时间。具有输入输出参数值和方法所花费的时间可以使查找问题变得更加容易。在本文中,我们将研究如何使用Spring Boot,AspectJ和Threadlocal为方法跟踪基础结构实现起点。
在此示例中,我使用了: Spring Boot Starter Web 2.1.7
- Java 1.8 +
- AspectJ 1.8
- Maven 3.2
1. 总览
在本教程中,我们将准备一个简单的REST服务,该服务将在书店中检索有关一本书的详细信息。然后,我们将添加一个ThreadLocal模型,该模型将在整个线程生命周期中保持堆栈结构。最后,我们将增加一个方面来削减调用堆栈中的方法,以获取输入/输出参数值。让我们开始吧!
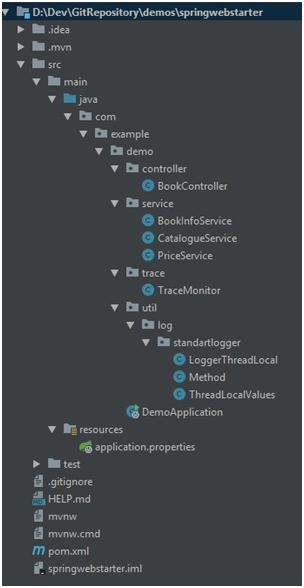
项目结构
2. Maven依赖
- Spring Boot Starter Web —使用Spring MVC的RESTful服务
- Spring — 具备Aspect功能
- AspectJ编织者向Java类引入建议
- Apache Commons Lang —用于字符串实用程序
  <parent>

         <groupId>org.springframework.boot</groupId>

         <artifactId>spring-boot-starter-parent</artifactId>

         <version>2.1.7.RELEASE</version>

     </parent>

 <properties>

         <java.version>1.8</java.version>

     </properties>

 <dependencies>

         <dependency>

             <groupId>org.springframework.boot</groupId>

             <artifactId>spring-boot-starter-web</artifactId>

             <version>2.1.7.RELEASE</version>

         </dependency>

         <dependency>

             <groupId>org.springframework</groupId>

             <artifactId>spring-aop</artifactId>

             <version>5.0.9.RELEASE</version>

         </dependency>

         <dependency>

             <groupId>org.aspectj</groupId>

             <artifactId>aspectjweaver</artifactId>

             <version>1.8.9</version>

         </dependency>

         <dependency>

             <groupId>org.apache.commons</groupId>

             <artifactId>commons-lang3</artifactId>

             <version>3.8.1</version>

         </dependency>

     </dependencies>
3. 实操
创建一个Spring Boot应用程序
你可以使用这些模板来为逐步实现创建一个简单的Spring Boot Application,也可以在此处直接下载最终项目。
For IntelliJ:
https://www.javadevjournal.com/spring-boot/spring-boot-application-intellij/
For Eclipse:
https://dzone.com/articles/building-your-first-spring-boot-web-application-ex
简单的Rest Service和方法
首先,我们将创建我们的服务。我们将获得书籍项目号作为输入参数,并提供书名,价格和内容信息作为服务输出。
我们将提供三个简单的服务:
PriceService:
 package com.example.demo.service;

 import org.springframework.stereotype.Service;

 @Service

 public class PriceService {

     public double getPrice(int itemNo){

             switch (itemNo) {

                 case 1 :

                     return 10.d;

                 case 2 :

                     return 20.d;

                 default:

                     return 0.d;

             }

     }

 }
CatalogueService:
 package com.example.demo.service;

 import org.springframework.stereotype.Service;

 @Service

 public class CatalogueService {

     public String getContent(int itemNo){

         switch (itemNo) {

             case 1 :

                 return "Lorem ipsum content 1.";

             case 2 :

                 return "Lorem ipsum content 2.";

             default:

                 return "Content not found.";

         }

     }

     public String getTitle(int itemNo){

         switch (itemNo) {

             case 1 :

                 return "For whom the bell tolls";

             case 2 :

                 return "Of mice and men";

             default:

                 return "Title not found.";

         }

     }

 }
BookInfoService:
 package com.example.demo.service;

 import org.springframework.beans.factory.annotation.Autowired;

 import org.springframework.stereotype.Service;

 @Service

 public class BookInfoService {

     @Autowired

     PriceService priceService;

     @Autowired

     CatalogueService catalogueService;

     public String getBookInfo(int itemNo){

         StringBuilder sb = new StringBuilder();

         sb.append(" Title :" + catalogueService.getTitle(itemNo));

         sb.append(" Price:" + priceService.getPrice(itemNo));

         sb.append(" Content:" + catalogueService.getContent(itemNo));

         return sb.toString();

     }

 }
BookController: 这是我们的REST控制器,用于创建可检索图书信息的RET服务。我们将准备一个TraceMonitor服务,以便以后打印堆栈跟踪。
 package com.example.demo.controller;

 import com.example.demo.service.BookInfoService;

 import com.example.demo.trace.TraceMonitor;

 import org.springframework.beans.factory.annotation.Autowired;

 import org.springframework.web.bind.annotation.GetMapping;

 import org.springframework.web.bind.annotation.PathVariable;

 import org.springframework.web.bind.annotation.RestController;

 @RestController

 public class BookController {

     @Autowired

     BookInfoService bookInfoService;

     @Autowired

     TraceMonitor traceMonitor;

     @GetMapping("/getBookInfo/{itemNo}")

     public String getBookInfo(@PathVariable int itemNo) {

         try{

             return bookInfoService.getBookInfo(itemNo);

         }finally {

             traceMonitor.printTrace();

         }

     }

 }
我们的REST控制器随时可以使用。如果我们注释掉尚未实现的traceMonitor.printTrace()方法,然后使用@SpringBootApplication注释的类运行我们的应用程序:
 package com.example.demo;

 import org.springframework.boot.SpringApplication;

 import org.springframework.boot.autoconfigure.SpringBootApplication;

 @SpringBootApplication

 public class DemoApplication {

     public static void main(String[] args) {

         SpringApplication.run(DemoApplication.class, args);

     }

 }
http://localhost:8080/getBookInfo/2
> Title :Of mice and men Price:20.0 Content:Lorem ipsum content 2.
线程本地模型
现在,我们将准备我们的Method对象,该对象将保存任何方法调用的信息。稍后,我们将准备堆栈结构和ThreadLocal对象,这些对象将在线程的整个生命周期中保持堆栈结构。
Method:这是我们的模型对象,它将保留有关方法执行的所有详细信息。它包含方法的输入/输出参数,该方法所花费的时间以及methodList对象,该对象是直接从该方法调用的方法列表。
 package com.example.demo.util.log.standartlogger;

 import java.util.List;

 public class Method {

 private String methodName;

 private String input;

 private List<Method> methodList;

 private String output;

 private Long timeInMs;

 public Long getTimeInMs() {

 return timeInMs;

 }

 public void setTimeInMs(Long timeInMs) {

 this.timeInMs = timeInMs;

 }

 public String getInput() {

 return input;

 }

 public void setInput(String input) {

 this.input = input;

 }

 public String getOutput() {

 return output;

 }

 public void setOutput(String output) {

 this.output = output;

 }

 public List<Method> getMethodList() {

 return methodList;

 }

 public void setMethodList(List<Method> methodList) {

 this.methodList = methodList;

 }

 public String getMethodName() {

 return methodName;

 }

 public void setMethodName(String methodName) {

 this.methodName = methodName;

 }

 }
ThreadLocalValues: 保留主要方法的跟踪信息。方法mainMethod包含List<Method>methodList对象,该对象包含从main方法调用的子方法。
Deque<Method>methodStack 是保留方法调用堆栈的对象。它贯穿线程的整个生命周期。调用子方法时,将Method对象推送到methodStack上,当子方法返回时,将从methodStack弹出顶部的Method对象。
 package com.example.demo.util.log.standartlogger;

 import java.util.Deque;

 public class ThreadLocalValues {

 private Deque<Method> methodStack;

 private Method mainMethod;

 public ThreadLocalValues() {

 super();

 }

 public Method getMainMethod() {

 return mainMethod;

 }

 public void setMainMethod(Method mainMethod) {

 this.mainMethod = mainMethod;

 }

 public Deque<Method> getMethodStack() {

 return methodStack;

 }

 public void setMethodStack(Deque<Method> methodStack) {

 this.methodStack = methodStack;

 }

 }
LoggerThreadLocal: 此类保留ThreadLocalValues的ThreadLocal对象。该对象在线程的整个生命周期中一直存在。
 package com.example.demo.util.log.standartlogger;

 import java.util.ArrayDeque;

 import java.util.Deque;

 public class LoggerThreadLocal {

 static final ThreadLocal<ThreadLocalValues> threadLocal = new ThreadLocal<>();

 private LoggerThreadLocal() {

 super();

 }

 public static void setMethodStack(Deque<Method> methodStack) {

 ThreadLocalValues threadLocalValues = threadLocal.get();

 if (null == threadLocalValues) {

 threadLocalValues = new ThreadLocalValues();

 }

 threadLocalValues.setMethodStack(methodStack);

 threadLocal.set(threadLocalValues);

 }

 public static void setMainMethod(Method mainMethod){

 ThreadLocalValues threadLocalValues = threadLocal.get();

 if (null == threadLocalValues) {

 threadLocalValues = new ThreadLocalValues();

 }

 threadLocalValues.setMainMethod(mainMethod);

 threadLocal.set(threadLocalValues);

 }

 public static Method getMainMethod() {

 if (threadLocal.get() == null) {

 return null;

 }

 return threadLocal.get().getMainMethod();

 }

 public static Deque<Method> getMethodStack() {

 if (threadLocal.get() == null) {

 setMethodStack(new ArrayDeque<>());

 }

 return threadLocal.get().getMethodStack();

 }

 }
Aspect Implementations:
TraceMonitor: 此类是我们方面的配置类。在此类中,我们定义切入点,切面在切入点处切割代码流。我们的切入点定义了名称以单词“ Service”结尾的所有类中的所有方法。
@Pointcut(value = "execution(* com.example.demo.service.*Service.*(..))")
pushStackInBean: 这是将在切入点中执行方法之前将当前方法推入方法堆栈的方法。
popStackInBean: 此方法将在切入点返回该方法后,删除堆栈中的top方法。
printTrace: 这是一种将以JSON格式打印threadLocal值(mainMethod)的方法。
 package com.example.demo.trace;

 import java.util.ArrayList;

 import com.example.demo.util.log.standartlogger.LoggerThreadLocal;

 import com.example.demo.util.log.standartlogger.Method;

 import com.fasterxml.jackson.core.JsonProcessingException;

 import com.fasterxml.jackson.databind.ObjectMapper;

 import org.apache.commons.lang3.StringUtils;

 import org.apache.commons.lang3.exception.ExceptionUtils;

 import org.aspectj.lang.JoinPoint;

 import org.aspectj.lang.annotation.AfterReturning;

 import org.aspectj.lang.annotation.Aspect;

 import org.aspectj.lang.annotation.Before;

 import org.aspectj.lang.annotation.Pointcut;

 import org.springframework.context.annotation.Configuration;

 import org.springframework.stereotype.Service;

 @Aspect

 @Service

 @Configuration

 public class TraceMonitor {

     @Pointcut(value = "execution(* com.example.demo.service.*Service.*(..))")

     private void executionInService() {

         //do nothing, just for pointcut def

     }

     @Before(value = "executionInService()")

     public void pushStackInBean(JoinPoint joinPoint) {

         pushStack(joinPoint);

     }

     @AfterReturning(value = "executionInService()", returning = "returnValue")

     public void popStackInBean(Object returnValue) {

         popStack(returnValue);

     }

     ObjectMapper mapper = new ObjectMapper();

     private void pushStack(JoinPoint joinPoint) {

             Method m = new Method();

             m.setMethodName(StringUtils.replace(joinPoint.getSignature().toString(), "com.example.demo.service.", ""));

             String input = getInputParametersString(joinPoint.getArgs());

             m.setInput(input);

             m.setTimeInMs(Long.valueOf(System.currentTimeMillis()));

             LoggerThreadLocal.getMethodStack().push(m);

     }

     private String getInputParametersString(Object[] joinPointArgs) {

         String input;

         try {

             input = mapper.writeValueAsString(joinPointArgs);

         } catch (Exception e) {

             input = "Unable to create input parameters string. Error:" + e.getMessage();

         }

         return input;

     }

     private void popStack(Object output) {

         Method childMethod = LoggerThreadLocal.getMethodStack().pop();

         try {

             childMethod.setOutput(output==null?"": mapper.writeValueAsString(output));

         } catch (JsonProcessingException e) {

             childMethod.setOutput(e.getMessage());

         }

         childMethod.setTimeInMs(Long.valueOf(System.currentTimeMillis() - childMethod.getTimeInMs().longValue()));

         if (LoggerThreadLocal.getMethodStack().isEmpty()) {

             LoggerThreadLocal.setMainMethod(childMethod);

         } else {

             Method parentMethod = LoggerThreadLocal.getMethodStack().peek();

             addChildMethod(childMethod, parentMethod);

         }

     }

     private void addChildMethod(Method childMethod, Method parentMethod) {

         if (parentMethod != null) {

             if (parentMethod.getMethodList() == null) {

                 parentMethod.setMethodList(new ArrayList<>());

             }

             parentMethod.getMethodList().add(childMethod);

         }

     }

     public void printTrace() {

         try {

             StringBuilder sb = new StringBuilder();

             sb.append("\n<TRACE>\n").append(mapper.writerWithDefaultPrettyPrinter().writeValueAsString(LoggerThreadLocal.getMainMethod()));

             sb.append("\n</TRACE>");

             System.out.println(sb.toString());

         } catch (JsonProcessingException e) {

             StringUtils.abbreviate(ExceptionUtils.getStackTrace(e), 2000);

         }

     }

 }
3. 测试和打印堆栈
当我们运行Spring Boot应用程序并发送get请求时:
http://localhost:8080/getBookInfo/2
回复将是:
> Title:Of mice and men Price:20.0 Content:Lorem ipsum content 2.
注意:如果你之前对traceMonitor.printTrace()进行了注释,请不要忘记取消注释。
控制台输出将是:
 <TRACE>

 {

   "methodName": "String service.BookInfoService.getBookInfo(int)",

   "input": "[2]",

   "methodList": [

     {

       "methodName": "String service.ContentService.getTitle(int)",

       "input": "[2]",

       "output": "\"Of mice and men\"",

       "timeInMs": 3

     },

     {

       "methodName": "Double service.PriceService.getPrice(int)",

       "input": "[2]",

       "output": "20.0",

       "timeInMs": 1

     },

     {

       "methodName": "String service.ContentService.getContent(int)",

       "input": "[2]",

       "output": "\"Lorem ipsum content 2.\"",

       "timeInMs": 0

     }

   ],

   "output": "\" Title :Of mice and men Price:20.0 Content:Lorem ipsum content 2.\"",

   "timeInMs": 6

 }

 </TRACE>
由于我们可以轻松跟踪方法流程:
getBookInfomethod is called with input 2getBookInfocallsgetTitlemethod with input 2getTitlereturns with output "Of mice and men" in 3 ms.getBookInfocallsgetPricewith input 2getPricereturns with output 20.0 in 1 ms.getBookInfocallsgetContentwith input 2getContentreturns with output "Lorem ipsum content 2." in 0 ms.getBookInfomethod returns with output "Title :Of mice and men Price:20.0 Content:Lorem ipsum content 2." in 6 ms.
我们的跟踪实现适用于我们简单的REST服务调用。
进一步的改进应该是:
- 如果有任何方法获得异常,则使用
@AfterThrowing处理异常。 - 具有可缓存方法的打开/关闭跟踪机制,该方法从服务或数据库中读取可跟踪方法列表。
- 使用记录器实现(sl4j)将跟踪打印到单独的日志文件中。
感谢阅读!

使用Spring Boot和AspectJ实现方法跟踪基础结构的更多相关文章
- Spring Boot 初始化运行特定方法
Spring Boot提供了两种 “开机自启动” 的方式,ApplicationRunner和CommandLineRunner 这两种方式的目的是为了满足,在容器启动时like执行某些方法.我们可以 ...
- Spring Boot 2.0 + zipkin 分布式跟踪系统快速入门
原文:https://www.jianshu.com/p/9bfe103418e2 注意 Spring Boot 2.0之后,使用EnableZipkinServer创建自定义的zipkin服务器已经 ...
- Spring boot 打包瘦身方法
背景 随着spring boot 的流行.越来越多的来发着选择使用spring boot 来发 web 应用. 不同于传统的 web 应用 需要 war 包来发布应用. spring boot 应用可 ...
- Spring Boot 之异步执行方法
前言: 最近的时候遇到一个需求,就是当服务器接到请求并不需要任务执行完成才返回结果,可以立即返回结果,让任务异步的去执行.开始考虑是直接启一个新的线程去执行任务或者把任务提交到一个线程池去执行,这两种 ...
- TDDL与Spring Boot集成Version报错——跟踪与解决
先说背景:公司采用diamond+tddl,这套技术来做web管理.本人处于好奇率先体验了下spring-boot,于是就有了spring-boot+tddl的组合.但是jar包上线后,屡屡发现一条e ...
- spring boot启动后执行方法
@Componentpublic class InitProject implements ApplicationRunner { private static final Logger logger ...
- Spring boot异常统一处理方法:@ControllerAdvice注解的使用、全局异常捕获、自定义异常捕获
一.全局异常 1.首先创建异常处理包和类 2.使用@ControllerAdvice注解,全局捕获异常类,只要作用在@RequestMapping上,所有的异常都会被捕获 package com.ex ...
- Spring boot JPA读取数据库方法
方法1: 1 StringBuffer sb = new StringBuffer(300); 2 sb.append("SELECT v.id, v.container_number, v ...
- Spring Boot重定向的使用方法
@RequestMapping(value = "/redirect", method = RequestMethod.GET) public void redirecttest( ...
随机推荐
- 替换"marquee",实现无缝滚动
js的marquee标签,可以实现元素循环滚动,但是不能无缝连接,要实现“无缝滚动”的效果必须使用js(借鉴百度),思路是使要滚动元素相对位置不断改变,上下滚动就相对top或者bottom,左右滚动就 ...
- git push后出现错误 ![rejected] master -> master(non-fast-forward) error:failed to push some refs to 'XXX'
本地创建了一个project并在GitHub上创建了一个仓库,想要将本地的仓库链接到远程仓库我用的是如下方法:git init //初始化本地仓库git remote add origin XX ...
- 一个ip, 两个域名, 两个ssl, 对应多个不同的项目 之 坑
之前配置了好几天, 就想通过tomcat直接配置. 找各种资料, 都说先配置Connector, 在配置Host. 我试了很多次, 都不成功. 原因我也没有找到在哪里. 我的配置参考如下网址: 修改这 ...
- 使用Spring安全表达式控制系统功能访问权限
一.SPEL表达式权限控制 从spring security 3.0开始已经可以使用spring Expression表达式来控制授权,允许在表达式中使用复杂的布尔逻辑来控制访问的权限.Spring ...
- 【SpringBoot | Redis】SpringBoot整合Redis
SpringBoot整合Redis 1. pom.xml中引入Redis相关包 请注意,这里我们排除了lettuce驱动,采用了jedis驱动 <!-- redis的依赖 --> < ...
- Linux内核版本 uname命令 GNU项目 Linux发行版
1.内核版本由linux内核社区统一编码和发布,格式如下图: major.minor.patch-build.desc 主版本号.次版本号.对次版本号的修订次数-编译次数.当前版本的特殊信息 次版本号 ...
- windows下安装Apache、php、mysql集成环境
一.准备工作 本次安装的版本分别为:apache2.4 .php5.6 . mysql5.7 下载地址为:http://pan.baidu.com/s/1boQNIOn 密码:zarx 二.安装步骤 ...
- gRPC asp.net core自定义策略认证
在GitHub上有个项目,本来是作为自己研究学习.net core的Demo,没想到很多同学在看,还给了很多星,所以觉得应该升成3.0,整理一下,写成博分享给学习.net core的同学们. 项目名称 ...
- HDFS之DataNode
DataNode工作机制 1)一个数据块在datanode上以文件形式存储在磁盘上,包括两个文件,一个是数据本身,一个是元数据包括数据块的长度,块数据的校验和,以及时间戳. 2)DataNode启动后 ...
- day 27 网路编程 面向对象多继承
知识补充: 字符串转化为字节 string1 = input(“请输入你的名字”) string1.encode('utf-8') 字节转化为字符串 byte1 = b"alex" ...

