SpringBoot整合redis缓存(一)
准备工作
1.Linux系统
2.安装redis(也可以安装docker,然后再docker中装redis,本文章就直接用Linux安装redis做演示)
redis下载地址:http://download.redis.io/releases/redis-4.0.14.tar.gz
修改redis,开启远程访问
找到redis中的redis.conf文件并编辑(在安装路径中找到)
vim ./redis.conf
1、找到bind 127.0.0.1并注释掉
默认127.0.0.1只能本地访问,注释掉即可ip访问
2、修改 protected-mode 属性值为no
注释掉并把保护模式禁用以后可以IP访问
3、修改daemonize属性将no 改为yes
将daemonize设置为yes即启动后台运行
4、开放6379端口
/sbin/iptables -I INPUT -p tcp --dport 6379 -j ACCEPT
默认不对外开放6379
5、启动redis
redis-server /myconf/redis.conf
redis-server默认在/usr/local/bin路径下,redis.conf在redis的安装路径下
6、测试连接
redis-cli -h 192.168.126.129 -p 6379
redis-cli -h redis服务器IP -p 6379 -a 密码(没有设置redis密码不要写空,否则报错)

Java代码编写
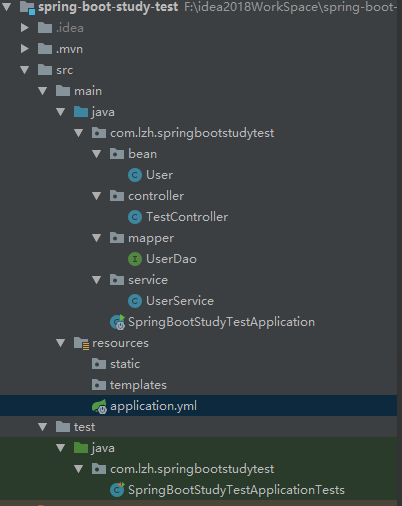
目录结构
项目源码结构
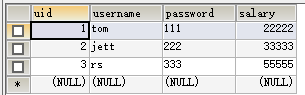
一个user表
代码
pom.xml文件(可以根据自己的需要来添加或修改)
<dependencies>

        <dependency>

            <groupId>org.springframework.boot</groupId>

            <artifactId>spring-boot-starter-web</artifactId>

        </dependency>

        <!-- mybatis 与 spring boot 2.x的整合包 -->

        <dependency>

            <groupId>org.mybatis.spring.boot</groupId>

            <artifactId>mybatis-spring-boot-starter</artifactId>

            <version>1.3.2</version>

        </dependency>

        <!--mysql JDBC驱动 -->

        <dependency>

            <groupId>mysql</groupId>

            <artifactId>mysql-connector-java</artifactId>

            <version>5.1.39</version>

        </dependency>

        <dependency>

            <groupId>org.springframework.boot</groupId>

            <artifactId>spring-boot-starter-test</artifactId>

            <scope>test</scope>

        </dependency>

        <dependency>

            <groupId>org.springframework.boot</groupId>

            <artifactId>spring-boot-starter-data-redis</artifactId>

        </dependency>

        <dependency>

            <groupId>org.springframework.boot</groupId>

            <artifactId>spring-boot-starter-cache</artifactId>

        </dependency>

    </dependencies>
下面是springboot的配置文件application.yml,配置redis(里面都有注释解释)
server:

  port: 8081

#数据库连接

spring:

  datasource:

    url: jdbc:mysql://localhost:3306/mytest_springboot_cache?useUnicode=true

    driver-class-name: com.mysql.jdbc.Driver

    username: root

    password: lzh

  ## Redis 配置

  redis:

    ## Redis数据库索引(默认为0)

    database: 0

    ## Redis服务器地址

    host: 192.168.126.129

    ## Redis服务器连接端口

    port: 6379

    ## Redis服务器连接密码(默认为空)

    password:

    jedis:

      pool:

        ## 连接池最大连接数(使用负值表示没有限制)

        #spring.redis.pool.max-active=8

        max-active: 8

        ## 连接池最大阻塞等待时间(使用负值表示没有限制)

        #spring.redis.pool.max-wait=-1

        max-wait: -1

        ## 连接池中的最大空闲连接

        #spring.redis.pool.max-idle=8

        max-idle: 8

        ## 连接池中的最小空闲连接

        #spring.redis.pool.min-idle=0

        min-idle: 0

    ## 连接超时时间(毫秒)

    timeout: 1200

  #将themilef的默认缓存禁用,热加载生效

  thymeleaf:

    cache: false

  #mybatis的下划线转驼峰配置

  configuration:

    map-underscore-to-camel-case: true

    #另外一种打印语句的方式

    log-impl: org.apache.ibatis.logging.stdout.StdOutImpl

#打印sql时的语句

logging:

  level:

    com:

      acong:

        dao: debug

  file: d:/logs/bsbdj.log
接着是实体类,这个比较简单就不多说了
package com.lzh.springbootstudytest.bean;

import java.io.Serializable;

/**

 * @author lzh

 * create 2019-09-18-22:32

 */

public class User implements Serializable {

    private static final long serialVersionUID = 1L;

    private int uid;

    private String userName;

    private String passWord;

    private int salary;

    public int getUid() {

        return uid;

    }

    public void setUid(int uid) {

        this.uid = uid;

    }

    public String getUserName() {

        return userName;

    }

    public void setUserName(String userName) {

        this.userName = userName;

    }

    public String getPassWord() {

        return passWord;

    }

    public void setPassWord(String passWord) {

        this.passWord = passWord;

    }

    public int getSalary() {

        return salary;

    }

    public void setSalary(int salary) {

        this.salary = salary;

    }

    public User(int uid, String userName, String passWord, int salary) {

        super();

        this.uid = uid;

        this.userName = userName;

        this.passWord = passWord;

        this.salary = salary;

    }

    public User() {

        super();

    }

}
这是controller类,用于暴露接口访问
package com.lzh.springbootstudytest.controller;

import com.lzh.springbootstudytest.bean.User;

import com.lzh.springbootstudytest.service.UserService;

import org.springframework.beans.factory.annotation.Autowired;

import org.springframework.stereotype.Controller;

import org.springframework.web.bind.annotation.RequestMapping;

import org.springframework.web.bind.annotation.RequestParam;

import org.springframework.web.bind.annotation.ResponseBody;

import org.springframework.web.bind.annotation.RestController;

import java.util.HashMap;

import java.util.List;

import java.util.Map;

/**

 * @author lzh

 * create 2019-09-18-22:36

 */

@RestController

public class TestController {

    @Autowired

    private UserService userService;

    @RequestMapping("/queryAll")

    public List<User> queryAll(){

        List<User> lists = userService.queryAll();

        return lists;

    }

    @RequestMapping("/findUserById")

    public Map<String, Object> findUserById(@RequestParam int id){

        User user = userService.findUserById(id);

        Map<String, Object> result = new HashMap<>();

        result.put("uid", user.getUid());

        result.put("uname", user.getUserName());

        result.put("pass", user.getPassWord());

        result.put("salary", user.getSalary());

        return result;

    }

    @RequestMapping("/updateUser")

    public String updateUser(){

        User user = new User();

        user.setUid(1);

        user.setUserName("cat");

        user.setPassWord("miaomiao");

        user.setSalary(4000);

        int result = userService.updateUser(user);

        if(result != 0){

            return "update user success";

        }

        return "fail";

    }

    @RequestMapping("/deleteUserById")

    public String deleteUserById(@RequestParam int id){

        int result = userService.deleteUserById(id);

        if(result != 0){

            return "delete success";

        }

        return "delete fail";

    }

}
配置redistemplate序列化
package com.lzh.springbootstudytest.config;

import com.fasterxml.jackson.annotation.JsonAutoDetect;

import com.fasterxml.jackson.annotation.PropertyAccessor;

import com.fasterxml.jackson.databind.ObjectMapper;

import org.springframework.cache.CacheManager;

import org.springframework.cache.annotation.CachingConfigurerSupport;

import org.springframework.cache.annotation.EnableCaching;

import org.springframework.context.annotation.Bean;

import org.springframework.context.annotation.Configuration;

import org.springframework.data.redis.cache.RedisCacheConfiguration;

import org.springframework.data.redis.cache.RedisCacheManager;

import org.springframework.data.redis.cache.RedisCacheWriter;

import org.springframework.data.redis.connection.RedisConnectionFactory;

import org.springframework.data.redis.core.*;

import org.springframework.data.redis.serializer.Jackson2JsonRedisSerializer;

import org.springframework.data.redis.serializer.StringRedisSerializer;

import java.time.Duration;

/**

 * @author lzh

 * create 2019-09-24-15:07

 */

@Configuration

@EnableCaching

public class RedisConfig extends CachingConfigurerSupport {

    /**

     * 选择redis作为默认缓存工具

     * @param redisConnectionFactory

     * @return

     */

    /*@Bean

    //springboot 1.xx

    public CacheManager cacheManager(RedisTemplate redisTemplate) {

        RedisCacheManager rcm = new RedisCacheManager(redisTemplate);

        return rcm;

    }*/

    @Bean

    public CacheManager cacheManager(RedisConnectionFactory redisConnectionFactory) {

        RedisCacheConfiguration redisCacheConfiguration = RedisCacheConfiguration.defaultCacheConfig()

                .entryTtl(Duration.ofHours(1)); // 设置缓存有效期一小时

        return RedisCacheManager

                .builder(RedisCacheWriter.nonLockingRedisCacheWriter(redisConnectionFactory))

                .cacheDefaults(redisCacheConfiguration).build();

    }

    /**

     * retemplate相关配置

     * @param factory

     * @return

     */

    @Bean

    public RedisTemplate<String, Object> redisTemplate(RedisConnectionFactory factory) {

        RedisTemplate<String, Object> template = new RedisTemplate<>();

        // 配置连接工厂

        template.setConnectionFactory(factory);

        //使用Jackson2JsonRedisSerializer来序列化和反序列化redis的value值(默认使用JDK的序列化方式)

        Jackson2JsonRedisSerializer jacksonSeial = new Jackson2JsonRedisSerializer(Object.class);

        ObjectMapper om = new ObjectMapper();

        // 指定要序列化的域,field,get和set,以及修饰符范围,ANY是都有包括private和public

        om.setVisibility(PropertyAccessor.ALL, JsonAutoDetect.Visibility.ANY);

        // 指定序列化输入的类型,类必须是非final修饰的,final修饰的类,比如String,Integer等会跑出异常

        om.enableDefaultTyping(ObjectMapper.DefaultTyping.NON_FINAL);

        jacksonSeial.setObjectMapper(om);

        // 值采用json序列化

        template.setValueSerializer(jacksonSeial);

        //使用StringRedisSerializer来序列化和反序列化redis的key值

        template.setKeySerializer(new StringRedisSerializer());

        // 设置hash key 和value序列化模式

        template.setHashKeySerializer(new StringRedisSerializer());

        template.setHashValueSerializer(jacksonSeial);

        template.afterPropertiesSet();

        return template;

    }

    /**

     * 对hash类型的数据操作

     *

     * @param redisTemplate

     * @return

     */

    @Bean

    public HashOperations<String, String, Object> hashOperations(RedisTemplate<String, Object> redisTemplate) {

        return redisTemplate.opsForHash();

    }

    /**

     * 对redis字符串类型数据操作

     *

     * @param redisTemplate

     * @return

     */

    @Bean

    public ValueOperations<String, Object> valueOperations(RedisTemplate<String, Object> redisTemplate) {

        return redisTemplate.opsForValue();

    }

    /**

     * 对链表类型的数据操作

     *

     * @param redisTemplate

     * @return

     */

    @Bean

    public ListOperations<String, Object> listOperations(RedisTemplate<String, Object> redisTemplate) {

        return redisTemplate.opsForList();

    }

    /**

     * 对无序集合类型的数据操作

     *

     * @param redisTemplate

     * @return

     */

    @Bean

    public SetOperations<String, Object> setOperations(RedisTemplate<String, Object> redisTemplate) {

        return redisTemplate.opsForSet();

    }

    /**

     * 对有序集合类型的数据操作

     *

     * @param redisTemplate

     * @return

     */

    @Bean

    public ZSetOperations<String, Object> zSetOperations(RedisTemplate<String, Object> redisTemplate) {

        return redisTemplate.opsForZSet();

    }

}
接着是Mapper持久层Dao,这里主要用注解写比较方便,也可以使用mybatis的xml配置文件写sql语句
package com.lzh.springbootstudytest.mapper;

import com.lzh.springbootstudytest.bean.User;

import org.apache.ibatis.annotations.*;

import java.util.List;

/**

 * @author lzh

 * create 2019-09-18-22:32

 */

@Mapper

public interface UserDao {

    @Select("select * from user")

    List<User> queryAll();

    @Select("select * from user where uid = #{id}")

    User findUserById(int id);

    @Update("UPDATE USER SET username = CASE WHEN (#{userName} != NULL) AND (#{userName} != '') THEN #{userName},PASSWORD = CASE WHEN (#{passWord} != NULL) AND (#{passWord} != '') THEN #{passWord},salary = CASE WHEN (#{salary} != 0) THEN #{salary} WHERE uid = #{uid}")

    int updateUser(@Param("user") User user);

    @Delete("delete from user where uid = #{id}")

    int deleteUserById(int id);

}
service层,这里主要是使用redis模板来写
package com.lzh.springbootstudytest.service;

import com.lzh.springbootstudytest.bean.User;

import com.lzh.springbootstudytest.mapper.UserDao;

import org.springframework.beans.factory.annotation.Autowired;

import org.springframework.data.redis.core.RedisTemplate;

import org.springframework.data.redis.core.ValueOperations;

import org.springframework.stereotype.Service;

import java.util.List;

import java.util.concurrent.TimeUnit;

/**

 * @author lzh

 * create 2019-09-18-22:33

 */

@Service

public class UserService {

    @Autowired

    private UserDao userDao;

    @Autowired

    private RedisTemplate redisTemplate;

    public List<User> queryAll() {

        return userDao.queryAll();

    }

    /**

     * 获取用户策略:先从缓存中获取用户,没有则取数据表中 数据,再将数据写入缓存

     */

    public User findUserById(int id) {

        String key = "user_" + id;

        ValueOperations<String, User> operations = redisTemplate.opsForValue();

        //判断redis中是否有键为key的缓存

        boolean hasKey = redisTemplate.hasKey(key);

        if (hasKey) {

            User user = operations.get(key);

            System.out.println("从缓存中获得数据:"+user.getUserName());

            System.out.println("------------------------------------");

            return user;

        } else {

            User user = userDao.findUserById(id);

            System.out.println("查询数据库获得数据:"+user.getUserName());

            System.out.println("------------------------------------");

            // 写入缓存

            operations.set(key, user, 5, TimeUnit.HOURS);

            return user;

        }

    }

    /**

     * 更新用户策略:先更新数据表,成功之后,删除原来的缓存,再更新缓存

     */

    public int updateUser(User user) {

        ValueOperations<String, User> operations = redisTemplate.opsForValue();

        int result = userDao.updateUser(user);

        if (result != 0) {

            String key = "user_" + user.getUid();

            boolean haskey = redisTemplate.hasKey(key);

            if (haskey) {

                redisTemplate.delete(key);

                System.out.println("删除缓存中的key-----------> " + key);

            }

            // 再将更新后的数据加入缓存

            User userNew = userDao.findUserById(user.getUid());

            if (userNew != null) {

                operations.set(key, userNew, 3, TimeUnit.HOURS);

            }

        }

        return result;

    }

    /**

     * 删除用户策略:删除数据表中数据,然后删除缓存

     */

    public int deleteUserById(int id) {

        int result = userDao.deleteUserById(id);

        String key = "user_" + id;

        if (result != 0) {

            boolean hasKey = redisTemplate.hasKey(key);

            if (hasKey) {

                redisTemplate.delete(key);

                System.out.println("删除了缓存中的key:" + key);

            }

        }

        return result;

    }

}
这里主要是使用RedisTemplate来对远程redis操作,每次访问controller暴露的接口,首先判断redis缓存中是否存在该数据,若不存在就从数据库中读取数据,然后保存到redis缓存中,当下次访问的时候,就直接从缓存中取出来。这样就不用每次都执行sql语句,能够提高访问速度。 但是在保存数据到缓存中,通过设置键和值和超时删除,注意设置超时删除缓存时间不要太长,否则会给服务器带来压力。
执行spring boot的启动类,访问http://localhost:8081/findUserById?id=1

再次访问http://localhost:8081/findUserById?id=1就是从缓存中获取保存的数据

SpringBoot整合redis缓存(一)的更多相关文章
- SpringBoot 整合 Redis缓存
在我们的日常项目开发过程中缓存是无处不在的,因为它可以极大的提高系统的访问速度,关于缓存的框架也种类繁多,今天主要介绍的是使用现在非常流行的NoSQL数据库(Redis)来实现我们的缓存需求. Spr ...
- springboot整合redis缓存
使用springBoot添加redis缓存需要在POM文件里引入 org.springframework.bootspring-boot-starter-cacheorg.springframewor ...
- springboot整合redis缓存一些知识点
前言 最近在做智能家居平台,考虑到家居的控制需要快速的响应于是打算使用redis缓存.一方面减少数据库压力另一方面又能提高响应速度.项目中使用的技术栈基本上都是大家熟悉的springboot全家桶,在 ...
- SpringBoot缓存管理(二) 整合Redis缓存实现
SpringBoot支持的缓存组件 在SpringBoot中,数据的缓存管理存储依赖于Spring框架中cache相关的org.springframework.cache.Cache和org.spri ...
- SpringBoot入门系列(七)Spring Boot整合Redis缓存
前面介绍了Spring Boot 中的整合Mybatis并实现增删改查,.不清楚的朋友可以看看之前的文章:https://www.cnblogs.com/zhangweizhong/category/ ...
- springBoot整合redis(作缓存)
springBoot整合Redis 1,配置Redis配置类 package org.redislearn.configuration; import java.lang.reflect.Method ...
- SpringBoot整合Redis、mybatis实战,封装RedisUtils工具类,redis缓存mybatis数据 附源码
创建SpringBoot项目 在线创建方式 网址:https://start.spring.io/ 然后创建Controller.Mapper.Service包 SpringBoot整合Redis 引 ...
- Redis-基本概念、java操作redis、springboot整合redis,分布式缓存,分布式session管理等
NoSQL的引言 Redis数据库相关指令 Redis持久化相关机制 SpringBoot操作Redis Redis分布式缓存实现 Resis中主从复制架构和哨兵机制 Redis集群搭建 Redis实 ...
- SpringBoot整合Redis、ApachSolr和SpringSession
SpringBoot整合Redis.ApachSolr和SpringSession 一.简介 SpringBoot自从问世以来,以其方便的配置受到了广大开发者的青睐.它提供了各种starter简化很多 ...
随机推荐
- vue 使用gojs绘制简单的流程图
在vue项目中需要展示工作流进度,可以使用的流程图插件很多 flowchart.js http://adrai.github.io/flowchart.js/ , 基于SVG创建Flow Chart ...
- Mac查看及清理QQ、微信之前下载的图片、视频或DB等
之前写过一篇清理Mac空间的文章: Mac系统清理.占用空间大.空间不够.查看系统文件大小分布 其实这篇文章不是太全,有些资源还是清理不彻底,正好前段时间需要找微信下载的资源,其实可以算作空间清理的续 ...
- Suring开发集成部署时问题记录
前言 开发时一定要用管理员模式打开VS或者VSCODE进行开发,同时不要在nuget上直接下载,要去github上下载源代码调试.第一方便调试,第二Surging迭代较快,nuget版本往往不是最新的 ...
- Codeforces 697D
题意略. 思路: 对于随机产生的一个数列,对于某个儿子,其兄弟在其前面的概率为 1 / 2. 所以这个兄弟对期望的贡献为son[v] / 2,所有兄弟加起来即为(tot - 1) / 2. 详见代码: ...
- Java多线程之线程协作
Java多线程之线程协作 一.前言 上一节提到,如果有一个线程正在运行synchronized 方法,那么其他线程就无法再运行这个方法了.这就是简单的互斥处理. 假如我们现在想执行更加精确的控制,而不 ...
- 第8章 浏览器对象模型BOM 8.2 location对象
location 是最有用的 BOM对象之一,它提供了与当前窗口中加载的文档有关的信息,还提供了一些导航功能.事实上, location 对象是很特别的一个对象,因为它既是 window 对象的属性, ...
- JIra配置权限方案
目录: 添加用户 添加用户组 将用户分配到不同的组中 创建项目权限方案 配置项目采用的权限方案 1. 添加用户 1)使用admin权限的账户登录后,点击右上角的配置,选择system 2)在打开的页面 ...
- 2019dx#9
Solved Pro.ID Title Ratio(Accepted / Submitted) 1001 Rikka with Quicksort 25.85%(38/147) 1002 Ri ...
- codeforces 820 D. Mister B and PR Shifts(思维)
题目链接:http://codeforces.com/contest/820/problem/D 题意:求.有一种操作 k = 0: shift p1, p2, ... pn, k = 1: shif ...
- codeforces 814 C. An impassioned circulation of affection(二分+思维)
题目链接:http://codeforces.com/contest/814/problem/C 题意:给出一串字符串然后q个询问,问替换掉将m个字符替换为字符c,能得到的最长的连续的字符c是多长 题 ...