Mac下安装 php+nginx+mysql 开发环境
一、mysql安装
mysql是安装最简单顺利的
1. 首先去官方网站下载Mac适用的MySQL的dmg包
下载页面 选择图中最下方的dmg包下载进行安装
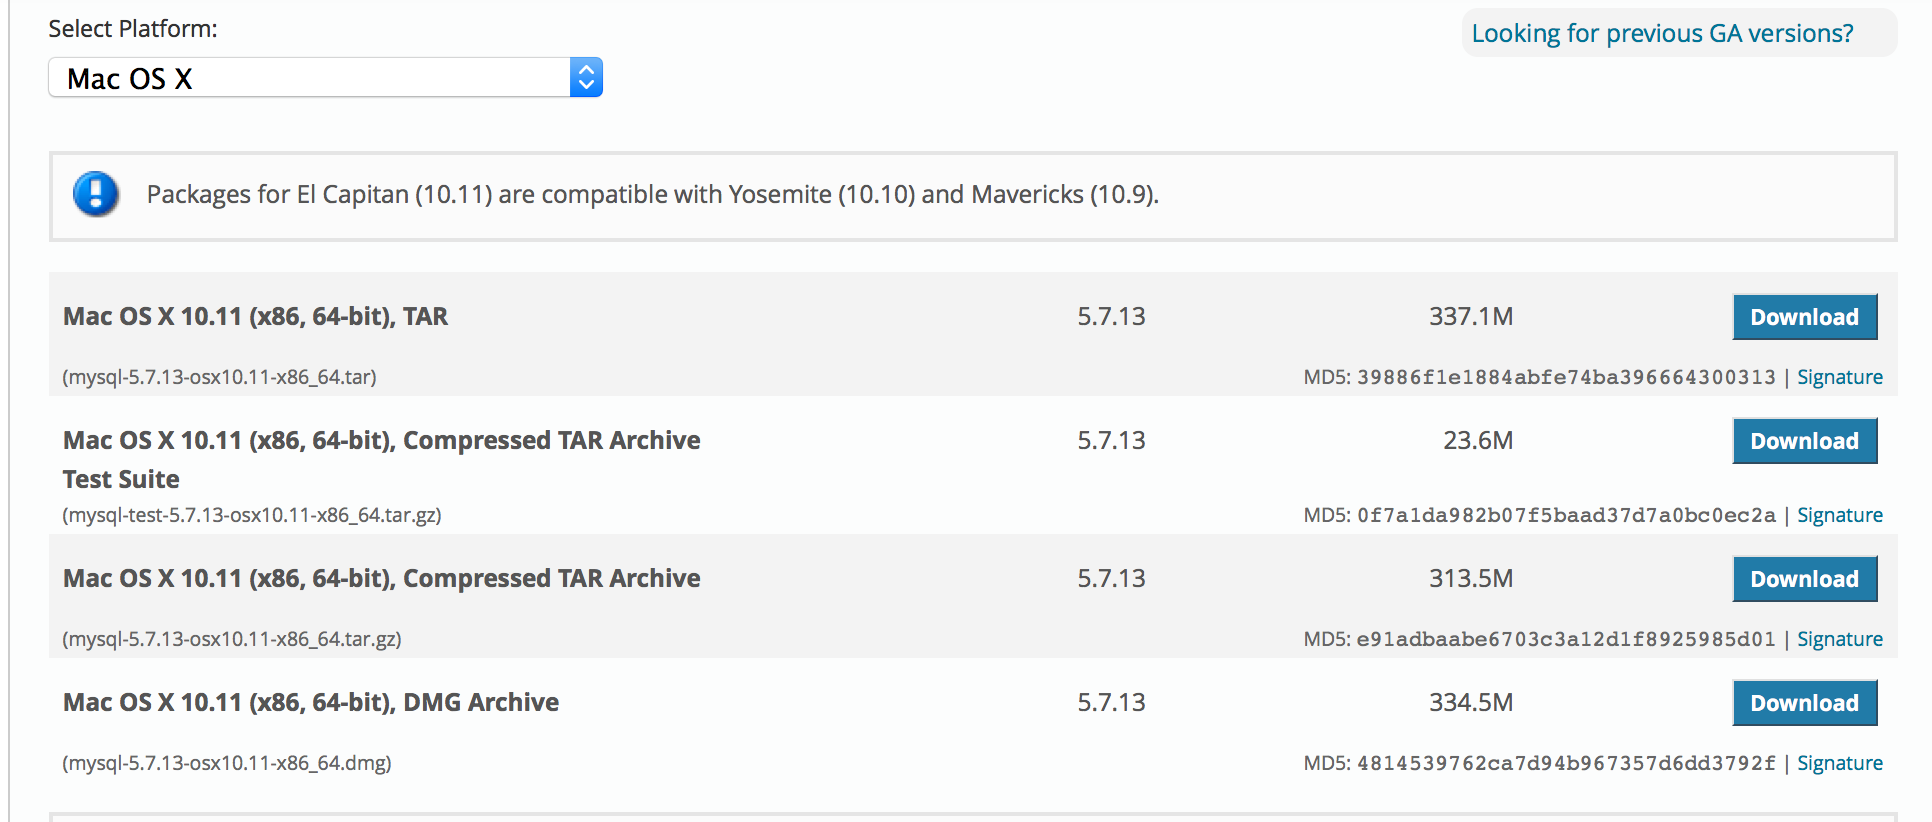
安装完成后 MySQL的安装目录为/usr/local/mysql/
2. 启动服务
设置里 找到MySQL 启动服务 显示running 则服务已启动

上图倒数第二

上图服务已启动
如果需要在终端内执行MySQL命令 需要加入环境变量
export PATH=$PATH:/usr/local/mysql/bin/
MySQL安装完成
二、redis安装
1. 到官方网站下载redis 当前版本 redis-3.2.1.tar.gz
tar -zxvf ./redis-3.2..tar.gz  #解压压缩包

cd ./redis-3.2.1          #进入解压的软件目录内

sudo make install          #执行安装

redis-server              #启动redis
2. 安装完成之后 修改redis的配置文件及启动脚本
配置文件 注意修改启动脚本相关路径的配置:
vi /Library/LaunchDaemons/com.redis.plist #启动脚本内容 <?xml version="1.0" encoding="UTF-8"?> <!DOCTYPE plist PUBLIC "-//Apple//DTD PLIST 1.0//EN" "http://www.apple.com/DTDs/PropertyList-1.0.dtd"> <plist version="1.0"> <dict> <keyLabel</key> <stringcom.redis</string> <keyRunAtLoad</key> <true/> <keyProgramArguments</key> <array> <string/usr/local/redis/bin/redis-server</string redis <string/usr/local/redis/redis.conf</string redis.conf </array> </dict> </plist>
#保存退出
launchctl load /Library/LaunchDaemons/com.redis.plist #加载启动脚本 launchctl start com.redis #启动服务 ps aux | grep redis #查看进程是否启动
三、php安装
本人Mac里自带的php版本为5.5 启动正常 但是zend guard loader扩展始终安装不上最后决定使用php5.4
这里提到一个网站 http://php-osx.liip.ch/
网站里有多个PHP版本的集成包 已经内置好了各种扩展 redis memcace mysql等等安装过程极简单
官方给出了相应的命令
curl -s http://php-osx.liip.ch/install.sh | bash -s 5.4
等待命令执行完成 我这里用时大概二十分钟左右安装完成后php会安装到/usr/local/目录下php5
export PATH=/usr/local/php5/bin:$PATH #加入环境变量

php -v

PHP 5.4. (cli) (built: Mar   ::)

Copyright (c) - The PHP Group

Zend Engine v2.4.0, Copyright (c) - Zend Technologies

with Xdebug v2.2.5, Copyright (c) -, by Derick Rethans
显示php已经是5.4版本
虽然安装了很多扩展 但是并没有zend guard loader的扩展 因此还要下载相关的扩展进行安装
这里要说明一下PHP安装完成后的目录结构
cd /usr/local/php5

ls -l

drwxr-xr-x   root  wheel          : bin

-rw-r--r--     root  wheel           : entropy-php.conf

drwxr-xr-x     root  wheel           : etc #配置文件目录php.ini php-fpm.conf 如有需要推荐修改./php.d/99-liip-developer.ini

drwxr-xr-x    root  wheel          : include

drwxr-xr-x    root  wheel           : info

drwxr-xr-x   root  wheel          : lib

-rwxr-xr-x     root  wheel      : libphp5.so

drwxr-xr-x    root  wheel          : php.d  #php各种扩展加载的配置目录 其中99-liip-developer.ini可修改配置相当于php.ini

drwxr-xr-x     root  wheel           : sbin

drwxr-xr-x    root  wheel           : share

drwxr-xr-x     root  wheel           : var
安装ZendGuardLoader
tar -zxvf ./ZendGuardLoader--PHP-5.4-darwin10.-x86_64.tar.gz

cp ./ZendGuardLoader--PHP-5.4-darwin10.-x86_64/php-5.4.x/ZendGuardLoader.so /usr/local/php5/lib/php/extensions/no-debug-non-zts-/
增加启动脚本(注意修改相关文件路径)
vi /etc/php-fpm
#! /bin/sh
### BEGIN INIT INFO
# Provides: php-fpm
# Required-Start: $remote_fs $network
# Required-Stop: $remote_fs $network
# Default-Start:
# Default-Stop:
# Short-Description: starts php-fpm
# Description: starts the PHP FastCGI Process Manager daemon
### END INIT INFO
prefix=/usr/local/php5/
exec_prefix=${prefix}
php_fpm_BIN=${exec_prefix}/sbin/php-fpm
php_fpm_CONF=${prefix}/etc/php-fpm.conf
php_fpm_PID=${prefix}/var/run/php-fpm.pid
php_opts="--fpm-config $php_fpm_CONF --pid $php_fpm_PID"
wait_for_pid () {
try=while test $try -lt ; docase "$1" in
'created')
if [ -f "$2" ] ; then
try=''
break
fi
;;
'removed')
if [ ! -f "$2" ] ; then
try=''
break
fi
;;
esacecho -n .
try=`expr $try + `
force-quit)
echo -n "Terminating php-fpm "
if [ ! -r $php_fpm_PID ] ; then
echo "warning, no pid file found - php-fpm is not running ?"
exit
fikill -TERM `cat $php_fpm_PID`
wait_for_pid removed $php_fpm_PID
if [ -n "$try" ] ; then
echo " failed"
exit
else
echo " done"
fi
;;
restart)
$ stop
$ start
;;
reload)
echo -n "Reload service php-fpm "
if [ ! -r $php_fpm_PID ] ; then
echo "warning, no pid file found - php-fpm is not running ?"
exit
fi
kill -USR2 `cat $php_fpm_PID`
echo " done"
;;
*)
echo "Usage: $0 {start|stop|force-quit|restart|reload|status}"
exit
;;
esac
四、nginx安装
这里推荐使用OpenResty
OpenResty ™ 是一个基于 Nginx 与 Lua 的高性能 Web 平台,其内部集成了大量精良的 Lua 库、第三方模块以及大多数的依赖项。用于方便地搭建能够处理超高并发、扩展性极高的动态 Web 应用、Web 服务和动态网关。
#安装

tar -zxvf ./openresty-1.9.7.5.tar.gz

cd ./openresty-1.9.15.1

./configure

make

make install
注意 这一步安装可能会报错 需要安装 PCRE 和 OpenSSL
Mac OS X 不像linux那样 可以使用yum安装软件 依赖包
推荐大家使用brew
首先执行下面命令进行安装
/usr/bin/ruby -e "$(curl -fsSL https://raw.githubusercontent.com/Homebrew/install/master/install)"
brew安装完成可以直接使用
关于brew的详细介绍请查看官方说明https://git.io/brew-docs
brew update

brew install pcre openssl
安装完成后重新编译安装openresty
./configure --prefix=/usr/local/openresty \   #指定安装目录

   --with-cc-opt="-I/usr/local/Cellar/openssl/1.0.2h_1/include/ -I/usr/local/Cellar/pcre/8.39/include/" \

   --with-ld-opt="-L/usr/local/Cellar/openssl/1.0.2h_1/lib/ -L/usr/local/Cellar/pcre/8.39/lib/" \

#使用 ./configure --help 查看更多的选项。

make

make install
OpenResty安装完成后 找到nginx目录进行配置文件的修改
cd /usr/local/openresty

ls -l

drwxr-xr-x    root  admin        : bin

drwxr-xr-x    root  admin        : luajit

drwxr-xr-x    root  admin        : lualib

drwxr-xr-x   root  admin        : nginx

drwxr-xr-x@  root  admin       : pod

-rw-r--r--@   root  admin      : resty.index

cd ./nginx/conf/

ls -l

-rw-r--r--@   root  admin      : fastcgi.conf

-rw-r--r--@   root  admin      : fastcgi.conf.default

-rw-r--r--@   root  admin      : fastcgi_params

-rw-r--r--@   root  admin      : fastcgi_params.default

-rw-r--r--    root  admin      : injection.lua

-rw-r--r--@   root  admin      : koi-utf

-rw-r--r--@   root  admin      : koi-win

-rw-r--r--@   root  admin      : mime.types

-rw-r--r--@   root  admin      : mime.types.default

-rw-r--r--    root  admin      : nginx.conf

-rw-r--r--@   root  admin      : nginx.conf.default

-rw-r--r--@   root  admin       : scgi_params

-rw-r--r--@   root  admin       : scgi_params.default

-rw-r--r--@   root  admin       : uwsgi_params

-rw-r--r--@   root  admin       : uwsgi_params.default

drwxr-xr-x   root  admin       : vhosts

-rw-r--r--@   root  admin      : win-utf

#根据需要修改相关配置文件
nginx启动
sudo /usr/local/openresty/nginx/sbin/nginx
本文已在版权印备案,如需转载请访问版权印89818122
Mac下安装 php+nginx+mysql 开发环境的更多相关文章
- Mac下安装LNMP(Nginx+PHP5.6)环境
[转自:http://avnpc.com/pages/install-lnmp-on-osx] 安装Homebrew 最近工作环境切换到Mac,所以以OS X Yosemite(10.10.1)为例, ...
- Mac下安装LNMP(Nginx+PHP5.6)环境(转)
安装Homebrew 最近工作环境切换到Mac,所以以OS X Yosemite(10.10.1)为例,记录一下从零开始安装Mac下LNMP环境的过程 确保系统已经安装xcode,然后使用一行命令安装 ...
- MAC 下用 brew 搭建 PHP 开发环境
Mac下用brew搭建PHP(LNMP/LAMP)开发环境 Mac下搭建lamp开发环境很容易,有xampp和mamp现成的集成环境.但是集成环境对于经常需要自定义一些配置的开发者来说会非常麻烦,而且 ...
- 第一篇:Win10系统搭建Python+Django+Nginx+MySQL 开发环境详解(完美版)
Win10+Python+Django+Nginx+MySQL 开发环境搭建详解 PaulTsao 说明:本文由作者原创,仅供内部参考学习与交流,转载引用请注明出处,用于商业目的请联系作者本人. Wi ...
- Mac下搭建Cocos2d-x-3.2的开发环境
配置:OS X 10.9.4 + Xcode 6.0 + Cocos2d-x-3.2 摘要:本文目标为在Xcode成功运行HelloWorld程序. 一.下载必要项 1.从官网下载Cocos2d-x- ...
- mac 下 用 glfw3 搭建opengl开发环境
mac 下 用 glfw3 搭建opengl开发环境 下载编译 glfw3 Build Setting 里面, Library Search Paths -> 设置好编译 glfw 库的路径 H ...
- MAC下安装与配置MySQL
MAC下安装与配置MySQL MAC下安装与配置MySQL 一 下载MySQL 访问MySQL的官网http://www.mysql.com/downloads/ 然后在页面中会看到“MySQL ...
- Mac下使用brew搭建PHP7+nginx+mysql开发环境
http://blog.csdn.net/mysteryhaohao/article/details/52230634 HomeBrew brew的安装,直接上官网:http://brew.sh/ 一 ...
- Mac配置PHP+Nginx+MySQL开发环境
Homebrew简称brew,OSX上的软件包管理工具,在Mac终端可以通过brew安装.更新.卸载各种软件,(简直就是神器级武器). 废话不多说,没安装brew自己去百度学习安装,这里就不多说了. ...
随机推荐
- iOS开发——C篇&预处理
其实在C语言的远行过程中,有这样一个流程, 编译:C----〉可执行文件(可以运行的) 1:.C------.i 预处理(之前和之后还是C语法)2: .i-------.s 编译(之前是C语法,之后是 ...
- CSS 3层嵌套居中布局
<html> <head> <style type="text/css"> .root{ background-color: red; widt ...
- OC学习篇之---通知(NSNotificationCenter)
在前一篇文章中我们介绍了OC中很常用的两个技术:KVC和KVO: http://blog.csdn.net/jiangwei0910410003/article/details/41912937,今天 ...
- Sicily 1021. Couples
题目地址:1021. Couples 思路: 想清楚了这道题其实很简单.利用夫妻出现的位置作为下标,并设为同一值,第一对夫妻值为1,第二对为2,以此类推,存储完毕即可进入下一步. 利用栈这个数据结构: ...
- PullToRefreshListView 内嵌checkbox 数据丢失问题
在PullToRefreshListView 内部内嵌了Checkbox如下图所示: 原本设计思路是:对CheckBox 进行 setOnCheckedChangeListener 监听 当Check ...
- ViewConfiguration滑动参数设置类
/** * 包含了方法和标准的常量用来设置UI的超时.大小和距离 */ public class ViewConfiguration { // 设定水平滚动条的宽度和垂直滚动条的高度,单位是像素px ...
- Windows服务器Pyton辅助运维--03.安装Visual Studio 的 Python 开发插件 PTVS
PTVS (Python Tools for Visual Studio) http://pytools.codeplex.com/ 当前版本:2.1 RC PTVS (Python Tools fo ...
- Edit Distance 解答
Question Given two words word1 and word2, find the minimum number of steps required to convert word1 ...
- UVA 195 Anagram
题意:求输入字符串的所有组合,按字典序输出! 解法:使用枚举(枚举前先找出最字符串的最小字典序)枚举时加上枚举生成条件! #include <iostream> #include < ...
- Android中AsyncTask的简单用法 .
在开发Android应用时必须遵守单线程模型的原则: Android UI操作并不是线程安全的并且这些操作必须在UI线程中执行.在单线程模型中始终要记住两条法则: 1. 不要阻塞UI线程 2. 确保只 ...