tesnorflow conv deconv,padding
1.padding test
input = tf.placeholder(tf.float32, shape=(1,2, 2,1))
simpleconv=slim.conv2d(input,1,[3,3],stride = 1,activation_fn = None,scope = 'simpleconv3')
sess.run(tf.global_variables_initializer())
weights=graph.get_tensor_by_name("simpleconv3/weights:0")
sess.run(tf.assign(weights,tf.constant(1.0,shape=weights.shape)))
a=np.ndarray(shape=(1,2,2,1),dtype='float',buffer=np.array([1.0,2,3,4]))
simpleconvout=sess.run(simpleconv,feed_dict={input:a.astype('float32')})
print simpleconvout
[[[[ 10.000000]
[ 10.000000]] [[ 10.000000]
[ 10.000000]]]] input1 = tf.placeholder(tf.float32, shape=(1,4, 4,1))
simpleconv=slim.conv2d(input1,1,[3,3],stride = 2,activation_fn = None,scope = 'simpleconv3')
sess.run(tf.global_variables_initializer())
weights=graph.get_tensor_by_name("simpleconv3/weights:0")
sess.run(tf.assign(weights,tf.constant(1.0,shape=weights.shape)))
a=np.ndarray(shape=(1,4,4,1),dtype='float',buffer=np.array([1.0,2,3,4,2,3,4,5,3,4,5,6,4,5,6,7]))
simpleconvout=sess.run(simpleconv,feed_dict={input1:a.astype('float32')}) print simpleconvout [[[[ 27.]
[ 27.]] [[ 27.]
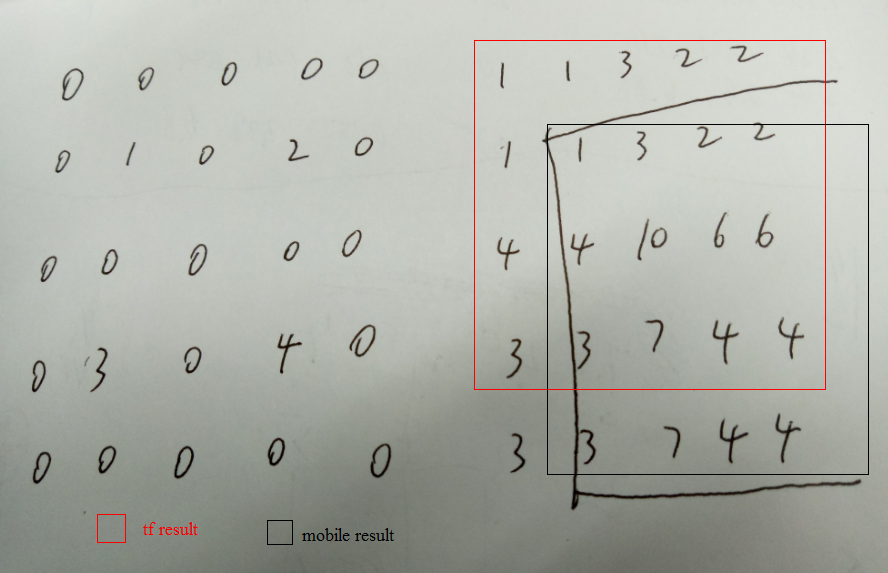
[ 24.]]]] simpledeconv=slim.conv2d_transpose(input,1,[3,3],stride = 2,activation_fn = None,scope = 'simpledeconv')
sess.run(tf.global_variables_initializer())
weights=graph.get_tensor_by_name("simpledeconv/weights:0")
sess.run(tf.assign(weights,tf.constant(1.0,shape=weights.shape)))
a=np.ndarray(shape=(1,2,2,1),dtype='float',buffer=np.array([1.0,2,3,4]))
simpleconvout=sess.run(simpledeconv,feed_dict={input:a.astype('float32')})
print simpleconvout [[[[ 1.000000]
[ 1.000000]
[ 3.000000]
[ 2.000000]] [[ 1.000000]
[ 1.000000]
[ 3.000000]
[ 2.000000]] [[ 4.000000]
[ 4.000000]
[ 10.000000]
[ 6.000000]] [[ 3.000000]
[ 3.000000]
[ 7.000000]
[ 4.000000]]]] conv stride=1是四周padding 0,stride=2是down right padding 0 deconv是top left各插了两行0 而torch中的deconv是四周padding一圈0
参考http://blog.csdn.net/lujiandong1/article/details/53728053
'SAME' padding方式时,如果padding的数目是奇数,则多的padding在右边(下边)
2.实现custom-padding
https://stackoverflow.com/questions/37659538/custom-padding-for-convolutions-in-tensorflow
实现custom conv decon

def conv(input,num_outputs,kernel_size,stride=1,padW=0,padH=0,activation_fn=None,scope=None):

    padded_input = tf.pad(input, [[0, 0], [padH, padH], [padW, padW], [0, 0]], "CONSTANT")

    return slim.conv2d(padded_input,num_outputs,kernel_size,stride = stride,padding="VALID",activation_fn = activation_fn ,scope = scope)

input1 = tf.placeholder(tf.float32, shape=(1,4, 4,1))

a=np.ndarray(shape=(1,4,4,1),dtype='float',buffer=np.array([1.0,2,3,4,2,3,4,5,3,4,5,6,4,5,6,7]))

simpleconv=conv(input1,1,[3,3],stride = 2,padW=1,padH=1,activation_fn = None,scope = 'conv')

sess.run(tf.global_variables_initializer())

weights=graph.get_tensor_by_name("conv/weights:0")

sess.run(tf.assign(weights,tf.constant(1.0,shape=weights.shape)))

simpleconvout=sess.run(simpleconv,feed_dict={input1:a.astype('float32')})

print simpleconvout

[[[[ 8.]

[ 21.]]

[[ 21.]

[ 45.]]]]

def deconv(input,num_outputs,kernel_size,stride=2,activation_fn=None,scope=None):

    N,H,W,C = [i.value for i in input.get_shape()]

    out = slim.conv2d_transpose(input,num_outputs,kernel_size,stride = stride,padding="VALID",activation_fn = activation_fn ,scope = scope)

    return tf.slice(out, [0, kernel_size[0]/2,kernel_size[1]/2, 0], [N, H*stride, W*stride,num_outputs])

input = tf.placeholder(tf.float32, shape=(1,2, 2,1))

a=np.ndarray(shape=(1,2,2,1),dtype='float',buffer=np.array([1.0,2,3,4]))

simpledeconv=deconv(input,1,[3,3],stride = 2,activation_fn = None,scope = 'simpledeconv1')

sess.run(tf.global_variables_initializer())

weights=graph.get_tensor_by_name("simpledeconv1/weights:0")

sess.run(tf.assign(weights,tf.constant(1.0,shape=weights.shape)))

out=sess.run(simpledeconv,feed_dict={input:a.astype('float32')})

print out

[[[[ 1.]

[ 3.]

[ 2.]

[ 2.]]

[[ 4.]

[ 10.]

[ 6.]

[ 6.]]

[[ 3.]

[ 7.]

[ 4.]

[ 4.]]

[[ 3.]

[ 7.]

[ 4.]

[ 4.]]]]

tesnorflow conv deconv,padding的更多相关文章
- 深度学习卷积网络中反卷积/转置卷积的理解 transposed conv/deconv
搞明白了卷积网络中所谓deconv到底是个什么东西后,不写下来怕又忘记,根据参考资料,加上我自己的理解,记录在这篇博客里. 先来规范表达 为了方便理解,本文出现的举例情况都是2D矩阵卷积,卷积输入和核 ...
- 论文阅读(Xiang Bai——【arXiv2016】Scene Text Detection via Holistic, Multi-Channel Prediction)
Xiang Bai--[arXiv2016]Scene Text Detection via Holistic, Multi-Channel Prediction 目录 作者和相关链接 方法概括 创新 ...
- 论文笔记:Mask R-CNN
之前在一次组会上,师弟诉苦说他用 UNet 处理一个病灶分割的任务,但效果极差,我看了他的数据后发现,那些病灶区域比起整张图而言非常的小,而 UNet 采用的损失函数通常是逐像素的分类损失,如此一来, ...
- 本人AI知识体系导航 - AI menu
Relevant Readable Links Name Interesting topic Comment Edwin Chen 非参贝叶斯 徐亦达老板 Dirichlet Process 学习 ...
- 【文献阅读】Densely Connected Convolutional Networks-best paper-CVPR-2017
Densely Connected Convolutional Networks,CVPR-2017-best paper之一(共两篇,另外一篇是apple关于GAN的paper),早在去年八月 De ...
- 如何快速使用YOLO3进行目标检测
本文目的:介绍一篇YOLO3的Keras实现项目,便于快速了解如何使用预训练的YOLOv3,来对新图像进行目标检测. 本文使用的是Github上一位大神训练的YOLO3开源的项目.这个项目提供了很多使 ...
- YOLO v3算法介绍
图片来自https://towardsdatascience.com/yolo-v3-object-detection-with-keras-461d2cfccef6 数据前处理 输入的图片维数:(4 ...
- LCD: 2D-3D匹配算法
LCD: 2D-3D匹配算法 标题:LCD:Learned Cross-Domain Descriptors for 2D-3D Matching 作者:Quang-Hieu Pham, Mikael ...
- dilated conv、deconv、fractional-strided conv
deconv的其中一个用途是做upsampling,即增大图像尺寸. dilated convolution: dilated conv,中文可以叫做空洞卷积或者扩张卷积. 首先是诞生背景,在图像分割 ...
随机推荐
- 04Hibernate连接数据库环境配置
Hibernate连接数据库环境配置
- RabbitMQ 基础概念介绍
AMQP 消息模型 RabbitMQ 是基于 AMQP(高级消息队列协议)的一个开源实现,其内部实际也是 AMQP 的基本概念.
- vue项目设置每个页面的title
1.在项目目录下安装vue-wechat-title 2.在main.js中 使用vue-wechat-title 3.在router的配置中设置 4.在每个vue页面中加入 <div v-we ...
- Java中创建对象的内存图
所有人都知道面向对象思想,Java中的对象的创建在内存中是如何创建的,传智播客的视频看了一遍,把一些讲解的比较清晰的内容记录下来,方便记忆的更加深刻,Java中创建对象的过程,首先要理解JVM中栈.堆 ...
- LeetCode1-5
Leetcode1: Given an array of integers, return indices of the two numbers such that they add up to a ...
- Unexpected token d in JSON at position 669 while parsing near '...ct-mode":"^6.0.2"}
问题 在安装 babel 的时候,遇到问题 Unexpected token d in JSON at position 669 while parsing near '...ct-mode" ...
- 启发式合并CodeForces - 1009F
E - Dominant Indices CodeForces - 1009F You are given a rooted undirected tree consisting of nn vert ...
- 修改Python的镜像源
Mac OS下修改Python的镜像源 步骤: 切换到家目录 创建目录 .pip 并切换到该目录 创建 pip.conf 文件并写入配置信息 [global] index-url = https:// ...
- python_字符串常用方法
1.切片就是通过索引(索引:索引:步长)截取字符串的一段,形成新的字符串(原则就是顾头不顾腚). a = 'ABCDEFGHIJK' print(a[0:3]) # print(a[:3]) 从开头开 ...
- CODE【VS】3160 最长公共子串 (后缀自动机)
3160 最长公共子串 题目描述 Description 给出两个由小写字母组成的字符串,求它们的最长公共子串的长度. 输入描述 Input Description 读入两个字符串 输出描述 Outp ...