iOS-UI-UI控件概述

 1 @interface ViewController : UIViewController

 2

 3 @property(nonatomic, weak)IBOutlet UILabel *lable;

 4

 5 @end

 6

 7

 8

 9 @interface ViewController ()

10

11 @end

12

13 @implementation ViewController

14

15 /**

16  红色按钮

17  */

18 - (IBAction)redBtnClick

19 {

20 //    -[ViewController redBtnClick]

21     NSLog(@"%s", __func__);

22     // 拿到UILabel对象, 修改对象的属性, 让label对象变为红色

23     self.lable.textColor = [UIColor redColor];

24     self.lable.text = @"我是红色文字";

25     self.lable.backgroundColor = [UIColor purpleColor];

26     self.lable.font = [UIFont systemFontOfSize:30];

27     self.lable.textAlignment = NSTextAlignmentCenter;

28 }

29 /**

30  绿色按钮

31  */

32 - (IBAction)greenBtnClick

33 {

34     NSLog(@"%s", __func__);

35     self.lable.textColor = [UIColor greenColor];

36 }

37 /**

38  蓝色按钮

39  */

40 - (IBAction)blueBtnClick

41 {

42     NSLog(@"%s", __func__);

43     self.lable.textColor = [UIColor blueColor];

44 }

45 @end

一、控制器
1.什么是控制器:
任何继承于UIViewController的类,都称之为控制器
2.控制器的作用:
管理UI界面(负责管理UI界面的创建和一些事件的处理)
3.注意点:
UI界面是可以和它与之对应的控制器进行连线的,我们可以通过连线的方式,让UI界面上的元素和控制器中的代码产生一定的关系;默认情况下,UI界面中的元素是不能和方法进行关联的,要想关联UI界面中的元素必须将方法的返回值修改为IBAction。
二、IBAction和IBOutlet
- IBAction
- (IBAction)redBtnClick;
1. IBAction
1.1 从返回值角度上看,作用相当于void
1.2 只有返回值声明为IBAction的方法,才能跟storyboard中的控件进行连线
1.3 IBAction只能加在方法上, 不能加在属性上
2. IBAction几种连线方式
从"控制器"往"Storyboard"连线
从"Storyboard"往"控制器"连线
直接在"Storyboard"中往"Storyboard"上的界面顶部连线
直接在"Storyboard"中往"Storyboard"上的工具条连线
不用先定义方法, 直接从"Storyboard"往"控制器"连线(常用)
3.IBAction连线的注意点:
3.1 在Storyboard中拷贝元素的时候需要注意
拷贝的同时会将以前的连线一起拷贝
一个方法可以很多个控件关联
一个控件可以和很多方法进行连线,在开发中, 一般情况下不会这样写
3.2 如果将按钮关联的方法删除, 运行之后会报一个经典错误
reason: '-[ViewController redBtnClick]: unrecognized selector sent to instance 0x7fb4aa618e50'
3.3 IBAction只能作为方法的返回值
- IBOutlet
@property(nonatomic, weak)IBOutlet UILabel *lable;
1. IBOutlet
1.1 只有声明为IBOutlet的属性,才能跟storyboard中的控件进行连线
1.2 属性要想能够连线必须在数据类型前面加上IBOutlet
2. IBOutlet的几种连线方式
从"控制器"往"Storyboard"连线
从"Storyboard"往"控制器"连线
直接在"Storyboard"中往"Storyboard"上的界面顶部连线
直接在"Storyboard"中往"Storyboard"上的工具条连线
不用先定义方法, 直接从"Storyboard"往"控制器"连线
3. 注意点:
一个控件可以关联多个属性
一个属性不可以关联多个控件
在进行属性连线的时候, Xcode会自动帮我们进行类型检测, 如果类型不匹配那么不能连线
如果将属性和控件连线之后又将属性删除了, 那么只要程序运行就会报一个经典错误
'[<ViewController 0x7fe9d9f1a5d0> setValue:forUndefinedKey:]: this class is not key value coding-compliant for the key lable.'
任何UI控件都可以和属性进行连线, 但是并不是任何控件都可以和方法连线. 只有继承于UIControl的控件才可以连线
三、UIView
+ 什么是控件?
- 屏幕上的所有UI元素都叫做控件,也有人叫做视图、组件
- 按钮(UIButton)、文本(UILabel)都是控件
+ 控件的共同属性有哪些?
- 尺寸
- 位置
- 背景色
- ......
+ 苹果将控件的共同属性都抽取到父类UIView中
- 所有的控件最终都继承自UIView
- UIButton、UILabel都是继承自UIView(可以查看头文件)
+ 每一个控制器(UIViewController)内部都有个默认的UIView属性
- @property(nonatomic,retain) UIView *view;
- 控制器中管理的其他所有控件都是这个view的子控件(直接或者间接)
+ UIView常见属性和方法

 1 + @property(nonatomic,readonly) UIView *superview;

 2  //获得自己的父控件对象

 3

 4 + @property(nonatomic,readonly,copy) NSArray *subviews;

 5  //获得自己的所有子控件对象

 6

 7 + @property(nonatomic) NSInteger tag;

 8  //控件的ID(标识),父控件可以通过tag来找到对应的子控件

 9

10 + @property(nonatomic) CGAffineTransform transform;

11 // 控件的形变属性(可以设置旋转角度、比例缩放、平移等属性)

12

13 + @property(nonatomic) CGRect frame;

14 // 控件矩形框在父控件中的位置和尺寸(以父控件的左上角为坐标原点)

15

16 + @property(nonatomic) CGRect bounds;

17  //控件矩形框的位置和尺寸(以自己左上角为坐标原点,所以bounds的x、y一般为0)

18

19 + @property(nonatomic) CGPoint center;

20 // 控件中点的位置(以父控件的左上角为坐标原点)

21

22

23

24

25 - (void)addSubview:(UIView *)view;

26  //添加一个子控件view

27

28 - (void)removeFromSuperview;

29  //从父控件中移除

30

31 - (UIView *)viewWithTag:(NSInteger)tag;

32  //根据一个tag标识找出对应的控件(一般都是子控件)

2. 修改对象的结构体成员
在OC中,不允许直接修改“对象”的“结构体属性”的“成员”,但是允许修改“对象”的“结构体属性”
修改结构体属性的成员方法如下:
(1)使用临时变量记录对象的结构体属性
(2) 修改临时变量的属性
(3)将临时变量重新设置给对象的结构体属性
3. 在程序开发中需要避免出现魔法数字(Magic Number)
使用枚举类型,可以避免在程序中出现魔法数字
(1)枚举类型实质上就是一个整数,其作用就是用来替代魔法数字
(2)枚举类型中,指定了第一个整数之后,后面的数字会递增
4. frame & bounds & center
1> frame可以修改对象的位置和尺寸
2> bounds可以修改对象的尺寸
3> center可以修改对象的位置
一、
1.UIButton 按钮
2.UILabel 文本标签
3.UITextField 文本输入框
4.UIImageView 图片显示
5.UIScrollView 滚动的控件
6.UITableView 表格
7.UICollectionView 九宫格
8.UIWebView 网页显示控件
9.UIAlertView 对话框(中间弹框)
10.UINavigationBar导航条
二、
1.UIPageControl 分页控件
2.UITextView 能滚动的文字显示控件
3.UIActivityIndicator 圈圈
4.UISwitch 开关
5.UIActionSheet 底部弹框
6.UIDatePicker 日期选择器
三、
1.UIToolbar 工具条
2.UIProgressView 进度条
3.UISlider 滑块
4.UISegmentControl 选项卡
5.UIPickerView 选择器
红色表明最常用,蓝色代表一般,黑色代表几乎不用(这不是绝对的,仅供参考)
四、控件使用的介绍;
(一)、
1.UIButton
有一个非常重要的UI控件---UIButton,俗称“按钮” 一般情况下,点击某个控件后,会做出相应反应的都是按钮 按钮的功能比较多,既能显示文字,又能显示图片,还能随时调整内部图片和文字的位置
C.png)


normal(普通状态)
默认情况(Default) 对应的枚举常量:UIControlStateNormal
highlighted(高亮状态) 按钮被按下去的时候(手指还未松开) 对应的枚举常量:UIControlStateHighlighted
disabled(失效状态,不可用状态) 如果enabled属性为NO,就是处于disable状态,代表按钮不可以被点击 对应的枚举常量:UIControlStateDisabled
设置按钮的背景图片
设置按钮在不同状态下的背景图片 (为了保证高亮状态下的图片正常显示,必须设置按钮的type为custom)
实际上,UIButton自带了很多种不同的样式

在用代码创建按钮的同时指定按钮样式 UIButton *btn = [UIButton buttonWithType:UIButtonTypeCustom];
UIButtonTypeCustom:无类型,按钮的内容需要自定义
UIButtonTypeDetailDisclosure:
UIButtonTypeInfoLight:
UIButtonTypeInfoDark:
UIButtonTypeContactAdd:
UIButton的常见设置
- (void)setTitle:(NSString *)title forState:(UIControlState)state、;
设置按钮的文字
- (void)setTitleColor:(UIColor *)color forState:(UIControlState)state;
设置按钮的文字颜色
- (void)setImage:(UIImage *)image forState:(UIControlState)state;
设置按钮内部的小图片
- (void)setBackgroundImage:(UIImage *)image forState:(UIControlState)state;
设置按钮的背景图片
设置按钮的文字字体(需要拿到按钮内部的label来设置)
btn.titleLabel.font = [UIFont systemFontOfSize:13];
- (NSString *)titleForState:(UIControlState)state;
获得按钮的文字
- (UIColor *)titleColorForState:(UIControlState)state;
获得按钮的文字颜色
- (UIImage *)imageForState:(UIControlState)state;
获得按钮内部的小图片
- (UIImage *)backgroundImageForState:(UIControlState)state;
获得按钮的背景图片
创建UIButton
UIButton *btn = [UIButton buttonWithType:UIButtonTypeRoundedRect];
btn.frame = CGRectMake(30, 360, 90, 35);
[btn setTitle:@"ZoomIn" forState:UIControlStateNormal];
[btn setTitle:@"ZoomIn" forState:UIControlStateHighlighted];
[btn addTarget:self action:@selector(zoomInAction:) forControlEvents:UIControlEventTouchUpInside];
//@selector可以理解为"选择子",selector是一个指针变量,类似于sender。 这里是将method的方法指定给新建的这个btn。
/*在 method 方法里可以将 sender 看作是 btn 了
比如设置btn的hidden属性等等
btn.hidden = YES;
这样btn被隐藏了
*/
[view addSubview:btn];

-(void)zoomInAction:(id)sender {

}
UIButton的
从UIControl继承:UIView的:UIResponder:NSObject的符合NSCoding NSCoding(UIView的)NSObject的(NSObject的)框架/系统/资源库/框架/ UIKit.framework在iPhone OS 2.0和更高的可用性。声明UIButton.h相关的代码示例配件BubbleLevel HeadsUpUI TheElements UICatalog
目录[ 隐藏 ] |
概述
UIButton的类是一个UIControl子类,它实现了在触摸屏上的按钮。触摸一个按钮拦截事件和动作消息发送到目标对象时,它的挖掘。设定的目标和行动方法都继承自UIControl。这个类提供了方法来设置标题,图像,按钮等外观属性。通过使用set方法,你可以指定一个不同的外观为每个按钮状态。
任务
创建按钮+ buttonWithType:配置按钮的标题
ButtonType属性字体属性lineBreakMode财产titleShadowOffset财产reversesTitleShadowWhenHighlighted财产
- setTitle:forState: - setTitleColor:forState: - setTitleShadowColor:forState: - titleColorForState: - titleForState: - titleShadowColorForState:配置按钮图像
adjustsImageWhenHighlighted财产adjustsImageWhenDisabled财产showsTouchWhenHighlighted财产
- backgroundImageForState: - imageForState: - setBackgroundImage:forState: - setImage:forState:配置边缘的Insets
titleEdgeInsets财产imageEdgeInsets财产contentEdgeInsets财产
获取当前状态
currentTitle财产currentTitleColor财产currentTitleShadowColor财产currentImage财产currentBackgroundImage财产
尺寸入门 - backgroundRectForBounds: - contentRectForBounds: - titleRectForContentRect: - imageRectForContentRect:
属性
Objective - C的属性,看到的Objective - C 2.0编程语言中的“属性”。
adjustsImageWhenDisabled
一个布尔值,决定是否形象的变化时,该按钮被禁用。
@属性(非原子)BOOL adjustsImageWhenDisabled讨论,如果是的话,图像绘制较深时,按钮被禁用。默认值是YES。
供货情况在iPhone OS 2.0和更高版本。另请参见
@财产adjustsImageWhenHighlighted
在UIButton.h宣布相关的示例代码BubbleLevel
adjustsImageWhenHighlighted
一个布尔值,决定是否按钮时,突出显示图像的变化。
@属性(非原子)BOOL adjustsImageWhenHighlighted讨论,如果是,绘制图像较轻的按钮时,突出显示。默认值是YES。
供货情况在iPhone OS 2.0和更高版本。另请参见
@财产adjustsImageWhenDisabled
在UIButton.h宣布相关的示例代码BubbleLevel
按钮类型
按钮类型。(只读)
@属性(非原子,只读)UIButtonType按钮类型的讨论,见UIButtonType的可能值。
供货情况在iPhone OS 2.0和更高版本。声明在UIButton.h
contentEdgeInsets
内容的插图或一开始就为每个边缘。
@属性(非原子)UIEdgeInsets contentEdgeInsets如果每条边的价值是积极的,指定的插图,否则,指定一开始。一个插图是周围绘制矩形的保证金;每边(左,右,顶部和底部),可以有不同的值。使用UIEdgeInsetsMake功能设置此属性。默认值是UIEdgeInsetsZero。
供货情况在iPhone OS 2.0和更高版本。另请参见
_AT_财产imageEdgeInsets
宣布UIButton.h currentBackgroundImage按钮上显示当前的背景图像。(只读)
@属性(只读,非原子,保留)的UIImage * currentBackgroundImage讨论这个值可以为零。
供货情况在iPhone OS 2.0和更高版本。另请参见
_AT_财产currentImage
声明在UIButton.h
currentImage
当前图像上显示的按钮。(只读)
@属性(只读,非原子,保留)的UIImage * currentImage讨论这个值可以为零。
供货情况在iPhone OS 2.0和更高版本。另请参见
_AT_财产currentBackgroundImage
声明在UIButton.h
currentTitle
当前标题,按钮上显示的。(只读)
@属性(只读,非原子,保留)的NSString * currentTitle讨论这个值可能为零。
供货情况在iPhone OS 2.0和更高版本。另请参见
@财产currentTitleColor财产currentTitleShadowColor
声明在UIButton.h
currentTitleColor
颜色用于显示标题。(只读)
@属性(只读,非原子,保留)UIColor * currentTitleColor讨论这个值是保证不会是零。默认值是白色。
供货情况在iPhone OS 2.0和更高版本。另请参见
@财产currentTitle财产currentTitleShadowColor
声明在UIButton.h
currentTitleShadowColor
标题的阴影的颜色。(只读)
@属性(只读,非原子,保留)UIColor * currentTitleShadowColor讨论默认值是白色。
供货情况在iPhone OS 2.0和更高版本。另请参见
@财产currentTitle财产currentTitleColor
声明在UIButton.h
字体
字体用来显示按钮上的文字。
@属性(非原子,保留)UIFont *字体的讨论,如果为零,使用系统字体。默认值是零。
供货情况在iPhone OS 2.0和更高版本。声明在UIButton.h
imageEdgeInsets
图像插图或一开始就为每个边缘。
@属性(非原子)UIEdgeInsets imageEdgeInsets如果每条边的价值是积极的,指定的插图,否则,指定一开始。一个插图是周围绘制矩形的保证金;每边(左,右,顶部和底部),可以有不同的值。使用UIEdgeInsetsMake功能设置此属性。默认值是UIEdgeInsetsZero。
供货情况在iPhone OS 2.0和更高版本。另请参见
_AT_财产titleEdgeInsets
声明在UIButton.h
lineBreakMode
绘制文本时使用的换行模式。
属性(非原子)UILineBreakMode lineBreakMode讨论这个属性是UILineBreakMode描述的常量之一。默认值是UILineBreakModeMiddleTruncation。
供货情况在iPhone OS 2.0和更高版本。在UIButton.h声明reversesTitleShadowWhenHighlighted一个布尔值,决定是否按钮时,突出的标题阴影的变化。
如果有属性(非原子)BOOL reversesTitleShadowWhenHighlighted讨论,从雕刻的影子时,突出浮雕外观的变化。默认值是NO。
供货情况在iPhone OS 2.0和更高版本。声明在UIButton.h
showsTouchWhenHighlighted
一个布尔值,决定是否点击按钮会导致其发光。
@属性(非原子)BOOL showsTouchWhenHighlighted讨论,如果是的话,按钮发光时挖掘出来,否则,它不会。图像和按钮的行为是没有改变的辉光。默认值是NO。
供货情况在iPhone OS 2.0和更高版本。另请参见
@财产adjustsImageWhenHighlighted
声明在UIButton.h
titleEdgeInsets
标题插图或一开始就为每个边缘。
@属性(非原子)UIEdgeInsets titleEdgeInsets如果每条边的价值是积极的,指定的插图,否则,指定一开始。一个插图是周围绘制矩形的保证金;每边(左,右,顶部和底部),可以有不同的值。使用UIEdgeInsetsMake功能设置此属性。默认值是UIEdgeInsetsZero。
供货情况在iPhone OS 2.0和更高版本。另请参见
_AT_财产imageEdgeInsets
声明在UIButton.h
titleShadowOffset
用于显示接收的标题阴影的偏移。
属性(非原子)CGSize titleShadowOffset讨论的水平和垂直偏移值,使用CGSize数据类型的宽度和高度场指定的。正面的价值观总是向上延伸的权利,从用户的角度来看。默认值是CGSizeZero。
供货情况在iPhone OS 2.0和更高版本。宣布UIButton.h类方法
buttonWithType:创建并返回一个指定类型的新按钮。
+(ID)buttonWithType:(UIButtonType)按钮类型
参数
按钮类型
按钮类型。见的可能值UIButtonType。
返回值一个新创建的按钮。
供货情况在iPhone OS 2.0和更高版本。相关的示例代码配件BubbleLevel TheElements TouchCells UICatalog宣布UIButton.h实例方法
backgroundImageForState:
返回一个按钮的状态中使用的背景图像。
- (UIImage的*)backgroundImageForState:(UIControlState)状态
参数状态的状态使用的背景图像。可能的值是在UIControlState描述。
返回值用于指定的状态背景图像。
供货情况在iPhone OS 2.0和更高版本。又见 - setBackgroundImage:forState:UIButton.h声明
backgroundRectForBounds:
返回矩形的接收绘制其背景。
- (CGRect)backgroundRectForBounds:(CGRect)边界
参数范围接收器的边界矩形。
返回值的矩形接收机,绘制其背景。
供货情况在iPhone OS 2.0和更高版本。又见 - contentRectForBounds:UIButton.h声明
contentRectForBounds:
返回矩形的接收提请其全部内容。
- (CGRect)contentRectForBounds:(CGRect)边界
参数限定为接收器的边界矩形。
返回值的矩形接收提请其全部内容。
讨论内容的矩形来显示图像和标题对齐和其他设置,包括任何填充和调整所需的面积。
供货情况在iPhone OS 2.0和更高版本。 - titleRectForContentRect: - imageRectForContentRect: - backgroundRectForBounds:UIButton.h imageForState中声明:返回一个按钮的状态所使用的图像。
- (UIImage的*)imageForState:(UIControlState)状态
参数状态使用图像的状态。可能的值是在UIControlState描述。
返回值用于指定状态的图像。
供货情况在iPhone OS 2.0和更高版本。又见 - setImage:forState:UIButton.h imageRectForContentRect宣布:返回接收绘制其图像的矩形。
- (CGRect)imageRectForContentRect:(CGRect)contentRect
参数contentRect接收的内容矩形。
返回值接收绘制其图像的矩形。
供货情况在iPhone OS 2.0和更高版本。又见 - contentRectForBounds: - titleRectForContentRect:forState::UIButton.h setBackgroundImage宣布设置背景图像使用指定的按钮状态。
- (无效)setBackgroundImage:(UIImage的*)图像forState:(UIControlState)状态
参数图像背景图像使用指定的状态。
状态的状态使用指定的图像。在UIControlState值的描述。
在一般性讨论,如果没有一个国家指定一个属性,默认是使用UIControlStateNormal的价值。如果UIControlStateNormal值未设置,则属性默认为一个系统的价值。因此,至少,你应该设置为正常状态的价值。
供货情况在iPhone OS 2.0和更高版本。又见 - backgroundImageForState:相关示例代码配件BubbleLevel TheElements UICatalog UIButton.h setImage宣布:forState:设置图像使用指定的状态。
- (无效)setImage:(UIImage的*)图像forState:(UIControlState)状态
参数图像的图像使用指定的状态。
状态的状态使用指定的标题。在UIControlState值的描述。
在一般性讨论,如果没有一个国家指定一个属性,默认是使用UIControlStateNormal的价值。如果UIControlStateNormal值未设置,则属性默认为一个系统的价值。因此,至少,你应该设置为正常状态的价值。
供货情况在iPhone OS 2.0和更高版本。又见 - imageForState:forState::相关示例代码BubbleLevel在UIButton.h setTitle声明TouchCells设置标题使用指定的状态。
- (无效)setTitle是:(NSString的*)forState标题:(UIControlState)状态
参数标题标题使用指定的状态。
状态的状态使用指定的标题。在UIControlState值的描述。
在一般性讨论,如果没有一个国家指定一个属性,默认是使用UIControlStateNormal的价值。如果UIControlStateNormal价值不设置,则属性默认为系统值。因此,至少,你应该设置为正常状态的价值。
供货情况在iPhone OS 2.0和更高版本。又见 - titleForState:UIButton.h setTitleColor:forState相关的示例代码BubbleLevel UICatalog宣布:设置标题使用指定的状态的颜色。
- (无效)setTitleColor:(UIColor *)颜色forState:(UIControlState)状态
参数颜色的标题使用指定的状态的颜色。
状态的状态使用指定的颜色。在UIControlState值的描述。
在一般性讨论,如果没有一个国家指定一个属性,默认是使用UIControlStateNormal的价值。如果UIControlStateNormal值未设置,则属性默认为一个系统的价值。因此,至少,你应该设置为正常状态的价值。
供货情况在iPhone OS 2.0和更高版本。又见 - titleColorForState:UIButton.h setTitleShadowColor:forState相关的示例代码BubbleLevel UICatalog宣布:设置标题阴影的颜色,使用指定的状态。
- (无效)setTitleShadowColor:(UIColor *)颜色forState:(UIControlState)状态
参数颜色的标题阴影的颜色,使用指定的状态。
状态的状态使用指定的颜色。在UIControlState值的描述。
在一般性讨论,如果没有一个国家指定一个属性,默认是使用UIControlStateNormal的价值。如果UIControlStateNormal值未设置,则属性默认为一个系统的价值。因此,至少,你应该设置为正常状态的价值。
供货情况在iPhone OS 2.0和更高版本。又见 - titleShadowColorForState:UIButton.h titleColorForState宣布:返回一个国家使用的标题的颜色。
- (UIColor *)titleColorForState:(UIControlState)状态
参数状态的国家,使用的标题颜色。可能的值是在UIControlState描述。
返回值指定的状态标题的颜色。
供货情况在iPhone OS 2.0和更高版本。又见 - setTitleColor:forState:UIButton.h titleForState宣布:返回一个国家所使用的标题。
- (NSString的*)titleForState:(UIControlState)状态
参数状态的国家,使用的标题。可能的值是在UIControlState描述。
返回值指定的状态标题。
供货情况在iPhone OS 2.0和更高版本。又见 - setTitle:forState:UIButton.h titleRectForContentRect宣布:返回矩形的接收器绘制它的标题。
- (CGRect)titleRectForContentRect:(CGRect)contentRect
参数contentRect接收的内容矩形。
返回值的矩形接收器绘制它的标题。
供货情况在iPhone OS 2.0和更高版本。又见 - contentRectForBounds: - imageRectForContentRect:UIButton.h titleShadowColorForState宣布:返回的阴影颜色为国家所用的标题。
- (UIColor *)titleShadowColorForState:(UIControlState)状态
参数状态的国家,使用的标题阴影颜色。可能的值是在UIControlState描述。
返回值指定的状态标题的影子颜色。
供货情况在iPhone OS 2.0和更高版本。又见 - setTitleShadowColor:forState:UIButton.h常量声明
UIButtonType指定一个按钮的风格。
的typedef枚举{
UIButtonTypeCustom = 0,UIButtonTypeRoundedRect,UIButtonTypeDetailDisclosure,UIButtonTypeInfoLight,UIButtonTypeInfoDark,UIButtonTypeContactAdd
} UIButtonType;常量UIButtonTypeCustom无按钮的样式。
在iPhone OS 2.0及更高版本。
声明中UIButton.h。
UIButtonTypeRoundedRect一个圆角矩形样式的按钮。
在iPhone OS 2.0及更高版本。
声明中UIButton.h。
UIButtonTypeDetailDisclosure一个详细披露按钮。
在iPhone OS 2.0及更高版本。
声明中UIButton.h。
UIButtonTypeInfoLight一个信息按钮,有一个浅色背景。
在iPhone OS 2.0及更高版本。
声明中UIButton.h。
UIButtonTypeInfoDark一个信息按钮,有一个黑暗的背景。
在iPhone OS 2.0及更高版本。
声明中UIButton.h。
UIButtonTypeContactAdd一个联系人添加“按钮。
在iPhone OS 2.0及更高版本。
声明中UIButton.h。
供货情况在iPhone OS 2.0和更高版本。声明在UIButton.h
(一)2.UILabel
UILabel极其常用,功能比较专一:显示文字

UILabel的常见属性
@property(nonatomic,copy) NSString *text;
显示的文字
@property(nonatomic,retain) UIFont *font;
字体
@property(nonatomic,retain) UIColor *textColor;
文字颜色
@property(nonatomic) NSTextAlignment textAlignment;
对齐模式(比如左对齐、居中对齐、右对齐)
@property(nonatomic) NSInteger numberOfLines;
文字行数
@property(nonatomic) NSLineBreakMode lineBreakMode;
换行模式
UIFont
UIFont代表字体,常见创建方法有以下几个:
+ (UIFont *)systemFontOfSize:(CGFloat)fontSize; 系统默认字体
+ (UIFont *)boldSystemFontOfSize:(CGFloat)fontSize; 粗体
+ (UIFont *)italicSystemFontOfSize:(CGFloat)fontSize; 斜体

#import "LabelTestViewController.h"
@implementation LabelTestViewController
/*
Accessing the Text Attributes
text property
font property
textColor property
textAlignment property
lineBreakMode property
enabled property
Sizing the Label’s Text
adjustsFontSizeToFitWidth property
baselineAdjustment property
minimumFontSize property 无例
numberOfLines property
Managing Highlight Values
highlightedTextColor property
highlighted property
Drawing a Shadow
shadowColor property
shadowOffset property
Drawing and Positioning Overrides
– textRectForBounds:limitedToNumberOfLines: 无例
– drawTextInRect: 无例
Setting and Getting Attributes
userInteractionEnabled property
*/
// Implement viewDidLoad to do additional setup after loading the view, typically from a nib.
- (void)viewDidLoad {
UILabel *label1 = [[UILabel alloc]initWithFrame:CGRectMake(50.0, 20.0, 200.0, 50.0)];
UILabel *label2 = [[UILabel alloc]initWithFrame:CGRectMake(50.0, 80.0, 200.0, 50.0)];
UILabel *label3 = [[UILabel alloc]initWithFrame:CGRectMake(50.0, 140.0, 200.0, 50.0)];
UILabel *label4 = [[UILabel alloc]initWithFrame:CGRectMake(50.0, 200.0, 200.0, 50.0)];
UILabel *label5 = [[UILabel alloc]initWithFrame:CGRectMake(50.0, 260.0, 200.0, 50.0)];
UILabel *label6 = [[UILabel alloc]initWithFrame:CGRectMake(50.0, 320.0, 200.0, 50.0)];
UILabel *label7 = [[UILabel alloc]initWithFrame:CGRectMake(50.0, 380.0, 200.0, 50.0)];
//设置显示文字
label1.text = @"label1";
label2.text = @"label2";
label3.text = @"label3--label3--label3--label3--label3--label3--label3--label3--label3--label3--label3--";
label4.text = @"label4--label4--label4--label4--";
label5.text = @"label5--label5--label5--label5--label5--label5--";
label6.text = @"label6";
label7.text = @"label7";
//设置字体:粗体,正常的是 SystemFontOfSize
label1.font = [UIFont boldSystemFontOfSize:20];
//设置文字颜色
label1.textColor = [UIColor orangeColor];
label2.textColor = [UIColor purpleColor];
//设置文字位置
label1.textAlignment = UITextAlignmentRight;
label2.textAlignment = UITextAlignmentCenter;
//设置字体大小适应label宽度
label4.adjustsFontSizeToFitWidth = YES;
//设置label的行数
UIlabel.backgroudColor=[UIColor clearColor]; //可以去掉背景色
//设置高亮
label6.highlighted = YES;
label6.highlightedTextColor = [UIColor orangeColor];
//设置阴影
label7.shadowColor = [UIColor redColor];
label7.shadowOffset = CGSizeMake(1.0,1.0);
//设置是否能与用户进行交互
label7.userInteractionEnabled = YES;
//设置label中的文字是否可变,默认值是YES
label3.enabled = NO;
//设置文字过长时的显示格式
label3.lineBreakMode = UILineBreakModeMiddleTruncation;//截去中间
// typedef enum {
// UILineBreakModeWordWrap = 0,
// UILineBreakModeCharacterWrap,
// UILineBreakModeClip,//截去多余部分
// UILineBreakModeHeadTruncation,//截去头部
// UILineBreakModeTailTruncation,//截去尾部
// UILineBreakModeMiddleTruncation,//截去中间
// } UILineBreakMode;
//如果adjustsFontSizeToFitWidth属性设置为YES,这个属性就来控制文本基线的行为
label4.baselineAdjustment = UIBaselineAdjustmentNone;
// typedef enum {
// UIBaselineAdjustmentAlignBaselines,
// UIBaselineAdjustmentAlignCenters,
// UIBaselineAdjustmentNone,
// } UIBaselineAdjustment;
[self.view addSubview:label1];
[self.view addSubview:label2];
[self.view addSubview:label3];
[self.view addSubview:label4];
[self.view addSubview:label5];
[self.view addSubview:label6];
[self.view addSubview:label7];
[label1 release];
[label2 release];
[label3 release];
[label4 release];
[label5 release];
[label6 release];
[label7 release];
[super viewDidLoad];
}
/*
// Override to allow orientations other than the default portrait orientation.
- (BOOL)shouldAutorotateToInterfaceOrientation:(UIInterfaceOrientation)interfaceOrientation {
// Return YES for supported orientations
return (interfaceOrientation == UIInterfaceOrientationPortrait);
}
*/
- (void)didReceiveMemoryWarning {
// Releases the view if it doesn't have a superview.
[super didReceiveMemoryWarning];
// Release any cached data, images, etc that aren't in use.
}
- (void)viewDidUnload {
// Release any retained subviews of the main view.
// e.g. self.myOutlet = nil;
}
- (void)dealloc {
[super dealloc];
}
@end
UITextField – 文本输入框

1.UITextField的初始化和设置
  textField = [[UITextField alloc] initWithFrame:CGRectMake(120.0f, 80.0f, 150.0f, 30.0f)];
  [textField setBorderStyle:UITextBorderStyleRoundedRect]; //外框类型

  textField.placeholder = @"password"; //默认显示的字

  textField.secureTextEntry = YES; //密码

  textField.autocorrectionType = UITextAutocorrectionTypeNo;
  textField.autocapitalizationType = UITextAutocapitalizationTypeNone;
  textField.returnKeyType = UIReturnKeyDone;
  textField.clearButtonMode = UITextFieldViewModeWhileEditing; //编辑时会出现个修改X

  textField.delegate = self;
2.要实现的Delegate方法,关闭键盘
  - (BOOL)textFieldShouldReturn:(UITextField *)textField
  {
      [self.textField resignFirstResponder];
      return YES;
  }
3. 可以在UITextField使用下面方法,按return键返回
-(IBAction) textFieldDone:(id) sender
{
 [textFieldName resignFirstResponder];
}
链接TextField控件的"Did end on exit"
最右侧加图片是以下代码,
    UIImageView *imgv=[[UIImageView alloc] initWithImage:[UIImage imageNamed:@"right.png"]];
    text.rightView=imgv;
    text.rightViewMode = UITextFieldViewModeAlways;

如果是在最左侧加图片就换成:
text.leftView=imgv;
text.leftViewMode = UITextFieldViewModeAlways;
UITextField 继承自 UIControl,此类中有一个属性contentVerticalAlignment
所以想让UITextField里面的text垂直居中可以这样写:
text.contentVerticalAlignment = UIControlContentVerticalAlignmentCenter;
查看函数的方法:
按住command键双击进入函数声明
按住alt键双击进入doc文档
///////////////////////////////////////////////////////////////
文本框常用方法:
如何用程序删除文本框中选中的文本
[textView delete: nil];
///////////////////////////////////////////////////////////////
如何限制文本框只能输入数字:
建立NSNumberFormatter的子类,增加这个方法,将formatter链接至文本框。

- (BOOL) isPartialStringValid: (NSString **) partialStringPtr
        proposedSelectedRange: (NSRangePointer) proposedSelRangePtr
               originalString: (NSString *) origString
        originalSelectedRange: (NSRange) origSelRange
             errorDescription: (NSString **) error
{
    NSCharacterSet *nonDigits;
    NSRange newStuff;
    NSString *newStuffString;

    nonDigits = [[NSCharacterSet decimalDigitCharacterSet] invertedSet];
    newStuff = NSMakeRange(origSelRange.location,
                           proposedSelRangePtr->location
                           - origSelRange.location);
    newStuffString = [*partialStringPtr substringWithRange: newStuff];

    if ([newStuffString rangeOfCharacterFromSet: nonDigits
                                                                                             options: NSLiteralSearch].location != NSNotFound) {
        *error = @"不是数字";
        return (NO);
    } else {
        *error = nil;
        return (YES);
    }

}
///////////////////////////////////////////////////////////////
从文本框获取十六进制数据的代码
char singleNumberString[3] = {'\0','\0','\0'};
uint32_t singleNumber = 0;
uint32_t i = 0;
 NSMutableData *data = [NSMutableData data];
 //从文本框获取到得数据
 const char *buf = [[_hexToSendTextField text] UTF8String];
 //转换为十六进制
 for(i = 0; i < strlen(buf); i+=2)
 {
 if(((i+1) < len && isxdigit(buf) && (isxdigit(buf[i+1])))
 {
 singleNumberString[0] = buf;
 singleNumberString[1] = buf[i+1];
 sscanf(singleNumberString, "%x", &singleNumber);
 [data appendBytes:(void*)(&tmp) length:1];
 }
 else
 {
 break;
 }
 }
 //输出
 NSLog(@"%@", data);
/////////////////////////////////////////////////////////////
点击 UITextView 输入文字,光标都从最初点开始
- (void)textViewDidChangeSelection:(UITextView *)textView
{
    NSRange range;
    range.location = 0;
    range.length = 0;
    textView.selectedRange = range;
}
///////////////////////////////////////////////////////////
软键盘
在登录页面要实现用户名和密码,密码要是点点格式,引入当前页面光标要停留在用户名选项,软键盘要弹出界面。如下图:
弹出键盘:
[username becomeFirstResponder];
取消键盘:
[username resignFirstResponder];
密码保护:
password.secureTextEntry=YES;
//////////////////////////////////////////////////////////////////
1.UITextField的初始化和设置
  textField = [[UITextField alloc] initWithFrame:CGRectMake(120.0f, 80.0f, 150.0f, 30.0f)];
  [textField setBorderStyle:UITextBorderStyleRoundedRect]; //外框类型
  textField.placeholder = @"password"; //默认显示的字
  textField.secureTextEntry = YES; //密码
  textField.autocorrectionType = UITextAutocorrectionTypeNo;
  textField.autocapitalizationType = UITextAutocapitalizationTypeNone;
  textField.returnKeyType = UIReturnKeyDone;
  textField.clearButtonMode = UITextFieldViewModeWhileEditing; //编辑时会出现个修改X
  textField.delegate = self;
2.要实现的Delegate方法,关闭键盘
  - (BOOL)textFieldShouldReturn:(UITextField *)textField
  {
      [self.textField resignFirstResponder];
      return YES;
  }
3. 可以在UITextField使用下面方法,按return键返回
-(IBAction) textFieldDone:(id) sender
{
 [textFieldName resignFirstResponder];
}
链接TextField控件的"Did end on exit"
////////////////////////////////////////////////////////////////////
限制输入文本的长度
- (BOOL)textField:(UITextField *)textField shouldChangeCharactersInRange:(NSRange)range replacementString:(NSString *)string
{
    if (range.location >= MAX_LENGTH)
        return NO; // return NO to not change text
    return YES;
}
if (textField.text.length >= 10 && range.length == 0)
    return NO;
return YES;
- (BOOL)textField:(UITextField *)textField shouldChangeCharactersInRange:(NSRange)range replacementString:(NSString *)string
{
 if ([textField.text length] > MAXLENGTH)
 {
  textField.text = [textField.text substringToIndex:MAXLENGTH-1];
  return NO;
 }
 return YES;
}
//////////////////////////////////////////////////////////////////////
使用UITextFieldDelegate来隐藏键盘
在iPhone界面上,时常会需要当用户输入完内容后,隐藏键盘。 当然有很多方法,今天只介绍使用UITextFieldDelegate这个协议实现隐藏键盘。
其实很简单, 需要三步:
1. 在你的控制器类中,加入UITextFieldDelegate这个协议
如:@interface AddItemViewController : UIViewController <UITextFieldDelegate>
2. 在使用了UITextFieldDelegate协议的控制器类的实现中,加入- (BOOL)textFieldShouldReturn:方法。
- (BOOL)textFieldShouldReturn:(UITextField *)textField {

        [textField resignFirstResponder];
        return YES;
}
 //设置焦点:

[UITextField becomeFirstResponder];

3. 将xib文件中的TextField控件的delegate变量指向到之前使用UITextFieldDelegate协议的那个控制器类,将 TextField的delegate IBOutlet变量右键链接到前面的控制器类的实例上。或者使用代码方式,指定相关TextField的delegate变量。

- (void)viewDidLoad

{

    [super viewDidLoad];

        itemNameField.delegate = self;

        priceField.delegate = self;

}

(一)4.UIImageView

UIImageView的常见属性
@property(nonatomic,retain) UIImage *image;
显示的图片
@property(nonatomic,copy) NSArray *animationImages;
显示的动画图片
@property(nonatomic) NSTimeInterval animationDuration;
动画图片的持续时间
@property(nonatomic) NSInteger animationRepeatCount;
动画的播放次数(默认是0,代表无限播放)
UIImageView的常见方法
- (void)startAnimating; // 开始动画
- (void)stopAnimating; // 停止动画
- (BOOL)isAnimating; // 是否正在执行动画
UIImage
一个UIImage对象代表一张图片,一般通过imageNamed:方法就可以通过文件名加载项目中的图片
UIImage *image = [UIImage imageNamed:@"lufy"];


(一)5.UIScrollvView
UIScrollView – 滚动的控件

1.UIScrollView控件是什么?
(1)移动设备的屏幕⼤大⼩小是极其有限的,因此直接展⽰示在⽤用户眼前的内容也相当有限
(2)当展⽰示的内容较多,超出⼀一个屏幕时,⽤用户可通过滚动⼿手势来查看屏幕以外的内容
(3)普通的UIView不具备滚动功能,不能显⽰示过多的内容
(4)UIScrollView是一个能够滚动的视图控件,可以⽤用来展⽰示⼤大量的内容,并且可以通过滚 动查看所有的内容
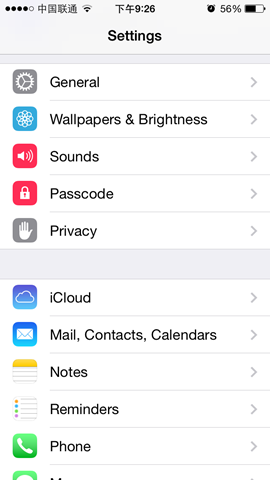
(5) 举例:手机上的“设置”、其他⽰示例程序
2.UIScrollView的简单使用
(1)将需要展⽰的内容添加到UIScrollView中
(2)设置UIScrollView的contentSize属性,告诉UIScrollView所有内容的尺⼨寸,也就是告诉 它滚动的范围(能滚多远,滚到哪⾥里是尽头)
3.属性
(1)常用属性:
1)@property(nonatomic)CGPointcontentOffset; 这个属性⽤用来表⽰示UIScrollView滚动的位置
2)@property(nonatomic)CGSizecontentSize;这个属性⽤用来表⽰示UIScrollView内容的尺⼨寸,滚动范围(能滚多远)
3)@property(nonatomic)UIEdgeInsetscontentInset; 这个属性能够在UIScrollView的4周增加额外的滚动区域
(2)其他属性:
1)@property(nonatomic) BOOL bounces; 设置UIScrollView是否需要弹簧效果
2)@property(nonatomic,getter=isScrollEnabled)BOOLscrollEnabled; 设置UIScrollView是否能滚动
3)@property(nonatomic) BOOL showsHorizontalScrollIndicator; 是否显⽰示⽔水平滚动条
4)@property(nonatomic) BOOL showsVerticalScrollIndicator; 是否显⽰示垂直滚动条
4.注意点
• 如果UIScrollView⽆无法滚动,可能是以下原因:
(1)没有设置contentSize
(2) scrollEnabled = NO
(3) 没有接收到触摸事件:userInteractionEnabled = NO
(4)没有取消autolayout功能(要想scrollView滚动,必须取消autolayout)
二、关于UIScrollView常见属性的一些说明
1.属性使用的代码示例

 1 #import "MJViewController.h"

 2

 3 @interface MJViewController ()

 4 {

 5     //在私有扩展中创建一个属性

 6     UIScrollView *_scrollView;

 7 }

 8 @end

 9

10 @implementation MJViewController

11

12 - (void)viewDidLoad

13 {

14     [super viewDidLoad];

15

16     // 1.创建UIScrollView

17     UIScrollView *scrollView = [[UIScrollView alloc] init];

18     scrollView.frame = CGRectMake(0, 0, 250, 250); // frame中的size指UIScrollView的可视范围

19     scrollView.backgroundColor = [UIColor grayColor];

20     [self.view addSubview:scrollView];

21

22     // 2.创建UIImageView(图片)

23     UIImageView *imageView = [[UIImageView alloc] init];

24     imageView.image = [UIImage imageNamed:@"big.jpg"];

25     CGFloat imgW = imageView.image.size.width; // 图片的宽度

26     CGFloat imgH = imageView.image.size.height; // 图片的高度

27     imageView.frame = CGRectMake(0, 0, imgW, imgH);

28     [scrollView addSubview:imageView];

29

30     // 3.设置scrollView的属性

31

32     // 设置UIScrollView的滚动范围(内容大小)

33     scrollView.contentSize = imageView.image.size;

34

35     // 隐藏水平滚动条

36     scrollView.showsHorizontalScrollIndicator = NO;

37     scrollView.showsVerticalScrollIndicator = NO;

38

39     // 用来记录scrollview滚动的位置

40 //    scrollView.contentOffset = ;

41

42     // 去掉弹簧效果

43 //    scrollView.bounces = NO;

44

45     // 增加额外的滚动区域(逆时针,上、左、下、右)

46     // top  left  bottom  right

47     scrollView.contentInset = UIEdgeInsetsMake(20, 20, 20, 20);

48

49     _scrollView = scrollView;

50 }

51

52 - (IBAction)down:(UIButton *)sender {

53     [UIView animateWithDuration:1.0 animations:^{

54         //三个步骤

55         CGPoint offset = _scrollView.contentOffset;

56         offset.y += 150;

57         _scrollView.contentOffset = offset;

58

59         //_scrollView.contentOffset = CGPointMake(0, 0);

60     }];

61 }

62 @end

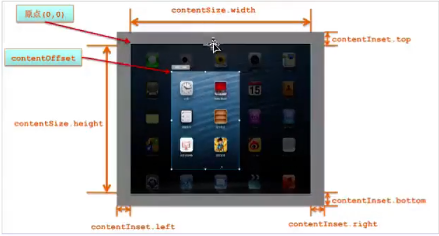
2.几个属性坐标示意图

3.重要说明
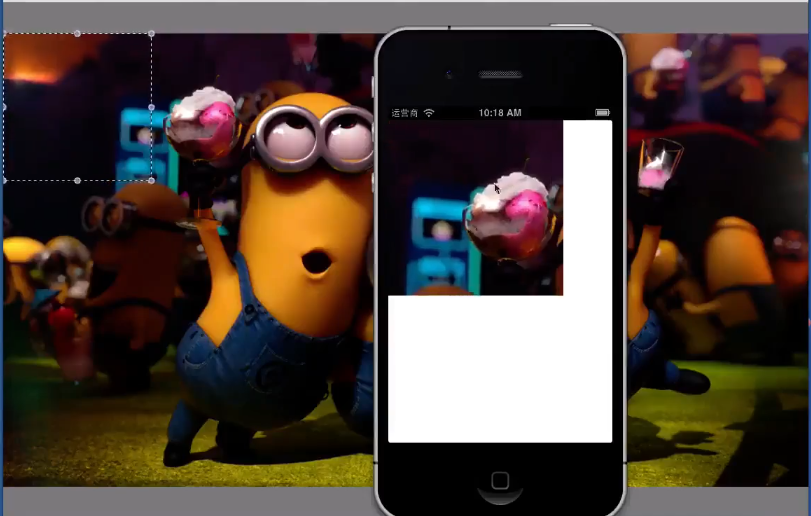
(1)UIScrollView的frame与contentsize属性的区分:UIScrollView的frame指的是这个scrollview的可视范围(可看见的区域),contentsize是其滚动范围。
(2)contentinset(不带*号的一般不是结构体就是枚举),为UIScrollView增加额外的滚动区域。(上,左,下,右)逆时针。contentinset可以使用代码或者是视图控制器进行设置,但两者有区别(注意区分)。
(3)contentsize属性只能使用代码设置。
(4)contentoffset是个CGpoint类型的结构体,用来记录ScrollView的滚动位置,即记录着“框”跑到了哪里。知道了这个属性,就知道了其位置,可以通过设置这个属性来控制这个“框”的移动。
(5)不允许直接修改某个对象内部结构体属性的成员,三个步骤(先拿到值,修改之,再把修改后的值赋回去)。
(6)增加了额外区域后,contentoffset的原点在哪里?
三、有助于理解的几个截图
模型图:
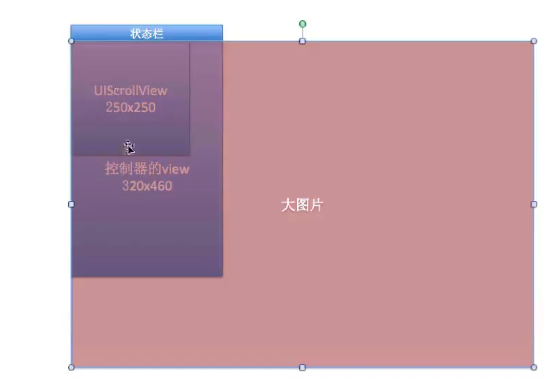
对比图:
坐标图:
(一)6UITableView

概述
在iOS开发中UITableView可以说是使用最广泛的控件,我们平时使用的软件中到处都可以看到它的影子,类似于微信、QQ、新浪微博等软件基本上随处都是UITableView。当然它的广泛使用自然离不开它强大的功能,今天这篇文章将针对UITableView重点展开讨论。今天的主要内容包括:
基本介绍
UITableView有两种风格:UITableViewStylePlain和UITableViewStyleGrouped。这两者操作起来其实并没有本质区别,只是后者按分组样式显示前者按照普通样式显示而已。大家先看一下两者的应用:
1>分组样式

2>不分组样式

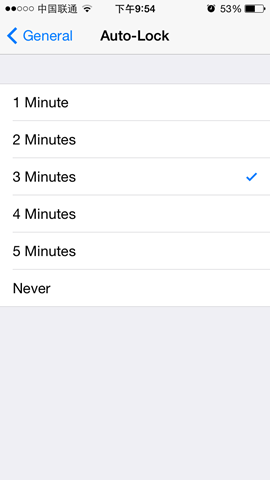
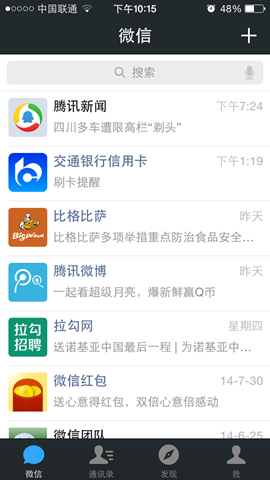
大家可以看到在UITableView中数据只有行的概念,并没有列的概念,因为在手机操作系统中显示多列是不利于操作的。UITableView中每行数据都是一个UITableViewCell,在这个控件中为了显示更多的信息,iOS已经在其内部设置好了多个子控件以供开发者使用。如果我们查看UITableViewCell的声明文件可以发现在内部有一个UIView控件(contentView,作为其他元素的父控件)、两个UILable控件(textLabel、detailTextLabel)、一个UIImage控件(imageView),分别用于容器、显示内容、详情和图片。使用效果类似于微信、QQ信息列表:

当然,这些子控件并不一定要全部使用,具体操作时可以通过UITableViewCellStyle进行设置,具体每个枚举表示的意思已经在代码中进行了注释:
typedef NS_ENUM(NSInteger, UITableViewCellStyle) {

    UITableViewCellStyleDefault,    // 左侧显示textLabel(不显示detailTextLabel),imageView可选(显示在最左边)

    UITableViewCellStyleValue1,        // 左侧显示textLabel、右侧显示detailTextLabel(默认蓝色),imageView可选(显示在最左边)

    UITableViewCellStyleValue2,        // 左侧依次显示textLabel(默认蓝色)和detailTextLabel,imageView可选(显示在最左边)

    UITableViewCellStyleSubtitle    // 左上方显示textLabel,左下方显示detailTextLabel(默认灰色),imageView可选(显示在最左边)

};
数据源
由于iOS是遵循MVC模式设计的,很多操作都是通过代理和外界沟通的,但对于数据源控件除了代理还有一个数据源属性,通过它和外界进行数据交互。 对于UITableView设置完dataSource后需要实现UITableViewDataSource协议,在这个协议中定义了多种 数据操作方法,下面通过创建一个简单的联系人管理进行演示:
首先我们需要创建一个联系人模型KCContact
KCContact.h
//

//  Contact.h

//  UITableView

//

//  Created by Kenshin Cui on 14-3-1.

//  Copyright (c) 2014年 Kenshin Cui. All rights reserved.

//

#import <Foundation/Foundation.h>

@interface KCContact : NSObject

#pragma mark 姓

@property (nonatomic,copy) NSString *firstName;

#pragma mark 名

@property (nonatomic,copy) NSString *lastName;

#pragma mark 手机号码

@property (nonatomic,copy) NSString *phoneNumber;

#pragma mark 带参数的构造函数

-(KCContact *)initWithFirstName:(NSString *)firstName andLastName:(NSString *)lastName andPhoneNumber:(NSString *)phoneNumber;

#pragma mark 取得姓名

-(NSString *)getName;

#pragma mark 带参数的静态对象初始化方法

+(KCContact *)initWithFirstName:(NSString *)firstName andLastName:(NSString *)lastName andPhoneNumber:(NSString *)phoneNumber;

@end
KCContact.m
//

//  Contact.m

//  UITableView

//

//  Created by Kenshin Cui on 14-3-1.

//  Copyright (c) 2014年 Kenshin Cui. All rights reserved.

//

#import "KCContact.h"

@implementation KCContact

-(KCContact *)initWithFirstName:(NSString *)firstName andLastName:(NSString *)lastName andPhoneNumber:(NSString *)phoneNumber{

    if(self=[super init]){

        self.firstName=firstName;

        self.lastName=lastName;

        self.phoneNumber=phoneNumber;

    }

    return self;

}

-(NSString *)getName{

    return [NSString stringWithFormat:@"%@ %@",_lastName,_firstName];

}

+(KCContact *)initWithFirstName:(NSString *)firstName andLastName:(NSString *)lastName andPhoneNumber:(NSString *)phoneNumber{

    KCContact *contact1=[[KCContact alloc]initWithFirstName:firstName andLastName:lastName andPhoneNumber:phoneNumber];

    return contact1;

}

@end
为了演示分组显示我们不妨将一组数据也抽象成模型KCContactGroup
KCContactGroup.h
//

//  KCContactGroup.h

//  UITableView

//

//  Created by Kenshin Cui on 14-3-1.

//  Copyright (c) 2014年 Kenshin Cui. All rights reserved.

//

#import <Foundation/Foundation.h>

#import "KCContact.h"

@interface KCContactGroup : NSObject

#pragma mark 组名

@property (nonatomic,copy) NSString *name;

#pragma mark 分组描述

@property (nonatomic,copy) NSString *detail;

#pragma mark 联系人

@property (nonatomic,strong) NSMutableArray *contacts;

#pragma mark 带参数个构造函数

-(KCContactGroup *)initWithName:(NSString *)name andDetail:(NSString *)detail andContacts:(NSMutableArray *)contacts;

#pragma mark 静态初始化方法

+(KCContactGroup *)initWithName:(NSString *)name andDetail:(NSString *)detail andContacts:(NSMutableArray *)contacts;

@end
KCContactGroup.m
//

//  KCContactGroup.m

//  UITableView

//

//  Created by Kenshin Cui on 14-3-1.

//  Copyright (c) 2014年 Kenshin Cui. All rights reserved.

//

#import "KCContactGroup.h"

@implementation KCContactGroup

-(KCContactGroup *)initWithName:(NSString *)name andDetail:(NSString *)detail andContacts:(NSMutableArray *)contacts{

    if (self=[super init]) {

        self.name=name;

        self.detail=detail;

        self.contacts=contacts;

    }

    return self;

}

+(KCContactGroup *)initWithName:(NSString *)name andDetail:(NSString *)detail andContacts:(NSMutableArray *)contacts{

    KCContactGroup *group1=[[KCContactGroup alloc]initWithName:name andDetail:detail andContacts:contacts];

    return group1;

}

@end
然后在viewDidLoad方法中创建一些模拟数据同时实现数据源协议方法:
KCMainViewController.m
//

//  KCMainViewController.m

//  UITableView

//

//  Created by Kenshin Cui on 14-3-1.

//  Copyright (c) 2014年 Kenshin Cui. All rights reserved.

//

#import "KCMainViewController.h"

#import "KCContact.h"

#import "KCContactGroup.h"

@interface KCMainViewController ()<UITableViewDataSource>{

    UITableView *_tableView;

    NSMutableArray *_contacts;//联系人模型

}

@end

@implementation KCMainViewController

- (void)viewDidLoad {

    [super viewDidLoad];

    //初始化数据

    [self initData];

    //创建一个分组样式的UITableView

    _tableView=[[UITableView alloc]initWithFrame:self.view.bounds style:UITableViewStyleGrouped];

    //设置数据源,注意必须实现对应的UITableViewDataSource协议

    _tableView.dataSource=self;

    [self.view addSubview:_tableView];

}

#pragma mark 加载数据

-(void)initData{

    _contacts=[[NSMutableArray alloc]init];

    KCContact *contact1=[KCContact initWithFirstName:@"Cui" andLastName:@"Kenshin" andPhoneNumber:@"18500131234"];

    KCContact *contact2=[KCContact initWithFirstName:@"Cui" andLastName:@"Tom" andPhoneNumber:@"18500131237"];

    KCContactGroup *group1=[KCContactGroup initWithName:@"C" andDetail:@"With names beginning with C" andContacts:[NSMutableArray arrayWithObjects:contact1,contact2, nil]];

    [_contacts addObject:group1];

    KCContact *contact3=[KCContact initWithFirstName:@"Lee" andLastName:@"Terry" andPhoneNumber:@"18500131238"];

    KCContact *contact4=[KCContact initWithFirstName:@"Lee" andLastName:@"Jack" andPhoneNumber:@"18500131239"];

    KCContact *contact5=[KCContact initWithFirstName:@"Lee" andLastName:@"Rose" andPhoneNumber:@"18500131240"];

    KCContactGroup *group2=[KCContactGroup initWithName:@"L" andDetail:@"With names beginning with L" andContacts:[NSMutableArray arrayWithObjects:contact3,contact4,contact5, nil]];

    [_contacts addObject:group2];

    KCContact *contact6=[KCContact initWithFirstName:@"Sun" andLastName:@"Kaoru" andPhoneNumber:@"18500131235"];

    KCContact *contact7=[KCContact initWithFirstName:@"Sun" andLastName:@"Rosa" andPhoneNumber:@"18500131236"];

    KCContactGroup *group3=[KCContactGroup initWithName:@"S" andDetail:@"With names beginning with S" andContacts:[NSMutableArray arrayWithObjects:contact6,contact7, nil]];

    [_contacts addObject:group3];

    KCContact *contact8=[KCContact initWithFirstName:@"Wang" andLastName:@"Stephone" andPhoneNumber:@"18500131241"];

    KCContact *contact9=[KCContact initWithFirstName:@"Wang" andLastName:@"Lucy" andPhoneNumber:@"18500131242"];

    KCContact *contact10=[KCContact initWithFirstName:@"Wang" andLastName:@"Lily" andPhoneNumber:@"18500131243"];

    KCContact *contact11=[KCContact initWithFirstName:@"Wang" andLastName:@"Emily" andPhoneNumber:@"18500131244"];

    KCContact *contact12=[KCContact initWithFirstName:@"Wang" andLastName:@"Andy" andPhoneNumber:@"18500131245"];

    KCContactGroup *group4=[KCContactGroup initWithName:@"W" andDetail:@"With names beginning with W" andContacts:[NSMutableArray arrayWithObjects:contact8,contact9,contact10,contact11,contact12, nil]];

    [_contacts addObject:group4];

    KCContact *contact13=[KCContact initWithFirstName:@"Zhang" andLastName:@"Joy" andPhoneNumber:@"18500131246"];

    KCContact *contact14=[KCContact initWithFirstName:@"Zhang" andLastName:@"Vivan" andPhoneNumber:@"18500131247"];

    KCContact *contact15=[KCContact initWithFirstName:@"Zhang" andLastName:@"Joyse" andPhoneNumber:@"18500131248"];

    KCContactGroup *group5=[KCContactGroup initWithName:@"Z" andDetail:@"With names beginning with Z" andContacts:[NSMutableArray arrayWithObjects:contact13,contact14,contact15, nil]];

    [_contacts addObject:group5];

}

#pragma mark - 数据源方法

#pragma mark 返回分组数

-(NSInteger)numberOfSectionsInTableView:(UITableView *)tableView{

    NSLog(@"计算分组数");

    return _contacts.count;

}

#pragma mark 返回每组行数

-(NSInteger)tableView:(UITableView *)tableView numberOfRowsInSection:(NSInteger)section{

    NSLog(@"计算每组(组%i)行数",section);

    KCContactGroup *group1=_contacts[section];

    return group1.contacts.count;

}

#pragma mark返回每行的单元格

-(UITableViewCell *)tableView:(UITableView *)tableView cellForRowAtIndexPath:(NSIndexPath *)indexPath{

    //NSIndexPath是一个结构体,记录了组和行信息

    NSLog(@"生成单元格(组:%i,行%i)",indexPath.section,indexPath.row);

    KCContactGroup *group=_contacts[indexPath.section];

    KCContact *contact=group.contacts[indexPath.row];

    UITableViewCell *cell=[[UITableViewCell alloc]initWithStyle:UITableViewCellStyleDefault reuseIdentifier:nil];

    cell.textLabel.text=[contact getName];

    cell.detailTextLabel.text=contact.phoneNumber;

    return cell;

}

#pragma mark 返回每组头标题名称

-(NSString *)tableView:(UITableView *)tableView titleForHeaderInSection:(NSInteger)section{

    NSLog(@"生成组(组%i)名称",section);

    KCContactGroup *group=_contacts[section];

    return group.name;

}

#pragma mark 返回每组尾部说明

-(NSString *)tableView:(UITableView *)tableView titleForFooterInSection:(NSInteger)section{

    NSLog(@"生成尾部(组%i)详情",section);

    KCContactGroup *group=_contacts[section];

    return group.detail;

}

@end
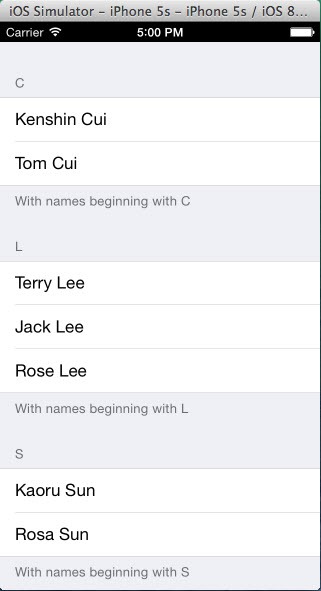
运行可以看到如下效果:
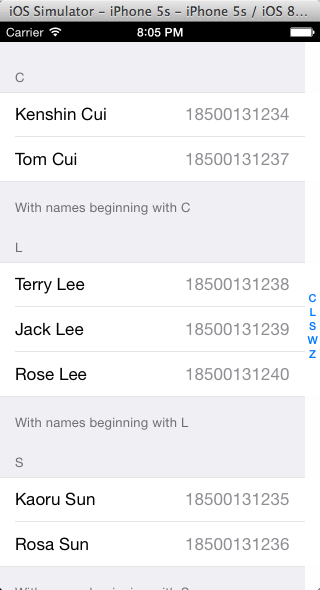
大家在使用iPhone通讯录时会发现右侧可以按字母检索,使用起来很方便,其实这个功能使用UITableView实现很简单,只要实现数据源协议的一个方法,构建一个分组标题的数组即可实现。数组元素的内容和组标题内容未必完全一致,UITableView是按照数组元素的索引和每组数据索引顺序来定位的而不是按内容查找。
#pragma mark 返回每组标题索引

-(NSArray *)sectionIndexTitlesForTableView:(UITableView *)tableView{

    NSLog(@"生成组索引");

    NSMutableArray *indexs=[[NSMutableArray alloc]init];

    for(KCContactGroup *group in _contacts){

        [indexs addObject:group.name];

    }

    return indexs;

}
效果如下:
需要注意的是上面几个重点方法的执行顺序,请看下图:

值得指出的是生成单元格的方法并不是一次全部调用,而是只会生产当前显示在界面上的单元格,当用户滚动操作时再显示其他单元格。
注意:随着我们的应用越来越复杂,可能经常需要调试程序,在iOS中默认情况下不能定位到错误代码行,我们可以通过如下设置让程序定位到出错代码行:Show the Breakpoint navigator—Add Exception breakpoint。
代理
上面我们已经看到通讯录的简单实现,但是我们发现单元格高度、分组标题高度以及尾部说明的高度都需要调整,此时就需要使用代理方法。UITableView代理方法有很多,例如监听单元格显示周期、监听单元格选择编辑操作、设置是否高亮显示单元格、设置行高等。
1.设置行高
#pragma mark - 代理方法

#pragma mark 设置分组标题内容高度

-(CGFloat)tableView:(UITableView *)tableView heightForHeaderInSection:(NSInteger)section{

    if(section==0){

        return 50;

    }

    return 40;

}

#pragma mark 设置每行高度(每行高度可以不一样)

-(CGFloat)tableView:(UITableView *)tableView heightForRowAtIndexPath:(NSIndexPath *)indexPath{

    return 45;

}

#pragma mark 设置尾部说明内容高度

-(CGFloat)tableView:(UITableView *)tableView heightForFooterInSection:(NSInteger)section{

    return 40;

}
2.监听点击
在iOS中点击某联系个人就可以呼叫这个联系人,这时就需要监听点击操作,这里就不演示呼叫联系人操作了,我们演示一下修改人员信息的操作。
KCMainViewContrller.m
//

//  KCMainViewController.m

//  UITableView

//

//  Created by Kenshin Cui on 14-3-1.

//  Copyright (c) 2014年 Kenshin Cui. All rights reserved.

//

#import "KCMainViewController.h"

#import "KCContact.h"

#import "KCContactGroup.h"

@interface KCMainViewController ()<UITableViewDataSource,UITableViewDelegate,UIAlertViewDelegate>{

    UITableView *_tableView;

    NSMutableArray *_contacts;//联系人模型

    NSIndexPath *_selectedIndexPath;//当前选中的组和行

}

@end

@implementation KCMainViewController

- (void)viewDidLoad {

    [super viewDidLoad];

    //初始化数据

    [self initData];

    //创建一个分组样式的UITableView

    _tableView=[[UITableView alloc]initWithFrame:self.view.bounds style:UITableViewStyleGrouped];

    //设置数据源,注意必须实现对应的UITableViewDataSource协议

    _tableView.dataSource=self;

    //设置代理

    _tableView.delegate=self;

    [self.view addSubview:_tableView];

}

#pragma mark 加载数据

-(void)initData{

    _contacts=[[NSMutableArray alloc]init];

    KCContact *contact1=[KCContact initWithFirstName:@"Cui" andLastName:@"Kenshin" andPhoneNumber:@"18500131234"];

    KCContact *contact2=[KCContact initWithFirstName:@"Cui" andLastName:@"Tom" andPhoneNumber:@"18500131237"];

    KCContactGroup *group1=[KCContactGroup initWithName:@"C" andDetail:@"With names beginning with C" andContacts:[NSMutableArray arrayWithObjects:contact1,contact2, nil]];

    [_contacts addObject:group1];

    KCContact *contact3=[KCContact initWithFirstName:@"Lee" andLastName:@"Terry" andPhoneNumber:@"18500131238"];

    KCContact *contact4=[KCContact initWithFirstName:@"Lee" andLastName:@"Jack" andPhoneNumber:@"18500131239"];

    KCContact *contact5=[KCContact initWithFirstName:@"Lee" andLastName:@"Rose" andPhoneNumber:@"18500131240"];

    KCContactGroup *group2=[KCContactGroup initWithName:@"L" andDetail:@"With names beginning with L" andContacts:[NSMutableArray arrayWithObjects:contact3,contact4,contact5, nil]];

    [_contacts addObject:group2];

    KCContact *contact6=[KCContact initWithFirstName:@"Sun" andLastName:@"Kaoru" andPhoneNumber:@"18500131235"];

    KCContact *contact7=[KCContact initWithFirstName:@"Sun" andLastName:@"Rosa" andPhoneNumber:@"18500131236"];

    KCContactGroup *group3=[KCContactGroup initWithName:@"S" andDetail:@"With names beginning with S" andContacts:[NSMutableArray arrayWithObjects:contact6,contact7, nil]];

    [_contacts addObject:group3];

    KCContact *contact8=[KCContact initWithFirstName:@"Wang" andLastName:@"Stephone" andPhoneNumber:@"18500131241"];

    KCContact *contact9=[KCContact initWithFirstName:@"Wang" andLastName:@"Lucy" andPhoneNumber:@"18500131242"];

    KCContact *contact10=[KCContact initWithFirstName:@"Wang" andLastName:@"Lily" andPhoneNumber:@"18500131243"];

    KCContact *contact11=[KCContact initWithFirstName:@"Wang" andLastName:@"Emily" andPhoneNumber:@"18500131244"];

    KCContact *contact12=[KCContact initWithFirstName:@"Wang" andLastName:@"Andy" andPhoneNumber:@"18500131245"];

    KCContactGroup *group4=[KCContactGroup initWithName:@"W" andDetail:@"With names beginning with W" andContacts:[NSMutableArray arrayWithObjects:contact8,contact9,contact10,contact11,contact12, nil]];

    [_contacts addObject:group4];

    KCContact *contact13=[KCContact initWithFirstName:@"Zhang" andLastName:@"Joy" andPhoneNumber:@"18500131246"];

    KCContact *contact14=[KCContact initWithFirstName:@"Zhang" andLastName:@"Vivan" andPhoneNumber:@"18500131247"];

    KCContact *contact15=[KCContact initWithFirstName:@"Zhang" andLastName:@"Joyse" andPhoneNumber:@"18500131248"];

    KCContactGroup *group5=[KCContactGroup initWithName:@"Z" andDetail:@"With names beginning with Z" andContacts:[NSMutableArray arrayWithObjects:contact13,contact14,contact15, nil]];

    [_contacts addObject:group5];

}

#pragma mark - 数据源方法

#pragma mark 返回分组数

-(NSInteger)numberOfSectionsInTableView:(UITableView *)tableView{

    NSLog(@"计算分组数");

    return _contacts.count;

}

#pragma mark 返回每组行数

-(NSInteger)tableView:(UITableView *)tableView numberOfRowsInSection:(NSInteger)section{

    NSLog(@"计算每组(组%i)行数",section);

    KCContactGroup *group1=_contacts[section];

    return group1.contacts.count;

}

#pragma mark返回每行的单元格

-(UITableViewCell *)tableView:(UITableView *)tableView cellForRowAtIndexPath:(NSIndexPath *)indexPath{

    //NSIndexPath是一个对象,记录了组和行信息

    NSLog(@"生成单元格(组:%i,行%i)",indexPath.section,indexPath.row);

    KCContactGroup *group=_contacts[indexPath.section];

    KCContact *contact=group.contacts[indexPath.row];

    UITableViewCell *cell=[[UITableViewCell alloc]initWithStyle:UITableViewCellStyleValue1 reuseIdentifier:nil];

    cell.textLabel.text=[contact getName];

    cell.detailTextLabel.text=contact.phoneNumber;

    return cell;

}

#pragma mark 返回每组头标题名称

-(NSString *)tableView:(UITableView *)tableView titleForHeaderInSection:(NSInteger)section{

    NSLog(@"生成组(组%i)名称",section);

    KCContactGroup *group=_contacts[section];

    return group.name;

}

#pragma mark 返回每组尾部说明

-(NSString *)tableView:(UITableView *)tableView titleForFooterInSection:(NSInteger)section{

    NSLog(@"生成尾部(组%i)详情",section);

    KCContactGroup *group=_contacts[section];

    return group.detail;

}

#pragma mark 返回每组标题索引

-(NSArray *)sectionIndexTitlesForTableView:(UITableView *)tableView{

    NSLog(@"生成组索引");

    NSMutableArray *indexs=[[NSMutableArray alloc]init];

    for(KCContactGroup *group in _contacts){

        [indexs addObject:group.name];

    }

    return indexs;

}

#pragma mark - 代理方法

#pragma mark 设置分组标题内容高度

-(CGFloat)tableView:(UITableView *)tableView heightForHeaderInSection:(NSInteger)section{

    if(section==0){

        return 50;

    }

    return 40;

}

#pragma mark 设置每行高度(每行高度可以不一样)

-(CGFloat)tableView:(UITableView *)tableView heightForRowAtIndexPath:(NSIndexPath *)indexPath{

    return 45;

}

#pragma mark 设置尾部说明内容高度

-(CGFloat)tableView:(UITableView *)tableView heightForFooterInSection:(NSInteger)section{

    return 40;

}

#pragma mark 点击行

-(void)tableView:(UITableView *)tableView didSelectRowAtIndexPath:(NSIndexPath *)indexPath{

    _selectedIndexPath=indexPath;

    KCContactGroup *group=_contacts[indexPath.section];

    KCContact *contact=group.contacts[indexPath.row];

    //创建弹出窗口

    UIAlertView *alert=[[UIAlertView alloc]initWithTitle:@"System Info" message:[contact getName] delegate:self cancelButtonTitle:@"Cancel" otherButtonTitles:@"OK", nil];

    alert.alertViewStyle=UIAlertViewStylePlainTextInput; //设置窗口内容样式

    UITextField *textField= [alert textFieldAtIndex:0]; //取得文本框

    textField.text=contact.phoneNumber; //设置文本框内容

    [alert show]; //显示窗口

}

#pragma mark 窗口的代理方法,用户保存数据

-(void)alertView:(UIAlertView *)alertView clickedButtonAtIndex:(NSInteger)buttonIndex{

    //当点击了第二个按钮(OK)

    if (buttonIndex==1) {

        UITextField *textField= [alertView textFieldAtIndex:0];

        //修改模型数据

        KCContactGroup *group=_contacts[_selectedIndexPath.section];

        KCContact *contact=group.contacts[_selectedIndexPath.row];

        contact.phoneNumber=textField.text;

        //刷新表格

        [_tableView reloadData];

    }

}

#pragma mark 重写状态样式方法

-(UIStatusBarStyle)preferredStatusBarStyle{

    return UIStatusBarStyleLightContent;

}

@end
在上面的代码中我们通过修改模型来改变UI显示,这种方式是经典的MVC应用,在后面的代码中会经常看到。当然UI的刷新使用了UITableView的reloadData方法,该方法会重新调用数据源方法,包括计算分组、计算每个分组的行数,生成单元格等刷新整个UITableView。当然这种方式在实际开发中是不可取的,我们不可能因为修改了一个人的信息就刷新整个UITableViewView,此时我们需要采用局部刷新。局部刷新使用起来很简单,只需要调用UITableView的另外一个方法:
#pragma mark 窗口的代理方法,用户保存数据

-(void)alertView:(UIAlertView *)alertView clickedButtonAtIndex:(NSInteger)buttonIndex{

    //当点击了第二个按钮(OK)

    if (buttonIndex==1) {

        UITextField *textField= [alertView textFieldAtIndex:0];

        //修改模型数据

        KCContactGroup *group=_contacts[_selectedIndexPath.section];

        KCContact *contact=group.contacts[_selectedIndexPath.row];

        contact.phoneNumber=textField.text;

        //刷新表格

        NSArray *indexPaths=@[_selectedIndexPath];//需要局部刷新的单元格的组、行

        [_tableView reloadRowsAtIndexPaths:indexPaths withRowAnimation:UITableViewRowAnimationLeft];//后面的参数代表更新时的动画

    }

}
性能优化
前面已经说过UITableView中的单元格cell是在显示到用户可视区域后创建的,那么如果用户往下滚动就会继续创建显示在屏幕上的单元格,如果用户向上滚动返回到查看过的内容时同样会重新创建之前已经创建过的单元格。如此一来即使UITableView的内容不是太多,如果用户反复的上下滚动,内存也会瞬间飙升,更何况很多时候UITableView的内容是很多的(例如微博展示列表,基本向下滚动是没有底限的)。
前面一节中我们曾经提到过如何优化UIScrollView,当时就是利用有限的UIImageView动态切换其内容来尽可能减少资源占用。同样的,在UITableView中也可以采用类似的方式,只是这时我们不是在滚动到指定位置后更改滚动的位置而是要将当前没有显示的Cell重新显示在将要显示的Cell的位置然后更新其内容。原因就是UITableView中的Cell结构布局可能是不同的,通过重新定位是不可取的,而是需要重用已经不再界面显示的已创建过的Cell。
当然,听起来这么做比较复杂,其实实现起来很简单,因为UITableView已经为我们实现了这种机制。在UITableView内部有一个缓存池,初始化时使用initWithStyle:(UITableViewCellStyle) reuseIdentifier:(NSString *)方法指定一个可重用标识,就可以将这个cell放到缓存池。然后在使用时使用指定的标识去缓存池中取得对应的cell然后修改cell内容即可。
#pragma mark返回每行的单元格

-(UITableViewCell *)tableView:(UITableView *)tableView cellForRowAtIndexPath:(NSIndexPath *)indexPath{

    //NSIndexPath是一个对象,记录了组和行信息

    NSLog(@"生成单元格(组:%i,行%i)",indexPath.section,indexPath.row);

    KCContactGroup *group=_contacts[indexPath.section];

    KCContact *contact=group.contacts[indexPath.row];

    //由于此方法调用十分频繁,cell的标示声明成静态变量有利于性能优化

    static NSString *cellIdentifier=@"UITableViewCellIdentifierKey1";

    //首先根据标识去缓存池取

    UITableViewCell *cell=[tableView dequeueReusableCellWithIdentifier:cellIdentifier];

    //如果缓存池没有到则重新创建并放到缓存池中

    if(!cell){

        cell=[[UITableViewCell alloc]initWithStyle:UITableViewCellStyleValue1 reuseIdentifier:cellIdentifier];

    }

    cell.textLabel.text=[contact getName];

    cell.detailTextLabel.text=contact.phoneNumber;

    NSLog(@"cell:%@",cell);

    return cell;

}
上面的代码中已经打印了cell的地址,如果大家运行测试上下滚动UITableView会发现滚动时创建的cell地址是初始化时已经创建的。
这里再次给大家强调两点:
- -(UITableViewCell *)tableView:(UITableView *)tableView cellForRowAtIndexPath:(NSIndexPath *)方法调用很频繁,无论是初始化、上下滚动、刷新都会调用此方法,所有在这里执行的操作一定要注意性能;
- 可重用标识可以有多个,如果在UITableView中有多类结构不同的Cell,可以通过这个标识进行缓存和重新;
UITableViewCell
1.自带的UITableViewCell
UITableViewCell是构建一个UITableView的基础,在UITableViewCell内部有一个UIView控件作为其他内容的容器,它上面有一个UIImageView和两个UILabel,通过UITableViewCellStyle属性可以对其样式进行控制。其结构如下:
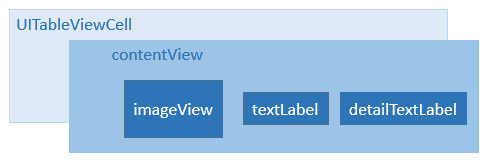
有时候我们会发现很多UITableViewCell右侧可以显示不同的图标,在iOS中称之为访问器,点击可以触发不同的事件,例如设置功能:
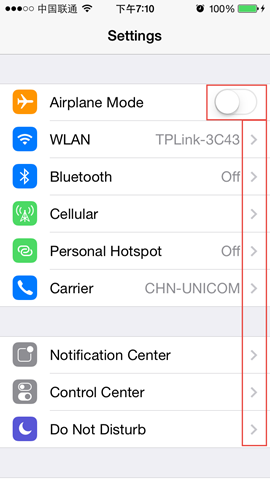
要设置这些图标只需要设置UITableViewCell的accesoryType属性,这是一个枚举类型具体含义如下:
typedef NS_ENUM(NSInteger, UITableViewCellAccessoryType) {

    UITableViewCellAccessoryNone,                   // 不显示任何图标

    UITableViewCellAccessoryDisclosureIndicator,    // 跳转指示图标

    UITableViewCellAccessoryDetailDisclosureButton, // 内容详情图标和跳转指示图标

    UITableViewCellAccessoryCheckmark,              // 勾选图标

    UITableViewCellAccessoryDetailButton NS_ENUM_AVAILABLE_IOS(7_0) // 内容详情图标

};
例如在最近通话中我们通常设置为详情图标,点击可以查看联系人详情:

很明显iOS设置中第一个accessoryType不在枚举之列,右侧的访问器类型是UISwitch控件,那么如何显示自定义的访问器呢?其实只要设置UITableViewCell的accessoryView即可,它支持任何UIView控件。假设我们在通讯录每组第一行放一个UISwitch,同时切换时可以输出对应信息:
//

//  KCMainViewController.m

//  UITableView

//

//  Created by Kenshin Cui on 14-3-1.

//  Copyright (c) 2014年 Kenshin Cui. All rights reserved.

//

#import "KCMainViewController.h"

#import "KCContact.h"

#import "KCContactGroup.h"

@interface KCMainViewController ()<UITableViewDataSource,UITableViewDelegate,UIAlertViewDelegate>{

    UITableView *_tableView;

    NSMutableArray *_contacts;//联系人模型

    NSIndexPath *_selectedIndexPath;//当前选中的组和行

}

@end

@implementation KCMainViewController

- (void)viewDidLoad {

    [super viewDidLoad];

    //初始化数据

    [self initData];

    //创建一个分组样式的UITableView

    _tableView=[[UITableView alloc]initWithFrame:self.view.bounds style:UITableViewStyleGrouped];

    //设置数据源,注意必须实现对应的UITableViewDataSource协议

    _tableView.dataSource=self;

    //设置代理

    _tableView.delegate=self;

    [self.view addSubview:_tableView];

}

#pragma mark 加载数据

-(void)initData{

    _contacts=[[NSMutableArray alloc]init];

    KCContact *contact1=[KCContact initWithFirstName:@"Cui" andLastName:@"Kenshin" andPhoneNumber:@"18500131234"];

    KCContact *contact2=[KCContact initWithFirstName:@"Cui" andLastName:@"Tom" andPhoneNumber:@"18500131237"];

    KCContactGroup *group1=[KCContactGroup initWithName:@"C" andDetail:@"With names beginning with C" andContacts:[NSMutableArray arrayWithObjects:contact1,contact2, nil]];

    [_contacts addObject:group1];

    KCContact *contact3=[KCContact initWithFirstName:@"Lee" andLastName:@"Terry" andPhoneNumber:@"18500131238"];

    KCContact *contact4=[KCContact initWithFirstName:@"Lee" andLastName:@"Jack" andPhoneNumber:@"18500131239"];

    KCContact *contact5=[KCContact initWithFirstName:@"Lee" andLastName:@"Rose" andPhoneNumber:@"18500131240"];

    KCContactGroup *group2=[KCContactGroup initWithName:@"L" andDetail:@"With names beginning with L" andContacts:[NSMutableArray arrayWithObjects:contact3,contact4,contact5, nil]];

    [_contacts addObject:group2];

    KCContact *contact6=[KCContact initWithFirstName:@"Sun" andLastName:@"Kaoru" andPhoneNumber:@"18500131235"];

    KCContact *contact7=[KCContact initWithFirstName:@"Sun" andLastName:@"Rosa" andPhoneNumber:@"18500131236"];

    KCContactGroup *group3=[KCContactGroup initWithName:@"S" andDetail:@"With names beginning with S" andContacts:[NSMutableArray arrayWithObjects:contact6,contact7, nil]];

    [_contacts addObject:group3];

    KCContact *contact8=[KCContact initWithFirstName:@"Wang" andLastName:@"Stephone" andPhoneNumber:@"18500131241"];

    KCContact *contact9=[KCContact initWithFirstName:@"Wang" andLastName:@"Lucy" andPhoneNumber:@"18500131242"];

    KCContact *contact10=[KCContact initWithFirstName:@"Wang" andLastName:@"Lily" andPhoneNumber:@"18500131243"];

    KCContact *contact11=[KCContact initWithFirstName:@"Wang" andLastName:@"Emily" andPhoneNumber:@"18500131244"];

    KCContact *contact12=[KCContact initWithFirstName:@"Wang" andLastName:@"Andy" andPhoneNumber:@"18500131245"];

    KCContactGroup *group4=[KCContactGroup initWithName:@"W" andDetail:@"With names beginning with W" andContacts:[NSMutableArray arrayWithObjects:contact8,contact9,contact10,contact11,contact12, nil]];

    [_contacts addObject:group4];

    KCContact *contact13=[KCContact initWithFirstName:@"Zhang" andLastName:@"Joy" andPhoneNumber:@"18500131246"];

    KCContact *contact14=[KCContact initWithFirstName:@"Zhang" andLastName:@"Vivan" andPhoneNumber:@"18500131247"];

    KCContact *contact15=[KCContact initWithFirstName:@"Zhang" andLastName:@"Joyse" andPhoneNumber:@"18500131248"];

    KCContactGroup *group5=[KCContactGroup initWithName:@"Z" andDetail:@"With names beginning with Z" andContacts:[NSMutableArray arrayWithObjects:contact13,contact14,contact15, nil]];

    [_contacts addObject:group5];

}

#pragma mark - 数据源方法

#pragma mark 返回分组数

-(NSInteger)numberOfSectionsInTableView:(UITableView *)tableView{

    NSLog(@"计算分组数");

    return _contacts.count;

}

#pragma mark 返回每组行数

-(NSInteger)tableView:(UITableView *)tableView numberOfRowsInSection:(NSInteger)section{

    NSLog(@"计算每组(组%i)行数",section);

    KCContactGroup *group1=_contacts[section];

    return group1.contacts.count;

}

#pragma mark返回每行的单元格

-(UITableViewCell *)tableView:(UITableView *)tableView cellForRowAtIndexPath:(NSIndexPath *)indexPath{

    //NSIndexPath是一个对象,记录了组和行信息

    NSLog(@"生成单元格(组:%i,行%i)",indexPath.section,indexPath.row);

    KCContactGroup *group=_contacts[indexPath.section];

    KCContact *contact=group.contacts[indexPath.row];

    //由于此方法调用十分频繁,cell的标示声明成静态变量有利于性能优化

    static NSString *cellIdentifier=@"UITableViewCellIdentifierKey1";

    static NSString *cellIdentifierForFirstRow=@"UITableViewCellIdentifierKeyWithSwitch";

    //首先根据标示去缓存池取

    UITableViewCell *cell;

    if (indexPath.row==0) {

        cell=[tableView dequeueReusableCellWithIdentifier:cellIdentifierForFirstRow];

    }else{

        cell=[tableView dequeueReusableCellWithIdentifier:cellIdentifier];

    }

    //如果缓存池没有取到则重新创建并放到缓存池中

    if(!cell){

        if (indexPath.row==0) {

            cell=[[UITableViewCell alloc]initWithStyle:UITableViewCellStyleValue1 reuseIdentifier:cellIdentifierForFirstRow];

            UISwitch *sw=[[UISwitch alloc]init];

            [sw addTarget:self action:@selector(switchValueChange:) forControlEvents:UIControlEventValueChanged];

            cell.accessoryView=sw;

        }else{

            cell=[[UITableViewCell alloc]initWithStyle:UITableViewCellStyleValue1 reuseIdentifier:cellIdentifier];

            cell.accessoryType=UITableViewCellAccessoryDetailButton;

        }

    }

    if(indexPath.row==0){

        ((UISwitch *)cell.accessoryView).tag=indexPath.section;

    }

    cell.textLabel.text=[contact getName];

    cell.detailTextLabel.text=contact.phoneNumber;

    NSLog(@"cell:%@",cell);

    return cell;

}

#pragma mark 返回每组头标题名称

-(NSString *)tableView:(UITableView *)tableView titleForHeaderInSection:(NSInteger)section{

    NSLog(@"生成组(组%i)名称",section);

    KCContactGroup *group=_contacts[section];

    return group.name;

}

#pragma mark 返回每组尾部说明

-(NSString *)tableView:(UITableView *)tableView titleForFooterInSection:(NSInteger)section{

    NSLog(@"生成尾部(组%i)详情",section);

    KCContactGroup *group=_contacts[section];

    return group.detail;

}

#pragma mark 返回每组标题索引

-(NSArray *)sectionIndexTitlesForTableView:(UITableView *)tableView{

    NSLog(@"生成组索引");

    NSMutableArray *indexs=[[NSMutableArray alloc]init];

    for(KCContactGroup *group in _contacts){

        [indexs addObject:group.name];

    }

    return indexs;

}

#pragma mark - 代理方法

#pragma mark 设置分组标题内容高度

-(CGFloat)tableView:(UITableView *)tableView heightForHeaderInSection:(NSInteger)section{

    if(section==0){

        return 50;

    }

    return 40;

}

#pragma mark 设置每行高度(每行高度可以不一样)

-(CGFloat)tableView:(UITableView *)tableView heightForRowAtIndexPath:(NSIndexPath *)indexPath{

    return 45;

}

#pragma mark 设置尾部说明内容高度

-(CGFloat)tableView:(UITableView *)tableView heightForFooterInSection:(NSInteger)section{

    return 40;

}

#pragma mark 点击行

-(void)tableView:(UITableView *)tableView didSelectRowAtIndexPath:(NSIndexPath *)indexPath{

    _selectedIndexPath=indexPath;

    KCContactGroup *group=_contacts[indexPath.section];

    KCContact *contact=group.contacts[indexPath.row];

    //创建弹出窗口

    UIAlertView *alert=[[UIAlertView alloc]initWithTitle:@"System Info" message:[contact getName] delegate:self cancelButtonTitle:@"Cancel" otherButtonTitles:@"OK", nil];

    alert.alertViewStyle=UIAlertViewStylePlainTextInput; //设置窗口内容样式

    UITextField *textField= [alert textFieldAtIndex:0]; //取得文本框

    textField.text=contact.phoneNumber; //设置文本框内容

    [alert show]; //显示窗口

}

#pragma mark 窗口的代理方法,用户保存数据

-(void)alertView:(UIAlertView *)alertView clickedButtonAtIndex:(NSInteger)buttonIndex{

    //当点击了第二个按钮(OK)

    if (buttonIndex==1) {

        UITextField *textField= [alertView textFieldAtIndex:0];

        //修改模型数据

        KCContactGroup *group=_contacts[_selectedIndexPath.section];

        KCContact *contact=group.contacts[_selectedIndexPath.row];

        contact.phoneNumber=textField.text;

        //刷新表格

        NSArray *indexPaths=@[_selectedIndexPath];//需要局部刷新的单元格的组、行

        [_tableView reloadRowsAtIndexPaths:indexPaths withRowAnimation:UITableViewRowAnimationLeft];//后面的参数代码更新时的动画

    }

}

#pragma mark 重写状态样式方法

-(UIStatusBarStyle)preferredStatusBarStyle{

    return UIStatusBarStyleLightContent;

}

#pragma mark 切换开关转化事件

-(void)switchValueChange:(UISwitch *)sw{

    NSLog(@"section:%i,switch:%i",sw.tag, sw.on);

}

@end
最终运行效果:

注意:
- 由于此时我们需要两种UITableViewCell样式,考虑到性能我们需要在缓存池缓存两种Cell。
- UISwitch继承于UIControl而不是UIView(当然UIControl最终也是继承于UIView),继承于UIControl的控件使用addTarget添加对应事件而不是代理,同时有“是否可用”、“是否高亮”、“是否选中”等属性;
- 上面代码中如果有些UITableViewCell的UISwitch设置为on当其他控件重用时状态也是on,解决这个问题可以在模型中设置对应的属性记录其状态,在生成cell时设置当前状态(为了尽可能简化上面的代码这里就不再修复这个问题);
2.自定义UITableViewCell
虽然系统自带的UITableViewCell已经够强大了,但是很多时候这并不能满足我们的需求。例如新浪微博的Cell就没有那么简单:
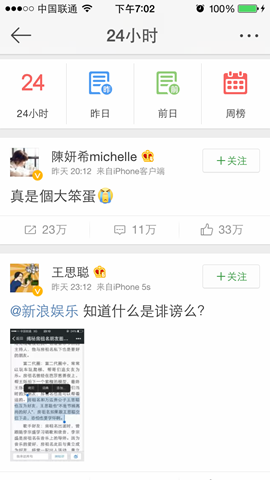
没错,这个界面布局也是UITableView实现的,其中的内容就是UITableViewCell,只是这个UITableViewCell是用户自定义实现的。当然要实现上面的UITableViewCell三言两语我们是说不完的,这里我们实现一个简化版本,界面原型如下:

我们对具体控件进行拆分:
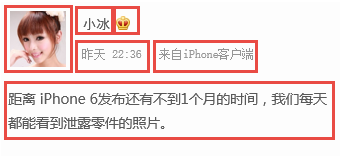
在这个界面中有2个UIImageView控件和4个UILabel,整个界面显示效果类似于新浪微博的消息内容界面,但是又在新浪微博基础上进行了精简以至于利用现有知识能够顺利开发出来。
在前面的内容中我们的数据都是手动构建的,在实际开发中自然不会这么做,这里我们不妨将微博数据存储到plist文件中然后从plist文件读取数据构建模型对象(实际开发微博当然需要进行网络数据请求,这里只是进行模拟就不再演示网络请求的内容)。假设plist文件内容如下:
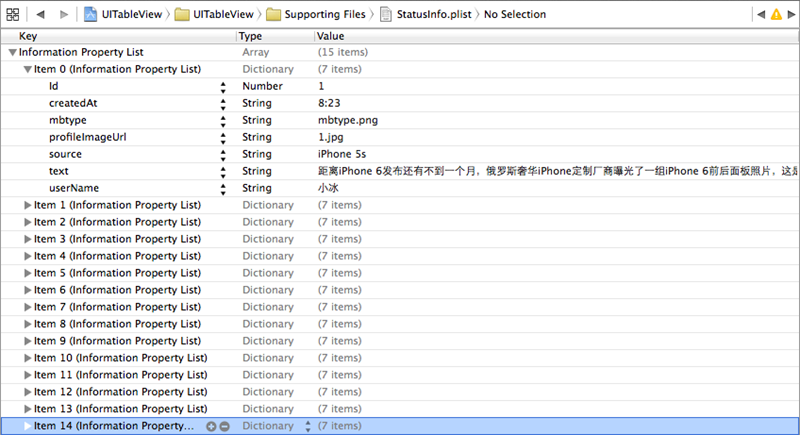
接下来就定义一个KCStatusTableViewCell实现UITableViewCell,一般实现自定义UITableViewCell需要分为两步:第一初始化控件;第二设置数据,重新设置控件frame。原因就是自定义Cell一般无法固定高度,很多时候高度需要随着内容改变。此外由于在单元格内部是无法控制单元格高度的,因此一般会定义一个高度属性用于在UITableView的代理事件中设置每个单元格高度。
1.首先看一下微博模型KCStatus,这个模型主要的方法就是根据plist字典内容生成微博对象:
KCStatus.h
//

//  KCStatus.h

//  UITableView

//

//  Created by Kenshin Cui on 14-3-1.

//  Copyright (c) 2014年 Kenshin Cui. All rights reserved.

//

#import <Foundation/Foundation.h>

@interface KCStatus : NSObject

#pragma mark - 属性

@property (nonatomic,assign) long long Id;//微博id

@property (nonatomic,copy) NSString *profileImageUrl;//头像

@property (nonatomic,copy) NSString *userName;//发送用户

@property (nonatomic,copy) NSString *mbtype;//会员类型

@property (nonatomic,copy) NSString *createdAt;//创建时间

@property (nonatomic,copy) NSString *source;//设备来源

@property (nonatomic,copy) NSString *text;//微博内容

#pragma mark - 方法

#pragma mark 根据字典初始化微博对象

-(KCStatus *)initWithDictionary:(NSDictionary *)dic;

#pragma mark 初始化微博对象(静态方法)

+(KCStatus *)statusWithDictionary:(NSDictionary *)dic;

@end
KCStatus.m
//

//  KCStatus.m

//  UITableView

//

//  Created by Kenshin Cui on 14-3-1.

//  Copyright (c) 2014年 Kenshin Cui. All rights reserved.

//

#import "KCStatus.h"

@implementation KCStatus

#pragma mark 根据字典初始化微博对象

-(KCStatus *)initWithDictionary:(NSDictionary *)dic{

    if(self=[super init]){

        self.Id=[dic[@"Id"] longLongValue];

        self.profileImageUrl=dic[@"profileImageUrl"];

        self.userName=dic[@"userName"];

        self.mbtype=dic[@"mbtype"];

        self.createdAt=dic[@"createdAt"];

        self.source=dic[@"source"];

        self.text=dic[@"text"];

    }

    return self;

}

#pragma mark 初始化微博对象(静态方法)

+(KCStatus *)statusWithDictionary:(NSDictionary *)dic{

    KCStatus *status=[[KCStatus alloc]initWithDictionary:dic];

    return status;

}

-(NSString *)source{

    return [NSString stringWithFormat:@"来自 %@",_source];

}

@end
2.然后看一下自定义的Cell
KCStatusTableViewCell.h
//

//  KCStatusTableViewCell.h

//  UITableView

//

//  Created by Kenshin Cui on 14-3-1.

//  Copyright (c) 2014年 Kenshin Cui. All rights reserved.

//

#import <UIKit/UIKit.h>

@class KCStatus;

@interface KCStatusTableViewCell : UITableViewCell

#pragma mark 微博对象

@property (nonatomic,strong) KCStatus *status;

#pragma mark 单元格高度

@property (assign,nonatomic) CGFloat height;

@end
KCStatusTableViewCell.m
//

//  KCStatusTableViewCell.m

//  UITableView

//

//  Created by Kenshin Cui on 14-3-1.

//  Copyright (c) 2014年 Kenshin Cui. All rights reserved.

//

#import "KCStatusTableViewCell.h"

#import "KCStatus.h"

#define KCColor(r,g,b) [UIColor colorWithHue:r/255.0 saturation:g/255.0 brightness:b/255.0 alpha:1] //颜色宏定义

#define kStatusTableViewCellControlSpacing 10 //控件间距

#define kStatusTableViewCellBackgroundColor KCColor(251,251,251)

#define kStatusGrayColor KCColor(50,50,50)

#define kStatusLightGrayColor KCColor(120,120,120)

#define kStatusTableViewCellAvatarWidth 40 //头像宽度

#define kStatusTableViewCellAvatarHeight kStatusTableViewCellAvatarWidth

#define kStatusTableViewCellUserNameFontSize 14

#define kStatusTableViewCellMbTypeWidth 13 //会员图标宽度

#define kStatusTableViewCellMbTypeHeight kStatusTableViewCellMbTypeWidth

#define kStatusTableViewCellCreateAtFontSize 12

#define kStatusTableViewCellSourceFontSize 12

#define kStatusTableViewCellTextFontSize 14

@interface KCStatusTableViewCell(){

    UIImageView *_avatar;//头像

    UIImageView *_mbType;//会员类型

    UILabel *_userName;

    UILabel *_createAt;

    UILabel *_source;

    UILabel *_text;

}

@end

@implementation KCStatusTableViewCell

- (instancetype)initWithStyle:(UITableViewCellStyle)style reuseIdentifier:(NSString *)reuseIdentifier {

    self = [super initWithStyle:style reuseIdentifier:reuseIdentifier];

    if (self) {

        [self initSubView];

    }

    return self;

}

#pragma mark 初始化视图

-(void)initSubView{

    //头像控件

    _avatar=[[UIImageView alloc]init];

    [self.contentView addSubview:_avatar];

    //用户名

    _userName=[[UILabel alloc]init];

    _userName.textColor=kStatusGrayColor;

    _userName.font=[UIFont systemFontOfSize:kStatusTableViewCellUserNameFontSize];

    [self.contentView addSubview:_userName];

    //会员类型

    _mbType=[[UIImageView alloc]init];

    [self.contentView addSubview:_mbType];

    //日期

    _createAt=[[UILabel alloc]init];

    _createAt.textColor=kStatusLightGrayColor;

    _createAt.font=[UIFont systemFontOfSize:kStatusTableViewCellCreateAtFontSize];

    [self.contentView addSubview:_createAt];

    //设备

    _source=[[UILabel alloc]init];

    _source.textColor=kStatusLightGrayColor;

    _source.font=[UIFont systemFontOfSize:kStatusTableViewCellSourceFontSize];

    [self.contentView addSubview:_source];

    //内容

    _text=[[UILabel alloc]init];

    _text.textColor=kStatusGrayColor;

    _text.font=[UIFont systemFontOfSize:kStatusTableViewCellTextFontSize];

    _text.numberOfLines=0;

//    _text.lineBreakMode=NSLineBreakByWordWrapping;

    [self.contentView addSubview:_text];

}

#pragma mark 设置微博

-(void)setStatus:(KCStatus *)status{

    //设置头像大小和位置

    CGFloat avatarX=10,avatarY=10;

    CGRect avatarRect=CGRectMake(avatarX, avatarY, kStatusTableViewCellAvatarWidth, kStatusTableViewCellAvatarHeight);

    _avatar.image=[UIImage imageNamed:status.profileImageUrl];

    _avatar.frame=avatarRect;

    //设置会员图标大小和位置

    CGFloat userNameX= CGRectGetMaxX(_avatar.frame)+kStatusTableViewCellControlSpacing ;

    CGFloat userNameY=avatarY;

    //根据文本内容取得文本占用空间大小

    CGSize userNameSize=[status.userName sizeWithAttributes:@{NSFontAttributeName: [UIFont systemFontOfSize:kStatusTableViewCellUserNameFontSize]}];

    CGRect userNameRect=CGRectMake(userNameX, userNameY, userNameSize.width,userNameSize.height);

    _userName.text=status.userName;

    _userName.frame=userNameRect;

    //设置会员图标大小和位置

    CGFloat mbTypeX=CGRectGetMaxX(_userName.frame)+kStatusTableViewCellControlSpacing;

    CGFloat mbTypeY=avatarY;

    CGRect mbTypeRect=CGRectMake(mbTypeX, mbTypeY, kStatusTableViewCellMbTypeWidth, kStatusTableViewCellMbTypeHeight);

    _mbType.image=[UIImage imageNamed:status.mbtype];

    _mbType.frame=mbTypeRect;

    //设置发布日期大小和位置

    CGSize createAtSize=[status.createdAt sizeWithAttributes:@{NSFontAttributeName:[UIFont systemFontOfSize:kStatusTableViewCellCreateAtFontSize]}];

    CGFloat createAtX=userNameX;

    CGFloat createAtY=CGRectGetMaxY(_avatar.frame)-createAtSize.height;

    CGRect createAtRect=CGRectMake(createAtX, createAtY, createAtSize.width, createAtSize.height);

    _createAt.text=status.createdAt;

    _createAt.frame=createAtRect;

    //设置设备信息大小和位置

    CGSize sourceSize=[status.source sizeWithAttributes:@{NSFontAttributeName:[UIFont systemFontOfSize:kStatusTableViewCellSourceFontSize]}];

    CGFloat sourceX=CGRectGetMaxX(_createAt.frame)+kStatusTableViewCellControlSpacing;

    CGFloat sourceY=createAtY;

    CGRect sourceRect=CGRectMake(sourceX, sourceY, sourceSize.width,sourceSize.height);

    _source.text=status.source;

    _source.frame=sourceRect;

    //设置微博内容大小和位置

    CGFloat textX=avatarX;

    CGFloat textY=CGRectGetMaxY(_avatar.frame)+kStatusTableViewCellControlSpacing;

    CGFloat textWidth=self.frame.size.width-kStatusTableViewCellControlSpacing*2;

    CGSize textSize=[status.text boundingRectWithSize:CGSizeMake(textWidth, MAXFLOAT) options:NSStringDrawingUsesLineFragmentOrigin attributes:@{NSFontAttributeName: [UIFont systemFontOfSize:kStatusTableViewCellTextFontSize]} context:nil].size;

    CGRect textRect=CGRectMake(textX, textY, textSize.width, textSize.height);

    _text.text=status.text;

    _text.frame=textRect;

    _height=CGRectGetMaxY(_text.frame)+kStatusTableViewCellControlSpacing;

}

#pragma mark 重写选择事件,取消选中

-(void)setSelected:(BOOL)selected animated:(BOOL)animated{

}

@end
这是我们自定义Cell这个例子的核心,自定义Cell分为两个步骤:首先要进行各种控件的初始化工作,这个过程中只要将控件放到Cell的View中同时设置控件显示内容的格式(字体大小、颜色等)即可;然后在数据对象设置方法中进行各个控件的布局(大小、位置)。在代码中有几点需要重点提示大家:
- 对于单行文本数据的显示调用- (CGSize)sizeWithAttributes:(NSDictionary *)attrs;方法来得到文本宽度和高度。
- 对于多行文本数据的显示调用- (CGRect)boundingRectWithSize:(CGSize)size options:(NSStringDrawingOptions)options attributes:(NSDictionary *)attributes context:(NSStringDrawingContext *)context ;方法来得到文本宽度和高度;同时注意在此之前需要设置文本控件的numberOfLines属性为0。
- 通常我们会在自定义Cell中设置一个高度属性,用于外界方法调用,因为Cell内部设置Cell的高度是没有用的,UITableViewCell在初始化时会重新设置高度。
3.最后我们看一下自定义Cell的使用过程:
KCStatusViewController.m
//

//  KCCutomCellViewController.m

//  UITableView

//

//  Created by Kenshin Cui on 14-3-1.

//  Copyright (c) 2014年 Kenshin Cui. All rights reserved.

//

#import "KCStatusCellViewController.h"

#import "KCStatus.h"

#import "KCStatusTableViewCell.h"

@interface KCStatusCellViewController ()<UITableViewDataSource,UITableViewDelegate,UIAlertViewDelegate>{

    UITableView *_tableView;

    NSMutableArray *_status;

    NSMutableArray *_statusCells;//存储cell,用于计算高度

}

@end

@implementation KCStatusCellViewController

- (void)viewDidLoad {

    [super viewDidLoad];

    //初始化数据

    [self initData];

    //创建一个分组样式的UITableView

    _tableView=[[UITableView alloc]initWithFrame:self.view.bounds style:UITableViewStyleGrouped];

    //设置数据源,注意必须实现对应的UITableViewDataSource协议

    _tableView.dataSource=self;

    //设置代理

    _tableView.delegate=self;

    [self.view addSubview:_tableView];

}

#pragma mark 加载数据

-(void)initData{

    NSString *path=[[NSBundle mainBundle] pathForResource:@"StatusInfo" ofType:@"plist"];

    NSArray *array=[NSArray arrayWithContentsOfFile:path];

    _status=[[NSMutableArray alloc]init];

    _statusCells=[[NSMutableArray alloc]init];

    [array enumerateObjectsUsingBlock:^(id obj, NSUInteger idx, BOOL *stop) {

        [_status addObject:[KCStatus statusWithDictionary:obj]];

        KCStatusTableViewCell *cell=[[KCStatusTableViewCell alloc]init];

        [_statusCells addObject:cell];

    }];

}

#pragma mark - 数据源方法

#pragma mark 返回分组数

-(NSInteger)numberOfSectionsInTableView:(UITableView *)tableView{

    return 1;

}

#pragma mark 返回每组行数

-(NSInteger)tableView:(UITableView *)tableView numberOfRowsInSection:(NSInteger)section{

    return _status.count;

}

#pragma mark返回每行的单元格

-(UITableViewCell *)tableView:(UITableView *)tableView cellForRowAtIndexPath:(NSIndexPath *)indexPath{

    static NSString *cellIdentifier=@"UITableViewCellIdentifierKey1";

    KCStatusTableViewCell *cell;

    cell=[tableView dequeueReusableCellWithIdentifier:cellIdentifier];

    if(!cell){

        cell=[[KCStatusTableViewCell alloc]initWithStyle:UITableViewCellStyleDefault reuseIdentifier:cellIdentifier];

    }

    //在此设置微博,以便重新布局

    KCStatus *status=_status[indexPath.row];

    cell.status=status;

    return cell;

}

#pragma mark - 代理方法

#pragma mark 重新设置单元格高度

-(CGFloat)tableView:(UITableView *)tableView heightForRowAtIndexPath:(NSIndexPath *)indexPath{

    //KCStatusTableViewCell *cell=[tableView cellForRowAtIndexPath:indexPath];

    KCStatusTableViewCell *cell= _statusCells[indexPath.row];

    cell.status=_status[indexPath.row];

    return cell.height;

}

#pragma mark 重写状态样式方法

-(UIStatusBarStyle)preferredStatusBarStyle{

    return UIStatusBarStyleLightContent;

}

@end
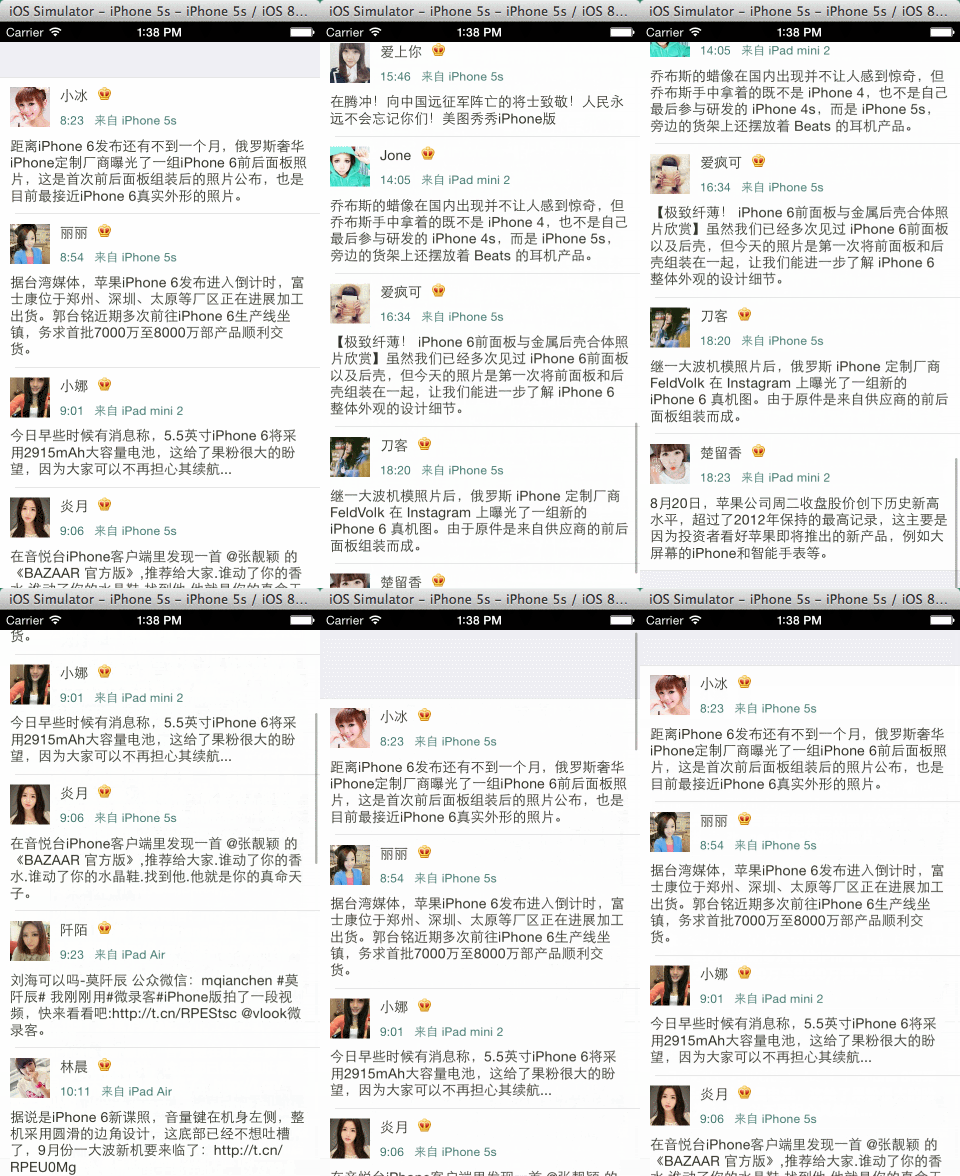
这个类中需要重点强调一下:Cell的高度需要重新设置(前面说过无论Cell内部设置多高都没有用,需要重新设置),这里采用的方法是首先创建对应的Cell,然后在- (CGFloat)tableView:(UITableView *)tableView heightForRowAtIndexPath:(NSIndexPath *)indexPath;方法中设置微博数据计算高度通知UITableView。
最后我们看一下运行的效果:
常用操作
UITableView和UITableViewCell提供了强大的操作功能,这一节中会重点讨论删除、增加、排序等操作。为了方便演示我们还是在之前的通讯录的基础上演示,在此之前先来给视图控制器添加一个工具条,在工具条左侧放一个删除按钮,右侧放一个添加按钮:
#pragma mark 添加工具栏

-(void)addToolbar{

    CGRect frame=self.view.frame;

    _toolbar=[[UIToolbar alloc]initWithFrame:CGRectMake(0, 0, frame.size.width, kContactToolbarHeight)];

    //    _toolbar.backgroundColor=[UIColor colorWithHue:246/255.0 saturation:246/255.0 brightness:246/255.0 alpha:1];

    [self.view addSubview:_toolbar];

    UIBarButtonItem *removeButton=[[UIBarButtonItem alloc]initWithBarButtonSystemItem:UIBarButtonSystemItemTrash target:self action:@selector(remove)];

    UIBarButtonItem *flexibleButton=[[UIBarButtonItem alloc]initWithBarButtonSystemItem:UIBarButtonSystemItemFlexibleSpace target:nil action:nil];

    UIBarButtonItem *addButton=[[UIBarButtonItem alloc]initWithBarButtonSystemItem:UIBarButtonSystemItemAdd target:self action:@selector(add)];

    NSArray *buttonArray=[NSArray arrayWithObjects:removeButton,flexibleButton,addButton, nil];

    _toolbar.items=buttonArray;

}
1.删除
在UITableView中无论是删除操作还是添加操作都是通过修改UITableView的编辑状态来改变的(除非你不用UITableView自带的删除功能)。在删除按钮中我们设置UITableView的编辑状态:
#pragma mark 删除

-(void)remove{

    //直接通过下面的方法设置编辑状态没有动画

    //_tableView.editing=!_tableView.isEditing;

    [_tableView setEditing:!_tableView.isEditing animated:true];

}
点击删除按钮会在Cell的左侧显示删除按钮:

此时点击左侧删除图标右侧出现删除:
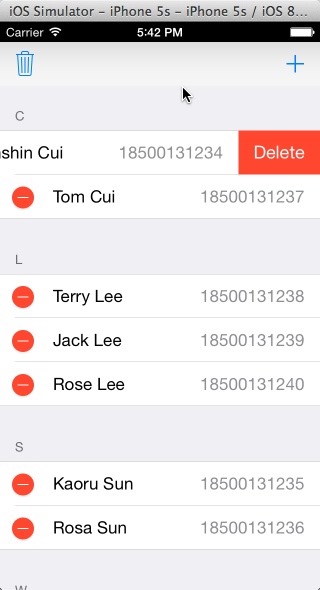
用过iOS的朋友都知道,一般这种Cell如果向左滑动右侧就会出现删除按钮直接删除就可以了。其实实现这个功能只要实现代理-(void)tableView:(UITableView *)tableView commitEditingStyle:(UITableViewCellEditingStyle)editingStyle forRowAtIndexPath:(NSIndexPath *)indexPath;方法,只要实现了此方法向左滑动就会显示删除按钮。只要点击删除按钮这个方法就会调用,但是需要注意的是无论是删除还是添加都是执行这个方法,只是第二个参数类型不同。下面看一下具体的删除实现:
#pragma mark 删除操作

//实现了此方法向左滑动就会显示删除按钮

-(void)tableView:(UITableView *)tableView commitEditingStyle:(UITableViewCellEditingStyle)editingStyle forRowAtIndexPath:(NSIndexPath *)indexPath{

    KCContactGroup *group =_contacts[indexPath.section];

    KCContact *contact=group.contacts[indexPath.row];

    if (editingStyle==UITableViewCellEditingStyleDelete) {

        [group.contacts removeObject:contact];

        //考虑到性能这里不建议使用reloadData

        //[tableView reloadData];

        //使用下面的方法既可以局部刷新又有动画效果

        [tableView deleteRowsAtIndexPaths:@[indexPath] withRowAnimation:UITableViewRowAnimationBottom];

        //如果当前组中没有数据则移除组刷新整个表格

        if (group.contacts.count==0) {

            [_contacts removeObject:group];

            [tableView reloadData];

        }

    }

}
从这段代码我们再次看到了MVC的思想,要修改UI先修改数据。而且我们看到了另一个刷新表格的方法- (void)deleteRowsAtIndexPaths:(NSArray *)indexPaths withRowAnimation:(UITableViewRowAnimation)animation;,使用这个方法可以再删除之后刷新对应的单元格。效果如下:

2.添加
添加和删除操作都是设置UITableView的编辑状态,具体是添加还是删除需要根据代理方法-(UITableViewCellEditingStyle)tableView:(UITableView *)tableView editingStyleForRowAtIndexPath:(NSIndexPath *)indexPath;的返回值来确定。因此这里我们定义一个变量来记录点击了哪个按钮,根据点击按钮的不同在这个方法中返回不同的值。
#pragma mark 取得当前操作状态,根据不同的状态左侧出现不同的操作按钮

-(UITableViewCellEditingStyle)tableView:(UITableView *)tableView editingStyleForRowAtIndexPath:(NSIndexPath *)indexPath{

    if (_isInsert) {

        return UITableViewCellEditingStyleInsert;

    }

    return UITableViewCellEditingStyleDelete;

}
#pragma mark 编辑操作(删除或添加)

//实现了此方法向左滑动就会显示删除(或添加)图标

-(void)tableView:(UITableView *)tableView commitEditingStyle:(UITableViewCellEditingStyle)editingStyle forRowAtIndexPath:(NSIndexPath *)indexPath{

    KCContactGroup *group =_contacts[indexPath.section];

    KCContact *contact=group.contacts[indexPath.row];

    if (editingStyle==UITableViewCellEditingStyleDelete) {

        [group.contacts removeObject:contact];

        //考虑到性能这里不建议使用reloadData

        //[tableView reloadData];

        //使用下面的方法既可以局部刷新又有动画效果

        [tableView deleteRowsAtIndexPaths:@[indexPath] withRowAnimation:UITableViewRowAnimationBottom];

        //如果当前组中没有数据则移除组刷新整个表格

        if (group.contacts.count==0) {

            [_contacts removeObject:group];

            [tableView reloadData];

        }

    }else if(editingStyle==UITableViewCellEditingStyleInsert){

        KCContact *newContact=[[KCContact alloc]init];

        newContact.firstName=@"first";

        newContact.lastName=@"last";

        newContact.phoneNumber=@"12345678901";

        [group.contacts insertObject:newContact atIndex:indexPath.row];

        [tableView insertRowsAtIndexPaths:@[indexPath] withRowAnimation:UITableViewRowAnimationBottom];//注意这里没有使用reladData刷新

    }

}
运行效果:
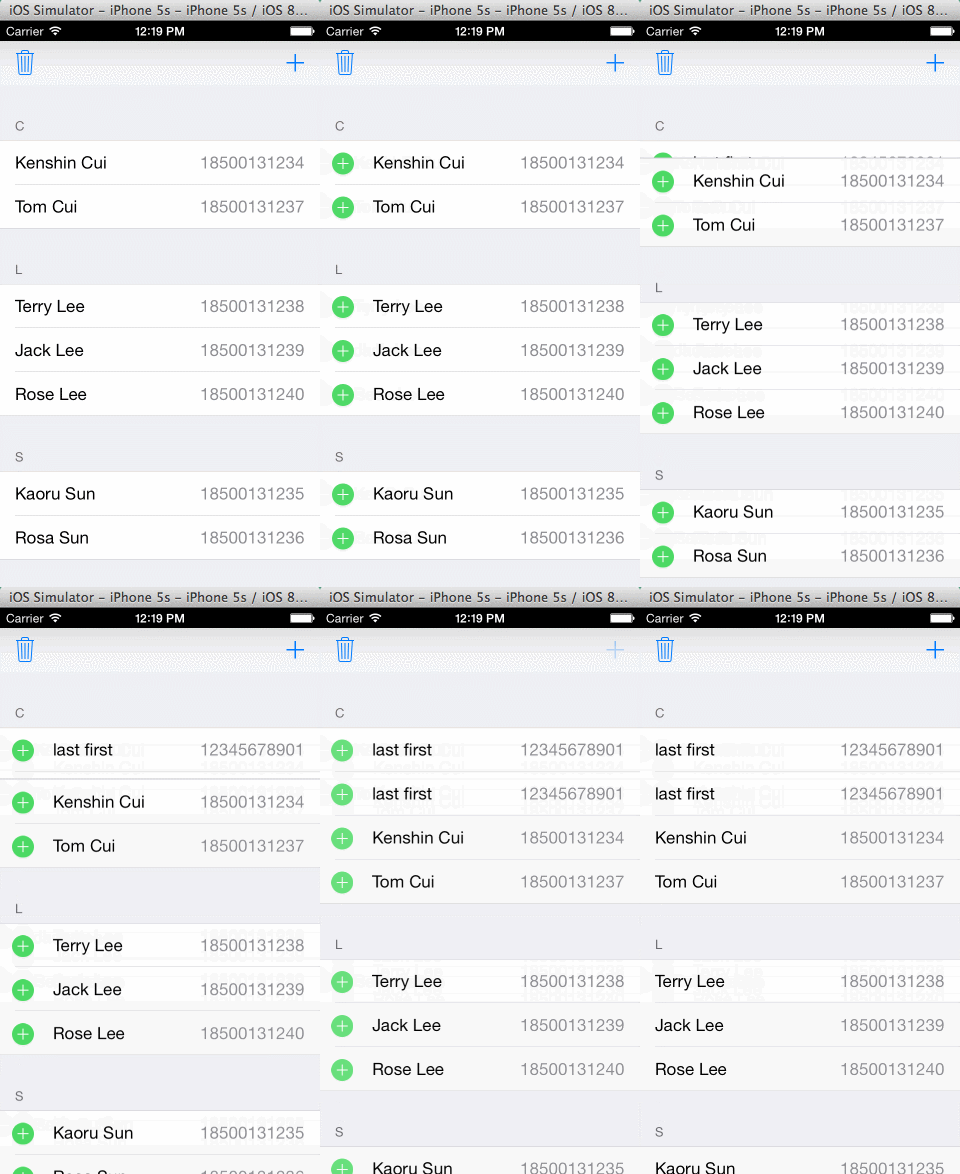
3.排序
只要实现-(void)tableView:(UITableView *)tableView moveRowAtIndexPath:(NSIndexPath *)sourceIndexPath toIndexPath:(NSIndexPath *)destinationIndexPath;代理方法当UITableView处于编辑状态时就可以排序。
#pragma mark 排序

//只要实现这个方法在编辑状态右侧就有排序图标

-(void)tableView:(UITableView *)tableView moveRowAtIndexPath:(NSIndexPath *)sourceIndexPath toIndexPath:(NSIndexPath *)destinationIndexPath{

    KCContactGroup *sourceGroup =_contacts[sourceIndexPath.section];

    KCContact *sourceContact=sourceGroup.contacts[sourceIndexPath.row];

    KCContactGroup *destinationGroup =_contacts[destinationIndexPath.section];

    [sourceGroup.contacts removeObject:sourceContact];

    if(sourceGroup.contacts.count==0){

        [_contacts removeObject:sourceGroup];

        [tableView reloadData];

    }

    [destinationGroup.contacts insertObject:sourceContact atIndex:destinationIndexPath.row];

}
运行效果:

最后给大家附上上面几种操作的完整代码:
//

//  KCContactViewController.m

//  UITableView

//

//  Created by Kenshin Cui on 14-3-1.

//  Copyright (c) 2014年 Kenshin Cui. All rights reserved.

//

#import "KCContactViewController.h"

#import "KCContact.h"

#import "KCContactGroup.h"

#define kContactToolbarHeight 44

@interface KCContactViewController ()<UITableViewDataSource,UITableViewDelegate,UIAlertViewDelegate>{

    UITableView *_tableView;

    UIToolbar *_toolbar;

    NSMutableArray *_contacts;//联系人模型

    NSIndexPath *_selectedIndexPath;//当前选中的组和行

    BOOL _isInsert;//记录是点击了插入还是删除按钮

}

@end

@implementation KCContactViewController

- (void)viewDidLoad {

    [super viewDidLoad];

    //初始化数据

    [self initData];

    //创建一个分组样式的UITableView

    _tableView=[[UITableView alloc]initWithFrame:self.view.bounds style:UITableViewStyleGrouped];

    _tableView.contentInset=UIEdgeInsetsMake(kContactToolbarHeight, 0, 0, 0);

    [self.view addSubview:_tableView];

    //添加工具栏

    [self addToolbar];

    //设置数据源,注意必须实现对应的UITableViewDataSource协议

    _tableView.dataSource=self;

    //设置代理

    _tableView.delegate=self;

}

#pragma mark 加载数据

-(void)initData{

    _contacts=[[NSMutableArray alloc]init];

    KCContact *contact1=[KCContact initWithFirstName:@"Cui" andLastName:@"Kenshin" andPhoneNumber:@"18500131234"];

    KCContact *contact2=[KCContact initWithFirstName:@"Cui" andLastName:@"Tom" andPhoneNumber:@"18500131237"];

    KCContactGroup *group1=[KCContactGroup initWithName:@"C" andDetail:@"With names beginning with C" andContacts:[NSMutableArray arrayWithObjects:contact1,contact2, nil]];

    [_contacts addObject:group1];

    KCContact *contact3=[KCContact initWithFirstName:@"Lee" andLastName:@"Terry" andPhoneNumber:@"18500131238"];

    KCContact *contact4=[KCContact initWithFirstName:@"Lee" andLastName:@"Jack" andPhoneNumber:@"18500131239"];

    KCContact *contact5=[KCContact initWithFirstName:@"Lee" andLastName:@"Rose" andPhoneNumber:@"18500131240"];

    KCContactGroup *group2=[KCContactGroup initWithName:@"L" andDetail:@"With names beginning with L" andContacts:[NSMutableArray arrayWithObjects:contact3,contact4,contact5, nil]];

    [_contacts addObject:group2];

    KCContact *contact6=[KCContact initWithFirstName:@"Sun" andLastName:@"Kaoru" andPhoneNumber:@"18500131235"];

    KCContact *contact7=[KCContact initWithFirstName:@"Sun" andLastName:@"Rosa" andPhoneNumber:@"18500131236"];

    KCContactGroup *group3=[KCContactGroup initWithName:@"S" andDetail:@"With names beginning with S" andContacts:[NSMutableArray arrayWithObjects:contact6,contact7, nil]];

    [_contacts addObject:group3];

    KCContact *contact8=[KCContact initWithFirstName:@"Wang" andLastName:@"Stephone" andPhoneNumber:@"18500131241"];

    KCContact *contact9=[KCContact initWithFirstName:@"Wang" andLastName:@"Lucy" andPhoneNumber:@"18500131242"];

    KCContact *contact10=[KCContact initWithFirstName:@"Wang" andLastName:@"Lily" andPhoneNumber:@"18500131243"];

    KCContact *contact11=[KCContact initWithFirstName:@"Wang" andLastName:@"Emily" andPhoneNumber:@"18500131244"];

    KCContact *contact12=[KCContact initWithFirstName:@"Wang" andLastName:@"Andy" andPhoneNumber:@"18500131245"];

    KCContactGroup *group4=[KCContactGroup initWithName:@"W" andDetail:@"With names beginning with W" andContacts:[NSMutableArray arrayWithObjects:contact8,contact9,contact10,contact11,contact12, nil]];

    [_contacts addObject:group4];

    KCContact *contact13=[KCContact initWithFirstName:@"Zhang" andLastName:@"Joy" andPhoneNumber:@"18500131246"];

    KCContact *contact14=[KCContact initWithFirstName:@"Zhang" andLastName:@"Vivan" andPhoneNumber:@"18500131247"];

    KCContact *contact15=[KCContact initWithFirstName:@"Zhang" andLastName:@"Joyse" andPhoneNumber:@"18500131248"];

    KCContactGroup *group5=[KCContactGroup initWithName:@"Z" andDetail:@"With names beginning with Z" andContacts:[NSMutableArray arrayWithObjects:contact13,contact14,contact15, nil]];

    [_contacts addObject:group5];

}

#pragma mark 添加工具栏

-(void)addToolbar{

    CGRect frame=self.view.frame;

    _toolbar=[[UIToolbar alloc]initWithFrame:CGRectMake(0, 0, frame.size.width, kContactToolbarHeight)];

    //    _toolbar.backgroundColor=[UIColor colorWithHue:246/255.0 saturation:246/255.0 brightness:246/255.0 alpha:1];

    [self.view addSubview:_toolbar];

    UIBarButtonItem *removeButton=[[UIBarButtonItem alloc]initWithBarButtonSystemItem:UIBarButtonSystemItemTrash target:self action:@selector(remove)];

    UIBarButtonItem *flexibleButton=[[UIBarButtonItem alloc]initWithBarButtonSystemItem:UIBarButtonSystemItemFlexibleSpace target:nil action:nil];

    UIBarButtonItem *addButton=[[UIBarButtonItem alloc]initWithBarButtonSystemItem:UIBarButtonSystemItemAdd target:self action:@selector(add)];

    NSArray *buttonArray=[NSArray arrayWithObjects:removeButton,flexibleButton,addButton, nil];

    _toolbar.items=buttonArray;

}

#pragma mark 删除

-(void)remove{

    //直接通过下面的方法设置编辑状态没有动画

    //_tableView.editing=!_tableView.isEditing;

    _isInsert=false;

    [_tableView setEditing:!_tableView.isEditing animated:true];

}

#pragma mark 添加

-(void)add{

    _isInsert=true;

    [_tableView setEditing:!_tableView.isEditing animated:true];

}

#pragma mark - 数据源方法

#pragma mark 返回分组数

-(NSInteger)numberOfSectionsInTableView:(UITableView *)tableView{

    return _contacts.count;

}

#pragma mark 返回每组行数

-(NSInteger)tableView:(UITableView *)tableView numberOfRowsInSection:(NSInteger)section{

    KCContactGroup *group1=_contacts[section];

    return group1.contacts.count;

}

#pragma mark返回每行的单元格

-(UITableViewCell *)tableView:(UITableView *)tableView cellForRowAtIndexPath:(NSIndexPath *)indexPath{

    //NSIndexPath是一个对象,记录了组和行信息

    KCContactGroup *group=_contacts[indexPath.section];

    KCContact *contact=group.contacts[indexPath.row];

    static NSString *cellIdentifier=@"UITableViewCellIdentifierKey1";

    //首先根据标识去缓存池取

    UITableViewCell *cell=[tableView dequeueReusableCellWithIdentifier:cellIdentifier];

    //如果缓存池没有取到则重新创建并放到缓存池中

    if(!cell){

        cell=[[UITableViewCell alloc]initWithStyle:UITableViewCellStyleValue1 reuseIdentifier:cellIdentifier];

    }

    cell.textLabel.text=[contact getName];

    cell.detailTextLabel.text=contact.phoneNumber;

    return cell;

}

#pragma mark - 代理方法

#pragma mark 设置分组标题

-(NSString *)tableView:(UITableView *)tableView titleForHeaderInSection:(NSInteger)section{

    KCContactGroup *group=_contacts[section];

    return group.name;

}

#pragma mark 编辑操作(删除或添加)

//实现了此方法向左滑动就会显示删除(或添加)图标

-(void)tableView:(UITableView *)tableView commitEditingStyle:(UITableViewCellEditingStyle)editingStyle forRowAtIndexPath:(NSIndexPath *)indexPath{

    KCContactGroup *group =_contacts[indexPath.section];

    KCContact *contact=group.contacts[indexPath.row];

    if (editingStyle==UITableViewCellEditingStyleDelete) {

        [group.contacts removeObject:contact];

        //考虑到性能这里不建议使用reloadData

        //[tableView reloadData];

        //使用下面的方法既可以局部刷新又有动画效果

        [tableView deleteRowsAtIndexPaths:@[indexPath] withRowAnimation:UITableViewRowAnimationBottom];

        //如果当前组中没有数据则移除组刷新整个表格

        if (group.contacts.count==0) {

            [_contacts removeObject:group];

            [tableView reloadData];

        }

    }else if(editingStyle==UITableViewCellEditingStyleInsert){

        KCContact *newContact=[[KCContact alloc]init];

        newContact.firstName=@"first";

        newContact.lastName=@"last";

        newContact.phoneNumber=@"12345678901";

        [group.contacts insertObject:newContact atIndex:indexPath.row];

        [tableView insertRowsAtIndexPaths:@[indexPath] withRowAnimation:UITableViewRowAnimationBottom];//注意这里没有使用reladData刷新

    }

}

#pragma mark 排序

//只要实现这个方法在编辑状态右侧就有排序图标

-(void)tableView:(UITableView *)tableView moveRowAtIndexPath:(NSIndexPath *)sourceIndexPath toIndexPath:(NSIndexPath *)destinationIndexPath{

    KCContactGroup *sourceGroup =_contacts[sourceIndexPath.section];

    KCContact *sourceContact=sourceGroup.contacts[sourceIndexPath.row];

    KCContactGroup *destinationGroup =_contacts[destinationIndexPath.section];

    [sourceGroup.contacts removeObject:sourceContact];

    [destinationGroup.contacts insertObject:sourceContact atIndex:destinationIndexPath.row];

    if(sourceGroup.contacts.count==0){

        [_contacts removeObject:sourceGroup];

        [tableView reloadData];

    }

}

#pragma mark 取得当前操作状态,根据不同的状态左侧出现不同的操作按钮

-(UITableViewCellEditingStyle)tableView:(UITableView *)tableView editingStyleForRowAtIndexPath:(NSIndexPath *)indexPath{

    if (_isInsert) {

        return UITableViewCellEditingStyleInsert;

    }

    return UITableViewCellEditingStyleDelete;

}

#pragma mark 重写状态样式方法

-(UIStatusBarStyle)preferredStatusBarStyle{

    return UIStatusBarStyleLightContent;

}

@end
通过前面的演示这里简单总结一些UITableView的刷新方法:
- (void)reloadData;刷新整个表格。
- (void)reloadRowsAtIndexPaths:(NSArray *)indexPaths withRowAnimation:(UITableViewRowAnimation)animation NS_AVAILABLE_IOS(3_0);刷新指定的分组和行。
- (void)reloadSections:(NSIndexSet *)sections withRowAnimation:(UITableViewRowAnimation)animation NS_AVAILABLE_IOS(3_0);刷新指定的分组。
- (void)deleteRowsAtIndexPaths:(NSArray *)indexPaths withRowAnimation:(UITableViewRowAnimation)animation;删除时刷新指定的行数据。
- (void)insertRowsAtIndexPaths:(NSArray *)indexPaths withRowAnimation:(UITableViewRowAnimation)animation;添加时刷新指定的行数据。
UITableViewController
很多时候一个UIViewController中只有一个UITableView,因此苹果官方为了方便大家开发直接提供了一个UITableViewController,这个控制器 UITableViewController实现了UITableView数据源和代理协议,内部定义了一个tableView属性供外部访问,同时自动铺满整个屏幕、自动伸缩以方便我们的开发。当然UITableViewController也并不是简单的帮我们定义完UITableView并且设置了数据源、代理而已,它还有其他强大的功能,例如刷新控件、滚动过程中固定分组标题等。
有时候一个表格中的数据特别多,检索起来就显得麻烦,这个时候可以实现一个搜索功能帮助用户查找数据,其实搜索的原理很简单:修改模型、刷新表格。下面使用UITableViewController简单演示一下这个功能:
//

//  KCContactTableViewController.m

//  UITableView

//

//  Created by Kenshin Cui on 14-3-1.

//  Copyright (c) 2014年 Kenshin Cui. All rights reserved.

//

#import "KCContactTableViewController.h"

#import "KCContact.h"

#import "KCContactGroup.h"

#define kSearchbarHeight 44

@interface KCContactTableViewController ()<UISearchBarDelegate>{

    UITableView *_tableView;

    UISearchBar *_searchBar;

    //UISearchDisplayController *_searchDisplayController;

    NSMutableArray *_contacts;//联系人模型

    NSMutableArray *_searchContacts;//符合条件的搜索联系人

    BOOL _isSearching;

}

@end

@implementation KCContactTableViewController

- (void)viewDidLoad {

    [super viewDidLoad];

    //初始化数据

    [self initData];

    //添加搜索框

    [self addSearchBar];

}

#pragma mark - 数据源方法

- (NSInteger)numberOfSectionsInTableView:(UITableView *)tableView {

    if (_isSearching) {

        return 1;

    }

    return _contacts.count;;

}

- (NSInteger)tableView:(UITableView *)tableView numberOfRowsInSection:(NSInteger)section {

    if (_isSearching) {

        return _searchContacts.count;

    }

    KCContactGroup *group1=_contacts[section];

    return group1.contacts.count;

}

- (UITableViewCell *)tableView:(UITableView *)tableView cellForRowAtIndexPath:(NSIndexPath *)indexPath {

    KCContact *contact=nil;

    if (_isSearching) {

        contact=_searchContacts[indexPath.row];

    }else{

        KCContactGroup *group=_contacts[indexPath.section];

        contact=group.contacts[indexPath.row];

    }

    static NSString *cellIdentifier=@"UITableViewCellIdentifierKey1";

    //首先根据标识去缓存池取

    UITableViewCell *cell=[tableView dequeueReusableCellWithIdentifier:cellIdentifier];

    //如果缓存池没有取到则重新创建并放到缓存池中

    if(!cell){

        cell=[[UITableViewCell alloc]initWithStyle:UITableViewCellStyleValue1 reuseIdentifier:cellIdentifier];

    }

    cell.textLabel.text=[contact getName];

    cell.detailTextLabel.text=contact.phoneNumber;

    return cell;

}

#pragma mark - 代理方法

#pragma mark 设置分组标题

-(NSString *)tableView:(UITableView *)tableView titleForHeaderInSection:(NSInteger)section{

    KCContactGroup *group=_contacts[section];

    return group.name;

}

#pragma mark - 搜索框代理

#pragma mark  取消搜索

-(void)searchBarCancelButtonClicked:(UISearchBar *)searchBar{

    _isSearching=NO;

    _searchBar.text=@"";

    [self.tableView reloadData];

}

#pragma mark 输入搜索关键字

-(void)searchBar:(UISearchBar *)searchBar textDidChange:(NSString *)searchText{

    if([_searchBar.text isEqual:@""]){

        _isSearching=NO;

        [self.tableView reloadData];

        return;

    }

    [self searchDataWithKeyWord:_searchBar.text];

}

#pragma mark 点击虚拟键盘上的搜索时

-(void)searchBarSearchButtonClicked:(UISearchBar *)searchBar{

    [self searchDataWithKeyWord:_searchBar.text];

    [_searchBar resignFirstResponder];//放弃第一响应者对象,关闭虚拟键盘

}

#pragma mark 重写状态样式方法

-(UIStatusBarStyle)preferredStatusBarStyle{

    return UIStatusBarStyleLightContent;

}

#pragma mark 加载数据

-(void)initData{

    _contacts=[[NSMutableArray alloc]init];

    KCContact *contact1=[KCContact initWithFirstName:@"Cui" andLastName:@"Kenshin" andPhoneNumber:@"18500131234"];

    KCContact *contact2=[KCContact initWithFirstName:@"Cui" andLastName:@"Tom" andPhoneNumber:@"18500131237"];

    KCContactGroup *group1=[KCContactGroup initWithName:@"C" andDetail:@"With names beginning with C" andContacts:[NSMutableArray arrayWithObjects:contact1,contact2, nil]];

    [_contacts addObject:group1];

    KCContact *contact3=[KCContact initWithFirstName:@"Lee" andLastName:@"Terry" andPhoneNumber:@"18500131238"];

    KCContact *contact4=[KCContact initWithFirstName:@"Lee" andLastName:@"Jack" andPhoneNumber:@"18500131239"];

    KCContact *contact5=[KCContact initWithFirstName:@"Lee" andLastName:@"Rose" andPhoneNumber:@"18500131240"];

    KCContactGroup *group2=[KCContactGroup initWithName:@"L" andDetail:@"With names beginning with L" andContacts:[NSMutableArray arrayWithObjects:contact3,contact4,contact5, nil]];

    [_contacts addObject:group2];

    KCContact *contact6=[KCContact initWithFirstName:@"Sun" andLastName:@"Kaoru" andPhoneNumber:@"18500131235"];

    KCContact *contact7=[KCContact initWithFirstName:@"Sun" andLastName:@"Rosa" andPhoneNumber:@"18500131236"];

    KCContactGroup *group3=[KCContactGroup initWithName:@"S" andDetail:@"With names beginning with S" andContacts:[NSMutableArray arrayWithObjects:contact6,contact7, nil]];

    [_contacts addObject:group3];

    KCContact *contact8=[KCContact initWithFirstName:@"Wang" andLastName:@"Stephone" andPhoneNumber:@"18500131241"];

    KCContact *contact9=[KCContact initWithFirstName:@"Wang" andLastName:@"Lucy" andPhoneNumber:@"18500131242"];

    KCContact *contact10=[KCContact initWithFirstName:@"Wang" andLastName:@"Lily" andPhoneNumber:@"18500131243"];

    KCContact *contact11=[KCContact initWithFirstName:@"Wang" andLastName:@"Emily" andPhoneNumber:@"18500131244"];

    KCContact *contact12=[KCContact initWithFirstName:@"Wang" andLastName:@"Andy" andPhoneNumber:@"18500131245"];

    KCContactGroup *group4=[KCContactGroup initWithName:@"W" andDetail:@"With names beginning with W" andContacts:[NSMutableArray arrayWithObjects:contact8,contact9,contact10,contact11,contact12, nil]];

    [_contacts addObject:group4];

    KCContact *contact13=[KCContact initWithFirstName:@"Zhang" andLastName:@"Joy" andPhoneNumber:@"18500131246"];

    KCContact *contact14=[KCContact initWithFirstName:@"Zhang" andLastName:@"Vivan" andPhoneNumber:@"18500131247"];

    KCContact *contact15=[KCContact initWithFirstName:@"Zhang" andLastName:@"Joyse" andPhoneNumber:@"18500131248"];

    KCContactGroup *group5=[KCContactGroup initWithName:@"Z" andDetail:@"With names beginning with Z" andContacts:[NSMutableArray arrayWithObjects:contact13,contact14,contact15, nil]];

    [_contacts addObject:group5];

}

#pragma mark 搜索形成新数据

-(void)searchDataWithKeyWord:(NSString *)keyWord{

    _isSearching=YES;

    _searchContacts=[NSMutableArray array];

    [_contacts enumerateObjectsUsingBlock:^(id obj, NSUInteger idx, BOOL *stop) {

        KCContactGroup *group=obj;

        [group.contacts enumerateObjectsUsingBlock:^(id obj, NSUInteger idx, BOOL *stop) {

            KCContact *contact=obj;

            if ([contact.firstName.uppercaseString containsString:keyWord.uppercaseString]||[contact.lastName.uppercaseString containsString:keyWord.uppercaseString]||[contact.phoneNumber containsString:keyWord]) {

                [_searchContacts addObject:contact];

            }

        }];

    }];

    //刷新表格

    [self.tableView reloadData];

}

#pragma mark 添加搜索栏

-(void)addSearchBar{

    CGRect searchBarRect=CGRectMake(0, 0, self.view.frame.size.width, kSearchbarHeight);

    _searchBar=[[UISearchBar alloc]initWithFrame:searchBarRect];

    _searchBar.placeholder=@"Please input key word...";

    //_searchBar.keyboardType=UIKeyboardTypeAlphabet;//键盘类型

    //_searchBar.autocorrectionType=UITextAutocorrectionTypeNo;//自动纠错类型

    //_searchBar.autocapitalizationType=UITextAutocapitalizationTypeNone;//哪一次shitf被自动按下

    _searchBar.showsCancelButton=YES;//显示取消按钮

    //添加搜索框到页眉位置

    _searchBar.delegate=self;

    self.tableView.tableHeaderView=_searchBar;

}

@end
运行效果:
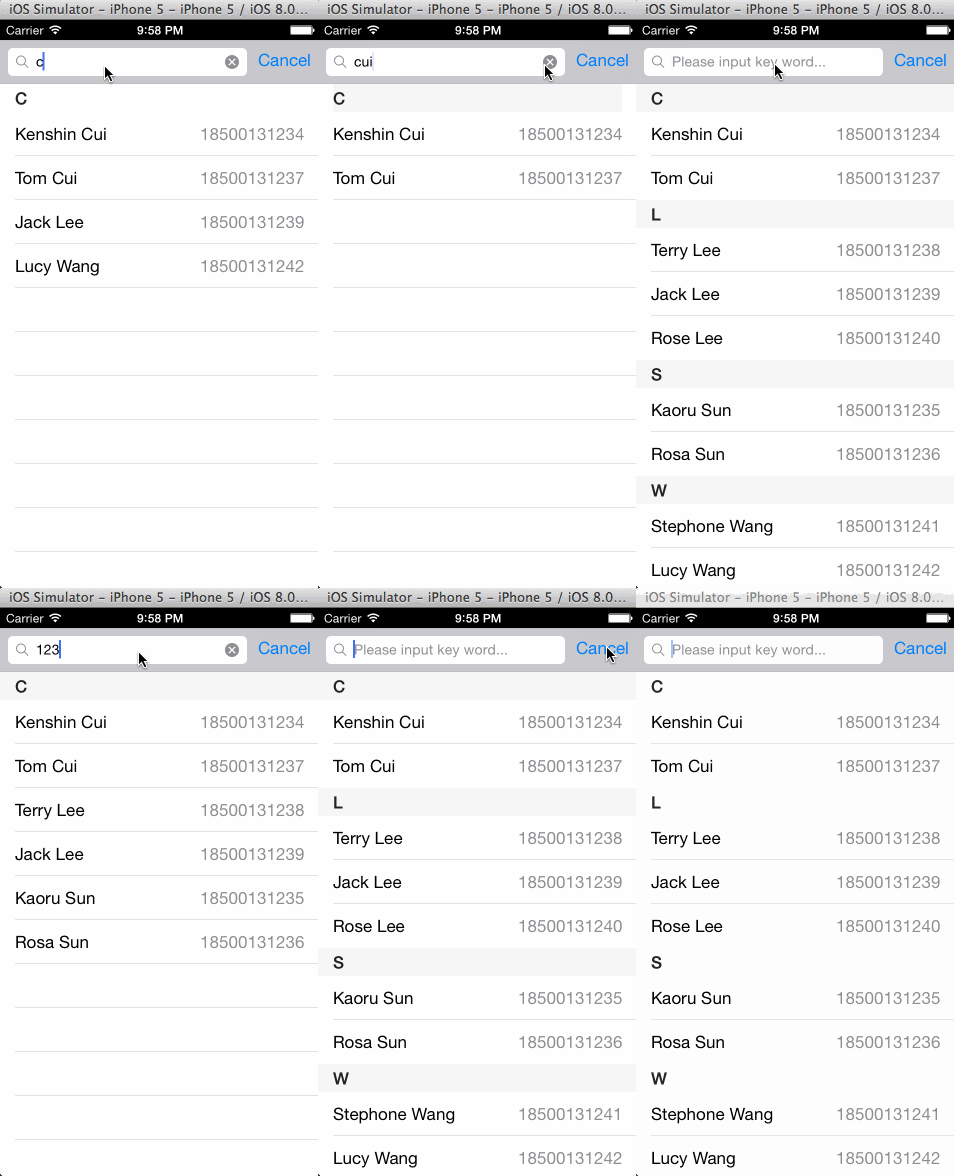
在上面的搜索中除了使用一个_contacts变量去保存联系人数据还专门定义了一个_searchContact变量用于保存搜索的结果。在输入搜索关键字时我们刷新了表格,此时会调用表格的数据源方法,在这个方法中我们根据定义的搜索状态去决定显示原始数据还是搜索结果。
我们发现每次搜索完后都需要手动刷新表格来显示搜索结果,而且当没有搜索关键字的时候还需要将当前的tableView重新设置为初始状态。也就是这个过程中我们要用一个tableView显示两种状态的不同数据,自然会提高程序逻辑复杂度。为了简化这个过程,我们可以使用UISearchDisplayController,UISearchDisplayController内部也有一个UITableView类型的对象searchResultsTableView,如果我们设置它的数据源代理为当前控制器,那么它完全可以像UITableView一样加载数据。同时它本身也有搜索监听的方法,我们不必在监听UISearchBar输入内容,直接使用它的方法即可自动刷新其内部表格。为了和前面的方法对比在下面的代码中没有直接删除原来的方式而是注释了对应代码大家可以对照学习:
//

//  KCContactTableViewController.m

//  UITableView

//

//  Created by Kenshin Cui on 14-3-1.

//  Copyright (c) 2014年 Kenshin Cui. All rights reserved.

//

#import "KCContactTableViewControllerWithUISearchDisplayController.h"

#import "KCContact.h"

#import "KCContactGroup.h"

#define kSearchbarHeight 44

@interface KCContactTableViewControllerWithUISearchDisplayController ()<UISearchBarDelegate,UISearchDisplayDelegate>{

    UITableView *_tableView;

    UISearchBar *_searchBar;

    UISearchDisplayController *_searchDisplayController;

    NSMutableArray *_contacts;//联系人模型

    NSMutableArray *_searchContacts;//符合条件的搜索联系人

    //BOOL _isSearching;

}

@end

@implementation KCContactTableViewControllerWithUISearchDisplayController

- (void)viewDidLoad {

    [super viewDidLoad];

    //初始化数据

    [self initData];

    //添加搜索框

    [self addSearchBar];

}

#pragma mark - 数据源方法

- (NSInteger)numberOfSectionsInTableView:(UITableView *)tableView {

//    if (_isSearching) {

//        return 1;

//    }

    //如果当前是UISearchDisplayController内部的tableView则不分组

    if (tableView==self.searchDisplayController.searchResultsTableView) {

        return 1;

    }

    return _contacts.count;;

}

- (NSInteger)tableView:(UITableView *)tableView numberOfRowsInSection:(NSInteger)section {

//    if (_isSearching) {

//        return _searchContacts.count;

//    }

    //如果当前是UISearchDisplayController内部的tableView则使用搜索数据

    if (tableView==self.searchDisplayController.searchResultsTableView) {

        return _searchContacts.count;

    }

    KCContactGroup *group1=_contacts[section];

    return group1.contacts.count;

}

- (UITableViewCell *)tableView:(UITableView *)tableView cellForRowAtIndexPath:(NSIndexPath *)indexPath {

    KCContact *contact=nil;

//    if (_isSearching) {

//        contact=_searchContacts[indexPath.row];

//    }else{

//        KCContactGroup *group=_contacts[indexPath.section];

//        contact=group.contacts[indexPath.row];

//    }

    //如果当前是UISearchDisplayController内部的tableView则使用搜索数据

    if (tableView==self.searchDisplayController.searchResultsTableView) {

        contact=_searchContacts[indexPath.row];

    }else{

        KCContactGroup *group=_contacts[indexPath.section];

        contact=group.contacts[indexPath.row];

    }

    static NSString *cellIdentifier=@"UITableViewCellIdentifierKey1";

    //首先根据标识去缓存池取

    UITableViewCell *cell=[tableView dequeueReusableCellWithIdentifier:cellIdentifier];

    //如果缓存池没有取到则重新创建并放到缓存池中

    if(!cell){

        cell=[[UITableViewCell alloc]initWithStyle:UITableViewCellStyleValue1 reuseIdentifier:cellIdentifier];

    }

    cell.textLabel.text=[contact getName];

    cell.detailTextLabel.text=contact.phoneNumber;

    return cell;

}

#pragma mark - 代理方法

#pragma mark 设置分组标题

-(NSString *)tableView:(UITableView *)tableView titleForHeaderInSection:(NSInteger)section{

    if (tableView==self.searchDisplayController.searchResultsTableView) {

        return @"搜索结果";

    }

    KCContactGroup *group=_contacts[section];

    return group.name;

}

#pragma mark 选中之前

-(NSIndexPath *)tableView:(UITableView *)tableView willSelectRowAtIndexPath:(NSIndexPath *)indexPath{

    [_searchBar resignFirstResponder];//退出键盘

    return indexPath;

}

#pragma mark - 搜索框代理

//#pragma mark  取消搜索

//-(void)searchBarCancelButtonClicked:(UISearchBar *)searchBar{

//    //_isSearching=NO;

//    _searchBar.text=@"";

//    //[self.tableView reloadData];

//    [_searchBar resignFirstResponder];

//}

//

//#pragma mark 输入搜索关键字

//-(void)searchBar:(UISearchBar *)searchBar textDidChange:(NSString *)searchText{

//    if([_searchBar.text isEqual:@""]){

//        //_isSearching=NO;

//        //[self.tableView reloadData];

//        return;

//    }

//    [self searchDataWithKeyWord:_searchBar.text];

//}

//#pragma mark 点击虚拟键盘上的搜索时

//-(void)searchBarSearchButtonClicked:(UISearchBar *)searchBar{

//

//    [self searchDataWithKeyWord:_searchBar.text];

//

//    [_searchBar resignFirstResponder];//放弃第一响应者对象,关闭虚拟键盘

//}

#pragma mark - UISearchDisplayController代理方法

-(BOOL)searchDisplayController:(UISearchDisplayController *)controller shouldReloadTableForSearchString:(NSString *)searchString{

    [self searchDataWithKeyWord:searchString];

    return YES;

}

#pragma mark 重写状态样式方法

-(UIStatusBarStyle)preferredStatusBarStyle{

    return UIStatusBarStyleLightContent;

}

#pragma mark 加载数据

-(void)initData{

    _contacts=[[NSMutableArray alloc]init];

    KCContact *contact1=[KCContact initWithFirstName:@"Cui" andLastName:@"Kenshin" andPhoneNumber:@"18500131234"];

    KCContact *contact2=[KCContact initWithFirstName:@"Cui" andLastName:@"Tom" andPhoneNumber:@"18500131237"];

    KCContactGroup *group1=[KCContactGroup initWithName:@"C" andDetail:@"With names beginning with C" andContacts:[NSMutableArray arrayWithObjects:contact1,contact2, nil]];

    [_contacts addObject:group1];

    KCContact *contact3=[KCContact initWithFirstName:@"Lee" andLastName:@"Terry" andPhoneNumber:@"18500131238"];

    KCContact *contact4=[KCContact initWithFirstName:@"Lee" andLastName:@"Jack" andPhoneNumber:@"18500131239"];

    KCContact *contact5=[KCContact initWithFirstName:@"Lee" andLastName:@"Rose" andPhoneNumber:@"18500131240"];

    KCContactGroup *group2=[KCContactGroup initWithName:@"L" andDetail:@"With names beginning with L" andContacts:[NSMutableArray arrayWithObjects:contact3,contact4,contact5, nil]];

    [_contacts addObject:group2];

    KCContact *contact6=[KCContact initWithFirstName:@"Sun" andLastName:@"Kaoru" andPhoneNumber:@"18500131235"];

    KCContact *contact7=[KCContact initWithFirstName:@"Sun" andLastName:@"Rosa" andPhoneNumber:@"18500131236"];

    KCContactGroup *group3=[KCContactGroup initWithName:@"S" andDetail:@"With names beginning with S" andContacts:[NSMutableArray arrayWithObjects:contact6,contact7, nil]];

    [_contacts addObject:group3];

    KCContact *contact8=[KCContact initWithFirstName:@"Wang" andLastName:@"Stephone" andPhoneNumber:@"18500131241"];

    KCContact *contact9=[KCContact initWithFirstName:@"Wang" andLastName:@"Lucy" andPhoneNumber:@"18500131242"];

    KCContact *contact10=[KCContact initWithFirstName:@"Wang" andLastName:@"Lily" andPhoneNumber:@"18500131243"];

    KCContact *contact11=[KCContact initWithFirstName:@"Wang" andLastName:@"Emily" andPhoneNumber:@"18500131244"];

    KCContact *contact12=[KCContact initWithFirstName:@"Wang" andLastName:@"Andy" andPhoneNumber:@"18500131245"];

    KCContactGroup *group4=[KCContactGroup initWithName:@"W" andDetail:@"With names beginning with W" andContacts:[NSMutableArray arrayWithObjects:contact8,contact9,contact10,contact11,contact12, nil]];

    [_contacts addObject:group4];

    KCContact *contact13=[KCContact initWithFirstName:@"Zhang" andLastName:@"Joy" andPhoneNumber:@"18500131246"];

    KCContact *contact14=[KCContact initWithFirstName:@"Zhang" andLastName:@"Vivan" andPhoneNumber:@"18500131247"];

    KCContact *contact15=[KCContact initWithFirstName:@"Zhang" andLastName:@"Joyse" andPhoneNumber:@"18500131248"];

    KCContactGroup *group5=[KCContactGroup initWithName:@"Z" andDetail:@"With names beginning with Z" andContacts:[NSMutableArray arrayWithObjects:contact13,contact14,contact15, nil]];

    [_contacts addObject:group5];

}

#pragma mark 搜索形成新数据

-(void)searchDataWithKeyWord:(NSString *)keyWord{

    //_isSearching=YES;

    _searchContacts=[NSMutableArray array];

    [_contacts enumerateObjectsUsingBlock:^(id obj, NSUInteger idx, BOOL *stop) {

        KCContactGroup *group=obj;

        [group.contacts enumerateObjectsUsingBlock:^(id obj, NSUInteger idx, BOOL *stop) {

            KCContact *contact=obj;

            if ([contact.firstName.uppercaseString containsString:keyWord.uppercaseString]||[contact.lastName.uppercaseString containsString:keyWord.uppercaseString]||[contact.phoneNumber containsString:keyWord]) {

                [_searchContacts addObject:contact];

            }

        }];

    }];

    //刷新表格

    //[self.tableView reloadData];

}

#pragma mark 添加搜索栏

-(void)addSearchBar{

    _searchBar=[[UISearchBar alloc]init];

    [_searchBar sizeToFit];//大小自适应容器

    _searchBar.placeholder=@"Please input key word...";

    _searchBar.autocapitalizationType=UITextAutocapitalizationTypeNone;

    _searchBar.showsCancelButton=YES;//显示取消按钮

    //添加搜索框到页眉位置

    _searchBar.delegate=self;

    self.tableView.tableHeaderView=_searchBar;

    _searchDisplayController=[[UISearchDisplayController alloc]initWithSearchBar:_searchBar contentsController:self];

    _searchDisplayController.delegate=self;

    _searchDisplayController.searchResultsDataSource=self;

    _searchDisplayController.searchResultsDelegate=self;

    [_searchDisplayController setActive:NO animated:YES];

}

@end
运行效果:
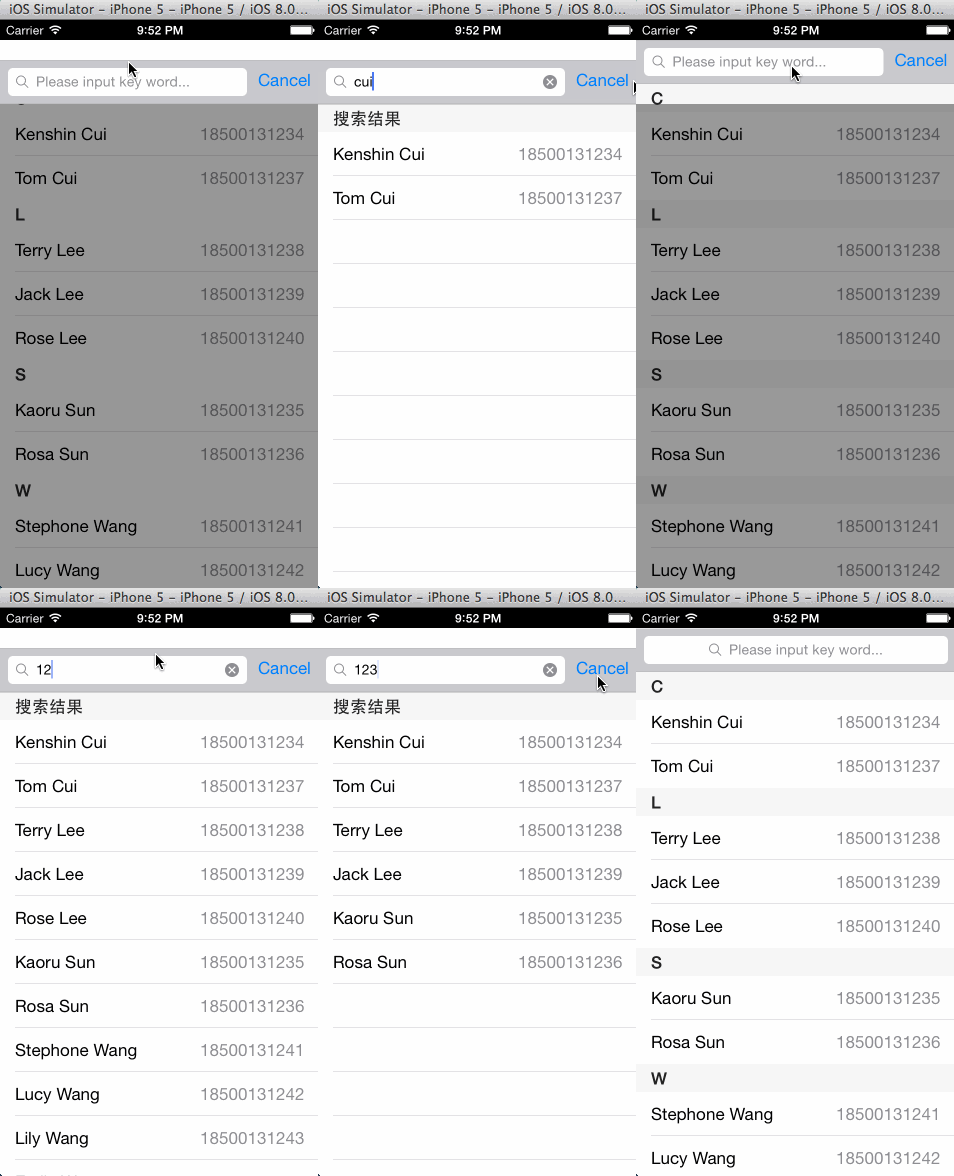
注意如果使用Storyboard或xib方式创建上述代码则无需定义UISearchDisplayController成员变量,因为每个UIViewController中已经有一个searchDisplayController对象。
MVC模式
通过UITableView的学习相信大家对于iOS的MVC已经有一个大致的了解,这里简单的分析一下iOS中MVC模式的设计方式。在iOS中多数数据源视图控件(View)都有一个dataSource属性用于和控制器(Controller)交互,而数据来源我们一般会以数据模型(Model)的形式进行定义,View不直接和模型交互,而是通过Controller间接读取数据。
就拿前面的联系人应用举例,UITableView作为视图(View)并不能直接访问模型Contact,它要显示联系人信息只能通过控制器(Controller)来提供数据源方法。同样的控制器本身就拥有视图控件,可以操作视图,也就是说视图和控制器之间可以互相访问。而模型既不能访问视图也不能访问控制器。具体依赖关系如下图:


UIWebView是iOS sdk中一个最常用的控件。是内置的浏览器控件,我们可以用它来浏览网页、打开文档等等。这篇文章我将使用这个控件,做一个简易的浏览器。如下图:

我们创建一个Window-based Application程序命名为:UIWebViewDemo
UIWebView的loadRequest可以用来加载一个url地址,它需要一个NSURLRequest参数。我们定义一个方法用来加载url。在UIWebViewDemoViewController中定义下面方法:

- (void)loadWebPageWithString:(NSString*)urlString
{
    NSURL *url =[NSURL URLWithString:urlString];
    NSLog(urlString);
    NSURLRequest *request =[NSURLRequest requestWithURL:url];
    [webView loadRequest:request];
}

在界面上放置3个控件,一个textfield、一个button、一个uiwebview,布局如下:

在代码中定义相关的控件:webView用于展示网页、textField用于地址栏、activityIndicatorView用于加载的动画、buttonPress用于按钮的点击事件。
@interface UIWebViewDemoViewController :UIViewController<UIWebViewDelegate> { IBOutlet UIWebView *webView; IBOutlet UITextField *textField; UIActivityIndicatorView *activityIndicatorView; }- (IBAction)buttonPress:(id) sender;- (void)loadWebPageWithString:(NSString*)urlString;@end |
使用IB关联他们。
设置UIWebView,初始化UIActivityIndicatorView:

- (void)viewDidLoad
{
    [super viewDidLoad];
    webView.scalesPageToFit =YES;
    webView.delegate =self;
    activityIndicatorView = [[UIActivityIndicatorView alloc]
                             initWithFrame : CGRectMake(0.0f, 0.0f, 32.0f, 32.0f)] ;
    [activityIndicatorView setCenter: self.view.center] ;
    [activityIndicatorView setActivityIndicatorViewStyle: UIActivityIndicatorViewStyleWhite] ;
    [self.view addSubview : activityIndicatorView] ;
    [self buttonPress:nil];
    // Do any additional setup after loading the view from its nib.
}

UIWebView主要有下面几个委托方法:
1、- (void)webViewDidStartLoad:(UIWebView *)webView;开始加载的时候执行该方法。
2、- (void)webViewDidFinishLoad:(UIWebView *)webView;加载完成的时候执行该方法。
3、- (void)webView:(UIWebView *)webView didFailLoadWithError:(NSError *)error;加载出错的时候执行该方法。
我们可以将activityIndicatorView放置到前面两个委托方法中。

- (void)webViewDidStartLoad:(UIWebView *)webView
{
    [activityIndicatorView startAnimating] ;
}
- (void)webViewDidFinishLoad:(UIWebView *)webView
{
    [activityIndicatorView stopAnimating];
}

buttonPress方法很简单,调用我们开始定义好的loadWebPageWithString方法就行了:
- (IBAction)buttonPress:(id) sender{ [textField resignFirstResponder]; [self loadWebPageWithString:textField.text]; } |
当请求页面出现错误的时候,我们给予提示:
- (void)webView:(UIWebView *)webView didFailLoadWithError:(NSError *)error{ UIAlertView *alterview = [[UIAlertView alloc] initWithTitle:@"" message:[error localizedDescription] delegate:nil cancelButtonTitle:nil otherButtonTitles:@"OK", nil]; [alterview show]; [alterview release];} |
总结:本文通过实现一个简单的浏览器,说明了uiwebview的方法和属性,相信通过这个例子,应该明白uiwebview的使用了。

1.基本用法

1 UIAlertView *view = [[UIAlertView alloc]initWithTitle:@"Test"    //标题

2                                               message:@"this is a alert view "   //显示内容

3                                              delegate:nil          //委托,可以点击事件进行处理

4                                     cancelButtonTitle:@"取消"

5                                     otherButtonTitles:@"确定"

6                                                     //,@"其他",    //添加其他按钮

7                                  nil];

8 [view show];

效果图:

2.多个按钮
取消上面代码@“其他”的注释后,运行效果如下

可以以此类推,添加多个
3.一些系统样式参数
UIAlertViewStyle这个枚举提供了几个样式
1 typedef NS_ENUM(NSInteger, UIAlertViewStyle) {

2     UIAlertViewStyleDefault = 0,            //缺省样式

3     UIAlertViewStyleSecureTextInput,         //密文输入框

4     UIAlertViewStylePlainTextInput,          //明文输入框

5     UIAlertViewStyleLoginAndPasswordInput      //登录用输入框,有明文用户名,和密文密码输入二个输入框

6 };
使用代码如下:

1     UIAlertView *view = [[UIAlertView alloc]initWithTitle:@"请等待"    //标题

2                                                   message:@"this is a alert view "   //显示内容

3                                                  delegate:nil                //委托,可以点击事件进行处理

4                                         cancelButtonTitle:@"取消"

5                                         otherButtonTitles:@"确定",

6                                                     //,@"其他",    //添加其他按钮

7                          nil];

8 [view setAlertViewStyle:UIAlertViewStyleLoginAndPasswordInput];   //控制样式

效果图:

这是参数为:UIAlertViewStyleLoginAndPasswordInput 效果图,其他的自行查看
不过这几个类型,我个人觉得太丑了,不能接受,便自定义了个弹出框,用来接受输入


实现也不难,有需要的朋友可以联系我
4.判断用户点了哪个按钮
UIAlertView的委托UIAlertViewDelegate ,实现该委托来实现点击事件,如下:
.h文件
1 @interface ViewController : UIViewController<UIAlertViewDelegate> {

2

3 }
在.m实现委托的方法
1 - (void)alertView:(UIAlertView *)alertView clickedButtonAtIndex:(NSInteger)buttonIndex

2 {

3     NSString* msg = [[NSString alloc] initWithFormat:@"您按下的第%d个按钮!",buttonIndex];

4     NSLog(@"%@",msg);

5 }
在这个方法中的参数 buttonIndex,表示的是按钮的索引,上图的三按键 “取消”,“确定”,“其他”对应的索引分别为“0”,“1”,“2”.
用Delegate的方式处理点击时候,会带来一个问题比较麻烦,比如在一个页面里,有好几个UIAlertView的时候,处理点击的时候,会增加处理逻辑的复杂度,得做一些判断
这种情况有一个解决办法,就是用Block,添加Block的回调,代替Delegate,target和selector.(下次展开写这个内容)
5.添加子视图
这个用得也是比较多的,贴几个使用实例
添加 UIActivityIndicatorView

实现代码:

 1     UIAlertView *view = [[UIAlertView alloc]initWithTitle:@"请等待"

 2                                                   message:nil

 3                                                  delegate:nil

 4                                         cancelButtonTitle:nil

 5                                         otherButtonTitles:nil,

 6                                                           nil];

 7     [view show];

 8     UIActivityIndicatorView *activeView = [[UIActivityIndicatorView alloc]initWithActivityIndicatorStyle:UIActivityIndicatorViewStyleWhiteLarge];

 9     activeView.center = CGPointMake(view.bounds.size.width/2.0f, view.bounds.size.height-40.0f);

10     [activeView startAnimating];

11     [view addSubview:activeView];

12

13     //[view show];

添加UITableView

这个列表的几行代码也说不清楚,就说下思路吧,UIAlertView之所以有这么大的空间显示UITableView,用了比较取巧的一个办法

1 UIAlertView *view = [[UIAlertView alloc]initWithTitle:@"请选择"

2                                             message:@"\n\n\n\n\n\n\n\n\n\n"

3                                                 delegate:nil

4                                        cancelButtonTitle:nil

5                                                  otherButtonTitles:nil,

6                                                            nil];

7  //其中用了10个换行符来撑大UIAlertView的

然后再来添加UITableView,可以自行实现,如果有需要,请留言
基本上这是一些比较常用且实用的东西了,然后还有一个比较重要的东西,就是自定义和美化UIAlertView,相信很多人关心这个,自定义和美化的内容放在下一篇来细说,分析几个个人觉得不错的Demo源码
1.title
获取或设置UIAlertView上的标题。
2.message
获取或设置UIAlertView上的消息
|
1
2
3
4
5
|
UIAlertView *alertView = [[UIAlertView alloc] initWithTitle:@"Title" message:@"message" delegate:self cancelButtonTitle:@"取消" otherButtonTitles:@"确定", nil];
alertView.title = @"T";
alertView.message = @"M";
[alertView show];
|
3.numberOfButtons (只读)
返回UIAlertView上有多少按钮.
|
1
2
3
|
UIAlertView *alertView = [[UIAlertView alloc] initWithTitle:@"Title" message:@"message" delegate:self cancelButtonTitle:@"取消" otherButtonTitles:@"确定", nil];
NSLog(@"%d",alertView.numberOfButtons);
[alertView show];
|
4.cancelButtonIndex
|
1
2
3
4
5
6
7
8
|
UIAlertView *alert = [[UIAlertView alloc]initWithTitle:@"提示"
message:@"请选择一个按钮:"
delegate:nil
cancelButtonTitle:@"取消"
otherButtonTitles:@"按钮一", @"按钮二", @"按钮三",nil];
[alert show];
NSLog(@"UIAlertView中取消按钮的角标是%d",alert.cancelButtonIndex);
|
注意不要认为取消按钮的角标是4,“取消”,“按钮一”,“按钮二”,“按钮三”的索引buttonIndex分别是0,1,2,3
5. alertViewStyle样式
UIAlertViewStyleLoginAndPasswordInput
|
1
2
3
4
5
6
|
UIAlertView *alert = [[UIAlertView alloc] initWithTitle:@"产品信息展示" message:p.name delegate:nil cancelButtonTitle:@"取消" otherButtonTitles:@"确定", nil];
alert.alertViewStyle = UIAlertViewStyleLoginAndPasswordInput;
// 弹出UIAlertView
[alert show];
|
UIAlertViewStylePlainTextInput
|
1
2
3
4
5
6
|
UIAlertView *alert = [[UIAlertView alloc] initWithTitle:@"产品信息展示" message:p.name delegate:nil cancelButtonTitle:@"取消" otherButtonTitles:@"确定", nil];
alert.alertViewStyle = UIAlertViewStylePlainTextInput;
// 弹出UIAlertView
[alert show];
|
UIAlertViewStyleSecureTextInput
|
1
2
3
4
5
6
|
UIAlertView *alert = [[UIAlertView alloc] initWithTitle:@"产品信息展示" message:p.name delegate:nil cancelButtonTitle:@"取消" otherButtonTitles:@"确定", nil];
alert.alertViewStyle = UIAlertViewStyleSecureTextInput;
// 弹出UIAlertView
[alert show];
|
6. - (UITextField *)textFieldAtIndex:(NSInteger)textFieldIndex
返回textFieldIndex角标对应的文本框,取出文本框文字。
7.手动的取消对话框
|
1
|
[alert dismissWithClickedButtonIndex:0 animated:YES];
|
8. delegate
作为UIAlertView的代理,必须遵守UIAlertViewDelegate。
当点击UIAlertView上的按钮时,就会调用,并且当方法调完后,UIAlertView会自动消失。
|
1
|
- (void)alertView:(UIAlertView *)alertView clickedButtonAtIndex:(NSInteger)buttonIndex;
|
当UIAlertView即将出现的时候调用
|
1
|
- (void)willPresentAlertView:(UIAlertView *)alertView;
|
当UIAlertView完全出现的时候调用
|
1
|
- (void)didPresentAlertView:(UIAlertView *)alertView;
|
当UIAlertView即将消失的时候调用
|
1
|
- (void)alertView:(UIAlertView *)alertView willDismissWithButtonIndex:(NSInteger)buttonIndex;
|
当UIAlertView完全消失的时候调用
|
1
|
- (void)alertView:(UIAlertView *)alertView didDismissWithButtonIndex:(NSInteger)buttonIndex;
|
9.注意UIAlertView调用show显示出来的时候,系统会自动强引用它,不会被释放。
10. 为UIAlertView添加子视图
在为UIAlertView对象太添加子视图的过程中,有点是需要注意的地方,如果删除按钮,也就是取消UIAlerView视图中所有的按钮的时候,可能会导致整个显示结构失衡。按钮占用的空间不会消失,我们也可以理解为这些按钮没有真正的删除,仅仅是他不可见了而已。如果在UIAlertview对象中仅仅用来显示文本,那么,可以在消息的开头添加换行符(@"\n)有助于平衡按钮底部和顶部的空间。
下面的代码用来演示如何为UIAlertview对象添加子视图的方法。
|
1
2
3
4
5
6
7
8
9
10
|
UIAlertView*alert = [[UIAlertView alloc]initWithTitle:@"请等待"
message:nil
delegate:nil
cancelButtonTitle:nil
otherButtonTitles:nil];
[alert show];
UIActivityIndicatorView*activeView = [[UIActivityIndicatorView alloc]initWithActivityIndicatorStyle:UIActivityIndicatorViewStyleWhiteLarge];
activeView.center = CGPointMake(alert.bounds.size.width / 2.0f, alert.bounds.size.height - 40.0f);
[activeView startAnimating];
[alert addSubview:activeView];
|
11. UIAlertView小例子
UIAlertView默认情况下所有的text是居中对齐的。 那如果需要将文本向左对齐或者添加其他控件比如输入框时该怎么办呢? 不用担心, iPhone SDK还是很灵活的, 有很多delegate消息供调用程序使用。 所要做的就是在
|
1
|
- (void)willPresentAlertView:(UIAlertView *)alertView
|
中按照自己的需要修改或添加即可, 比如需要将消息文本左对齐,下面的代码即可实现:
|
1
2
3
4
5
6
7
8
|
- (void)willPresentAlertView:(UIAlertView *)alertView {
for( UIView * view in alertView.subviews ) {
if( [view isKindOfClass:[UILabel class]] ) {
UILabel* label = (UILabel*) view;
label.textAlignment=UITextAlignmentLeft;
}
}
}
|

(二)1。UIPageControl 分页控件
UIPageControl控件在程序中出现的比较频繁,尤其在和UIScrollView配合来显示大量数据时,会使用它来控制UIScrollView的翻页。在滚动ScrollView时可通过PageControll中的小白点来观察当前页面的位置,也可通过点击PageContrll中的小白点来滚动到指定的页面。下面以一个简单但实用的例子来讲解PageControll的用法。


如上图中的曲线图和表格便是由ScrollView加载两个控件(UIWebView 和 UITableView)实用其翻页属性实现的页面滚动。而PageControll但当配合角色,页面滚动小白点会跟着变化位置,而点击小白点ScrollView会滚动到指定的页面。
代码:(只罗列主要代码)
- (void)viewDidLoad
{
[superviewDidLoad];
self.view.backgroundColor = [UIColorcolorWithPatternImage:[UIImageimageNamed:@"bg_blank.png"]];
// self.view.backgroundColor = [UIColor clearColor];
//定义UIScrollView
scrollview = [[UIScrollViewalloc] init];
scrollview.frame = CGRectMake(10, 0, 300, 108);
scrollview.contentSize = CGSizeMake(600, 108); //scrollview的滚动范围
scrollview.showsVerticalScrollIndicator = NO;
scrollview.showsHorizontalScrollIndicator = NO;
//myScrollView.clipsToBounds = YES;
scrollview.delegate = self;
scrollview.scrollEnabled = YES;
scrollview.pagingEnabled = YES; //使用翻页属性
scrollview.bounces = NO;
//定义WebView加载曲线图
webview = [[UIWebViewalloc] init];
webview.frame = CGRectMake(-7, -10, 307, 118);
webview.delegate = self;
[webviewsetBackgroundColor:[UIColorclearColor]];
[webviewsetOpaque:NO];
NSString *fullPath = [NSBundlepathForResource:@"sline"ofType:@"htm"inDirectory:[[NSBundlemainBundle] bundlePath]];
[self.webviewloadRequest:[NSURLRequestrequestWithURL:[NSURLfileURLWithPath:fullPath]]];
//用来制定边框
view22 = [[UIViewalloc] init];
//将图层的边框设置为圆脚
view22.layer.cornerRadius = 10;
view22.layer.masksToBounds = YES;
//给图层添加一个有色边框
view22.layer.borderWidth = 1;
//view1.layer.borderColor = [[UIColor colorWithRed:0.52 green:0.09 blue:0.07 alpha:1] CGColor];
view22.layer.borderColor = [[UIColorcolorWithRed:0green:0blue:0alpha:1] CGColor];
view22.frame = CGRectMake(0, 0, 300, 108);
view22.backgroundColor = [UIColorcolorWithRed:0.31green:0.31blue:0.31alpha:1];
tableview.frame = CGRectMake(0, 21, 300, 87);
tableview.allowsSelection = NO;
tableview.backgroundColor = [UIColorcolorWithRed:0.31green:0.31blue:0.31alpha:1];
//用来制定边框
view11 = [[UIViewalloc] init];
//将图层的边框设置为圆脚
view11.layer.cornerRadius = 10;
view11.layer.masksToBounds = YES;
//给图层添加一个有色边框
view11.layer.borderWidth = 1;
//view1.layer.borderColor = [[UIColor colorWithRed:0.52 green:0.09 blue:0.07 alpha:1] CGColor];
view11.layer.borderColor = [[UIColorcolorWithRed:0green:0blue:0alpha:1] CGColor];
view11.frame = CGRectMake(300, 0, 300, 108);
view11.backgroundColor = [UIColorblackColor];
[view11addSubview:tableview];
[scrollviewaddSubview:view11];
[view22addSubview:webview];
[scrollviewaddSubview:view22];
//定义PageControll
pageControl = [[UIPageControlalloc] init];
pageControl.frame = CGRectMake(150, 100, 20, 20);//指定位置大小
pageControl.numberOfPages = 2;//指定页面个数
pageControl.currentPage = 0;//指定pagecontroll的值,默认选中的小白点(第一个)
[pageControladdTarget:selfaction:@selector(changePage:)forControlEvents:UIControlEventValueChanged];
//添加委托方法,当点击小白点就执行此方法
[self.viewaddSubview:scrollview];
[self.viewaddSubview:pageControl];
}
//scrollview的委托方法,当滚动时执行
- (void)scrollViewDidScroll:(UIScrollView *)sender {
int page = scrollview.contentOffset.x / 290;//通过滚动的偏移量来判断目前页面所对应的小白点
pageControl.currentPage = page;//pagecontroll响应值的变化
}
- (void)scrollViewDidEndDecelerating:(UIScrollView *)scrollView {
}
//pagecontroll的委托方法
- (IBAction)changePage:(id)sender {
int page = pageControl.currentPage;//获取当前pagecontroll的值
[scrollview setContentOffset:CGPointMake(300 * page, 0)];//根据pagecontroll的值来改变scrollview的滚动位置,以此切换到指定的页面
}
以上是一种简单的方法来实现pagecontroll的切换页面功能,以后会为大家添加 “无限循环切换页面”和“动态的增加和减少页面”。
1.创建并初始化
创建UITextView的文件,并在.h文件中写入如下代码:

#import <UIKit/UIKit.h>

@interface TextViewController : UIViewController <UITextViewDelegate>

{

              UITextView *textView;

}

@property (nonatomic, retain) UITextView *textView;

@end

在.m文件中初始化这个textview,写入代码如下:
self.textView = [[[UITextView alloc] initWithFrame:self.view.frame] autorelease]; //初始化大小并自动释放 |
self.textView.textColor = [UIColor blackColor];//设置textview里面的字体颜色 |
self.textView.font = [UIFont fontWithName:@"Arial" size:18.0];//设置字体名字和字体大小 |
self.textView.delegate = self;//设置它的委托方法 |
self.textView.backgroundColor = [UIColor whiteColor];//设置它的背景颜色 |
self.textView.text = @"Now is the time for all good developers to come to serve their country.\n\nNow is the time for all good developers to come to serve their country.";//设置它显示的内容 |
self.textView.returnKeyType = UIReturnKeyDefault;//返回键的类型 |
self.textView.keyboardType = UIKeyboardTypeDefault;//键盘类型 |
self.textView.scrollEnabled = YES;//是否可以拖动 |
self.textView.autoresizingMask = UIViewAutoresizingFlexibleHeight;//自适应高度 |
[self.view addSubview: self.textView];//加入到整个页面中 |
2. UITextView退出键盘的几种方式
因为你点击UITextView会出现键盘,如果你退出键盘,有如下几种方式:
(1)如果你程序是有导航条的,可以在导航条上面加多一个Done的按钮,用来退出键盘,当然要先实UITextViewDelegate。
代码如下:
- (void)textViewDidBeginEditing:(UITextView *)textView { |
UIBarButtonItem *done = [[[UIBarButtonItem alloc] initWithBarButtonSystemItem:UIBarButtonSystemItemDone target:self action:@selector(leaveEditMode)] autorelease]; |
self.navigationItem.rightBarButtonItem = done; |
} |
- (void)textViewDidEndEditing:(UITextView *)textView { |
self.navigationItem.rightBarButtonItem = nil; |
} |
- (void)leaveEditMode { |
[self.textView resignFirstResponder]; |
} |
(2)如果你的textview里不用回车键,可以把回车键当做退出键盘的响应键。
代码如下:
#pragma mark - UITextView Delegate Methods |
-(BOOL)textView:(UITextView *)textView shouldChangeTextInRange:(NSRange)range replacementText:(NSString *)text |
{ |
|
|
|
|
|
|
这样无论你是使用电脑键盘上的回车键还是使用弹出键盘里的return键都可以达到退出键盘的效果。
(3)还有你也可以自定义其他加载键盘上面用来退出,比如在弹出的键盘上面加一个view来放置退出键盘的Done按钮。
代码如下:
UIToolbar * topView = [[UIToolbar alloc]initWithFrame:CGRectMake(0, 0, 320, 30)]; |
|
|
|
|
|
|
|
|
|
|
|
|
|
|
(4)设置UITextView圆角问题
做法是在 #import QuartzCore/QuartzCore.h 后,便能調用 [textView.layer setCornerRadius:10]; 來把 UITextView 设定圓角
(5)UITextView根据文本大小自适应高度
通过实现文本字数来确定高度,如下:
NSString * desc = @"Description it is a test font, and don't become angry for which i use to do here.Now here is a very nice party from american or not!"; |
|
然后需要定义UITextView的numberoflines为0,即不做行数的限制。如下:
[textView setNumberOfLines:0]; |
|
|
(6)UITextView自定选择文字后的菜单
在ViewDidLoad中加入:
UIMenuItem *menuItem = [[UIMenuItem alloc]initWithTitle:@"分享到新浪微博" action:@selector(changeColor:)]; |
UIMenuController *menu = [UIMenuController sharedMenuController]; |
[menu setMenuItems:[NSArray arrayWithObject:menuItem]]; |
[menuItem release]; |
当然上面那个@selector里面的changeColor方法还是自己写吧,也就是说点击了我们自定义的菜单项后会触发的方法。
然后还得在代码里加上一个方法:
-(BOOL)canPerformAction:(SEL)action withSender:(id)sender |
{ |
if(action == @selector(changeColor:)) |
{ |
if(textView.selectedRange.length>0) |
return YES; |
} |
return NO; |
} |
实现后如下图:

(二)3.UIActivityIndicator 圈圈
UIActivityIndicator的用法
(1)创建
(二)4.UISwitch 开关
UISwitch的详细使用
开关(UISwitch)提供了一个简单的开/关UI元素,类似于传统的物理开关,开关的可配置选项很少,应将其用于处理布尔值。我们使用其Value Changed事件来检测开关切换,并通过属性on或实例方法isOn来获取当前值。

1.UISwitch的初始化
UISwitch *switchView = [[UISwitch alloc] initWithFrame:CGRectMake(54.0f, 16.0f, 100.0f, 28.0f)];
2.设置UISwitch的初始化状态
switchView.on = YES;//设置初始为ON的一边
3.UISwitch事件的响应
[switchView addTarget:self action:@selector(switchAction:) forControlEvents:UIControlEventValueChanged];
iOS自定义的UISwitch按钮
因为项目需要在UISwitch按钮上写文字,系统自带的UISwitch是这样的:

既不能写字,也不能改颜色,于是在网上找到了这么一个自定义的Switch按钮,具体出处找不见了。记录一下,怕以后找不见了。
先看下效果图:

按钮的样式很多,可以文字,可以写多行,文字大小和颜色都可以设置。
看下它的源码:
- #import <Foundation/Foundation.h>
- @interface HMCustomSwitch : UISlider {
- BOOL on;
- UIColor *tintColor;
- UIView *clippingView;
- UILabel *rightLabel;
- UILabel *leftLabel;
- // private member
- BOOL m_touchedSelf;
- }
- @property(nonatomic,getter=isOn) BOOL on;
- @property (nonatomic,retain) UIColor *tintColor;
- @property (nonatomic,retain) UIView *clippingView;
- @property (nonatomic,retain) UILabel *rightLabel;
- @property (nonatomic,retain) UILabel *leftLabel;
- + (HMCustomSwitch *) switchWithLeftText: (NSString *) tag1 andRight: (NSString *) tag2;
- - (void)setOn:(BOOL)on animated:(BOOL)animated;
.m文件
- #import "HMCustomSwitch.h"
- @implementation HMCustomSwitch
- @synthesize on;
- @synthesize tintColor, clippingView, leftLabel, rightLabel;
- +(HMCustomSwitch *)switchWithLeftText:(NSString *)leftText andRight:(NSString *)rightText
- {
- HMCustomSwitch *switchView = [[HMCustomSwitch alloc] initWithFrame:CGRectZero];
- switchView.leftLabel.text = leftText;
- switchView.rightLabel.text = rightText;
- return [switchView autorelease];
- }
- -(id)initWithFrame:(CGRect)rect
- {
- if ((self=[super initWithFrame:CGRectMake(rect.origin.x,rect.origin.y,95,27)]))
- {
- // self.clipsToBounds = YES;
- [self awakeFromNib]; // do all setup in awakeFromNib so that control can be created manually or in a nib file
- }
- return self;
- }
- -(void)awakeFromNib
- {
- [super awakeFromNib];
- self.backgroundColor = [UIColor clearColor];
- [self setThumbImage:[UIImage imageNamed:@"switchThumb.png"] forState:UIControlStateNormal];
- [self setMinimumTrackImage:[UIImage imageNamed:@"switchBlueBg.png"] forState:UIControlStateNormal];
- [self setMaximumTrackImage:[UIImage imageNamed:@"switchOffPlain.png"] forState:UIControlStateNormal];
- self.minimumValue = 0;
- self.maximumValue = 1;
- self.continuous = NO;
- self.on = NO;
- self.value = 0.0;
- self.clippingView = [[UIView alloc] initWithFrame:CGRectMake(4,2,87,23)];
- self.clippingView.clipsToBounds = YES;
- self.clippingView.userInteractionEnabled = NO;
- self.clippingView.backgroundColor = [UIColor clearColor];
- [self addSubview:self.clippingView];
- [self.clippingView release];
- NSString *leftLabelText = NSLocalizedString(@"ON","Custom UISwitch ON label. If localized to empty string then I/O will be used");
- if ([leftLabelText length] == 0)
- {
- leftLabelText = @"l"; // use helvetica lowercase L to be a 1.
- }
- self.leftLabel = [[UILabel alloc] init];
- self.leftLabel.frame = CGRectMake(0, 0, 48, 23);
- self.leftLabel.text = leftLabelText;
- self.leftLabel.textAlignment = NSTextAlignmentCenter;
- self.leftLabel.font = [UIFont boldSystemFontOfSize:17];
- self.leftLabel.textColor = [UIColor whiteColor];
- self.leftLabel.backgroundColor = [UIColor clearColor];
- // self.leftLabel.shadowColor = [UIColor redColor];
- // self.leftLabel.shadowOffset = CGSizeMake(0,0);
- [self.clippingView addSubview:self.leftLabel];
- [self.leftLabel release];
- NSString *rightLabelText = NSLocalizedString(@"OFF","Custom UISwitch OFF label. If localized to empty string then I/O will be used");
- if ([rightLabelText length] == 0)
- {
- rightLabelText = @"O"; // use helvetica uppercase o to be a 0.
- }
- self.rightLabel = [[UILabel alloc] init];
- self.rightLabel.frame = CGRectMake(95, 0, 48, 23);
- self.rightLabel.text = rightLabelText;
- self.rightLabel.textAlignment = NSTextAlignmentCenter;
- self.rightLabel.font = [UIFont boldSystemFontOfSize:17];
- self.rightLabel.textColor = [UIColor grayColor];
- self.rightLabel.backgroundColor = [UIColor clearColor];
- // self.rightLabel.shadowColor = [UIColor redColor];
- // self.rightLabel.shadowOffset = CGSizeMake(0,0);
- [self.clippingView addSubview:self.rightLabel];
- [self.rightLabel release];
- }
- -(void)layoutSubviews
- {
- [super layoutSubviews];
- // NSLog(@"leftLabel=%@",NSStringFromCGRect(self.leftLabel.frame));
- // move the labels to the front
- [self.clippingView removeFromSuperview];
- [self addSubview:self.clippingView];
- CGFloat thumbWidth = self.currentThumbImage.size.width;
- CGFloat switchWidth = self.bounds.size.width;
- CGFloat labelWidth = switchWidth - thumbWidth;
- CGFloat inset = self.clippingView.frame.origin.x;
- // NSInteger xPos = self.value * (self.bounds.size.width - thumbWidth) - (self.leftLabel.frame.size.width - thumbWidth/2);
- NSInteger xPos = self.value * labelWidth - labelWidth - inset;
- self.leftLabel.frame = CGRectMake(xPos, 0, labelWidth, 23);
- // xPos = self.value * (self.bounds.size.width - thumbWidth) + (self.rightLabel.frame.size.width - thumbWidth/2);
- xPos = switchWidth + (self.value * labelWidth - labelWidth) - inset;
- self.rightLabel.frame = CGRectMake(xPos, 0, labelWidth, 23);
- // NSLog(@"value=%f xPos=%i",self.value,xPos);
- // NSLog(@"thumbWidth=%f self.bounds.size.width=%f",thumbWidth,self.bounds.size.width);
- }
- - (UIImage *)image:(UIImage*)image tintedWithColor:(UIColor *)tint
- {
- if (tint != nil)
- {
- UIGraphicsBeginImageContext(image.size);
- //draw mask so the alpha is respected
- CGContextRef currentContext = UIGraphicsGetCurrentContext();
- CGImageRef maskImage = [image CGImage];
- CGContextClipToMask(currentContext, CGRectMake(0, 0, image.size.width, image.size.height), maskImage);
- CGContextDrawImage(currentContext, CGRectMake(0,0, image.size.width, image.size.height), image.CGImage);
- [image drawAtPoint:CGPointMake(0,0)];
- [tint setFill];
- UIRectFillUsingBlendMode(CGRectMake(0,0,image.size.width,image.size.height),kCGBlendModeColor);
- UIImage *newImage = UIGraphicsGetImageFromCurrentImageContext();
- UIGraphicsEndImageContext();
- return newImage;
- }
- else
- {
- return image;
- }
- }
- -(void)setTintColor:(UIColor*)color
- {
- if (color != tintColor)
- {
- [tintColor release];
- tintColor = [color retain];
- [self setMinimumTrackImage:[self image:[UIImage imageNamed:@"switchBlueBg.png"] tintedWithColor:tintColor] forState:UIControlStateNormal];
- }
- }
- - (void)setOn:(BOOL)turnOn animated:(BOOL)animated;
- {
- on = turnOn;
- if (animated)
- {
- [UIView beginAnimations:nil context:nil];
- [UIView setAnimationDuration:0.2];
- }
- if (on)
- {
- self.value = 1.0;
- }
- else
- {
- self.value = 0.0;
- }
- if (animated)
- {
- [UIView commitAnimations];
- }
- }
- - (void)setOn:(BOOL)turnOn
- {
- [self setOn:turnOn animated:NO];
- }
- - (void)endTrackingWithTouch:(UITouch *)touch withEvent:(UIEvent *)event
- {
- NSLog(@"preendTrackingWithtouch");
- [super endTrackingWithTouch:touch withEvent:event];
- NSLog(@"postendTrackingWithtouch");
- m_touchedSelf = YES;
- [self setOn:on animated:YES];
- }
- - (void)touchesBegan:(NSSet*)touches withEvent:(UIEvent*)event
- {
- [super touchesBegan:touches withEvent:event];
- NSLog(@"touchesBegan");
- m_touchedSelf = NO;
- on = !on;
- }
- - (void)touchesEnded:(NSSet*)touches withEvent:(UIEvent*)event
- {
- [super touchesEnded:touches withEvent:event];
- NSLog(@"touchesEnded");
- if (!m_touchedSelf)
- {
- [self setOn:on animated:YES];
- [self sendActionsForControlEvents:UIControlEventValueChanged];
- }
- }
- -(void)dealloc
- {
- [tintColor release];
- [clippingView release];
- [rightLabel release];
- [leftLabel release];
- [super dealloc];
- }
- @end
看代码可以知道,其实它是通过继承UISlider控件实现的,UISlider的左右分别是个UILabel,当YES的时候,滑块滑到了最右边,NO的时候滑到了最左边。
如何在代码中使用它呢?很简单:
- (void)loadView
{
UIView *contentView = [[UIView alloc] initWithFrame:[[UIScreen mainScreen] applicationFrame]];
self.view = contentView;
- contentView.backgroundColor = [UIColor whiteColor];
- // Standard ON/OFF
- HMCustomSwitch *switchView = [[HMCustomSwitch alloc] initWithFrame:CGRectZero];
- switchView.center = CGPointMake(160.0f, 20.0f);
- switchView.on = YES;
- [contentView addSubview:switchView];
- [switchView release];
- // Custom YES/NO
- switchView = [HMCustomSwitch switchWithLeftText:@"YES" andRight:@"NO"];
- switchView.center = CGPointMake(160.0f, 60.0f);
- switchView.on = YES;
- [contentView addSubview:switchView];
- // Custom font and color
- switchView = [HMCustomSwitch switchWithLeftText:@"Hello " andRight:@"ABC "];
- switchView.center = CGPointMake(160.0f, 100.0f);
- switchView.on = YES;
- [switchView.leftLabel setFont:[UIFont boldSystemFontOfSize:13.0f]];
- [switchView.rightLabel setFont:[UIFont italicSystemFontOfSize:15.0f]];
- [switchView.rightLabel setTextColor:[UIColor blueColor]];
- [contentView addSubview:switchView];
- // Multiple lines
- switchView = [HMCustomSwitch switchWithLeftText:@"Hello\nWorld" andRight:@"Bye\nWorld"];
- switchView.center = CGPointMake(160.0f, 140.0f);
- switchView.on = YES;
- switchView.tintColor = [UIColor orangeColor];
- switchView.leftLabel.font = [UIFont boldSystemFontOfSize:9.0f];
- switchView.rightLabel.font = [UIFont boldSystemFontOfSize:9.0f];
- switchView.leftLabel.numberOfLines = 2;
- switchView.rightLabel.numberOfLines = 2;
- switchView.leftLabel.lineBreakMode = NSLineBreakByWordWrapping;
- switchView.rightLabel.lineBreakMode = NSLineBreakByWordWrapping;
- [contentView addSubview:switchView];
- switchView = [[HMCustomSwitch alloc] init];
- switchView.center = CGPointMake(160.0f, 180.0f);
- switchView.on = YES;
- switchView.tintColor = [UIColor purpleColor];
- [contentView addSubview:switchView];
- [switchView release];
- switchView = [HMCustomSwitch switchWithLeftText:@"l" andRight:@"O"];
- switchView.center = CGPointMake(160.0f, 220.0f);
- // customSwitch.tintColor = [UIColor colorWithRed:125.f/255.f green:157.f/255.f blue:93.f/255.f alpha:1.0];
- // customSwitch.tintColor = [UIColor colorWithRed:125.f/255.f green:157.f/255.f blue:93.f/255.f alpha:1.0];
- [contentView addSubview:switchView];
- // Standard ON/OFF
- switchView = [[HMCustomSwitch alloc] init];
- switchView.center = CGPointMake(160.0f, 260.0f);
- switchView.tintColor = [UIColor colorWithRed:125.f/255.f green:157.f/255.f blue:93.f/255.f alpha:1.0];
- [switchView addTarget:self action:@selector(switchFlipped:) forControlEvents:UIControlEventValueChanged];
- [contentView addSubview:switchView];
- [switchView release];
- UIToolbar *toolbar = [[UIToolbar alloc] initWithFrame:CGRectMake(0, 420, 320, 40)];
- toolbar.tintColor = [UIColor colorWithRed:125.f/255.f green:157.f/255.f blue:93.f/255.f alpha:1.0];
- [contentView addSubview:toolbar];
- [contentView release];
- }
- -(void)switchFlipped:(HMCustomSwitch*)switchView
- {
- NSLog(@"switchFlipped=%f on:%@",switchView.value, (switchView.on?@"Y":@"N"));
- }
UIActionSheet是在IOS弹出的选择按钮项,可以添加多项,并为每项添加点击事件。
为了快速完成这例子,我们打开Xcode 4.3.2, 先建立一个single view application。然后再xib文件添加一个button,用来弹出sheet view。
1、首先在.h文件中实现协议,加代码的地方在@interface那行的最后添加<UIActionSheetDelegate>,协议相当于java里的接口,实现协议里的方法。
@interface sheetviewViewController : UIViewController<UIActionSheetDelegate>

@end
2、添加button,命名button为showSheetView.
3、为button建立Action映射,映射到.h文件上,事件类型为Action ,命名为showSheet。
4、在.m文件上添加点击事件代码
图的效果是这样的:


- (IBAction)showSheet:(id)sender {

    UIActionSheet *actionSheet = [[UIActionSheet alloc]

                                  initWithTitle:@"title,nil时不显示"

                                  delegate:self

                                  cancelButtonTitle:@"取消"

                                  destructiveButtonTitle:@"确定"

                                  otherButtonTitles:@"第一项", @"第二项",nil];

    actionSheet.actionSheetStyle = UIActionSheetStyleBlackOpaque;

    [actionSheet showInView:self.view];

}

actionSheet.actionSheetStyle = UIActionSheetStyleBlackOpaque;//设置样式
参数解释:
cancelButtonTitle destructiveButtonTitle是系统自动的两项。
otherButtonTitles是自己定义的项,注意,最后一个参数要是nil。
[actionSheet showInView:self.view];这行语句的意思是在当前view显示Action sheet。当然还可以用其他方法显示Action sheet。
对应上面的图和代码,一目了然了把
5、接下来我们怎么相应Action Sheet的选项的事件呢?实现协议里的方法。为了能看出点击Action sheet每一项的效果,我们加入UIAlertView来做信息显示。下面是封装的一个方法,传入对应的信息,在UIAlertView显示对应的信息。

-(void)showAlert:(NSString *)msg {

    UIAlertView *alert = [[UIAlertView alloc]

                          initWithTitle:@"Action Sheet选择项"

                          message:msg

                          delegate:self

                          cancelButtonTitle:@"确定"

                          otherButtonTitles: nil];

    [alert show];

}

那相应被Action Sheet选项执行的代码如下:

(void)actionSheet:(UIActionSheet *)actionSheet clickedButtonAtIndex:(NSInteger)buttonIndex

{

    if (buttonIndex == 0) {

        [self showAlert:@"确定"];

    }else if (buttonIndex == 1) {

        [self showAlert:@"第一项"];

    }else if(buttonIndex == 2) {

        [self showAlert:@"第二项"];

    }else if(buttonIndex == 3) {

        [self showAlert:@"取消"];

    }

}

- (void)actionSheetCancel:(UIActionSheet *)actionSheet{

}

-(void)actionSheet:(UIActionSheet *)actionSheet didDismissWithButtonIndex:(NSInteger)buttonIndex{

}

-(void)actionSheet:(UIActionSheet *)actionSheet willDismissWithButtonIndex:(NSInteger)buttonIndex{

}

可以看到 buttonIndex 是对应的项的索引。
看到那个红色的按钮没?那是ActionSheet支持的一种所谓的销毁按钮,对某户的某个动作起到警示作用,
比如永久性删除一条消息或图像时。如果你指定了一个销毁按钮他就会以红色高亮显示:
actionSheet.destructiveButtonIndex=1;
与导航栏类似,操作表单也支持三种风格 :
UIActionSheetStyleDefault //默认风格:灰色背景上显示白色文字
UIActionSheetStyleBlackTranslucent //透明黑色背景,白色文字
UIActionSheetStyleBlackOpaque //纯黑背景,白色文字
用法:
actionSheet.actionSheetStyle = UIActionSheetStyleBlackOpaque;//设置样式
我选sheet 里的第一项,显示如下:

6、注意事项,在开发过程中,发现有时候UIActionSheet的最后一项点击失效,点最后一项的上半区域时有效,这是在特定情况下才会发生,这个场景就是试用了UITabBar的时候才有。解决办法:
在showView时这样使用,[actionSheet showInView:[UIApplication sharedApplication].keyWindow];
或者[sheet showInView:[AppDelegate sharedDelegate].tabBarController.view];这样就不会发生遮挡现象了。
代码获取:http://download.csdn.net/detail/totogo2010/4343267
自定义UIActionSheet
UIActionSheet类系IOS开发中实现警告框的重要的类,而在好多应用中,都对它进行了扩展,今天介绍一下自定义风格的UIActionSheet
一、自定义CustomActionSheet类
CustomActionSheet类继承UIActionSheet,具体的实现如下所示:
1)CustomActionSheet.h头文件
#import <Foundation/Foundation.h>
@interface CustomActionSheet : UIActionSheet {
UIToolbar* toolBar;
UIView* view;
}
@property(nonatomic,retain)UIView* view;
@property(nonatomic,retain)UIToolbar* toolBar;
/*因为是通过给ActionSheet 加 Button来改变ActionSheet, 所以大小要与actionsheet的button数有关
*height = 84, 134, 184, 234, 284, 334, 384, 434, 484
*如果要用self.view = anotherview. 那么another的大小也必须与view的大小一样
*/
-(id)initWithHeight:(float)height WithSheetTitle:(NSString*)title;
@end
2)CustomActionSheet.m实现文件
#import "CustomActionSheet.h"
@implementation CustomActionSheet
@synthesize view;
@synthesize toolBar;
-(id)initWithHeight:(float)height WithSheetTitle:(NSString*)title
{
self = [super init];
if (self)
{
int theight = height - 40;
int btnnum = theight/50;
for(int i=0; i<btnnum; i++)
{
[self addButtonWithTitle:@" "];
}
toolBar = [[UIToolbar alloc] initWithFrame:CGRectMake(0, 0, 320, 44)];
toolBar.barStyle = UIBarStyleBlackOpaque;
UIBarButtonItem *titleButton = [[UIBarButtonItem alloc] initWithTitle:title
style:UIBarButtonItemStylePlain
target:nil
action:nil];
UIBarButtonItem *rightButton = [[UIBarButtonItem alloc] initWithTitle:@"Done"
style:UIBarButtonItemStyleDone
target:self
action:@selector(done)];
UIBarButtonItem *leftButton = [[UIBarButtonItem alloc] initWithTitle:@"Cancel"
style:UIBarButtonItemStyleBordered
target:self
action:@selector(docancel)];
UIBarButtonItem *fixedButton = [[UIBarButtonItem alloc] initWithBarButtonSystemItem:UIBarButtonSystemItemFlexibleSpace
target:nil
action:nil];
NSArray *array = [[NSArray alloc] initWithObjects:leftButton,fixedButton,titleButton,fixedButton,rightButton,nil];
[toolBar setItems: array];
[titleButton release];
[leftButton release];
[rightButton release];
[fixedButton release];
[array release];
[self addSubview:toolBar];
view = [[UIView alloc] initWithFrame:CGRectMake(0, 44, 320, height-44)];
view.backgroundColor = [UIColor groupTableViewBackgroundColor];
[self addSubview:view];
}
return self;
}
-(void)done
{
[self dismissWithClickedButtonIndex:0 animated:YES];
}
-(void)docancel
{
[self dismissWithClickedButtonIndex:0 animated:YES];
}
-(void)dealloc
{
[view release];
[super dealloc];
}
@end
二、利用自定义的CustomActionSheet类显示提示框
#import "TestActionSheetViewController.h"
#import "CustomActionSheet.h"
@implementation TestActionSheetViewController
-(IBAction)btndown
{
CustomActionSheet* sheet = [[CustomActionSheet alloc] initWithHeight:284.0f
WithSheetTitle:@"自定义ActionSheet"];
UILabel* label = [[UILabel alloc] initWithFrame:CGRectMake(0,50, 320, 50)];
label.text = @"这里是要自定义放的控制";
label.backgroundColor = [UIColor clearColor];
label.textAlignment = UITextAlignmentCenter;
[sheet.view addSubview:label];
[sheet showInView:self.view];
[sheet release];
}
@end
这里的UILabel是作一个示例,在这个位置你可以换成你自己的内容即可;
三、效果图

(二)6.UIDatePicker 日期选择器
UIDatePicker
这是两种可以上下滚动的控件。
这是UIDatePicker,可以显示日期和时间。

这个是UIPickerView,显示类似几个选择项的界面。
注意点:PickerView的高度不能改,默认162,PickerView里面每行的高度 可以改,不要弄混淆了。

做一个简单界面进行练习。单击生日输入框弹出自定义UIDatePicker,单击城市弹出自定义UIPickerView选择城市。

1、UIDatePicker使用
在点击过文本输入框后弹出日期选中键盘。需要给UITextField控件的inutView属性指定需要显示的界面。
这里显示的代码如下:
- (void)setBirthdayFieldKeyboard
{
//
UIDatePicker *datePicker = [[UIDatePicker alloc] init];
_datePicker = datePicker;
// 只显示时间
datePicker.datePickerMode = UIDatePickerModeDate;
// 显示中文
datePicker.locale = [NSLocalelocaleWithLocaleIdentifier:@"zh"];
// 监听值得改变
[datePicker addTarget:selfaction:@selector(datePickerValueChanged:) forControlEvents:UIControlEventValueChanged];
self.birthdayField.inputView = datePicker;
}
在程序加载时进行设定
- (void)viewDidLoad {
[superviewDidLoad];
[selfsetBirthdayFieldKeyboard];
}
然后对UITextField的一些属性进行设置,比如说不能输入日期,只能选择显示日期。可以在以下代理方法中实现
#pragma mark - textField代理方法
// 是否允许修改填充字符串
- (BOOL)textField:(UITextField *)textField shouldChangeCharactersInRange:(NSRange)range replacementString:(NSString *)string
{
returnNO;
}
当然使用之前要指定代理并遵守协议。
然后再选择过时间后,同步更新到文本输入框中,这里需要监听控件的valueChanged的方法
[datePicker addTarget:self action:@selector(datePickerValueChanged:) forControlEvents:UIControlEventValueChanged];
响应方法
- (void)datePickerValueChanged:(UIDatePicker *)datePicker
{
NSDateFormatter *formatter = [[NSDateFormatteralloc] init];
// 格式化日期格式
formatter.dateFormat = @"yyyy-MM-dd";
NSString *date = [formatter stringFromDate:datePicker.date];
// 显示时间
self.birthdayField.text = date;
}
最后要设置以下UITextField控件的默认值,默认显示0行0列的值
在改变文本输入框状态时进行设置默认值。
// 是否允许开始编辑(代理方法)
- (void)textFieldDidBeginEditing:(UITextField *)textField
{
// 添加自定义窗口
[selfdatePickerValueChanged:self.datePicker];
}
2、UIPickerView使用
先将城市选择键盘添加到文本输入框
// 设置城市键盘
- (void)setCitiesFieldKeyboard
{
//
UIPickerView *picker = [[UIPickerViewalloc] init];
_cityPicker = picker;
picker.dataSource = self;
picker.delegate = self;
self.cityField.inputView = picker;
}
设置代理和数据源为控制器,实现响应的方法
#pragma mark UIPickerView 数据源
// 列数
- (NSInteger)numberOfComponentsInPickerView:(UIPickerView *)pickerView
{
return 2;
}
// 某一列行数
- (NSInteger)pickerView:(UIPickerView *)pickerView numberOfRowsInComponent:(NSInteger)component
{
if (component == 0) // 省会
{
return self.provinces.count;
}
else // 其他城市
{
SLQProvince *pro = self.provinces[_proIndex];
return pro.cities.count;
}
}
#pragma mark UIPickerView 代理
// 每行的标题
- (NSString *)pickerView:(UIPickerView *)pickerView titleForRow:(NSInteger)row forComponent:(NSInteger)component
{
if (component == 0) // 省会
{
// 获取省会
SLQProvince *pro = self.provinces[row];
return pro.name;
}
else // 其他城市
{
SLQProvince *pro = self.provinces[_proIndex];
return pro.cities[row];
}
}
// 是否选中某行
- (void)pickerView:(UIPickerView *)pickerView didSelectRow:(NSInteger)row inComponent:(NSInteger)component
{
// 滚动省会刷新城市
if(component == 0)
{
// 记录当前省会
_proIndex = [pickerView selectedRowInComponent:0];
[pickerView reloadComponent:1];
}
// 获取选中省会
SLQProvince *pro = self.provinces[_proIndex];
NSInteger cityIndex = [pickerView selectedRowInComponent:1];
NSString *cityName = pro.cities[cityIndex];
_cityField.text = [NSString stringWithFormat:@"%@-%@",pro.name,cityName];
}
然后在文本输入框的代理方法中添加默认显示对象
// 是否允许开始编辑
- (void)textFieldDidBeginEditing:(UITextField *)textField
{
if (textField == self.birthdayField)
{
// 添加自定义窗口
[selfdatePickerValueChanged:self.datePicker];
}
else
{
[selfpickerView:self.cityPickerdidSelectRow:0inComponent:0]; // 默认显示0行0列
}
}
效果

主要代码参考
注意点:PickerView的高度不能改,默认162,PickerView里面每行的高度 可以改,不要弄混淆了。
1.Locale
设置DatePicker的地区,即设置DatePicker显示的语言。
|
1
2
3
4
5
6
7
8
|
// 1.跟踪所有可用的地区,取出想要的地区
NSLog(@"%@", [NSLocale availableLocaleIdentifiers]);
// 2. 设置日期选择控件的地区
[datePicker setLocale:[[NSLocale alloc]initWithLocaleIdentifier:@"zh_Hans_CN"]];
// 2) 设置日期选择控件的地区
[datePicker setLocale:[[NSLocale alloc]initWithLocaleIdentifier:@"en_SC"]];
|
2.Calendar
设置DatePicker的日历,默认为当天。
|
1
|
[datePicker setCalendar:[NSCalendar currentCalendar]];
|
3.timeZone
设置DatePicker的时区,默认为设置为:
|
1
|
[datePicker setTimeZone:[NSTimeZone defaultTimeZone]];
|
4.date
设置DatePicker的日期,默认设置为:
|
1
|
[datePicker setDate:[NSDate date]];
|
5.minimumDate
设置DatePicker的允许的最小日期。
6.maximumDate
设置DatePicker的允许的最大日期。
7.countDownDuration
设置DatePicker的倒计时间.
|
1
2
3
4
5
6
7
8
9
10
11
|
// 1) 设置日期选择的模
[self.datePicker setDatePickerMode:UIDatePickerModeCountDownTimer];
// 2) 设置倒计时的时长
// 注意:设置倒计时时长需要在确定模式之后指定
// 倒计时的时长,以秒为单位
[self.datePicker setCountDownDuration:10 * 60];
|
8.minuteInterval
你可以将分钟表盘设置为以不同的时间间隔来显示分钟,前提是该间隔要能够让60整除。默认间隔是一分钟。如果要使用不同的间隔,需要改变 minuteInterval属性:
|
1
2
3
|
// 设置分钟间隔
datePicker.minuteInterval = 15;
|
9.datePickerMode
UIDatePickerModeTime, 显示小时,分钟和AM/PM,这个的名称是根据本地设置的
|
1
|
[datePicker setDatePickerMode:UIDatePickerModeTime];
|
UIDatePickerModeDate, 显示年月日,名称根据本地设置的
|
1
|
[datePicker setDatePickerMode:UIDatePickerModeDate];
|
UIDatePickerModeDateAndTime, 显示日期,小时,分钟,和AM/PM,名称是根据本地设置的
|
1
|
[datePicker setDatePickerMode:UIDatePickerModeDateAndTime];
|
UIDatePickerModeCountDownTimer 显示小时和分钟
|
1
|
[datePicker setDatePickerMode:UIDatePickerModeCountDownTimer];
|
10.UIDatePicker使用教程一
10.1初始化
|
1
2
3
|
// 不用设置宽高,因为它的宽高是固定的
UIDatePicker *datePicker = [[UIDatePicker alloc] init];
|
10.2常用设置
|
1
2
3
4
5
6
7
8
9
|
// 设置区域为中国简体中文
datePicker.locale = [[NSLocale alloc]
initWithLocaleIdentifier:@"zh_CN"];
// 设置picker的显示模式:只显示日期
datePicker.datePickerMode = UIDatePickerModeDate;
|
10.3UIDatePicker需要监听值的改变
|
1
2
3
|
[datePicker addTarget:self action:@selector(dateChange:)
forControlEvents:UIControlEventValueChanged];
|
11.UIDatePicker使用教程二
你可以通过设置mininumDate 和 maxinumDate 属性,来指定使用的日期范围。如果用户试图滚动到超出这一范围的日期,表盘会回滚到最近的有效日期。两个方法都需要NSDate 对象作参数:
|
1
2
3
4
5
6
7
|
NSDate* minDate = [[NSDate alloc]initWithString:@"1900-01-01 00:00:00 -0500"];
NSDate* maxDate = [[NSDate alloc]initWithString:@"2099-01-01 00:00:00 -0500"];
datePicker.minimumDate = minDate;
datePicker.maximumDate = maxDate;
|
如果两个日期范围属性中任何一个未被设置,则默认行为将会允许用户选择过去或未来的任意日期。这在某些情况下很有用处,比如,当选择生日时,可以是过去的任意日期,但终止与当前日期。如果你希望设置默认显示的日期,可以使用date属性:
|
1
|
datePicker.date = minDate;
|
你还可以用 setDate 方法。如果选择了使用动画,则表盘会滚动到你指定的日期:
|
1
|
[ datePicker setDate:maxDate animated:YES];
|
UIdatePicker的使用
1. 初始化UIDatePicker
UIDatePicker *datePicker = [[UIDatePicker alloc] initWithFrame:CGRectMake(0, 200, 320, 216)];
注:高度和宽度可以设定为0,比如:
UIDatePicker *datePicker = [[UIDatePicker alloc] initWithFrame:CGRectMake(0, 200, 0, 0)];
2. 设置时区
[datePicker setTimeZone:[NSTimeZone timeZoneWithName:@"GMT"]];
3. 设置当前显示时间
[datePicker setDate:tempDate animated:YES];
4. 设置显示最大时间(此处为当前时间)
[datePicker setMaximumDate:[NSDate date]];
或
datePicker.maximumDate = [NSDate date];
设置最小时间
NSDate* minDate = [[NSDate alloc]initWithString:@"1900-01-01 00:00:00 -0500"];
datePicker.minimumDate = minDate;
[minDate release];
5. 设置UIDatePicker的显示模式
[datePicker setDatePickerMode:UIDatePickerModeDate];
参数 UIDatePickerMode 有四种:
UIDatePickerModeTime, // Displays hour, minute, and optionally AM/PM designation depending on the locale setting (e.g. 6 | 53 | PM)
UIDatePickerModeDate, // Displays month, day, and year depending on the locale setting (e.g. November | 15 | 2007)
UIDatePickerModeDateAndTime, // Displays date, hour, minute, and optionally AM/PM designation depending on the locale setting (e.g. Wed Nov 15 | 6 | 53 | PM)
UIDatePickerModeCountDownTimer // Displays hour and minute (e.g. 1 | 53)
6. 当值发生改变的时候调用的方法
[datePicker addTarget:self action:@selector(datePickerValueChanged:) forControlEvents:UIControlEventValueChanged];
7. 加入到视图
[self.view addSubview:datePicker];
甚至还可以加入到 UIActionSheet 中
[actionSheet addSubview: datePicker];
8. 释放对象
[datePicker release];
9. 获得当前UIPickerDate所在的时间
NSDate *date = [datePicker date];
10.设置本地化语言
NSLocale * locale = [[NSLocalealloc] initWithLocaleIdentifier:@"Chinese"];//设置本地化语言,本地化语言可以通过在xib文件中添加一个日历选取器,然后查看其属性来找到需要的值
[datePicker setLocale:locale];
比如可以在 datePickerValueChanged 回调方法中
- (void)datePickerValueChanged:(id)sender {
UIDatePicker *datePicker = sender;
NSDate *date = [datePicker date];
// TODO:
|
可以在toolBar上添加任何View。其实它的原理是把你要添加的View先加到UIBarButtonItem里面,最后再把UIBarButtonItem数组一次性放到toolbar的items里面。
1.首先,我们看一下UIBbarButtonItem有哪些初始化方法,这也可以看出,它可以被定义为什么东东,然后加到UIToolBar上面去。
根据SDK的文档,我们可以发现UIBarButtonItem有如下几种初始化的方法:
-initWithTitle(添加button用这个)
-initWithImage
-initWithBarButtonSystemItem(添加系统自定义的button,形状跟大小都已经固定了)下面链接里面有按钮图片样式
https://developer.apple.com/library/ios/#documentation/UIKit/Reference/UIBarButtonItem_Class/Reference/Reference.html
-initWithCustomView(添加除了button以外的View)
第4种方法就是我们添加各种作料的接口,所以今天的主角其它也是它。
2.在UIToolBar上面添加Title
view plaincopy to clipboardprint?
UIToolbar *myToolBar = [[UIToolbar alloc] initWithFrame:
CGRectMake(0.0f, 0.0f, 320.0f, 44.0f)];
NSMutableArray *myToolBarItems = [NSMutableArray array];
[myToolBarItems addObject:[[[UIBarButtonItem alloc]
initWithTitle:@"myTile"
style:UIBarButtonItemStylePlain
target:self
action:@selector(action)] autorelease]];
[myToolBar setItems:myToolBarItems animated:YES];
[myToolBar release];
[myToolBarItems];
setItems传入值或者说items是一个对象数组。
3.在UIToolBar上面添加image
view plaincopy to clipboardprint?
[myToolBarItems addObject:[[[UIBarButtonItem alloc]
initWithImage:[UIImage imageNamed:@"myImage.png"]
style:UIBarButtonItemStylePlain
target:self
action:@selector(action)]];
4.在UIToolBar上面添加SystemItem
[myToolBarItems addObject:[[[UIBarButtonItem alloc]
initWithBarButtonSystemItem:UIBarButtonSystemItemPlay
target:self
action:@selector(action)] autorelease]];
Note:
initWithBarButtonSystemItem初始化:
- (id)initWithBarButtonSystemItem:(UIBarButtonSystemItem)systemItem target:(id)target action:(SEL)action
Defines system defaults for commonly used items.
typedef enum {
UIBarButtonSystemItemDone,
UIBarButtonSystemItemCancel,
UIBarButtonSystemItemEdit,
UIBarButtonSystemItemSave,
UIBarButtonSystemItemAdd,
UIBarButtonSystemItemFlexibleSpace,
UIBarButtonSystemItemFixedSpace,
UIBarButtonSystemItemCompose,
UIBarButtonSystemItemReply,
UIBarButtonSystemItemAction,
UIBarButtonSystemItemOrganize,
UIBarButtonSystemItemBookmarks,
UIBarButtonSystemItemSearch,
UIBarButtonSystemItemRefresh,
UIBarButtonSystemItemStop,
UIBarButtonSystemItemCamera,
UIBarButtonSystemItemTrash,
UIBarButtonSystemItemPlay,
UIBarButtonSystemItemPause,
UIBarButtonSystemItemRewind,
UIBarButtonSystemItemFastForward,
UIBarButtonSystemItemUndo, // iPhoneOS 3.0
UIBarButtonSystemItemRedo, // iPhoneOS 3.0
} UIBarButtonSystemItem;
5.在UIToolBar上面添加其它各种控件,最自由意义,最有意思的,我把它放在最后来讲。我们使用initWithCustomView来完成,
这里需要看一下initWithCustomView的定义:
- (id)initWithCustomView:(UIView *)customView
可以看出,它的参数是一个VIEW,所以我们给它的配料要正确哦才行哦,否则,你就等着时间DIDADIDA的流失吧.
A>加一个开关switch:
[myToolBarItems addObject:[[[UIBarButtonItem alloc]
initWithCustomView:[[[UISwitch alloc] init] autorelease]]
autorelease]];
B>加一个按钮UIBarButtonItem
UIBarButtonItem *myButton = [[[UIBarButtonItem alloc]
initWithTitle:@"myButton"
style:UIBarButtonItemStyleBordered
target:self
action:@selector(action)]autorelease];
get1Button.width = 50;
[myToolBarItems addObject:myButton];
C>加一个文本Label
view plaincopy to clipboardprint?
UILabel *myLabel = [[UILabel alloc] initWithFrame:CGRectMake(40.0f, 20.0f, 45.0f, 10.0f)];
myLabel.font=[UIFont systemFontOfSize:10];
//myLabel.backgroundColor = [UIColor clearColor];
//myLabel.textAlignment=UITextAlignmentCenter;
UIBarButtonItem *myButtonItem = [[UIBarButtonItem alloc]initWithCustomView:myLabel];
[myToolBarItems addObject: myButtonItem];
[mylabel release];
[myButtonItem release];
D>加一个进度条UIProgressView
UIProgressView *myProgress = [[UIProgressView alloc] initWithFrame:CGRectMake(65.0f, 20.0f, 90.0f, 10.0f)];
UIBarButtonItem *myButtonItem = [[UIBarButtonItem alloc]initWithCustomView:myProgress];
[myToolBarItems addObject: myButtonItem];
[myProgress release];
[myButtonItem release];
可以加使用initWithCustomView制作各种button,这里就不在这里一个一个在加了。我想你应该也已经掌握了如何添加各种buttonItem的方法了。
UIProgressView顾名思义用来显示进度的,如音乐,视频的播放进度,和文件的上传下载进度等。
下面以一个简单的实例来介绍UIprogressView的使用。

@interface ActivityViewController : UIViewController
{
UIProgressView *proView;
double proValue;
NSTimer *timer;
}
@property(nonatomic, retain) UIProgressView *proView;
-(IBAction)btnStartClick;
@implementation ActivityViewController
@synthesize proView;
#pragma mark - View lifecycle
-(IBAction)btnStartClick
{
proValue=0;
timer = [NSTimerscheduledTimerWithTimeInterval:1target:selfselector:@selector(changeProgress) userInfo:nilrepeats:YES]; //利用计时器,每隔1秒调用一次(changeProgress)
}
-(void)changeProgress
{
proValue += 1.0; //改变proValue的值
if(proValue > 5)
{
//停用计时器
[timer invalidate];
}
else
{
[proViewsetProgress:(proValue / 5)];//重置进度条
}
}
- (void)viewDidLoad
{
proView = [[UIProgressViewalloc] initWithFrame:CGRectMake(100, 100, 150, 20)];
[proViewsetProgressViewStyle:UIProgressViewStyleDefault]; //设置进度条类型
[self.viewaddSubview:proView];
[superviewDidLoad];
}
(三)3.UISlider 滑块
UIslider是一个方便的控件,让用户能够以可视化的方式设置指定范围内的值。和按钮一样,滑块也能响应事件,还可像文本框一样被读取。如果希望用户对滑块的调整立刻影响应用程序,则需要让他触发操作。

UISlider *slider = [[UISlider alloc] initWithFrame:CGRectMake(0, 0, 200, 20)]; //初始化 	slider.minimumValue = 0;//指定可变最小值 	slider.maximumValue = 100;//指定可变最大值 	slider.value = 50;//指定初始值 	[slider addTarget:self action:@selector(updateValue:) forControlEvents:UIControlEventValueChanged];//设置响应事件 	[self.view addSubview:slider];

-(IBAction)updateValue:(id)sender{
  //添加响应事件
  float f = slider.value; //读取滑块的值
}

改变UISlider的样式:

需要资源如下
 (max.png)
 (min.png) 类似图片就可。
slider.backgroundColor = [UIColorclearColor];
[slider setMinimumTrackImage:[UIImageimageNamed:@"max.png"] forState:UIControlStateNormal];
[slider setMaximumTrackImage:[UIImageimageNamed:@"min.png"] forState:UIControlStateNormal];

注意:UISlider的长和宽,要和图片匹配。
(三)4.UISegmentControl 选项卡
-(void) viewDidLoad{
 /*************分段控件UISegmentdControl*************/

    UISegmentedControl *segmentedControl = [[UISegmentedControlalloc] initWithItems:nil];

    segmentedControl.segmentedControlStyle = UISegmentedControlStyleBar; //控件风格小按钮,适合导航栏:

    segmentedControl.segmentedControlStyle = UISegmentedControlStyleBezeled; //控件风格

    segmentedControl.segmentedControlStyle = UISegmentedControlStyleBordered; //控件风格黑边的大白按钮,适合表格单元

    segmentedControl.segmentedControlStyle = UISegmentedControlStylePlain; //控件风格灰边大白按钮,适合偏好设置单元

    segmentedControl.tintColor = [UIColor blueColor]; //渲染色彩

    //添加片段,从0单元开始 ,可加入标题或图片两种情况

    [segmentedControl insertSegmentWithTitle:@"First"atIndex:0animated:NO];

    [segmentedControl insertSegmentWithTitle:@"Second"atIndex:1animated:NO];

    UIImage *myImage = [UIImage imageNamed:@"1.png"];

    [segmentedControl insertSegmentWithImage:myImage atIndex:2animated:NO];

    //删除片段

    [segmentedControl removeSegmentAtIndex:1 animated:YES]; //删除单个

    [segmentedControl removeAllSegments];  //删除所有

    //片段标题

    [segmentedControl setTitle:@"Third" forSegmentAtIndex:2];//设置标题

    NSString *myTitle = [segmentedControl titleForSegmentAtIndex:0];//读取标题

    //图像

    [segmentedControl setImage:[UIImageimageNamed:@"2.png"] forSegmentAtIndex:0];//设置图像

    UIImage *myImage = [segmentedControl imageForSegmentAtIndex:3]; //读取图片

    //设置片段宽度

    [segmentedControl setWidth:64.0 forSegmentAtIndex:0];

    //瞬时单击

    segmentedControl.momentary = YES; //按钮被按下后很快恢复,默认为选中状态就一直保持

    //初始化默认片段

    segmentedControl.selectedSegmentIndex = 0; //初始指定第0个选中

    //显示控件

    [parentView addSubview:segmentedControl]; //添加到父视图

    self.navigationItem.titleView = segmentedControl; //添加到导航栏(通过视图控制器)

    //读取控件

    int selectIndex = segmentedControl.selectedSegmentIndex;  //对应当前被选总的片段号码

[segmentedControl addTarget:selfaction:@selector(controlPressed:) forControlEvents:UIControlEventValueChanged];
}
//SegmentedControl触发的动作
-(void)controlPressed:(id)sender{
UISegmentedControl *control = (UISegmentedControl *)sender;
if (control == mySegmentedControl) {
int x = control.selectedSegmentIndex;
/*添加代码,对片段变化做出响应*/
}
}
(三)5.UIPickerView 选择器
1.UIPickerView的初始化
|
1
2
3
|
pickerView = [[UIPickerView alloc] initWithFrame:CGRectMake(0.0f, 200.0f, 320.0f, 216.0f)];pickerView.delegate = self; //指定DelegatepickerView.showsSelectionIndicator = YES; //显示选中框 |
2.实现UIPickerViewDelegate和UIPickerViewDataSource
|
1
2
3
4
5
6
7
|
- (NSInteger)numberOfComponentsInPickerView:(UIPickerView *)pickerView; //返回列数- (NSInteger)pickerView:(UIPickerView *)pickerView numberOfRowsInComponent:(NSInteger)component; //返回每列的最大行数- (NSString *)pickerView:(UIPickerView *)pickerView titleForRow:(NSInteger)row forComponent:(NSInteger)component; //每一列中每一行的具体内容- (void)pickerView:(UIPickerView *)pickerView didSelectRow:(NSInteger)row inComponent:(NSInteger)component //选中哪一列哪一行 |
iOS-UI-UI控件概述的更多相关文章
- UI输入控件
--UI输入控件 -- 输入控件 cc.uii.UIInput.new(table) --[[ 参数 table{ image 输入框图像,可以为图片名或者display.newScale9Sprit ...
- UWP学习记录10-设计和UI之控件和模式7
UWP学习记录10-设计和UI之控件和模式7 1.导航控件 Hub,中心控件,利用它你可以将应用内容整理到不同但又相关的区域或类别中. 中心的各个区域可按首选顺序遍历,并且可用作更具体体验的起始点. ...
- UWP学习记录9-设计和UI之控件和模式6
UWP学习记录9-设计和UI之控件和模式6 1.图形和墨迹 InkCanvas是接收和显示墨迹笔划的控件,是新增的比较复杂的控件,这里先不深入. 而形状(Shape)则是可以显示的各种保留模式图形对象 ...
- UWP学习记录8-设计和UI之控件和模式5
UWP学习记录8-设计和UI之控件和模式5 1.日历.日期和时间控件 日期和时间控件提供了标准的本地化方法,可供用户在应用中查看并设置日期和时间值. 有四个日期和时间控件可供选择,选择的依据如下: 日 ...
- UWP学习记录7-设计和UI之控件和模式4
UWP学习记录7-设计和UI之控件和模式4 1.翻转视图 使用翻转视图浏览集合中的图像或其他项目(例如相册中的照片或产品详细信息页中的项目),一次显示一个项目. 对于触摸设备,轻扫某个项将在整个集合中 ...
- UWP学习记录6-设计和UI之控件和模式3
UWP学习记录6-设计和UI之控件和模式3 1.按钮 按钮,响应用户输入和引发 Click 事件的控件. 使用<Button>就能创建一个按钮控件了.按钮是 ContentControl, ...
- UWP学习记录5-设计和UI之控件和模式2
UWP学习记录5-设计和UI之控件和模式2 1.应用栏和命令栏 CommandBar 控件是一款通用.灵活.轻型的控件,可显示复杂内容(如图像或文本块)以及简单的命令(如 AppBarButton.A ...
- UWP学习记录4-设计和UI之控件和模式1
UWP学习记录4-设计和UI之控件和模式1 1.控件和事件简介 在 UWP 应用开发中,控件是一种显示内容或支持交互的 UI 元素. 控件是用户界面的构建基块. 我们提供了超过 45 种控件供你使用, ...
- UI常用控件
UICommonlyUsedControls [UI常用控件] 不需要学习多么深入,但是要知道系统提供的有用的控件. 一.UISwitch(开关) 二.UIActivityIndicatorView( ...
- QMUI UI库 控件 弹窗 列表 工具类 MD
Markdown版本笔记 我的GitHub首页 我的博客 我的微信 我的邮箱 MyAndroidBlogs baiqiantao baiqiantao bqt20094 baiqiantao@sina ...
随机推荐
- LeetCode 1. Two Sum
Problem: Given an array of integers, return indices of the two numbers such that they add up to a sp ...
- 一、PID控制原理
在模拟控制系统中,控制器最常用的控制规律是PID控制.模拟PID控制系统原理框图如下图.系统由模拟PID控制器和被控对象组成. PID控制器是一种线性控制器,它根据给定值Yd(t)与实际输出值Y(t) ...
- Android MVP 利用rxjava 避免向Model传入监听方法
传统的MVP: 1.抽离出View的接口,即ILoginView. 2.抽离Model的接口,即ILoginModel. 3.抽离Presenter的接口,即ILoginPresenter. 4.实现 ...
- 德国W家HIPP 奶粉有货播报:2014.6.25 HIPP 1+ 4盒装有货啦!
德国W家HIPP 奶粉有货播报:2014.6.25 HIPP 1+ 4盒装有货啦!
- 微信——获取用户基本信息及openid 、access_token、code
获取用户信息,需要获取 access_token.openid 然后调用接口https://api.weixin.qq.com/cgi-bin/user/info?access_token=ACCES ...
- c++书
http://www.enet.com.cn/eschool/video/c++/ 视频 http://www.runoob.com/cplusplus/cpp-inheritance.html ...
- python面试总结
1.python的优势 1.1 python是一门胶水语言,能够结合各种语言 1.2 python是支持面向对象编程 1.3 python是完全开放源代码,有大量的技术支持文档, 1.4 可移植,py ...
- 破除Odoo 菜单栏提示 99+
菜单栏提示利用的menu对象的needaction_counter属性,默认只能显示99个 多于99则显示99+ 如果希望显示完整的数字,则需要改动如下两个地方. 一.menu菜单的显示限制: 将第一 ...
- pythonchallenge 解谜 Level 4
下一关... 一张图片,于是就点击了一下. 跳转到了 http://www.pythonchallenge.com/pc/def/linkedlist.php?nothing=12345 显示的是: ...
- MDK for ARM (keil) 编译后的信息
文章转自http://blog.csdn.net/gasbi/article/details/6186312 当我们使用Keil对我们的代码进行编译之后,下方Build Output窗口会出现:Pro ...

