springboot的yaml基础语法与取值,配置类,配置文件加载优先级
1、基本语法
k:(空格)v:表示一对键值对(一个空格必须有);
以空格的缩进来控制层级关系;只要是左对齐的一列数据,都是同一个层级的
属性和值也是大小写敏感;
server:

    port: 8081

    path: /hello
2、值的写法
字面量:
普通的值(数字,字符串,布尔)
k: v:字面直接来写;
字符串:
默认不用加上单引号或者双引号;
"":双引号;不会转义字符串里面的特殊字符;特殊字符会作为本身想表示的意思
name: "zhangsan \n lisi":输出;zhangsan 换行 lisi
'':单引号;会转义特殊字符,特殊字符最终只是一个普通的字符串数据
name: ‘zhangsan \n lisi’:输出;zhangsan \n lisi
对象、Map(属性和值)(键值对):
k: v:在下一行来写对象的属性和值的关系;注意缩进
对象还是k: v的方式
friends:

    lastName: zhangsan

    age: 20
行内写法:
friends: {lastName: zhangsan,age: 18}
数组(List、Set):
用- 值表示数组中的一个元素
pets:

 ‐ cat

 ‐ dog

 ‐ pig
行内写法:
pets: [cat,dog,pig]
3.springboot配置类
3.1pom文件
<?xml version="1.0" encoding="UTF-8"?>

<project xmlns="http://maven.apache.org/POM/4.0.0" xmlns:xsi="http://www.w3.org/2001/XMLSchema-instance"

         xsi:schemaLocation="http://maven.apache.org/POM/4.0.0 http://maven.apache.org/xsd/maven-4.0.0.xsd">

    <modelVersion>4.0.0</modelVersion>

    <groupId>com.zy</groupId>

    <artifactId>spring-boot-yaml-demo</artifactId>

    <version>0.0.1-SNAPSHOT</version>

    <packaging>jar</packaging>

    <name>spring-boot-yaml-demo</name>

    <description>Demo project for Spring Boot</description>

    <parent>

        <groupId>org.springframework.boot</groupId>

        <artifactId>spring-boot-starter-parent</artifactId>

        <version>1.5.14.RELEASE</version>

        <relativePath/> <!-- lookup parent from repository -->

    </parent>

    <properties>

        <project.build.sourceEncoding>UTF-8</project.build.sourceEncoding>

        <project.reporting.outputEncoding>UTF-8</project.reporting.outputEncoding>

        <java.version>1.8</java.version>

    </properties>

    <dependencies>

        <dependency>

            <groupId>org.springframework.boot</groupId>

            <artifactId>spring-boot-starter-web</artifactId>

        </dependency>

        <dependency>

            <groupId>org.springframework.boot</groupId>

            <artifactId>spring-boot-starter-test</artifactId>

            <scope>test</scope>

        </dependency>

        <dependency>

            <groupId>org.projectlombok</groupId>

            <artifactId>lombok</artifactId>

            <version>1.16.20</version>

        </dependency>

        <dependency>

            <groupId>org.springframework.boot</groupId>

            <artifactId>spring-boot-configuration-processor</artifactId>

            <optional>true</optional>

        </dependency>

        <dependency>

            <groupId>com.netflix.archaius</groupId>

            <artifactId>archaius-core</artifactId>

            <version>0.7.6</version>

        </dependency>

    </dependencies>

    <build>

        <plugins>

            <plugin>

                <groupId>org.springframework.boot</groupId>

                <artifactId>spring-boot-maven-plugin</artifactId>

            </plugin>

        </plugins>

    </build>

</project>
3.2实体类
package com.zy.model;

import lombok.AllArgsConstructor;

import lombok.Builder;

import lombok.Data;

import lombok.NoArgsConstructor;

@Data

@AllArgsConstructor

@NoArgsConstructor

@Builder

public class Cat {

    private String name;

    private Integer age;

}
3.3配置类
package com.zy.config;

import com.zy.model.Cat;

import org.springframework.context.annotation.Bean;

import org.springframework.context.annotation.Configuration;

@Configuration

public class MyConfigBean {

    @Bean

    //将方法的返回值添加到容器中;容器中这个组件默认的id就是方法名

    public Cat getCat(){

        return new Cat("tom",20);

    }

}
3.4获得bean
@RunWith(SpringRunner.class)

@SpringBootTest

public class SpringBootYamlDemoApplicationTests {

    @Autowired

    private ApplicationContext applicationContext;

    @Test

    public void fn(){

        Cat cat = (Cat) applicationContext.getBean("getCat");

        System.out.println(cat);

    }

}
4.springboot取yaml中的值(在上述代码基础上)
package com.zy.model;

import lombok.AllArgsConstructor;

import lombok.Builder;

import lombok.Data;

import lombok.NoArgsConstructor;

import org.springframework.boot.context.properties.ConfigurationProperties;

import org.springframework.stereotype.Component;

import java.util.Date;

import java.util.List;

import java.util.Map;

@Data

@NoArgsConstructor

@AllArgsConstructor

@Builder

@Component

//@PropertySource(value = {"classpath:person.properties"}) 另一种配置方式

@ConfigurationProperties(prefix = "person") // 该prefix对应于yaml文件中的person

/**

 * 将配置文件中配置的每一个属性的值,映射到这个组件中

 * @ConfigurationProperties:告诉SpringBoot将本类中的所有属性和配置文件中相关的配置进行绑定;

 *      prefix = "person":配置文件中哪个下面的所有属性进行一一映射

 *

 * 只有这个组件是容器中的组件,才能容器提供的@ConfigurationProperties功能;

 *  @ConfigurationProperties(prefix = "person")默认从全局配置文件中获取值;

 *

 */

public class Person {

    private String lastName;

    private Integer age;

    private Boolean boss;

    private Date birth;

    private Map<String,Object> maps;

    private List<Object> lists;

    private Dog dog;

}
package com.zy.model;

import lombok.AllArgsConstructor;

import lombok.Builder;

import lombok.Data;

import lombok.NoArgsConstructor;

import org.springframework.boot.context.properties.ConfigurationProperties;

import org.springframework.stereotype.Component;

@Data

@NoArgsConstructor

@AllArgsConstructor

@Builder

@Component

@ConfigurationProperties(prefix = "dog") // 该prefix对应于yaml文件中的dog

public class Dog {

    private String name;

    private Integer age;

}
server:

  port: 8080

person:

  lastName: 张三

  age: 20

  boss: false

  birth: 1999/09/09

  maps: {k1: v1,k2: v2}

  lists:

    - z1

    - z2

    - z3

  dog:

    name: little dog

    age: 2
package com.zy;

import com.zy.model.Cat;

import com.zy.model.Person;

import org.junit.Test;

import org.junit.runner.RunWith;

import org.springframework.beans.factory.annotation.Autowired;

import org.springframework.boot.test.context.SpringBootTest;

import org.springframework.context.ApplicationContext;

import org.springframework.test.context.junit4.SpringRunner;

@RunWith(SpringRunner.class)

@SpringBootTest

public class SpringBootYamlDemoApplicationTests {

    @Autowired

    private Person person;

    @Test

    public void contextLoads() {

        System.out.println(person);

    }

}
5.springboot配置文件加载优先级
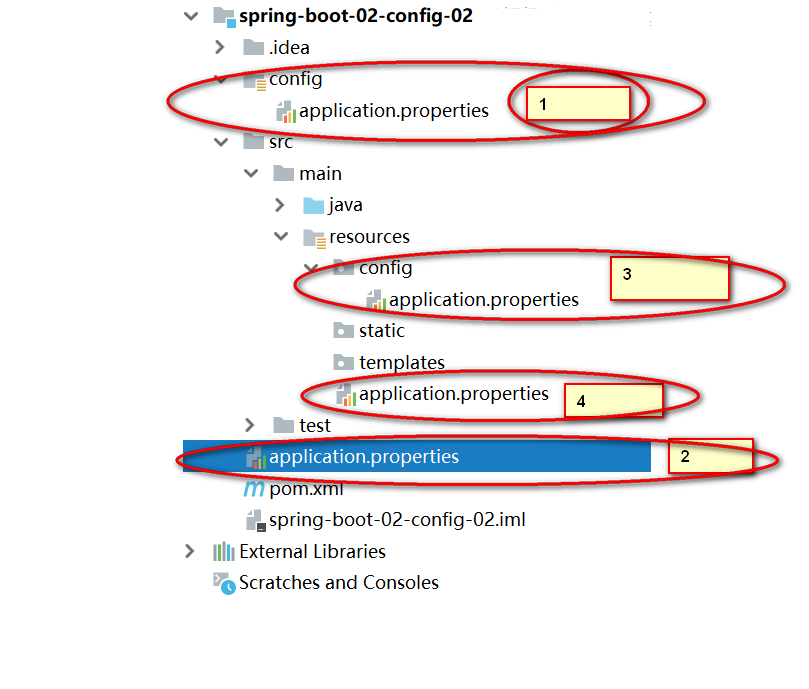
7.外部配置加载顺序
SpringBoot也可以从以下位置加载配置; 优先级从高到低;高优先级的配置覆盖低优先级的配置,所有的配置会
形成互补配置
7.1.命令行参数
所有的配置都可以在命令行上进行指定
java -jar spring-boot-02-config-02-0.0.1-SNAPSHOT.jar --server.port=8087 --server.context-path=/abc
多个配置用空格分开; --配置项=值
7.2.来自java:comp/env的JNDI属性
7.3.Java系统属性(System.getProperties())
7.4.操作系统环境变量
7.5.RandomValuePropertySource配置的random.*属性值
由jar包外向jar包内进行寻找;
优先加载带profile
7.6.jar包外部的application-{profile}.properties或application.yml(带spring.profile)配置文件
7.7.jar包内部的application-{profile}.properties或application.yml(带spring.profile)配置文件
再来加载不带profile
7.8.jar包外部的application.properties或application.yml(不带spring.profile)配置文件
7.9.jar包内部的application.properties或application.yml(不带spring.profile)配置文件
7.10.@Configuration注解类上的@PropertySource
7.11.通过SpringApplication.setDefaultProperties指定的默认属性
所有支持的配置加载来源;
springboot的yaml基础语法与取值,配置类,配置文件加载优先级的更多相关文章
- SpringBoot使用@Value从yml文件取值为空--注入静态变量
SpringBoot使用@Value从yml文件取值为空--注入静态变量 1.application.yml中配置内容如下: pcacmgr: publicCertFilePath: ...
- JAVA基础语法:函数(方法)、类和对象(转载)
4.JAVA基础语法:函数(方法).类和对象 函数 在java中函数也称为方法,是一段具备某种功能的可重用代码块. 一个函数包括这几部分: 函数头 函数头包括函数访问修饰符,函数返回值类型, 函数名, ...
- springboot属性类自动加载配置文件中的值
springboot属性类自动加载配置文件中的值,如Person类加载在yml中配置的name,age等属性值,可以通过如下步骤获取: 类上添加@ConfigurationProperties注解,p ...
- 【SpringBoot基础系列-实战】如何指定 bean 最先加载(应用篇)
[基础系列-实战]如何指定 bean 最先加载(应用篇) 在日常的业务开发中,绝大多数我们都是不关注 bean 的加载顺序,然而如果在某些场景下,当我们希望某个 bean 优于其他的 bean 被实例 ...
- 配置文件中取值: spring配置文件中util:properties和context:property-placeholder
转载大神 https://blog.csdn.net/n447194252/article/details/77498916 util:properties和context:property-plac ...
- DB数据源之SpringBoot+MyBatis踏坑过程(二)手工配置数据源与加载Mapper.xml扫描
DB数据源之SpringBoot+MyBatis踏坑过程(二)手工配置数据源与加载Mapper.xml扫描 liuyuhang原创,未经允许进制转载 吐槽之后应该有所改了,该方式可以作为一种过渡方式 ...
- DB数据源之SpringBoot+MyBatis踏坑过程(三)手工+半自动注解配置数据源与加载Mapper.xml扫描
DB数据源之SpringBoot+MyBatis踏坑过程(三)手工+半自动注解配置数据源与加载Mapper.xml扫描 liuyuhang原创,未经允许禁止转载 系列目录连接 DB数据源之Spr ...
- SpringBoot——配置文件加载位置及外部配置加载顺序
声明 本文部分转自:SpringBoot配置文件加载位置与优先级 正文 1. 项目内部配置文件 spring boot 启动会扫描以下位置的application.properties或者applic ...
- Python 爬取单个网页所需要加载的地址和CSS、JS文件地址
Python 爬取单个网页所需要加载的URL地址和CSS.JS文件地址 通过学习Python爬虫,知道根据正式表达式匹配查找到所需要的内容(标题.图片.文章等等).而我从测试的角度去使用Python爬 ...
随机推荐
- IntelliJ IDEA小问题解决方法------(持续更新)
1:IDEA运行时报错提示“找不到或无法加载主类”:在确保IDEA开发环境无误后->file->invalidate Cache/restart,之后再重新build.问题解决. 2.如何 ...
- 使用HTML5里页面可见性接口判断用户是否正在观看你的页面
转自:http://www.webhek.com/page-visibility 长期以来我们一直缺少一个判断用户是否正在浏览某个指定标签页的方法.用户是否去看别的网站了?他们切换回来了么?现在,HT ...
- C#后台调用前台javascript的五种方法小结
第一种,OnClientClick (vs2003不支持这个方法) <asp:Button ID="Button1" runat="server" Tex ...
- Delphi7到Delphi XE2的升级历程
1.PChar 转为PAnsiChar; 2.第三方控件的安装 SuiPack不能直接点击InStall.exe安装,需要打开DPK文件安装: SuiPack安装之后程序编译会报错,resHandle ...
- pig入门案例
测试数据位于:/home/hadoop/luogankun/workspace/sync_data/pigperson.txt中的数据以逗号分隔 ,zhangsan, ,lisi, ,wangwu, ...
- 使用HTML引用标签来分隔Ticket回复
今天在查看Ticket的时候,发现如何和客户之间有很多个来回,Ticket的Correspondence就会很长很长,虽然我们有自己的Breakline,但是由于客户回复邮件时,添加的用于分隔旧信息和 ...
- Jenkins配置HTML报告(Windows环境)
1.首先安装插件HTML Publisher,点击直接安装 2.在任务中配置,构建后操作,添加Publish HTML reports 3.添加完成后,新增一项 4.HTML directory to ...
- vb和c#插入行与删除行
vb: xSheet.Range(, ).Insert(Shift:=Excel.XlDirection.xlDown) xSheet.Range(, ).Delete() xSheet.Range( ...
- git常用命令,冲突
使用多个仓库git push cangkuming fenzhiming删除远程仓库 git push 远程仓库名 :删除目标分支 # 需要先删除本地目标分支 git pull <远程主机名&g ...
- IPv4选项
IPv4数据报的首部由固定首部(20字节)和可变部分组成(40字节).选项可用于网络的测试和排错. 1:选项的组成(TLV:type-length-value) 1.1:一个字节的类型字段. 1.1. ...