Java图形化界面设计——布局管理器之GridBagLayout
GridBagLayout 不会随着窗口的变化标签随之发生变化,可固定。
----------------------------------------------------------
import java.awt.Button;
import java.awt.Font;
import java.awt.GridBagConstraints;
import java.awt.GridBagLayout;
import java.awt.event.WindowAdapter;
import java.awt.event.WindowEvent;
import javax.swing.JFrame;
import javax.swing.JPanel;
public class GridBagEx2 extends JPanel
{
private static final long serialVersionUID = -5214441555967215113L;
protected void makebutton(String name, GridBagLayout gridbag,
GridBagConstraints c)
{
Button button = new Button(name);
gridbag.setConstraints(button, c);
add(button);
}
public void init()
{
GridBagLayout gridbag = new GridBagLayout();
GridBagConstraints c = new GridBagConstraints();
setFont(new Font("SansSerif", Font.PLAIN, 14));
setLayout(gridbag);
c.fill = GridBagConstraints.BOTH;
c.weightx = 1.0;
makebutton("Button1", gridbag, c);
makebutton("Button2", gridbag, c);
makebutton("Button3", gridbag, c);
c.gridwidth = GridBagConstraints.REMAINDER; //end row
makebutton("Button4", gridbag, c);
c.weightx = 0.0; //reset to the default
makebutton("Button5", gridbag, c); //another row
c.gridwidth = GridBagConstraints.RELATIVE; //next-to-last in row
makebutton("Button6", gridbag, c);
c.gridwidth = GridBagConstraints.REMAINDER; //end row
makebutton("Button7", gridbag, c);
c.gridwidth = 1; //reset to the default
c.gridheight = 2;
c.weighty = 1.0;
makebutton("Button8", gridbag, c);
c.weighty = 0.0; //reset to the default
c.gridwidth = GridBagConstraints.REMAINDER; //end row
c.gridheight = 1; //reset to the default
makebutton("Button9", gridbag, c);
makebutton("Button10", gridbag, c);
setSize(300, 100);
}
public static void main(String args[])
{
JFrame f = new JFrame("GridBag Layout Example");
f.setLocation(400, 200);
GridBagEx2 ex1 = new GridBagEx2();
ex1.init();
f.add("Center", ex1);
f.pack();
f.setSize(f.getPreferredSize());
f.setVisible(true);
f.addWindowListener(new WindowAdapter()
{
@Override
public void windowClosing(WindowEvent e)
{
System.exit(0);
}
});
}
}
The Java AWT: GridBagLayout
Jan Newmarch
Web: http://jan.newmarch.name
Email: jan@newmarch.name
Contents
- Introduction
- Debugging
- GridBagConstraints
- Absolute positioning
- Cell sizes
- Relative positioning
- Filling
- Anchor
- Padding and Insets
- Spanning multiple cells
- Relatively ending rows and columns
- Weight
- Limitations and variations
- Conclusion
Introduction
A graphical user interface is built up in Java by adding objects
to Containers, and using LayoutManagers
to place and size them within the containers.
There are several managers supplied in AWT:
BorderLayout- NSEW layoutFlowLayout- left-to-right with overflowGridLayout- regular rectangular gridGridBagLayout- general gridded layoutCardLayout- allows "flipping" through a set of "cards"
In the last issue of the X Advisor I discussed all of these
except for GridBagLayout. The reason is simple:
GridBagLayout is a manager that
can layout a large number of configurations in a flexible way.
This ability comes through complexity, and there is a lot to learn
before you can use this manager effectively. This article is devoted
entirely to GridBagLayout.
GridBagLayout is used to place objects in a rectangular
grid. The cells of this grid need not be the same size, and the objects
can span several cells. There is control over placement of each object
within the space allowed for it, and how it fills this space.
Debugging
The more complex the layout manager, the harder it is to get
layouts correct. Under X, I use two techniques to help me with
layouts using this manager. The first is very specifically
X Oriented: set the resource borderWidth for all
objects to some non-zero value. Then you can see exactly
how each object is placed, including objects like labels
which don't normally have visible edges. I set this in
.Xdefaults:
*borderWidth: 3
The second technique is more generally applicable, but harder to interpret. GridBagLayout has two protected methods, DumpConstraints() and DumpLayoutInfo(), intended for debugging the manager itself. However, if you want access to this level of information then you can subclass the manager and call these methods yourself. Here is a suitable subclass. Note that it must be installed in $CLASSES/java/awt since it has to belong to package java.awt
package java.awt;

public class DebugGridBagLayout extends GridBagLayout {

    public void dumpLayoutInfo(Container parent) {

	GridBagLayoutInfo s = GetLayoutInfo(parent,

				GridBagLayout.PREFERREDSIZE);

	DumpLayoutInfo(s);

    }

    public void dumpConstraints(Container parent) {

	Component comp;

	GridBagConstraints constraints;

	for (int n = 0; n < parent.ncomponents; n++) {

	    comp = parent.getComponent(n);

	    constraints = lookupConstraints(comp);

	    DumpConstraints(constraints);

	}

    }

}
Not all problems with using this manager are caused by your bugs :-). Many of the applets that run within this article fail to show components when they begin execution. Partly for this reason, I use components such as Button that respond to inputs and redraw themselves on changes. If some of the applets seem to be missing components, click over them to show the missing ones.
On my system, at least one of the applets displays correctly using appletviewer but doesn't show under Netscape 2.0.
GridBagConstraints
In order to layout objects within a container, the manager needs to know some information about them. A very simple manager like FlowLayout just needs to know the order in which objects were added to the container and it can get this from the container itself. A manager like BorderLayout needs to associate objects with special positions such as "North", and it gets this association from the add(String, Component) method. When the container executes this it also calls the layout object's addLayoutComponent(String, Component) which allows the layout manager to store information.
The information needed by GridBagLayout for each object is complicated: direction of layout, number of cells spanned, placement within this space, etc. The above methods are too simple for that. Instead, all of this information is stored in a GridBagConstraints object, and this is passed through to the layout manager by
setConstraints(Component, GridBagConstraints)
The layout manager makes a copy of the GridBagConstraints and links it to the Component using a hash table. (This means that you only need to have one of these objects which you can reset values of without messing up earlier references.)
Typical code using this manager is
GridBagLayout gridbag = new GridBagLayout();

setLayout(gridbag);

GridBagConstraints constraints = new GridBagConstraints();

// set values in constraints ...

Button btn = new Button("Hello");

add(btn);

// tell the layout manager of the constraints

gridbag.setConstraints(btn, constraints);
The fields of GridBagConstraints are
public int gridx, gridy, gridwidth, gridheight;

public double weightx, weighty;

public int anchor, fill;

public Insets insets;

public int ipadx, ipady;
These may be set by an application. They are discussed in the article in the appropriate places.
Absolute positioning
The two fields gridx and gridy may be used to set the positions of objects, where the topleft cell is at (0, 0). For example, to arrange four buttons at the corners of a fifth,
import java.awt.*;

public class Absolute extends Frame {

    public static void main(String argv[]) {

	new Absolute().show();

    }

    public Absolute() {

	GridBagLayout gridbag = new GridBagLayout();

	setLayout(gridbag);

	GridBagConstraints constraints = new GridBagConstraints();

	Button  btn1 = new Button("Button 1");

	add(btn1);

	// set at (0,0)

	constraints.gridx = 0;

	constraints.gridy = 0;

	gridbag.setConstraints(btn1, constraints);

	Button btn2 = new Button("Button 2");

	add(btn2);

	// set at (2,0)

	constraints.gridx = 2;

	constraints.gridy = 0;

	gridbag.setConstraints(btn2, constraints);

	Button btn3 = new Button("Button 3");

	add(btn3);

	// set at (0,2)

	constraints.gridx = 0;

	constraints.gridy = 2;

	gridbag.setConstraints(btn3, constraints);

	Button btn4 = new Button("Button 4");

	add(btn4);

	// set at (2,2)

	constraints.gridx = 2;

	constraints.gridy = 2;

	gridbag.setConstraints(btn4, constraints);

	Button btn5 = new Button("Button 5");

	add(btn5);

	// set at (1,1)

	constraints.gridx = 1;

	constraints.gridy = 1;

	gridbag.setConstraints(btn5, constraints);

	resize(300, 300);

    }

}
The program looks like

Note that problems in the AWT may result in buttons not showing until
pressed. It should look like

Cell sizes
The manager displays objects in one or more cells.
The cells may be of different sizes.
In each row the cells all have the same height, though,
and in each column the cells all have the same width.
For each row, the height is calculated by looking at the
preferredSize().height of the components in
that row. The maximum of these is found, and then the value of
ipady is added twice (for top and bottom).
The height is usually this, unless made larger by some other
constraint. Whatever,
the height of the row cannot be smaller than this.
Similarly, the width of each column is not smaller than the
maximum preferred width of each component,
plus twice ipadx.
Different rows can thus have different heights, and different columns
can have different widths. To see this, replace one of the
buttons by, say, a TextArea:
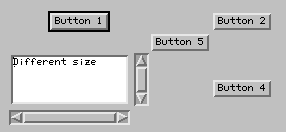
The sizing policy means that if there is nothing
in a row and ipady
is also zero, then the row has no width and does not show.
Similarly with a column with no components. In the example program
if we remove the central button, "Button 5", then that row and
column have zero height and width respectively, and all four
buttons show up against each other.
if you want to get four buttons occupying corners with a middle space,
then you need to adjust ipadx and ipady
to leave space around each button. This would leave a border around
the outside though. This particular problem is revisited later.
REVISIT THIS.
In the JDK version 1.0, there is a limitation on the number of
components that can appear in any row or column. Each is set to
a maximum of 128. If you exceed this, then an
ArrayIndexOutOfBoundsException is raised.
Relative positioning
If you want to layout a lot of objects in a row, then having to
specify gridx for each of them may be a little tedious.
An alternative way is to use relative positioning, in which
you say how to layout a component with respect to the last one
(roughly). The fields gridx and gridy are
used for this relative placement as well as the absolute placement.
If gridx == RELATIVE then add in row order. That is,
place the next component to the right of the previous component
unless the previous component was the last in the row,
in which case this one starts a new row.
Similarly, if gridy == RELATIVE then add in column
order. That is, add below the previous component unless it was the
last in the column, in which case it is placed in a new column to the right.
If both gridx and gridy are RELATIVE
then add in row order. This is the default value for a
GridBagConstraints object.
These values can be reset for each component.
It is also possible to mix up the absolute and relative
styles of positioning together.
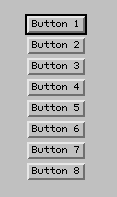
A simple example of relative positioning is to set a group of buttons
vertically without having to reset the GridBagConstraints
each time (this is, of course, easier with GridLayout)
import java.awt.*;

public class Vertical extends Frame {

    public static void main(String argv[]) {

	new Vertical().show();

    }

    public Vertical() {

	Button btn;

	GridBagLayout gridbag = new GridBagLayout();

	setLayout(gridbag);

	GridBagConstraints constraints = new GridBagConstraints();

	constraints.gridx = 0; // note: gridy == RELATIVE

	for (int n = 1; n <= 8; n++) {

	    btn = new Button("Button " + n);

	    add(btn);

	    gridbag.setConstraints(btn, constraints);

	}

    }

}
which shows as
More complex arrangements can be obtained by mixing relative and
absolute positioning:
import java.awt.*;

public class Direction extends Frame {

    Button btn1, btn2, btn3, btn4, btn5, btn6;

    GridBagLayout gridbag;

    GridBagConstraints c;

    public static void main(String argv[])

    {

	new Direction().show();

    }

    void makeButtons() {

	btn1 = new Button("Button 1"); add(btn1);

	btn2 = new Button("Button 2"); add(btn2);

	btn3 = new Button("Button 3"); add(btn3);

	btn4 = new Button("Button 4"); add(btn4);

	btn5 = new Button("Button 5"); add(btn5);

	btn6 = new Button("Button 6"); add(btn6);

    }

    public Direction()

    {

	gridbag = new GridBagLayout();

	setLayout(gridbag);

	c = new GridBagConstraints();

	makeButtons();

	// use defaults for btn1

	gridbag.setConstraints(btn1, c);

	// btn2 below btn1

	c.gridx = 0; // gridy is still RELATIVE

	gridbag.setConstraints(btn2, c);

	// btn3 below of btn2 - reuse constraint

	gridbag.setConstraints(btn3, c);

	// btn4 right of btn2

	c.gridx = GridBagConstraints.RELATIVE;

	c.gridy = 1;

	gridbag.setConstraints(btn4, c);

	// btn5 right of btn4

	c.gridx = GridBagConstraints.RELATIVE;

	c.gridy = 2;

	gridbag.setConstraints(btn5, c);

	// btn6 down and to right of btn5

	c.gridx = 2;

	c.gridy = 3;

	gridbag.setConstraints(btn6, c);

	resize(400, 200);

    }

}
which shows as

Filling
When a component is placed in a cell, the cell is guaranteed to be
at least as large as the component plus twice the values of
ipadx and ipady.
If there are components of different sizes then some of them will
be smaller than the cell size.
A component may also be set to occupy more than one cell,
which it may not be large enough to fill.
The amount of space an object occupies within its allocated area
is controlled by the fill field of the constraints
object. The possible values are
HORIZONTAL- set the component's width to the full size
available.VERTICAL- set the component's height to the full size
available.BOTH- set the width and height to the size of the
available space.
Anchor
There is an additional method of control over placement of an object
when its preferred size is smaller than that of the space it has to
occupy. The anchor field controls location within this.
The possible values of this are
NORTH, NORTHEAST, EAST,
SOUTHEAST, SOUTH, SOUTHWEST,
WEST, NORTHWEST and (the default)
CENTER.
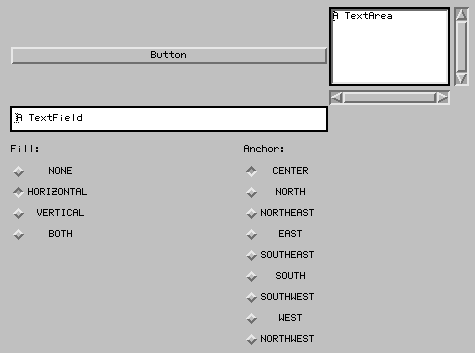
The following example is quite artificial: it forces a space larger
than a normal Button by setting a long TextField
horizontally and a high TextArea vertically.
A Button is set in this because it has natural edges so you
can see what happens to its boundaries. The applet allows selection
of fill and anchor parameters and how
they affect the Button. The source contains several uses
of layout managers and is available as
FillAnchorApplet.java
(Note: setting the anchor has no effect until a change is
made to fill - another minor bug in AWT :-( ).
The program looks like
Padding and Insets
There is a third level of control over sizing and placement of objects
(just for variety :-( ). Each GridBagConstraint has fields
of ipadx, ipady and insets -
an Insets object.
The insets object acts like it does in other managers.
Given a space in which to locate an object, insets specifies
a top, bottom, left and
right restriction of this space. So with a top
value of, say, 10, the top of the object must appear 10 pixels down
from the top of the space.
The ipadx and ipady fields specify internal
padding i.e. space that is added to the object's size to find
its "real" size. With an ipadx of 20 pixels, the object
will be 40 pixels (20 for each side) wider than otherwise.
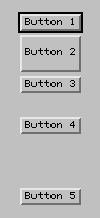
The difference can be seen by the following applet. It sets up five
buttons vertically. Buttons 1, 3 and 5 all have constraints with
ipadx = ipday = 0, and insets with all
fields zero. Button 2 sets its ipady to 20, and so is
40 pixels taller than normal. Button 4 sets insets.top = 20
and insets.bottom = 50, meaning that the
height it requires is 70 pixels taller than the space it displays in.
import java.awt.*;

import java.applet.*;

public class PaddingApplet extends Applet {

    public PaddingApplet() {

	GridBagLayout gridbag = new GridBagLayout();

	setLayout(gridbag);

	GridBagConstraints constraints = new GridBagConstraints();

	Button  btn1 = new Button("Button 1");

	add(btn1);

	constraints.gridx = 0;  // add in column order

	gridbag.setConstraints(btn1, constraints);

	Button btn2 = new Button("Button 2");

	add(btn2);

	constraints.ipady = 20;

	gridbag.setConstraints(btn2, constraints);

	Button btn3 = new Button("Button 3");

	add(btn3);

	constraints.ipady = 0; // reset to default

	gridbag.setConstraints(btn3, constraints);

	Button btn4 = new Button("Button 4");

	add(btn4);

	constraints.insets.top = 20;

	constraints.insets.bottom = 50;

	gridbag.setConstraints(btn4, constraints);

	Button btn5 = new Button("Button 5");

	add(btn5);

	constraints.insets.top = 0;  // reset to default

	constraints.insets.bottom = 0;  // reset to default

	gridbag.setConstraints(btn5, constraints);

	resize(300, 300);

    }

}
The program looks like
This mechanism allows us to solve the problem posed earlier in
"Cell sizes": in the Absolute.java five buttons were
shown with corners touching. Remove the center one and the arrangement
collapses to the remaining four in a 2x2 grid. The middle row and
column have height and width set to zero, respectively, and don't show.
To preserve the spacing of these four can be done by setting them in a
2x2 grid but setting insets to force them apart.
If we want to set the four objects with a fixed space
apart, then we can do that by just changing earlier programs to set
an Insets object. If we want to set the space to between
the four objects to the preferred size (or something related
to preferred or minimum sizes) then it gets a bit trickier.
This warrants a "sidebar" discussion, so here is an inline version:
Diversion: widget creation
Methods such as preferredSize() rely on the native
implementation. If the native code object has not yet been created
then such methods return "sensible" values such as
Dimension(0, 0).
The native code objects are created by peer methods
such as createButton(). These are called by a GUI
object's method addNotify().
When a container calls layout() the native object has
already been created, so it can do meaningful geometry calculations.
If we want to find meaningful values for preferredSize()
before this, then we have to ensure that the native object has already
been created. So far, we have been relying on show()
to do this.
The Window method pack() is documented as
"packs the components of the Window". It actually does something
far more important than that: it calls addNotify()
on itself and on all of its children. This creates the peer
objects and the native implementation. From then on, whenever a
container method add() is executed, it also calls
addNotify() on the component.
To be able to find the preferred/minimum size of an object before
show() is executed, call pack() on the
toplevel Window (or Frame), and then
add() each component. Then geometry works.
(For applets, packing has been done by the time the init()
method is called.)
End diversion
To creae a "hole" that is made from the preferred size of the
surrounding objects, first call pack() on the
Window and then add() each component.
After that it is valid to ask for preferred sizes and set this in the
Insets constraint field:
import java.awt.*;

public class AbsoluteHole extends Frame {

    public static void main(String argv[]) {

	new AbsoluteHole().show();

    }

    public AbsoluteHole() {

	// here is the pack()

	pack();

	// then add the rest

	setContents();

    }

    void setContents() {

	GridBagLayout gridbag = new GridBagLayout();

	setLayout(gridbag);

	GridBagConstraints constraints = new GridBagConstraints();

	// Button 1

	Button  btn1 = new Button("Button 1");

	add(btn1);

	constraints.gridx = 0;

	constraints.gridy = 0;

	Dimension size = btn1.preferredSize();

	constraints.insets = new Insets(0, 0, // top, left

					size.height/2,  // bottom

					size.width/2);  // right

	gridbag.setConstraints(btn1, constraints);

	// Button 2

	Button btn2 = new Button("Button 2");

	add(btn2);

	constraints.gridx = 1;

	constraints.gridy = 0;

	size = btn2.preferredSize();

	constraints.insets = new Insets(0, // top

				size.width/2, // left

				size.height/2,  //bottom

				0);

	gridbag.setConstraints(btn2, constraints);

	// Button 3

	Button btn3 = new Button("Button 3");

	add(btn3);

	constraints.gridx = 0;

	constraints.gridy = 1;

	size = btn3.preferredSize();

	constraints.insets = new Insets(size.height/2, // top

					0, 0, //left, bottom

					size.width/2); // right

	gridbag.setConstraints(btn3, constraints);

	// Button 4

	Button btn4 = new Button("Button 4");

	add(btn4);

	constraints.gridx = 1;

	constraints.gridy = 1;

	size = btn4.preferredSize();

	constraints.insets = new Insets(size.height/2, //top

					size.width/2, //left

					0, 0); // bottom, right

	gridbag.setConstraints(btn4, constraints);

	resize(300, 300);

    }

}
The program looks like

Spanning multiple cells
The GridBagConstraints fields gridwidth
and gridheight are used to specify how many cells
a component should span in that direction.
For example, the following applet places three buttons in a row along
the top, three down the left, with another button occupying the
remaining 2x2 space:
import java.awt.*;

import java.applet.*;

public class BigButtonApplet extends Applet {

    Button btn1, btn2, btn3, btn4, btn5, btn6;

    GridBagLayout gridbag;

    GridBagConstraints c;

    void makeButtons() {

	btn1 = new Button("Button 1"); add(btn1);

	btn2 = new Button("Button 2"); add(btn2);

	btn3 = new Button("Button 3"); add(btn3);

	btn4 = new Button("Button 4"); add(btn4);

	btn5 = new Button("Button 5"); add(btn5);

	btn6 = new Button("Button 6"); add(btn6);

    }

    public BigButtonApplet() {

	gridbag = new GridBagLayout();

	setLayout(gridbag);

	c = new GridBagConstraints();

	makeButtons();

	gridbag.setConstraints(btn1, c);

	c.gridx = 1;

	c.gridy = 0;

	gridbag.setConstraints(btn2, c);

	c.gridx = 2;

	c.gridy = 0;

	gridbag.setConstraints(btn3, c);

	c.gridx = 0;

	c.gridy = 1;

	gridbag.setConstraints(btn4, c);

	c.gridx = 0;

	c.gridy = 2;

	gridbag.setConstraints(btn5, c);

	c.gridx = 1;

	c.gridy = 1;

	c.gridwidth = 2;

	c.gridheight = 2;

	c.fill = GridBagConstraints.BOTH;

	gridbag.setConstraints(btn6, c);

    }

}
The program looks like

Note that Button 6 would normally be smaller than the space
it is allocated, so fill is set to BOTH to
force it to fill all of this space.
Relatively ending rows and colums
With relative placement of components, you can add components to the
right of or below the previous component. There is also a mechanism within
GridBagConstraints to allow the end of a row,
or the bottom of a column to be specified. Setting
gridWidth to REMAINDER makes this component
the last in a row, whereas setting gridHeight to
REMAINDER makes this the last in a column.
The more I use this manager, the less I use this method. It seems much
easier to use absolute positioning.
Setting gridWidth to RELATIVE makes this
component the last but one in this row. Similarly, setting
gridHeight to RELATIVE makes this component
the last but one in its column. I have never used this this.
The possibilities for specifying inconsistent geometry seem to
explode with this method!
Weight
The discussion so far has been in terms of placing components within
cells. The size of a cell is calculated as not smaller than the
biggest object that must fit inside it. When an object occupies a
space larger than its preferred size, then the fill
attribute specifies how it fills this space.
There may be external constraints that act on sizes. For example,
the container with a GridBagLayout may be managed
by another layout manager such as GridLayout that forces
the size of this container. How are these external size requests
passed to the components?
For example, in the last article we looked at aLabelledTextField,
where a Label was put to the left of a TextField.
The constraints on sizes were that the Label was kept
at a constant size (the width of the text) whereas the TextField
would stretch to fill the remaining space. This was done using a
BorderLayout manager, but should be (and can be) also
done with GridBagLayout.
The fields weightx and weighty control how
the manager resizes the components in response to external constraints.
A weight of 0.0 means no external resizing is done. This is the
default value.
In the earlier examples, the default value was used, so the externally
set size of the container was ignored. What the layout manager does
in this case is to use its own internal calculations, and then
place the group of objects in the center of its space.
If we specify an object to have a weight of more than zero in a
direction then the manager can resize the object to fill its available
space. To take the LabelledTextField example, here
is an implementation using GridBagLayout:
import java.awt.*;

public class LabelledTextField extends Panel {

    Label label;

    TextField text;

    public LabelledTextField(String l, int cols) {

	GridBagLayout gridbag = new GridBagLayout();

	setLayout(gridbag);

	GridBagConstraints constraints = new GridBagConstraints();

	label = new Label(l);

	text = new TextField(cols);

	add(label);

	add(text);

	// set resizing

	gridbag.setConstraints(label, constraints);

	constraints.weightx = 1.0;

	constraints.fill = GridBagConstraints.HORIZONTAL;

	gridbag.setConstraints(text, constraints);

   }

    public String getText() {

	return text.getText();

    }

}
Using this within a program looks like

Each component in a layout can have its own widthx
and widthy. However, when it comes to laying out the
components the cells in any row will all be the same size, and the
cells in any column will all be the same size. So GridBagLayout
needs to calculate row weights and column weights.
It finds a row weight by taking the maximum value of all the x-weights
in the row, and the column weight as the maximum of all the y-weights
for that column.
If there is more than one column and at least one of these has a non-zero
weight, then any extra space will need to be distributed. The following
example has three columns with weightx respectively of
1, 2 and 4.
import java.awt.*;

public class Weight extends Frame {

    public static void main(String argv[]) {

	new Weight().show();

    }

    public Weight() {

	GridBagLayout gridbag = new GridBagLayout();

	setLayout(gridbag);

	GridBagConstraints constraints = new GridBagConstraints();

	Button  btn1 = new Button("Button 1");

	add(btn1);

	constraints.weightx = 1;

	constraints.fill = GridBagConstraints.BOTH;

	gridbag.setConstraints(btn1, constraints);

	Button btn2 = new Button("Button 2");

	add(btn2);

	constraints.weightx = 2;

	gridbag.setConstraints(btn2, constraints);

	Button btn3 = new Button("Button 3");

	add(btn3);

	constraints.weightx = 4;

	gridbag.setConstraints(btn3, constraints);

	resize(300, 100);

    }

}
GridbagLayout distributes the extra space in proportion to the weights. To make this more concrete, suppose the preferred width of each button is 10 pixels, and the actual width available is 65 pixels. Then there are 65-30 = 35 pixels spare. The total weight of the row is 1+2+4 = 7. So Button 1 gets 1/7 of 35 i.e. 5 extra pixels to bring its width to 10+5 = 15 pixels. Button 2 gets 2/7 of 35 to bring its width to 10+10 = 20 pixels, and Button 3 gets 4/7 of 35 to bring its width to 10+20 = 30 pixels.
To observe this resizing behaviour, the following applet (similar to the applets in the last article) may be used if you are running a Java-aware browser:
Limitations and variations
We have already mentioned that if a row contains no elements then
its height is zero and nothing shows. There are other limitations
as well. One other that I have come across is in trying to set a
gridWidth or gridHeight that is too large.
For example, if only one row is specified but a request is made for
a height of two, then it will be shown with a height of only one.
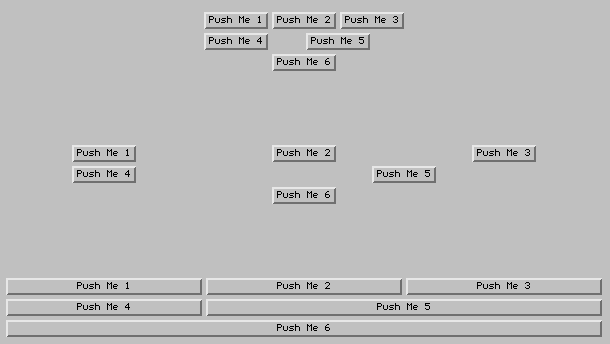
Layouts may display very differently with only a minor change in code.
The following three layouts show versions that differ
in small ways.
In the first layout weightx and fill
use default values.
In the second layout weightx is set to 1.0.
In the third layout weightx is set to 1.0 and
fill to HORIZONTAL.
The variants look like
Conclusion
This article has discussed the GridBagLayout manager
in depth. The manager allows a tremendous amount of freedom to build
complex arrangements. However it is not easy to learn, and a large
amount of time will be needed to determine the best way to layout
any complex arrangement.
The next article in this series will probably be on dialogs.
Some possibilities for other articles include
designing layouts, menus, applets vs applications,
the new event model, adding native widgets,
interacting with the window manager or browser, and images.
In the previous articles
I have been choosing topics on what I found lacking in the
existing documentation,
so if you have any preferences,
or other topics that you wish
discussed let me know in the article evaluation comments. Thanks!
Java图形化界面设计——布局管理器之GridBagLayout的更多相关文章
- 三十二、Java图形化界面设计——布局管理器之CardLayout(卡片布局)
摘自 http://blog.csdn.net/liujun13579/article/details/7773945 三十二.Java图形化界面设计--布局管理器之CardLayout(卡片布局) ...
- 三十三、Java图形化界面设计——布局管理器之null布局(空布局)
摘自http://blog.csdn.net/liujun13579/article/details/7774267 三十三.Java图形化界面设计--布局管理器之null布局(空布局) 一般容器都有 ...
- 三十一、Java图形化界面设计——布局管理器之GridLayout(网格布局)
摘自http://blog.csdn.net/liujun13579/article/details/7772491 三十一.Java图形化界面设计--布局管理器之GridLayout(网格布局) 网 ...
- 转:Java图形化界面设计——布局管理器之FlowLayout(流式布局)其他请参考转载出处网址
http://blog.csdn.net/liujun13579/article/details/7771191 前文讲解了JFrame.JPanel,其中已经涉及到了空布局的使用.Java虽然可以以 ...
- Java图形化界面设计——布局管理器之FlowLayout(流式布局)
一.布局管理器所属类包 所属类包 布局管理器名称 说明 Java.awt FlowLayout(流式布局) 组件按照加入的先后顺序按照设置的对齐方式从左向右排列,一行排满到下一行开始继续排列 Bord ...
- 03 Java图形化界面设计——布局管理器之FlowLayout(流式布局)
前文讲解了JFrame.JPanel,其中已经涉及到了空布局的使用.Java 虽然可以以像素为单位对组件进行精确的定位,但是其在不同的系统中将会有一定的显示差异,使得显示效果不尽相同,为此java提供 ...
- 转:三十二、Java图形化界面设计——布局管理器之CardLayout(卡片布局)
转:http://blog.csdn.net/liujun13579/article/details/7773945 卡片布局能够让多个组件共享同一个显示空间,共享空间的组件之间的关系就像一叠牌,组件 ...
- 转:三十、Java图形化界面设计——布局管理器之BorderLayout(边界布局)
http://blog.csdn.net/liujun13579/article/details/7772215 边界布局管理器把容器的的布局分为五个位置:CENTER.EAST.WEST.NORTH ...
- 三十、Java图形化界面设计——布局管理器之BorderLayout(边界布局)
边界布局管理器把容器的的布局分为五个位置:CENTER.EAST.WEST.NORTH.SOUTH.依次相应为:上北(NORTH).下南(SOUTH).左西(WEST).右东(EAST),中(CENT ...
随机推荐
- SyntaxError: Non-ASCII character ‘\xe5′ in file
在写一个抓取网页的小脚本,运行起来总是出现这个错误 查了下Python的默认编码文件是用的ASCII码,你将文件存成了UTF-8也没用,解决办法很简单 只要在文件开头加入 # -*- coding: ...
- java技术-重点方向
多线程 锁 事务 缓存 hashmap 并发编程
- case功能菜单选项
脚本aim; 实现如下功能菜单并实现相应的功能;同在之前公司的一个游戏控制脚本; 1),显示当前时间; 2),显示cpu负载 3),显示剩余内存 0),退出脚本 如图菜单界面
- PHP闭包
# 提到闭包就不得不想起匿名函数,也叫闭包函数(closures),貌似PHP闭包实现主要就是靠它.声明一个匿名函数是这样: $func = function() { }; //带结束符 ...
- 1.Log4j入门
转自:https://blog.csdn.net/luohai859/article/details/52250807 日志是应用软件中不可缺少的部分, .Apache的开源项目log4j是一个功能强 ...
- mysql 存储过程实例
--存储过程名和参数,参数中in表示传入参数,out标示传出参数,inout表示传入传出参数 create procedure p_procedurecode(in sumdate varchar(1 ...
- c#之using关键字
1.using可以引入命名空间: 2.在using语句里声明的变量,使用完后会自动调用Dispose方法(实现IDisposable接口). using 语句允许程序员指定使用资源的对象应当何时释放资 ...
- Windows窗体技术
Windows窗体技术 Winform例子下载 https://pan.baidu.com/s/1zXO8gVuFAeKQ_Tnz55A4VQ 密码:i1r6
- ansible进阶小技巧--tags
用ansible写playbook的朋友可能会发现,当配置工作很多时,如果在中间过程出错了,修改后想重新执行,前面的一大堆步骤让人感觉很烦躁.虽然提供了“retry”文件,但是却只是根据host来判断 ...
- sqlserver table partion
SQL SERVER 表分区实施步奏 1. 概要说明 SQL SERVER的表分区功能是为了将一个大表(表中含有非常多条数据)的数据根据某条件(仅限该表的主键)拆分成多个文件存放,以提高查询数据时 ...
