TestNG入门到...
目录
一、概述
二、@Test注解常用参数
三、测试中常用的断言(assert)
四、TestNG常用注解及使用
五、配置文件xml常用标签
六、参数传递
七、测试报告
一、概述
1、TestNG是一个开源自动化测试框架,其灵感来自JUnit和NUnit,TestNG还涵盖了整个核心的JUnit4功能,但引入了一些新的功能,使其功能更强大,使用更方便。
优势:支持依赖测试方法,并行测试,负载测试,局部故障;灵活的插件API;支持多线程测试;
2、Maven依赖
       <dependency>

            <groupId>org.testng</groupId>

            <artifactId>testng</artifactId>

            <version>6.8.7</version>

            <scope>test</scope>

        </dependency>
注:Eclicpe上想要直接运行还需要安装testng插件
3、helloword
(1)被测试方法类HelloWrold:
package study.testng;

public class HelloWorld {

    public String hello(){

        return "hello world !";

    }

}
(2)测试类TestHelloWorld:
package study.testng;

import org.testng.Assert;

import org.testng.annotations.Test;

public class TestHelloWorld {

    //测试返回结果不为空

    @Test

    public void tester1(){

        HelloWorld hello = new HelloWorld();

        String helloworld = hello.hello();

        Assert.assertNotNull(helloworld);

    }

    //测试返回结果为”hello world !“字符串

    @Test

    public void tester2(){

        HelloWorld hello = new HelloWorld();

        String helloworld = hello.hello();

        System.out.println(helloworld);

        Assert.assertEquals(helloworld, "hello world !");

    }

}
(3)运行测试

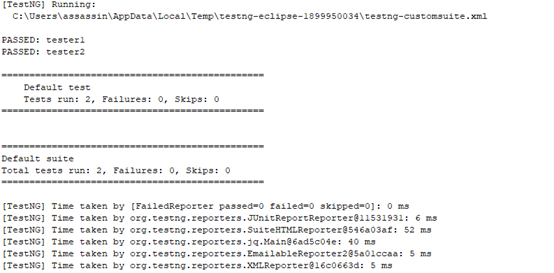
(4)测试结果
二、@Test注解常用参数
1、测试方法是否执行enable
默认是true,如果设置为false,则在运行时不会执行这个测试方法;
2、预期异常expectedExeption
@Test(expectedExceptions = ClassName.class)
如果ClassName类抛出了异常,测算测试通过,没有异常算测试不通过;
expectedExceptions的值也可以是一个数组:
@Test(expectedExceptions = {ClassName.class, ClassName2.class,... })
3、超时timeOut
单位为毫秒,如果测试方法运行时间超这个值算测试不通过;
4、分组groups
(1)把在一个<test>标签内的中所有类方法再进行组,在运行时,一个组的方法会一起运行,然后再运行下一个组的方法;
(2)分组的最小维度为方法,当把带分组的@Test(groups = ”groupName”)注解对类使用时,这个测试类中的所有方法都属于这同一个组;
(3)一个方法也可以同时属于多个组,@Test(groups = {“groupName1”, “groupName2”}),那么每组运行时这个方法都会被执行一次;
(4)同一个组里的方法类,如果分别属于两个不同的测试用例(<test>)内,那么它们其实可以算两个组,它们会在每个测试用例分别运行,而不会合在一起运行;
5、依赖方法dependsOnMethods
在被依赖的方法运行完成之后运行当前方法,如果依赖方法测试不通过,那么当前方法也不会继续运行了;依赖的方法可以有多个;
例:@Test(dependsOnMethods = { "methodName1" , “methodName2” })
6、依赖组,dependsOnGroups
和依赖方法类似,在被依赖组运行完成之后运行当前组,如果依赖组中的方法没有测试能过,那么当前的方法也不会继续运行了;依赖组可以有多个;
三、测试中常用的断言(assert)
 assertEqual ([String message], expected value, actual value)        断言两个值相等。值可能是类型有 int, short, long, byte, char or java.lang.Object. 第一个参数是一个可选的字符串消息;

 assertTrue([String message], boolean condition)                断言一个条件为真;

 assertFalse([String message],boolean condition)              断言一个条件为假;

 assertNotNull([String message], java.lang.Object object)           断言一个对象不为空(null);

 assertNull([String message], java.lang.Object object)            断言一个对象为空(null);

 assertSame([String message], java.lang.Object expected, java.lang.Object actual)       断言两个对象引用相同的对象;

 assertNotSame([String message], java.lang.Object unexpected, java.lang.Object actual)    断言两个对象不是引用同一个对象;

 assertArrayEquals([String message], expectedArray, resultArray)                  断言预期数组和结果数组相等。数组的类型可能是 int, long, short, char, byte or java.lang.Object.;
四、TestNG常用注解及使用
@BeforeSuite     在该套件的所有测试都运行在注释的方法之前,仅运行一次(套件测试是一起运行的多个测试类)。

@AfterSuite      在该套件的所有测试都运行在注释方法之后,仅运行一次。

@BeforeClass     在调用当前类的第一个测试方法之前运行,注释方法仅运行一次。

@AfterClass      在调用当前类的第一个测试方法之后运行,注释方法仅运行一次

@BeforeTest      注释的方法将在属于<test>标签内的类的所有测试方法运行之前运行。

@AfterTest       注释的方法将在属于<test>标签内的类的所有测试方法运行之后运行。

@BeforeGroups    配置方法将在之前运行组列表。 此方法保证在调用属于这些组中的任何一个的第一个测试方法之前不久运行。

@AfterGroups     此配置方法将在之后运行组列表。该方法保证在调用属于任何这些组的最后一个测试方法之后不久运行。

@BeforeMethod    注释方法将在每个测试方法之前运行。

@AfterMethod     注释方法将在每个测试方法之后运行。

@Parameters      描述如何将参数传递给@Test方法。

@DataProvider    标记一种方法来提供测试方法的数据。 注释方法必须返回一个Object [] [],其中每个Object []可以被分配给测试方法的参数列表。 要从该DataProvider接收数据的@Test方法需要使用与此注释名称相等的dataProvider名称。

@Factory         将一个方法标记为工厂,返回TestNG将被用作测试类的对象。 该方法必须返回Object []。

@Listeners       定义测试类上的侦听器。

@Test            将类或方法标记为测试的一部分。
例:
1、增加一个测试类TestConfig
package study.testng;

import org.testng.annotations.AfterGroups;

import org.testng.annotations.AfterMethod;

import org.testng.annotations.AfterSuite;

import org.testng.annotations.AfterTest;

import org.testng.annotations.BeforeGroups;

import org.testng.annotations.BeforeMethod;

import org.testng.annotations.BeforeSuite;

import org.testng.annotations.BeforeTest;

import org.testng.annotations.Test;

public class TestConfig {

    @BeforeSuite

    public void beforeSuite() {

        System.out.println("测试套件(当前xml中<suite>标签)之前运行@BeforeSuite--------------------");

    }

    @AfterSuite

    public void afterSuite() {

        System.out.println("测试套件(当前xml中<suite>标签)之后运行@AfterSuite--------------------\n");

    }

    @BeforeTest

    public void beforeTest() {

        System.out.println("测试用例(当前xml中<test>标签)之前运行@BeforeTest----------");

    }

    @AfterTest

    public void afterTest() {

        System.out.println("测试用例(当前xml中<test>标签)之后运行@AfterTest----------\n");

    }

    @BeforeMethod

    public void beforeMethod() {

        System.out.println("当前类每个测试方法(@Test)之前运行@BeforeMethod");

    }

    @AfterMethod

    public void AfterMethod(){

        System.out.println("当前类每个测试方法(@Test)之后运行@AfterMethod");

    }

    @BeforeGroups(value="group1")

    public void beforeGroups(){

        System.out.println("配置组配group1之前运行@BeforeGroups..................");

    }

    @AfterGroups(value="group1")

    public void afterGroups(){

        System.out.println("配置组配group1之前运行@AfterGroups..................");

    }

    @Test

    public void test1(){

        System.out.println("runnig TestConfig.test1()");

    }

    @Test(groups = "group1")

    public void test2(){

        System.out.println("runnig TestConfig.test2()");

    }

    @Test(groups = "group1")

    public void test3(){

        System.out.println("runnig TestConfig.test3()");

    }

}
2、新建一个自定义xml配置文件tester.xml(位置在哪都行)
<?xml version="1.0" encoding="UTF-8"?>

<!-- @BeforeSuite -->

<suite name="tester">

    <!-- @BeforeTest -->

    <test name="case1">

      <classes>

        <class name="study.testng.TestConfig" />

        <class name="study.testng.TestHelloWorld" />

      </classes>

    </test>

    <!-- @AfterTest -->

    <!-- @BeforeTest -->

    <test name="case2">

      <classes>

        <class name="study.testng.TestConfig" />

      </classes>

    </test>

    <!-- @AfterTest -->

</suite>

<!-- @AfterSuite -->
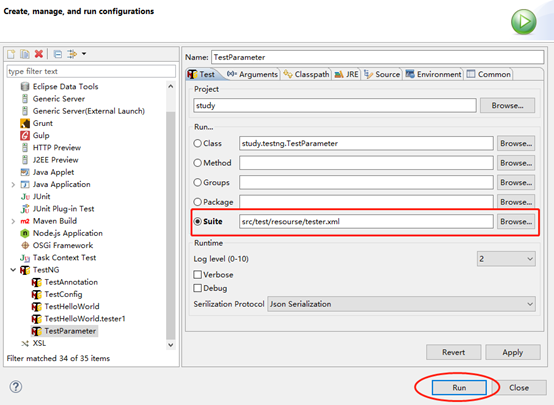
3、运行此配置测试
在有@Test方法的类页面右键

选择xml文件
4、运行结果
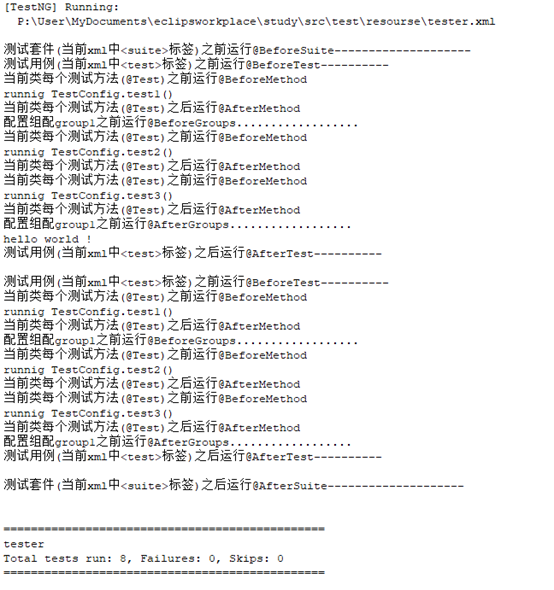
从这个结果显示出注释的作用位置。其中@BeforeGroups和@AfterGroups的作用范围是可以跨类的,但类必须是在同一个测试用例(<test>标签)范围内;
这些标签的运行先后顺序可以总结为:
@BeforeSuite->@BeforeTest->@BeforeClass->{@BeforeMethod->@Test->@AfterMethod}->@AfterClass->@AfterTest->@AfterSuite(其中{}内的与多少个@Test,就循环执行多少次)。
五、配置文件xml常用标签
<suite>  套件,根标签,通常由几个<test组成>

  属性:

  name            套件的名称,必须属性;

  verbose         运行的级别或详细程度;

  parallel        是否运行多线程来运行这个套件;

  thread-count    如果启用多线程,用于指定开户的线程数;

  annotations     在测试中使用的注释类型;

  time-out        在本测试中的所有测试方法上使用的默认超时时间;

<test>    测试用例,name为必须属性;

<classes>  用例中包含的类,子标签为<class name=”className”>;

<class>    测试类,其中属性name为必须属性;;

<packages> 用例中包含的包,包中所有的方法都会执行,子标签为<package name=”packageName”>;

<package>  测试包,name为必须属性;

<methods>  指定测试类中包含或排除的方法,子类为<include>,<exclude>;

<include>  指定需要测试的方法,name为必须属性;

<exclude>  指定类中不需要测试的方法,name为必须属性;

<groups>   指定测试用例中要运行或排除运行的分组,子标签为<run>,<run>下包含<include>,<exclude>标签,<include>,<exclude>的name指定运行、不运行的分组;
例:
<?xml version="1.0" encoding="UTF-8"?>

<suite name="tester">

    <test name="case1">

      <classes>

        <class name="study.testng.TestHelloWorld"/>

        <class name="study.testng.TestConfig">

            <methods>

                <include name="test1" />   <!-- 运行test1()方法-->

                <exclude name="test2" />   <!-- 不运行test2()方法-->

            </methods>

        </class>

      </classes>

    </test>

    <test name="case2">

      <packages>

        <package name="study.testng" />

      </packages>

      <groups>

        <run>

            <exclude name="group1" />   <!-- 不运行组group1的所有方法,或者也可include标签来表示需要行的组-->

        </run>

      </groups>

    </test>

</suite>
六、参数传递
1、使用@Parameters注解从测试配置xml文件获取参数
(1)新建测试类TestParameter
package study.testng;

import org.testng.annotations.Parameters;

import org.testng.annotations.Test;

public class TestParameter {

    @Test

    @Parameters({"param", "param2"})

    public void printParameters(String param, String param2){

        System.out.println("param参数值为 : " + param);

        System.out.println("param2参数值为 : " + param2);

    }

}
(2)新建配置xml文件,parameterTeser.xml
<?xml version="1.0" encoding="UTF-8"?>

<suite name="parameterTester">

    <test name="case1">

        <parameter name="param"  value="param的值"/>

        <parameter name="param2"  value="param2的值"/>

        <classes>

            <class name="study.testng.TestParameter" />

        </classes>

    </test>

</suite>
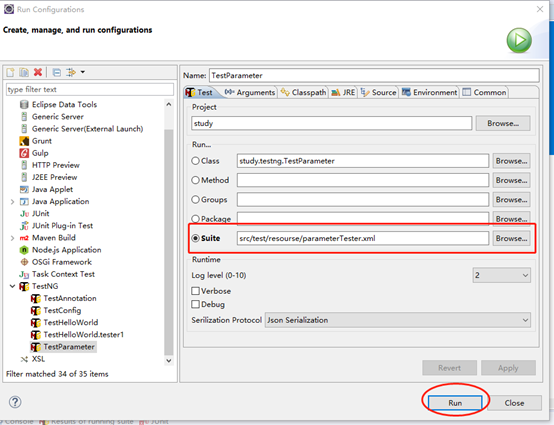
(3)以这个配置文件运行测试
(4)结果

2、使用@DataProvider传送参数,@DataProvider可以传递一些比较复杂的参数
(1)新建一个测试类TestParameter2
package study.testng;

import org.testng.annotations.DataProvider;

import org.testng.annotations.Test;

public class TestParameter2  {

    @DataProvider(name="user")

    public Object[][] Users(){

        return new Object[][]{

                {"root","passowrd"},

                {"cnblogs.com", "tankxiao"},

                {"tank","xiao"}

        };

    }

    @Test(dataProvider="user")

    public void verifyUser(String userName, String password){

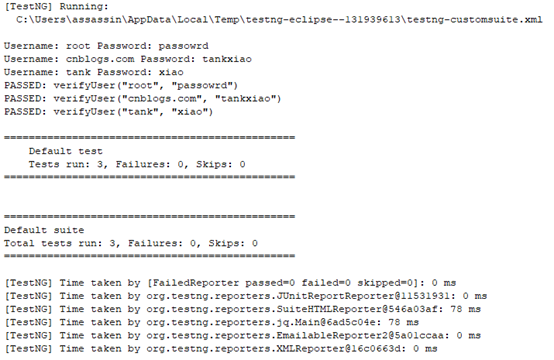
        System.out.println("Username: "+ userName + " Password: "+ password);

    }

}
(2)点击运行得到如下结果
七、测试报告
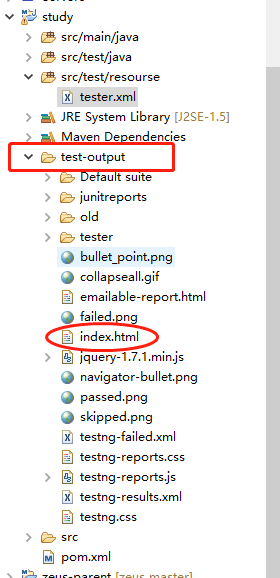
默认的测试报告位于当前项目文件夹下的test-output文件夹内,index.html即为总的测试报告(html文件用浏览器打开),tester文件夹下是按测试用例生成的报告,old文件夹下为历史报告。
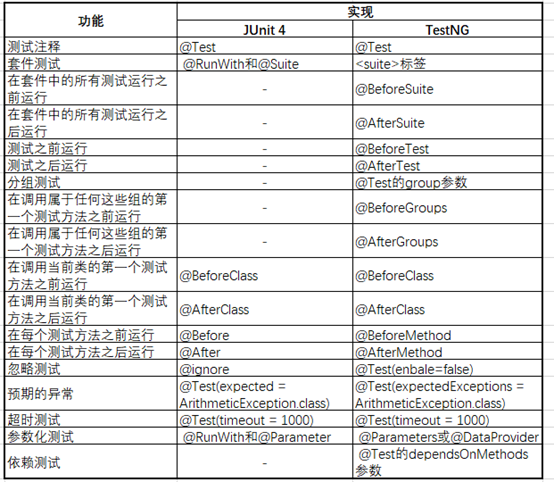
附:与Junit4的异同比较,可直接参考使用Junit4;
TestNG入门到...的更多相关文章
- testng入门教程16数据驱动(把数据写在xml)
testng入门教程16数据驱动(把数据写在xml) testng入门教程16数据驱动(把数据写在xml)把数据写在xml文件里面,在xml文件右键选择runas---testng执行 下面是case ...
- testng入门教程12 TestNG执行多线程测试
testng入门教程 TestNG执行多线程测试 testng入门教程 TestNG执行多线程测试 并行(多线程)技术在软件术语里被定义为软件.操作系统或者程序可以并行地执行另外一段程序中多个部分或者 ...
- TestNG 入门教程【转】
TestNG 入门教程[转] 国庆7天假期,大部分朋友都出去旅游了,微信圈里全是晒旅游的照片, 东南亚游,欧洲游呀,真是羡慕呀. 悲惨的我只去了上海野生动物园, 在家休息,利用这段假期,把之前学过的东 ...
- 自动化测试之 seleniumIDE,Selenium1,selenium2和testNG入门
由于前期三个月公司的项目一直在改需求阶段,一直是手动测试,现在项目雏形以及基本页面功能都确定下来,为了不让自己陷入天天测同一功能的无限循环中,故开始自动化测试的学习之路,也为自己以后的发展铺铺路. 一 ...
- TestNG 入门教程
原文出处:http://www.cnblogs.com/TankXiao/p/3888070.html 阅读目录 TestNG介绍 在Eclipse中在线安装TestNG 在Eclipse中离线安装T ...
- IDEA 单元测试testng入门及testng.xml
直接进入正题: 1.TestNG的运行方式如下: With a testng.xml file 直接run as test suite With ant 使用ant From the command ...
- TestNG 入门指导——理解testng.xml执行/不执行某个包,某个类,某个方法
这一篇我们主要学习如下几个知识点: ⑴关于testng.xml ⑵创建一个测试套件 ⑶执行testng.xml ⑷在测试套件中创建多个测试用例 ⑸在用例中增加class,packages, metho ...
- testng入门教程15数据驱动
testng在类 里面的数据驱动 package driver_test; import org.testng.annotations.DataProvider; import org.testng. ...
- testng入门教程14数据驱动(不同文件)
数据与test脚本不在同一文件时,下面是数据: package data_driver_two_parts; import org.testng.annotations.DataProvider; p ...
- testng入门教程13同文件数据驱动
下面是@DataProvider有name和没有name时 有name的时候可以引用name 即:@DataProvider(name="testData")----------& ...
随机推荐
- MapReduce (hive表SequenceFile的结果做输入)、MultipleOutputs和Reduce端迭代iterable的一些说明
很长时间以来一直写hive,嵌套脚本.偶尔写UDF. 最近用Hive的dynamic partition和多路插入做一些事情,很遗憾的结果是非常不稳定,有时能成功,有时失败.(可能是因为hive版本 ...
- 边框画的三角形给shadow
本文地址:http://www.cnblogs.com/veinyin/p/8690882.html 要写一个对话气泡样式,我们首先想到的当然给是一个盒子,然后用边框画一个三角形定位过去. 如果不需 ...
- HDU 2571 命运 (入门dp)
题目链接 题意:二维矩阵,左上角为起点,右下角为终点,如果当前格子是(x,y),下一步可以是(x+1,y),(x,y+1)或者(x,y*k) ,其中k>1.问最大路径和. 题解:入门dp,注意负 ...
- python 进程 线程 协程
并发与并行:并行是指两个或者多个事件在同一时刻发生:而并发是指两个或多个事件在同一时间间隔内发生.在单核CPU下的多线程其实都只是并发,不是并行. 进程是系统资源分配的最小单位,进程的出现是为了更好的 ...
- Velocity VelocityEngine 支持多种loader 乱码问题
最近升级团队的代码生成工具,此工具是velocity实现的. 之前习惯使用UTF-8编码,现在团队使用GBK. 所以遇到一种场景,模板文件使用UTF-8(习惯了所有任性),输出文件使用GBK(项目需要 ...
- 关于UDP数据报引发“异步错误”的疑问
在UNP卷一第三版的第8章8.9小节中说到:如果udp服务器没有启动,udp客户端在使用sendto发送一行文本后,将会等待一个永远也不会出现的应答从而阻塞在recvfrom调用上. 由于服务器段不存 ...
- AtCoder ARC 090 E / AtCoder 3883: Avoiding Collision
题目传送门:ARC090E. 题意简述: 给定一张有 \(N\) 个点 \(M\) 条边的无向图.每条边有相应的边权,边权是正整数. 小 A 要从结点 \(S\) 走到结点 \(T\) ,而小 B 则 ...
- input 标签禁止输入
1.鼠标可以点击输入框,但是不能输入 readonly 例如: <input class="layui-input" readonly > 2.鼠标点击输入框出现禁用图 ...
- socket相关系统调用的调用流程
最近一直在读内核网络协议栈源码,这里以ipv4/tcp为例对socket相关系统调用的流程做一个简要整理,这些相关系统调用的内部细节虽然各有不同,但其调用流程则基本一致: 调用流程: (1)系统调用 ...
- DRM/KMS 基本组件介绍
Each DRM device provides access to manage which monitors and displays are currently used and what fr ...
