实例讲解Springboot以Template方式整合Redis及序列化问题
1 简介
之前讲过如何通过Docker安装Redis,也讲了Springboot以Repository方式整合Redis,建议阅读后再看本文效果更佳:
(1) Docker安装Redis并介绍漂亮的可视化客户端进行操作
(2) 实例讲解Springboot以Repository方式整合Redis
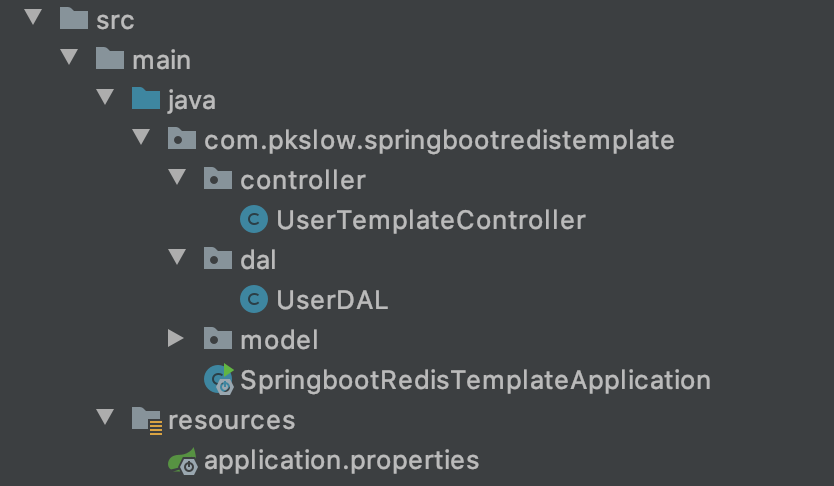
本文将通过实例讲解Springboot以Template方式整合Redis,并遇到一些序列化的问题。代码结构如下:
2 整合过程
与文章《实例讲解Springboot以Repository方式整合Redis》相同的代码不再列出来,文末将提供代码下载方式。
2.1 自动配置类
把相关依赖引入到项目中后,Springboot就自动帮我们生成了Template类,分别是RedisTemplate和StringRedisTemplate。看一下自动配置类能看出这两个类都已经创建到Spring容器里了。
public class RedisAutoConfiguration {

    public RedisAutoConfiguration() {

    }

    @Bean

    @ConditionalOnMissingBean( name = {"redisTemplate"} )

    public RedisTemplate<Object, Object> redisTemplate(RedisConnectionFactory redisConnectionFactory) throws UnknownHostException {

        RedisTemplate<Object, Object> template = new RedisTemplate();

        template.setConnectionFactory(redisConnectionFactory);

        return template;

    }

    @Bean

    @ConditionalOnMissingBean

    public StringRedisTemplate stringRedisTemplate(RedisConnectionFactory redisConnectionFactory) throws UnknownHostException {

        StringRedisTemplate template = new StringRedisTemplate();

        template.setConnectionFactory(redisConnectionFactory);

        return template;

    }

}
实际上StringRedisTemplate是RedisTemplate的子类,对于String类型,更推荐使用前者,它的类型只能是String的,会有类型检查上的安全;而RedisTemplate可以操作任何类型。
2.2 实现数据访问层
本文通过RedisTemplate对Redis进行操作,所以我们需要将它注入进来。代码如下:
package com.pkslow.springbootredistemplate.dal;

import org.springframework.beans.factory.annotation.Autowired;

import org.springframework.data.redis.core.RedisTemplate;

import org.springframework.stereotype.Repository;

@Repository

public class UserDAL {

    @Autowired

    private RedisTemplate<Object, Object> redisTemplate;

    public void setValue(Object key, Object value) {

        redisTemplate.opsForValue().set(key, value);

    }

    public Object getValue(Object key) {

        return redisTemplate.opsForValue().get(key);

    }

}
RedisTemplate提供了丰富的方法,具体可以参考官方文档,本次用到的及类似的方法有:
- opsForHash(): 返回对于Hash的操作类;
- opsForList(): 返回对于列表List的操作类;
- opsForSet(): 返回对于Set的操作类;
- opsForValue(): 返回对于字符串String的操作类;
- opsForZSet(): 返回对于ZSet的操作类。
2.3 实现Controller
我们需要把功能通过Web的方式暴露出去,实现以下Contrller:
package com.pkslow.springbootredistemplate.controller;

import com.pkslow.springbootredistemplate.dal.UserDAL;

import com.pkslow.springbootredistemplate.model.User;

import org.springframework.beans.factory.annotation.Autowired;

import org.springframework.web.bind.annotation.*;

@RestController

@RequestMapping("/userTemplate")

public class UserTemplateController {

    @Autowired

    private final UserDAL userDAL;

    public UserTemplateController(UserDAL userDAL) {

        this.userDAL = userDAL;

    }

    @GetMapping("/{userId}")

    public User getByUserId(@PathVariable String userId) {

        return (User)userDAL.getValue(userId);

    }

    @PostMapping("/{userId}")

    public User addNewUser(@PathVariable String userId,

                           @RequestBody User user) {

        user.setUserId(userId);

        userDAL.setValue(userId, user);

        return user;

    }

}
只提供两个接口,分别是设值和取值。
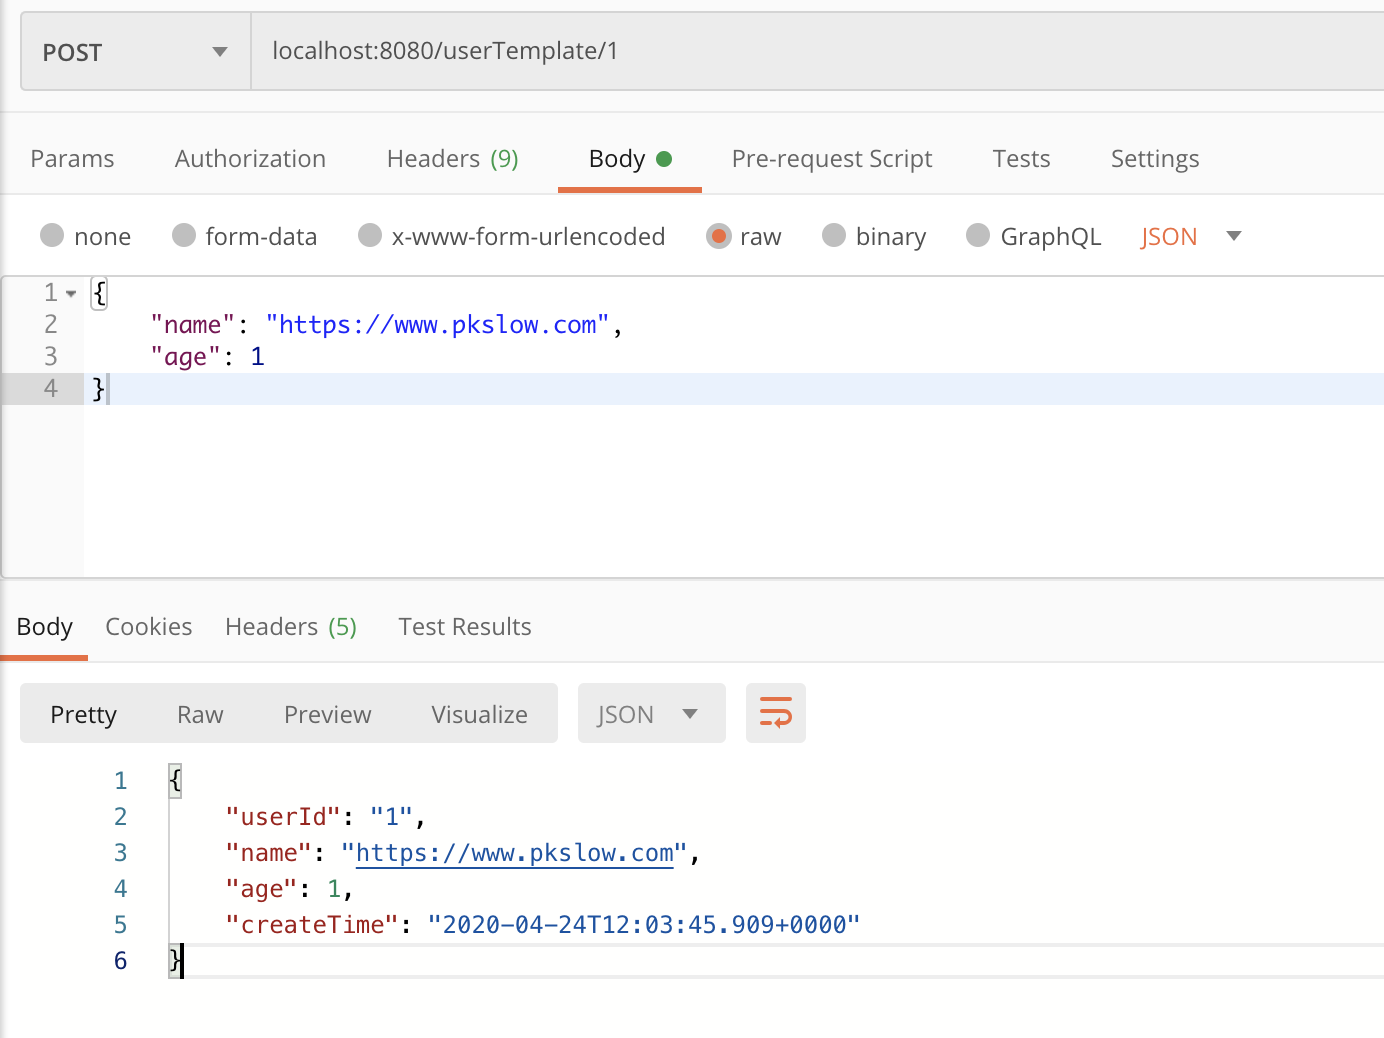
2.4 通过Postman测试
(1)存入对象
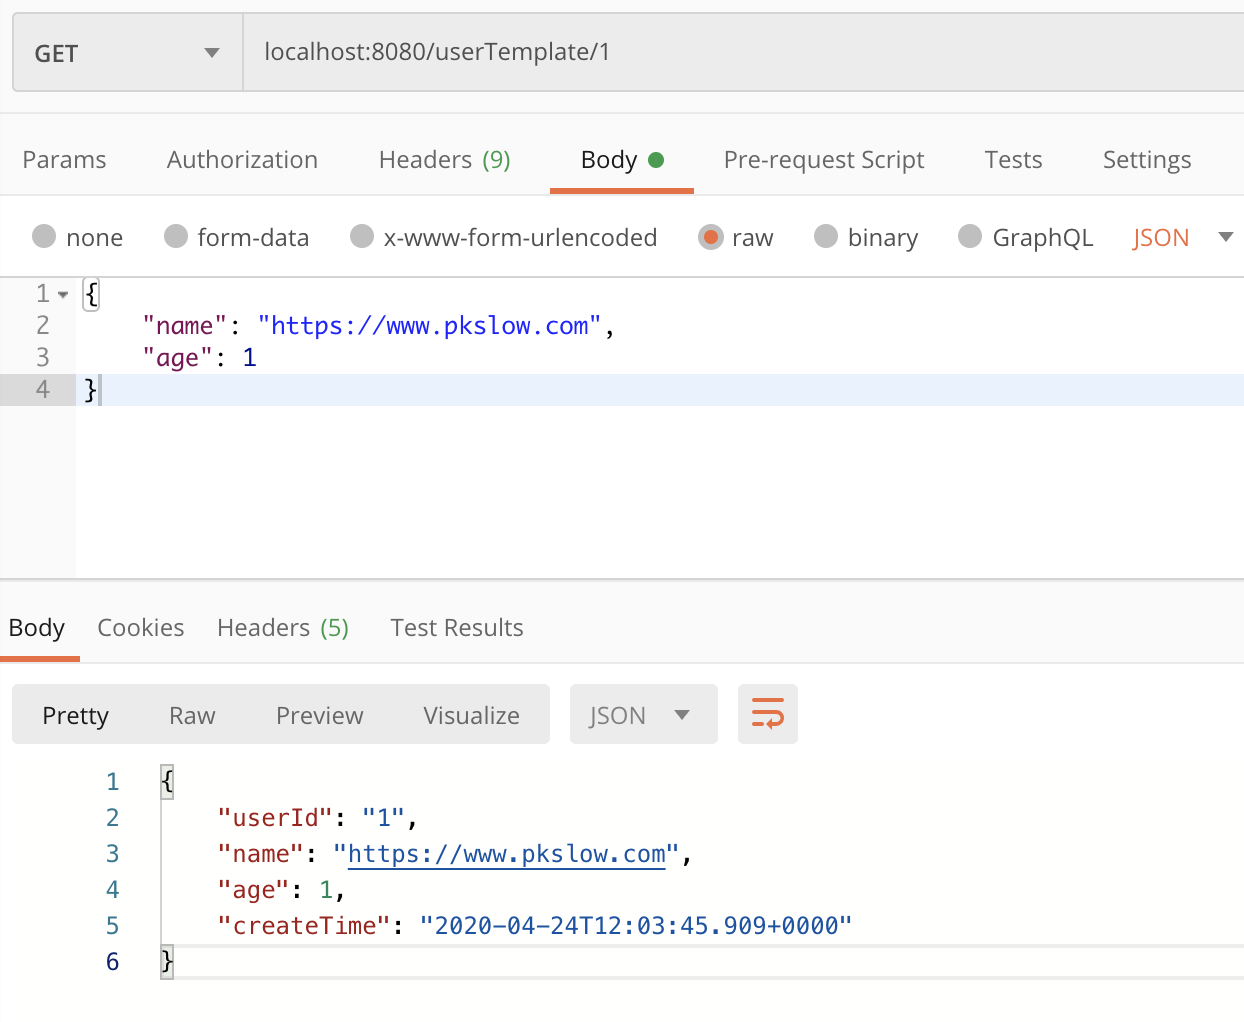
(2)读取对象
能写能读,功能实现,完美!Perfect!收工!
3 序列化问题
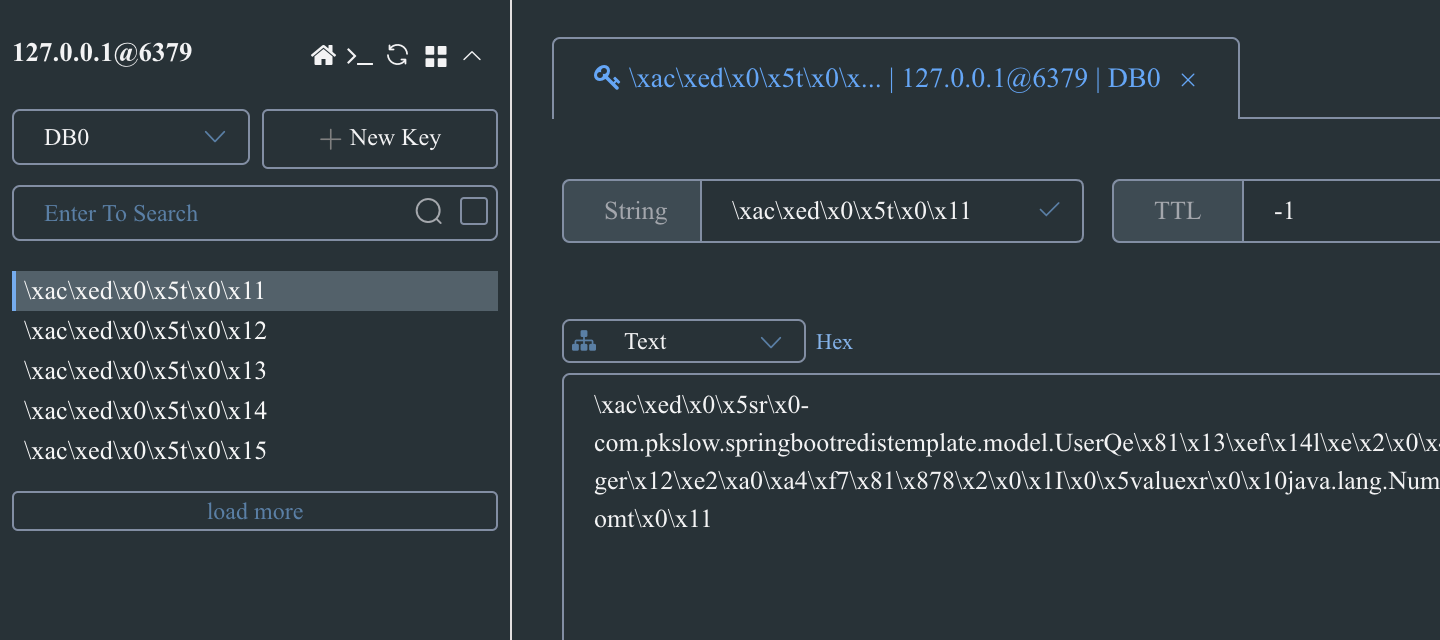
程序功能正常运行一段时间后,运维杀来了:“这是什么东西?我怎么看得懂?我要怎么查看数据?”
3.1 定位问题
不得不重新打开项目代码,Debug一下看看哪出了问题。既然用Postman测试能正常显示,而数据库显示不对,说明是写入数据库时做了转换。查看RedisTemplate就行了,毕竟活是他干的(先疯狂甩锅)。
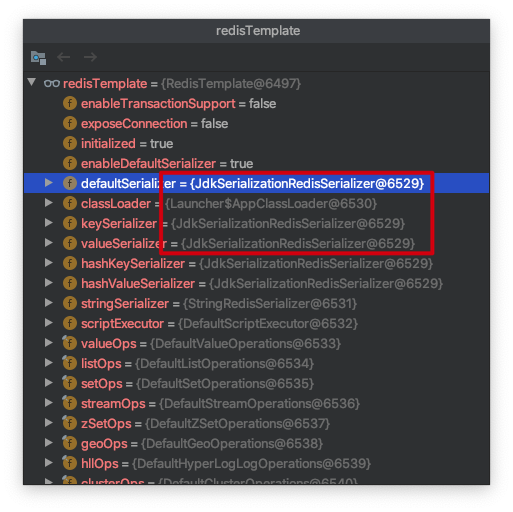
看它的序列化类用的是默认的JdkSerializationRedisSerializer,所以序列化后的数据我们看不懂。
3.2 问题修复
甩锅完后,还是要修复问题的,毕竟代码是自己写的。关键就是替换掉RedisTemplate所使用的序列化类就行了,这有两个方案可选:
(1)自定义一个新的RedisTemplate以覆盖旧的,在定义的时候指定序列化类。大致代码如下:
@Bean

public RedisTemplate<String, Object> redisTemplate(RedisConnectionFactory redisConnectionFactory) {

  Jackson2JsonRedisSerializer<Object> jackson2JsonRedisSerializer = new Jackson2JsonRedisSerializer<Object>(Object.class);

  ObjectMapper om = new ObjectMapper();

  om.setVisibility(PropertyAccessor.ALL, JsonAutoDetect.Visibility.ANY);

  om.enableDefaultTyping(ObjectMapper.DefaultTyping.NON_FINAL);

  jackson2JsonRedisSerializer.setObjectMapper(om);

  RedisTemplate<String, Object> template = new RedisTemplate<String, Object>();

  template.setConnectionFactory(redisConnectionFactory);

  template.setKeySerializer(jackson2JsonRedisSerializer);

  template.setValueSerializer(jackson2JsonRedisSerializer);

  template.setHashKeySerializer(jackson2JsonRedisSerializer);

  template.setHashValueSerializer(jackson2JsonRedisSerializer);

  template.afterPropertiesSet();

  return template;

}
甚至还可以自定义RedisConnectionFactory,如下:
@Bean

JedisConnectionFactory jedisConnectionFactory() {

    JedisConnectionFactory jedisConFactory = new JedisConnectionFactory();

    jedisConFactory.setHostName("localhost");

    jedisConFactory.setPort(6379);

    return jedisConFactory;

}
(2)使用原有的RedisTemplate,在使用前替换掉序列化类
引用的类的代码如下,init方法作为初始化方法:
public class UserDAL {

    @Autowired

    private RedisTemplate<Object, Object> redisTemplate;

    public void init() {

        redisTemplate.setKeySerializer(new StringRedisSerializer());

        redisTemplate.setValueSerializer(new Jackson2JsonRedisSerializer<>(Object.class));

    }

    public void setValue(Object key, Object value) {

        redisTemplate.opsForValue().set(key, value);

    }

    public Object getValue(Object key) {

        return redisTemplate.opsForValue().get(key);

    }

}
然后在创建UserDAL时,代码如下:
@Bean(initMethod = "init")

public UserDAL userDAL() {

  return new UserDAL();

}
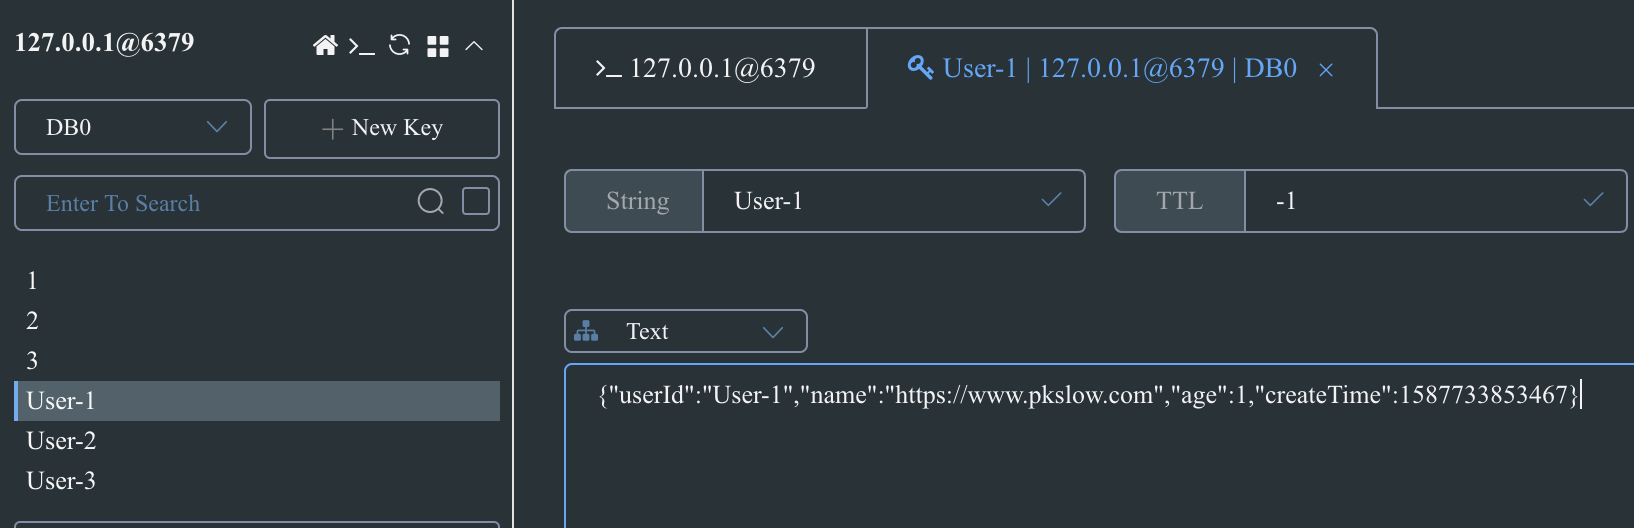
重新提交代码、重新测试、重新发布,结果可以了:
4 总结
本文详细代码可在南瓜慢说公众号回复<SpringbootRedisTemplate>获取。
欢迎访问南瓜慢说 www.pkslow.com获取更多精彩文章!
欢迎关注微信公众号<南瓜慢说>,将持续为你更新...

多读书,多分享;多写作,多整理。
实例讲解Springboot以Template方式整合Redis及序列化问题的更多相关文章
- 实例讲解Springboot以Repository方式整合Redis
1 简介 Redis是高性能的NoSQL数据库,经常作为缓存流行于各大互联网架构中.本文将介绍如何在Springboot中整合Spring Data Redis,使用Repository的方式操作. ...
- SpringBoot使用注解方式整合Redis
1.首先导入使用Maven导入jar包 <dependency> <groupId>org.springframework.boot</groupId> <a ...
- 实例讲解Springboot整合MongoDB进行CRUD操作的两种方式
1 简介 Springboot是最简单的使用Spring的方式,而MongoDB是最流行的NoSQL数据库.两者在分布式.微服务架构中使用率极高,本文将用实例介绍如何在Springboot中整合Mon ...
- SpringBoot缓存篇Ⅱ --- 整合Redis以及序列化机制
一.Redis环境搭建 系统默认是使用ConcurrentMapCacheManager,然后获取和创建ConcurrentMapCache类型的缓存组件,再将数据保存在ConcurrentMap中 ...
- springboot学习笔记-3 整合redis&mongodb
一.整合redis 1.1 建立实体类 @Entity @Table(name="user") public class User implements Serializable ...
- 【SpringBoot】Springboot2.x整合Redis(一)
备注: springboto整合redis依赖于spring-boot-starter-data-redis这个jar 一,项目环境和依赖 1.POM.xml配置 <parent> < ...
- Spring整合Redis&JSON序列化&Spring/Web项目部署相关
几种JSON框架用法和效率对比: https://blog.csdn.net/sisyphus_z/article/details/53333925 https://blog.csdn.net/wei ...
- 【Springboot】实例讲解Springboot整合OpenTracing分布式链路追踪系统(Jaeger和Zipkin)
1 分布式追踪系统 随着大量公司把单体应用重构为微服务,对于运维人员的责任就更加重大了.架构更复杂.应用更多,要从中快速诊断出问题.找到性能瓶颈,并不是一件容易的事.因此,也随着诞生了一系列面向Dev ...
- 33. Springboot 系列 原生方式引入Redis,非RedisTemplate
0.pom.xml <dependency> <groupId>redis.clients</groupId> <artifactId>jedis&l ...
随机推荐
- python中面向对象&装饰器
类的定义 基本形式: class ClassName(object): Statement 1.class定义类的关键字 2.ClassName类名,类名的每个单词的首字母大写. 3.object是父 ...
- MySQL默认隔离级别为什么是RR
曾多次听到“MySQL为什么选择RR为默认隔离级别”的问题,其实这是个历史遗留问题,当前以及解决,但是MySQL的各个版本沿用了原有习惯.历史版本中的问题是什么,本次就通过简单的测试来说明一下. 1. ...
- NodeMCU入坑指南-低成本打造零舍友闻风丧胆WiFi断网神器
前言 最近对IoT方面比较感兴趣,所以在某宝上入手了一块NodeMCU的开发板,至于为什么我选择这块开发板呢?嘿嘿,当然是因为便宜啊
- 【cs224w】Lecture 6 - 消息传递 及 节点分类
目录 Node Classification Probabilistic Relational Classifier Iterative Classification Belief Propagati ...
- apache-atlas 深度剖析
atlas 是apache下的大数据的元数据管理平台,支持对hive.storm.kafka.hbase.sqoop等进行元数据管理以及以图库的形式展示数据的血缘关系. 一.架构 整体架构实现如下图 ...
- 配置samba和NFS共享服务
配置samba和NFS共享服务 1案例1:配置SMB文件夹共享 1.1问题 本例要求在虚拟机server0上发布两个共享文件夹,具体要求如下: 此服务器 ...
- Hadoop(十一):组合任务概述和格式
组合任务概述 一些复杂的任务很难由一个MR处理完成,所以一般需要将其拆分成为多个简单的MR子任务来执行. MapReduce框架中对于这类的问题提供了几种方式进行任务执行流程的控制,主要包括以下几种方 ...
- 浅谈 PCA与SVD
前言 在用数据对模型进行训练时,通常会遇到维度过高,也就是数据的特征太多的问题,有时特征之间还存在一定的相关性,这时如果还使用原数据训练模型,模型的精度会大大下降,因此要降低数据的维度,同时新数据的特 ...
- ubuntu安装fastdfds
ubuntu安装fastdfds 安装fastdfds依赖 cd /user/local wget https://github.com/happyfish100/libfastcom ...
- ssl & ike/ipsec
SSL/TLS