RabbitMQ in Action(5): Clustering and dealing with failure
Batteries included: RabbitMQ clustering
The clustering built in to RabbitMQ was designed with two goals in mind: allowing consumers and producers to keep running in the event one Rabbit node dies, and linearly scaling messaging throughput by adding more nodes.
RabbitMQ adeptly satisfies both requirements by leveraging the Open Telecom Platform (OTP) distributed communication framework provided by Erlang.
when a Rabbit cluster node dies, the messages in queues on that node can disappear. This is because RabbitMQ doesn’t replicate the contents of
queues throughout the cluster by default. Without specific configuration, they live only on the node that owns the queue.
Architecture of a cluster
RabbitMQ is keeping track of four kinds of internal metadata:
- Queue metadata—Queue names and their properties (are they durable or autodelete?)
- Exchange metadata—The exchange’s name, the type of exchange it is, and what the properties are (durable and so on)
- Binding metadata—A simple table showing how to route messages to queues
- Vhost metadata—Namespacing and security attributes for the queues, exchanges, and bindings within a vhost
For clustering, RabbitMQ now has to keep track of a new type of metadata: cluster node location and the nodes’ relationships to the other types of metadata already being tracked.
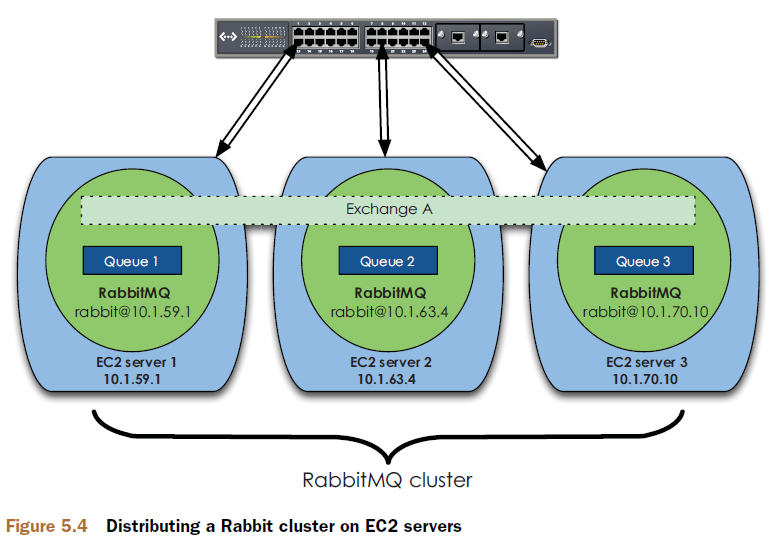
Queues in a cluster
Only the owner node for a queue knows the full information(metadata, state, contents) about that queue.
All of the non-owner nodes only know the queue’s metadata and a pointer to the node where the queue actually lives.

when a cluster node dies, that node’s queues and associated bindings disappear. Consumers attached to those queues lose their subscriptions, and any new messages that would’ve matched that queue’s bindings become black-holed.
You can have your consumers reconnect to the cluster and recreate the queues, only if the queues weren’t originally marked durable.
If the queues being re-created were marked as durable, redeclaring them from another node will get you an ugly 404 NOT_FOUND error.
The only way to get that specific queue name back into the cluster is to actually restore the failed node.
if the queues your consumers try to re-create are not durable, the redeclarations will succeed and you’re ready to rebind them and keep trucking.
Distributing exchanges
unlike queues which get their own process, exchanges are just a name and a list of queue bindings.
When you publish a message “into” an exchange, what really happens is the channel you’re connected to compares the routing key on the message to the list of bindings for that exchange, and then routes it.
an exchange is simply a lookup table rather than the actual router of messages
when you create a new exchange, all RabbitMQ has to do is add that lookup table to all of the nodes in the cluster. Every channel on every node then has access to the new exchange.
So where the full information about a queue is by default on a single node in the cluster, every node in the cluster has all of the information about every exchange.
what happens to messages that have been published into a channel but haven’t finished routing yet when the node fails?
The basic.publish AMQP command doesn’t return the status of the message.
The solution is to use an AMQP transaction, which blocks until the message is routed to a queue, or to use publisher confirms to keep track of which messages are still unconfirmed when the connection to a node dies.

Am I RAM or a disk?
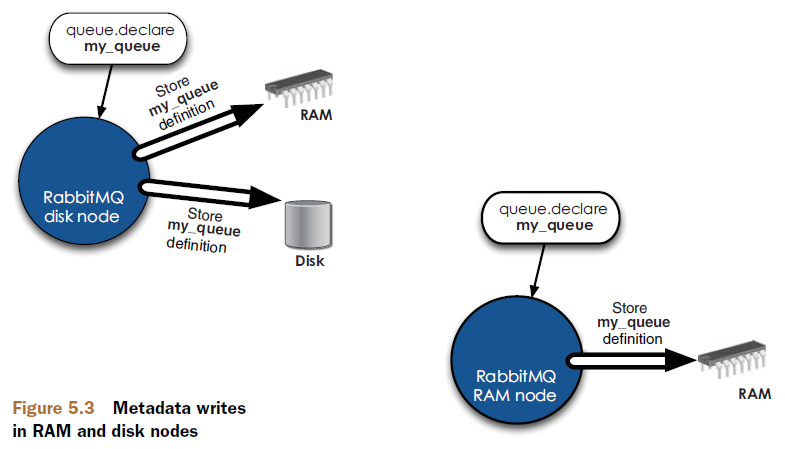
Every RabbitMQ node, whether it’s a single node system or a part of a larger cluster, is either a RAM node or a disk node.
A RAM node stores all of the metadata defining the queues, exchanges, bindings, users, permissions, and vhosts only in RAM, whereas a disk node also saves the metadata to disk.
Single-node systems are only allowed to be disk nodes
But in a cluster, you can choose to configure some of your nodes as RAM nodes.
When you declare a queue, exchange, or binding in a cluster, the operation won’t return until all of the cluster nodes have successfully committed the metadata changes.

RabbitMQ only requires that one node in a cluster be a disk node. Every other node can be a RAM node.
Keep in mind that when nodes join or leave a cluster, they need to be able to notify at least one disk node of the change.
If you only have one disk node and that node happens to be down, your cluster can continue to route messages but you can’t do any of the following:
- Create queues
- Create exchanges
- Create bindings
- Add users
- Change permissions
- Add or remove cluster nodes
The solution is to make two disk nodes in your cluster so at least one of them is available to persist metadata changes at any given time.
The only operation all of the disk nodes need to be online for is adding or removing cluster nodes. When RAM nodes restart, they connect to the disk nodes they’re preconfigured with to download the current copy of the cluster’s metadata.
If you only tell a RAM node about one of your two disk nodes and that disk node is down when the RAM node restarts, the RAM node won’t be able to find the cluster when it reboots.
Setting up a cluster on your laptop

You’ll now have three Rabbit nodes running on your development system called rabbit, rabbit_1, and rabbit_2
Start by stopping the RabbitMQ app on the second node:
$ ./sbin/rabbitmqctl -n rabbit_1@Phantome stop_app
Stopping node rabbit_1@Phantome ...
...done.
Next, you need to reset the second node’s metadata and state to be empty:
$ ./sbin/rabbitmqctl -n rabbit_1@Phantome reset
Resetting node rabbit_1@Phantome ...
...done.
Now that you have a stopped (and empty) Rabbit app, you’re ready to join it to the first cluster node:
$ ./sbin/rabbitmqctl -n rabbit_1@Phantome cluster rabbit@Phantome \
rabbit_1@Phantome
Clustering node rabbit_1@Phantome with [rabbit@Phantome,
rabbit_1@Phantome] ...
...done.
Finally you can start the second node’s app again so it can start being a functioning member of the cluster:
$ ./sbin/rabbitmqctl -n rabbit_1@Phantome start_app
Starting node rabbit_1@Phantome ...
...
broker running
...done.
When you join a new node to a cluster, you have to list all of the disk nodes in the cluster as arguments to the cluster command.
This is how a RAM node knows where to get its initial metadata and state if it reboots. If one of the disk nodes you’re telling the new node about is itself, rabbitmqctl is smart enough to realize that you want the new node to also be a disk node.

root@OpenstackIcehouse2:~# RABBITMQ_NODE_PORT=5673 RABBITMQ_NODENAME=rabbit_1 /usr/sbin/rabbitmq-server -detached
Warning: PID file not written; -detached was passed.
root@OpenstackIcehouse2:~# RABBITMQ_NODE_PORT=5674 RABBITMQ_NODENAME=rabbit_2 /usr/sbin/rabbitmq-server -detached
Warning: PID file not written; -detached was passed.
root@OpenstackIcehouse2:~# RABBITMQ_NODE_PORT=5675 RABBITMQ_NODENAME=rabbit_3 /usr/sbin/rabbitmq-server -detached
Warning: PID file not written; -detached was passed.
root@OpenstackIcehouse2:~# rabbitmqctl -n rabbit_2@OpenstackIcehouse2 stop_app
Stopping node rabbit_2@OpenstackIcehouse2 ...
...done.
root@OpenstackIcehouse2:~# rabbitmqctl -n rabbit_2@OpenstackIcehouse2 reset
Resetting node rabbit_2@OpenstackIcehouse2 ...
...done.
root@OpenstackIcehouse2:~# rabbitmqctl -n rabbit_2@OpenstackIcehouse2 join_cluster rabbit_1@OpenstackIcehouse2
Clustering node rabbit_2@OpenstackIcehouse2 with rabbit_1@OpenstackIcehouse2 ...
...done.
root@OpenstackIcehouse2:~# rabbitmqctl -n rabbit_2@OpenstackIcehouse2 start_app
Starting node rabbit_2@OpenstackIcehouse2 ...
...done.
root@OpenstackIcehouse2:~# rabbitmqctl -n rabbit_3@OpenstackIcehouse2 stop_app
Stopping node rabbit_3@OpenstackIcehouse2 ...
...done.
root@OpenstackIcehouse2:~# rabbitmqctl -n rabbit_3@OpenstackIcehouse2 reset
Resetting node rabbit_3@OpenstackIcehouse2 ...
...done.
root@OpenstackIcehouse2:~# rabbitmqctl -n rabbit_3@OpenstackIcehouse2 join_cluster rabbit_1@OpenstackIcehouse2 --ram
Clustering node rabbit_3@OpenstackIcehouse2 with rabbit_1@OpenstackIcehouse2 ...
...done.
root@OpenstackIcehouse2:~# rabbitmqctl -n rabbit_3@OpenstackIcehouse2 start_app
Starting node rabbit_3@OpenstackIcehouse2 ...
...done.
root@OpenstackIcehouse2:~# rabbitmqctl -n rabbit_1@OpenstackIcehouse2 cluster_status
Cluster status of node rabbit_1@OpenstackIcehouse2 ...
[{nodes,[{disc,[rabbit_1@OpenstackIcehouse2,rabbit_2@OpenstackIcehouse2]},
{ram,[rabbit_3@OpenstackIcehouse2]}]},
{running_nodes,[rabbit_3@OpenstackIcehouse2,rabbit_2@OpenstackIcehouse2,
rabbit_1@OpenstackIcehouse2]},
{partitions,[]}]
...done.

Mirrored queues and preserving messages
Declaring and using mirrored queues
queue_args = {"x-ha-policy" : "all" }
channel.queue_declare(queue="hello-queue", arguments=queue_args)
When set to all, x-ha-policy tells Rabbit that you want the queue to be mirrored across all nodes in the cluster. This means that if a new node
is added to the cluster after the queue is declared, it’ll automatically begin hosting a slave copy of the queue.
https://github.com/rabbitinaction/sourcecode/tree/master/python/chapter-5
import pika, sys
credentials = pika.PlainCredentials("guest", "guest")
conn_params = pika.ConnectionParameters("localhost", 5673, '/', credentials = credentials)
conn_broker = pika.BlockingConnection(conn_params)
channel = conn_broker.channel()
channel.exchange_declare(exchange="hello-exchange", type="direct", passive=False, durable=True, auto_delete=False)
queue_args = {"x-ha-policy" : "all" }
channel.queue_declare(queue="hello-queue", arguments=queue_args)
channel.queue_bind(queue="hello-queue", exchange="hello-exchange", routing_key="hola")
def msg_consumer(channel, method, header, body):
channel.basic_ack(delivery_tag=method.delivery_tag)
if body == "quit":
channel.basic_cancel(consumer_tag="hello-consumer")
channel.stop_consuming()
else:
print body
return
channel.basic_consume( msg_consumer, queue="hello-queue", consumer_tag="hello-consumer")
channel.start_consuming()
root@OpenstackIcehouse2:~# rabbitmqctl -n rabbit_1@OpenstackIcehouse2 list_queues name pid owner_pid slave_pids synchronised_slave_pids
Listing queues ...
hello-queue <rabbit_1@OpenstackIcehouse2.1.838.0>
...done.
root@OpenstackIcehouse2:~# rabbitmqctl -n rabbit_2@OpenstackIcehouse2 list_queues name pid owner_pid slave_pids synchronised_slave_pids
Listing queues ...
hello-queue <rabbit_1@OpenstackIcehouse2.1.838.0>
...done.
root@OpenstackIcehouse2:~# rabbitmqctl -n rabbit_3@OpenstackIcehouse2 list_queues name pid owner_pid slave_pids synchronised_slave_pids
Listing queues ...
hello-queue <rabbit_1@OpenstackIcehouse2.1.838.0>
...done.
You only need to make two changes to your mirrored queue declaration to make it use a subset of nodes, instead of all the nodes in a cluster.
queue_args = {"x-ha-policy" : "nodes",
"x-ha-policy-params" : ["rabbit@Phantome"]}
channel.queue_declare(queue="hello-queue", arguments=queue_args)
Under the hood with mirrored queues
the channel publishes the message in parallel to both the master and slave copies of a mirrored queue

if you need to ensure a message isn’t lost, you can use a publisher confirmation on the message and Rabbit will notify you when all of the queues and their slave copies have safely accepted the message.
But if a mirrored queue’s master fails before the message has been routed to the slave that will be become the new master, the publisher confirmation will never arrive and you’ll know that the message may have been lost.
if the node hosting the master copy fails, all of the queue’s consumers need to reattach to start listening to the new queue master.
For consumers that were connected through the node that actually failed, this isn’t hard. Since they’ve lost their TCP connection to the node, they’ll automatically pick up the new queue master when they reattach to a new node in the cluster.
But for consumers that were attached to the mirrored queue through a node that didn’t fail, RabbitMQ will send those consumers a consumer cancellation notification telling them they’re no longer attached to the queue master.
RabbitMQ in Action(5): Clustering and dealing with failure的更多相关文章
- RabbitMQ in Action (1): Understanding messaging
1. Consumers and producers Producers create messages and publish (send) them to a broker server (Rab ...
- RabbitMQ in Action (2): Running and administering Rabbit
Server management the Erlang node and the Erlang application Starting nodes multiple Erlang applicat ...
- 《RabbitMQ in action》
Producers create messages and publish (send) them to a broker server (RabbitMQ).What’s a message? A ...
- ActiveMQ in Action(5) - Clustering
关键字: activemq 2.5 Clustering ActiveMQ从多种不同的方面提供了集群的支持.2.5.1 Queue consumer clusters ActiveMQ支持 ...
- Windows & RabbitMQ:集群(clustering) & 高可用(HA)
描述:我们需要配置三台服务器:ServerA, ServerB, ServerC 注意事项: 所有的服务器的Erlang版本,RabbitMQ版本必须一样 服务器名大小写敏感 Step 1:安装Rab ...
- 别以为真懂Openstack: 虚拟机创建的50个步骤和100个知识点(2)
二.nova-api 步骤3:nova-api接收请求 nova-api接收请求,也不是随便怎么来都接收的,而是需要设定rate limits,默认的实现是在ratelimit的middleware里 ...
- 如何优雅的使用RabbitMQ
RabbitMQ无疑是目前最流行的消息队列之一,对各种语言环境的支持也很丰富,作为一个.NET developer有必要学习和了解这一工具.消息队列的使用场景大概有3种: 1.系统集成,分布式系统的设 ...
- RabbitMQ介绍6 - 其它
深入话题 Exchange实现路由的方法 http://www.rabbitmq.com/blog/2010/09/14/very-fast-and-scalable-topic-routing-pa ...
- Study notes for Clustering and K-means
1. Clustering Analysis Clustering is the process of grouping a set of (unlabeled) data objects into ...
随机推荐
- ERROR: 9-patch image C:\...\res\drawable\appwidget.9.png malformed. Frame pixels must be either solid or transparent (not intermediate alphas).
this is the problem with latest adt that is 20.0.3. you can instead rename the *.9.png to *.png and ...
- 在Linux 安装Python3.5.6详细文档!!!!
在Linux 安装Python3.5.6详细文档!!!! 1.安装相关依赖库(工具包) yum install gcc patch libffi-devel python-devel zlib-de ...
- kubernetes 常见问题整理
使用kubectl 命令是报错 报错: [root@k8s-master ~]# kubectl get pod The connection to the server localhost: was ...
- django2.0解决跨域问题
跨域问题一:(cors跨域问题) 解决方法: 1.安装 django-cors-headers 2.修改 setting.py INSTALLED_APPS = [ ... 'corsheaders' ...
- anaconda安装qt错误
windows下miniconda2安装python3下的qt包报错 conda install qt ERROR conda.core.link:_execute_actions(330): An ...
- form表单上传图片文件
import os def upload(request): if request.method == 'GET': img_list = models.Img.objects.all() retur ...
- java中的Condition协作线程接口类
在Java的Condition接口中,存在的几个方法跟Synchronized中的wait(),waitall(),wait(time ^),这个几个方法一一对应起来,但是在Lock.newCondi ...
- left join中where与on的区别
举例进行说明,我们现在有两个表,即商品表(products)与sales_detail(销售记录表).我们主要是通过这两个表来对MySQL关联left join 条件on与where 条件的不同之处进 ...
- mac电脑Git提交代码到Github提示git-credential-osxkeychain 验证解决方案
## 啊哈哈 这个简单,直接给出当前mac电脑登录账号密码即可,^_*,拿走不谢!!
- Python3 在操作excel时报PermissionError: [Errno 13] Permission denied: 'D:/workstation/yhdx_auto/config/case.xls'错误
此问题为文件被拒绝访问,主要是该文件已经被打开了.关闭此excel文件后在执行excel的相关操作就ok了.
