Spring Boot (四)模板引擎Thymeleaf集成
一、Thymeleaf介绍
Thymeleaf是一种Java XML / XHTML / HTML5模板引擎,可以在Web和非Web环境中使用。它更适合在基于MVC的Web应用程序的视图层提供XHTML / HTML5,但即使在脱机环境中,它也可以处理任何XML文件。它提供了完整的Spring Framework集成。
关于Spring推荐Thymeleaf的这种说法,我在Spring官方文档并没有看到具体的说明,只是在和JSP比较的时候,说了JSP和Thymeleaf对比JSP的一些不足,而Thymeleaf只是作为其他模板引擎的一种代表。
作为一款优秀的模板引擎,除了易用性、活跃的社区、健康快速的发展外,还有非常重要的一点就是性能了,那Thymeleaf 3 和 FreeMaker 的性能对比是怎么样的,后续文章会陆续更新。
二、Thymeleaf基础使用
Thymeleaf的使用是由两部分组成的:标签 + 表达式,标签是Thymeleaf的语法结构,而表达式就是语法里的内容实现。
通过标签 + 表达式,让数据和模板结合,最终转换成html代码,返回给用户。
Thymeleaf基础使用分为三部分:
- 标签使用
- 表达式使用
- 设置IDEA 对 Thymeleaf 代码补全
1.标签使用
1.1 th:text 基础信息输出
HTML代码:
<!DOCTYPE html>

<html xmlns="http://www.w3.org/1999/xhtml"

      xmlns:th="http://www.thymeleaf.org">

<head>

    <meta charset="UTF-8">

    <title>王磊的博客</title>

</head>

<body>

<span th:text="${name}"></span>

</body>

</html>
Java代码:
@RequestMapping("/")

public ModelAndView index() {

    ModelAndView modelAndView = new ModelAndView("/index");

    modelAndView.addObject("name", "老王");

    return modelAndView;

}
最终效果: 老王
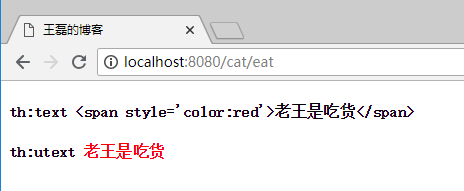
1.2 th:utext html内容输出
使用"th:text"是对内容的原样输出,使用“th:utext”可以进行html标签输出。
Java代码:
@RequestMapping("/eat")

public ModelAndView eat() {

    ModelAndView modelAndView = new ModelAndView("/cat");

    modelAndView.addObject("data", "<span style='color:red'>老王是吃货</span>");

    return modelAndView;

}
HTML代码:
<h4 th:text="'th:text '+${data}"></h4>

<h4 th:utext="'th:utext '+${data}"></h4>
展示效果:
1.3 th:if, th:unless 条件判断
<span th:if="${age > 18}">

    成年

</span>

<span th:unless="${age > 18}">

    未成年

</span>
th:if为满足条件的业务处理,th:unless正好相反,是除去的意思。
1.4 th:switch, th:case 多条件判断
<div th:switch="${age}">

    <span th:case="18">18岁</span>

    <span th:case="19">19岁</span>

    <spa th:case="*">其他</spa>

</div>
注意: 默认选项使用th:case="*" 指定。
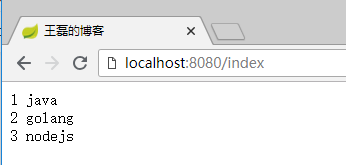
1.5 th:each 循环
HTML代码:
<div th:each="name,item:${names}">

    <span th:text="${item.count}"></span>

    <span th:text="${name}"></span>

</div>
Java代码:
@RequestMapping("/")

public ModelAndView index() {

    ArrayList<String> names = new ArrayList<>();

    names.add("java");

    names.add("golang");

    names.add("nodejs");

    ModelAndView modelAndView = new ModelAndView("/index");

    modelAndView.addObject("names",names);

    return modelAndView;

}
访问效果如下:
其中item为每行的详细值,key值如下:
- index 下标,从0开始
- count 第x个,从1开始
- size 这个集合的大小
- current 当前行的值
1.6 th:fragment、th:insert、th:replace、th:include 代码片段复用
- th:fragment标签是声明代码片段,用于解决代码复用的问题,好比Java程序写的公用代码一样,每个需要的地方都可以直接调用;
- th:insert 引用fragment的代码,保留自己的主标签;
- th:replace 引用fragment的代码,不保留自己的主标签;
- th:include 使用类似th:replace,Thymeleaf3.0之后不推荐使用;
footer.html页面代码:
<!DOCTYPE html>

<html xmlns="http://www.w3.org/1999/xhtml"

      xmlns:th="http://www.thymeleaf.org">

<head>

    <meta charset="UTF-8">

    <title>王磊的博客</title>

</head>

<body>

<div th:fragment="copyright">

    © 著作权归 老王 所有

</div>

<div th:fragment="about">

    关于

</div>

<div th:fragment="links">

    CCTV

</div>

</body>

</html>
声明了两个代码片段,copyright和about。
cat.html页面代码:
<!DOCTYPE html>

<html xmlns="http://www.w3.org/1999/xhtml"

      xmlns:th="http://www.thymeleaf.org">

<head>

    <meta charset="UTF-8">

    <title>王磊的博客</title>

</head>

<body>

<div th:replace="footer :: copyright"></div>

<div th:insert="footer :: about"></div>

<div th:include="footer :: links"></div>

</body>

</html>
其中第一个div引用了footer.html 的 copyright 代码片段,第二个div引用了 footer.html 的 about 代码片段。
双冒号的理解: 其中使用“::”双冒号来完成对页面片段的引用,有点像php里面的语法,使用双冒号来表示对类的静态属性和方法进行直接引用。
执行效果如下图:
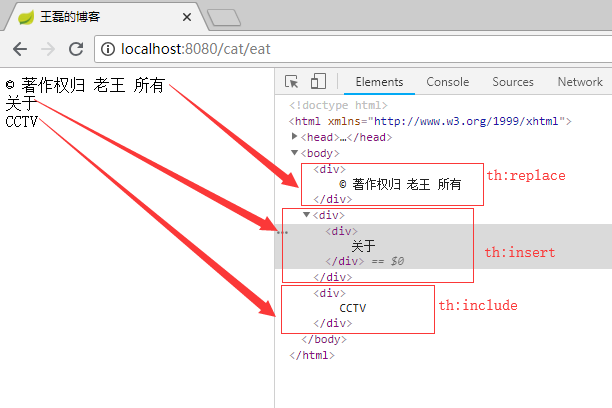
总结: 可以很清晰的看出th:insert、th:replace、th:include之间的区别,在于是否保留自己的主标签,th:include 在3.0之后已经不推荐使用了,可以使用th:replace标签替代。
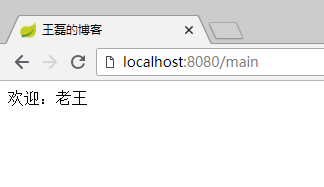
提高班——fragment代码传参
使用fragment我们是可以在html代码中传参的,比如我们定义了一个top.html其中有一个“欢迎XXX”的提示,而这个人名XXX就是需要动态传递的,这样我们可以最大程度的完成代码的复用,这个时候就是一个很好的使用场景,我们需要这样做。
页面main.html代码:
<!DOCTYPE html>

<html xmlns="http://www.w3.org/1999/xhtml"

      xmlns:th="http://www.thymeleaf.org"

>

<head>

    <meta charset="UTF-8">

    <title>王磊的博客</title>

</head>

<body>

<div th:replace="footer :: webcome('老王')"></div>

</body>

</html>
页面top.html
<!DOCTYPE html>

<html xmlns="http://www.w3.org/1999/xhtml"

      xmlns:th="http://www.thymeleaf.org"

>

<head>

    <meta charset="UTF-8">

    <title>王磊的博客</title>

</head>

<body>

<div th:fragment="webcome(about)">

    <span th:text="'欢迎:'+${about}"></span>

</div>

</body>

</html>
最终的效果:
1.7 th:with 定义局部变量
页面代码:
<!DOCTYPE html>

<html xmlns="http://www.w3.org/1999/xhtml"

      xmlns:th="http://www.thymeleaf.org"

>

<head>

    <meta charset="UTF-8">

    <title>王磊的博客</title>

</head>

<body>

<div th:with="sum=4-2">

    <span th:text="${sum}"></span>

</div>

</body>

</html>
页面输出结果:2
1.8 th:remove 删除标签
th:remove用于html代码的删除,th:remove值有五个:
- all 删除本段所有代码
- body 删除主标签内的所有元素
- tag 删除主标签,保留主标签所有的元素
- all-but-first 保留主标签和第一个元素,其他全部删除
- none 不删除任何标签
示例index.html代码如下:
<!DOCTYPE html>

<html xmlns="http://www.w3.org/1999/xhtml"

      xmlns:th="http://www.thymeleaf.org">

<head>

    <meta charset="UTF-8">

    <title>王磊的博客</title>

</head>

<body>

<div id="all" th:remove="all">

    <span>all</span>

    <span>1</span>

</div>

<div id="body" th:remove="body">

    <span>body</span>

    <span>2</span>

</div>

<div id="tag" th:remove="tag">

    <span>tag</span>

    <span>3</span>

</div>

<div id="all-but-first" th:remove="all-but-first">

    <span>all-but-first</span>

    <span>4</span>

</div>

<div id="none" th:remove="none">

    <span>none</span>

    <span>5</span>

</div>

</body>

</html>
最终展示效果如下:

1.9 其他标签
- th:style 定义样式
<div th:style="'color:'+${skinColor}"> - th:onclick 点击事件
<input type="button" value=" Click " th:onclick="'onsub()'"> - th:href 赋值属性href
<a th:href="${myhref}"></a> - th:value 赋值属性value
<input th:value="${user.name}" /> - th:src 赋值src
<img th:src="${img}" /> - th:action 赋值属性action
<form th:action="@{/suburl}"> - th:id 赋值属性id
<form id="${fromid}"> - th:attr 定义多个属性
<img th:attr="src=@{/img/stone.jpg},alt=${alt}" /> - th:object 定义一个对象
<div th:object="${user}"> - ...
2.表达式使用
2.1 表达式概要
2.1.1 简单表达式
变量表达式:${...}
选择变量表达式:*{...}
消息表达式:#{...}
链接表达式:@{...}
片段表达:~{...}
2.1.2 数据的类型
文字:'one text', 'Another one!',…
数字文字:0, 34, 3.0, 12.3,…
布尔文字:true, false
NULL文字:null
文字标记:one, sometext, main,…
2.1.3 文本操作
字符串拼接:+
字面替换:|The name is ${name}|
2.1.4 算术运算
二进制运算符:+, -, *, /, %
减号(一元运算符):-
2.1.5 布尔运算
二进制运算符:and, or
布尔否定(一元运算符):!, false
2.1.6 条件运算符
比较值:>, <, >=, <=
相等判断: ==, !=
2.1.7 条件判断
如果-然后:(if) ? (then)
如果-然后-否则:(if) ? (then) : (else)
违约:(value) ?: (defaultvalue)
所有以上这些表达式都可以组合和嵌套,例如:
'User is of type ' + (${user.isAdmin()} ? 'Administrator' : (${user.type} ?: 'Unknown'))
2.2 表达式使用实例
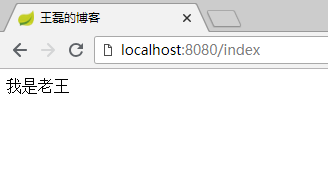
2.2.1 变量表达式 ${...}
变量表达式的使用,我们前面的代码已经见到了,$是我们平常开发中最常用的表达式,用于把后台Java类的动态数据,映射到页面,例如:
Java代码:
public ModelAndView index() {

    ModelAndView modelAndView = new ModelAndView("/cat");

    modelAndView.addObject("data", "我是老王");

    return modelAndView;

}
HTML代码:
<!DOCTYPE html>

<html xmlns="http://www.w3.org/1999/xhtml"

      xmlns:th="http://www.thymeleaf.org">

<head>

    <meta charset="UTF-8">

    <title>王磊的博客</title>

</head>

<body>

<span th:text="${data}"></span>

</body>

</html>
最终效果:
2.2.2 选择表达式 *{...}
选择表达式相当于选择了一个对象,在使用的时候不在需要这个对象的前缀,直接使用属性的key进行内容展示,代码如下:
<div th:object="${goods}">

    <span th:text="${goods.name}"></span>

    <span th:text="*{price}"></span>

    <span th:text="${#dates.format(goods.createTime, 'yyyy-MM-dd HH:mm:ss')}"></span>

</div>
最终效果:
iMac 7999.0 2018-08-10 14:03:51
总结: *{price} = ${goods.price}只是省去了“goods.”前缀,效果都是一样的。
2.2.3 链接表达式 @{...}
用于转换url,代码如下:
<a th:href="@{/footer(id=666,name=laowang)}">链接</a>
最终呈现的效果:
<a href="/footer?id=666&name=laowang">链接</a>
链接表达式,可以传递参数,用逗号分隔。
服务器根相对路径:@{~/path/to/something}
2.2.4 文本操作
文本操作分为两个:文本拼加、文本替换
文本拼加:
<span th:text="'我叫'+${name}"></span>
文本替换:
文本替换的语法:|内容${tag}|
<span th:text="|我叫${name},是一名开发工程师。|"></span>
2.2.5 三元表达式
2.2.6 双括号作用
<p th:text="${val}">...</p>

<p th:text="${{val}}">...</p>
结果:
<p>1234567890</p>

<p>1,234,567,890</p>
2.2.7 嵌入文本标签
虽然标准的标签几乎可以满足所有的业务场景,但某些情况我们更喜欢直接写入HTML文本,例如:
<p>Hello, [[${name}]]</p>
嵌入文本有两种写法“[[...]]”和“[(...)]”,分别的作用就像th:text 和 th:utext 一样,例如:
<p>

    [[${name}]]

</p>

<p>

    [(${name})]

</p>
看到的效果是这样的:
2.3 表达式对象概述
表达式里面的对象可以帮助我们处理要展示的内容,比如表达式的工具类dates可以格式化时间,这些内置类的熟练使用,可以让我们使用Thymeleaf的效率提高很多。
2.3.1 表达式基本对象
#ctx: 操作当前上下文.#vars:操作上下文变量.#request: (仅适用于Web项目)HttpServletRequest对象.#response: (仅适用于Web项目)HttpServletResponse对象.#session: (仅适用于Web项目)HttpSession对象.#servletContext: (仅适用于Web项目)ServletContext对象.2.3.2 表达式实用工具类
#execInfo: 操作模板的工具类,包含了一些模板信息,比如:${#execInfo.templateName}.#uris: url处理的工具#conversions: methods for executing the configured conversion service (if any).#dates: 方法来源于java.util.Date对象,用于处理时间,比如:格式化.#calendars: 类似于#dates, 但是来自于java.util.Calendar对象.#numbers: 用于格式化数字.#strings: methods forStringobjects: contains, startsWith, prepending/appending, etc.#objects: 普通的object对象方法.#bools: 判断bool类型的工具.#arrays: 数组操作工具.#lists: 列表操作数据.#sets: Set操作工具.#maps: Map操作工具.#aggregates: 操作数组或集合的工具.每个类中的具体方法,点击查看:https://www.thymeleaf.org/doc/tutorials/3.0/usingthymeleaf.html#appendix-b-expression-utility-objects
3.IDEA设置Thymeleaf自动补全
先上效果图:
IDEA默认是开启了Thymeleaf 插件支持的,如果不放心需要验证,请访问:https://www.jetbrains.com/help/idea/2018.2/thymeleaf.html
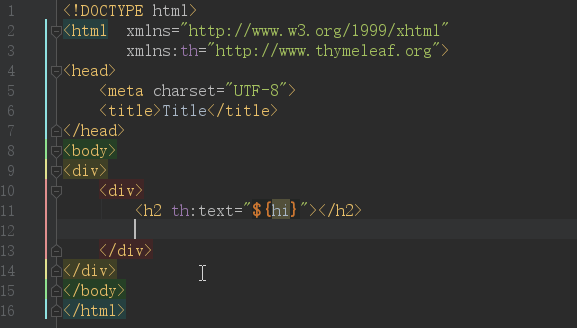
但仅仅是配置上面的效果,依然是无法正常使用的,原因是你要在html中声明 Thymeleaf 命名空间
xmlns:th="http://www.thymeleaf.org",完整代码如下:<!DOCTYPE html>
<html xmlns="http://www.w3.org/1999/xhtml"
xmlns:th="http://www.thymeleaf.org">
<head>
<meta charset="UTF-8">
<title>Title</title>
</head>
<body>
<h2 th:text="${hi}"></h2>
</body>
</html>
其中关键的代码是:
xmlns:th="http://www.thymeleaf.org"
这样当你在代码输入“th:”的时候就会看到 Thymeleaf 的所有标签了。
三、Spring Boot 集成 Thymeleaf
3.1 开发环境
- Spring Boot 2.0.4
- Thymeleaf 3.0.9
- Jdk 8
- Windows 10
- IDEA 2018.2
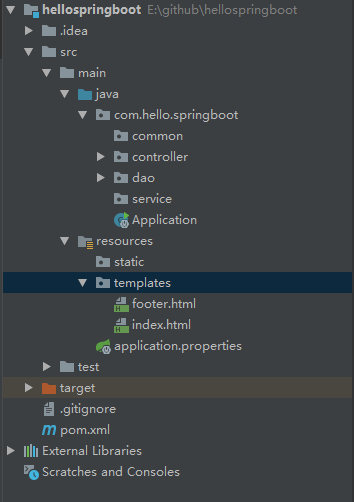
在正式集成Thymeleaf引擎之前,先来看下目录结构如图:
3.2 Spring MVC目录结构
除去包名,我们来解释一下这些目录代表的含义:
- common 通用公共类
- controller 控制器类
- dao 数据交互类
- service 业务逻辑处理类
- Application.java 启动文件
- resources 静态文件存储文件夹
- resources/templates 所有的Thymeleaf目录存放目录
- resources/application.properties 全局配置类
- pom.xml Maven 配置文件
3.3 Spring Boot 集成 Thymeleaf 分为四步:
- pom.xml 添加 Thymeleaf 模板引擎
- application.properties 配置 Thymeleaf 信息
- 创建controller类,编写代码
- 创建模板,编写html代码
接下来我们具体分别来看具体的步骤。
3.3.1 pom.xml 添加 Thymeleaf 模板引擎
<!--thymeleaf模板-->

<dependency>

    <groupId>org.springframework.boot</groupId>

    <artifactId>spring-boot-starter-thymeleaf</artifactId>

</dependency>
3.3.2 application.properties 配置 Thymeleaf 信息
# 启用缓存:建议生产开启

spring.thymeleaf.cache=false

# 建议模版是否存在

spring.thymeleaf.check-template-location=true

# Content-Type 值

spring.thymeleaf.servlet.content-type=text/html

# 是否启用

spring.thymeleaf.enabled=true

# 模版编码

spring.thymeleaf.encoding=utf-8

# 应该从解析中排除的视图名称列表(用逗号分隔)

spring.thymeleaf.excluded-view-names=

# 模版模式

spring.thymeleaf.mode=HTML5

# 模版存放路径

spring.thymeleaf.prefix=classpath:/templates/

# 模版后缀

spring.thymeleaf.suffix=.html
Thymeleaf常用配置说明
配置项 类型 默认值 建议值 说明 spring.thymeleaf.enabled bool true 默认 是否启用 spring.thymeleaf.mode String HTML 默认 模板类型,可以设置为HTML5 spring.thymeleaf.cache bool true 默认 是否启用缓存,生成环境建议设置为true spring.thymeleaf.prefix String classpath:/templates/ 默认 模版存放路径 spring.thymeleaf.suffix String .html 默认 模版后缀 spring.thymeleaf.servlet.content-type String text/html 默认 Content-Type 值 spring.thymeleaf.encoding String - utf-8 模版编码 3.3.3 创建controller类,编写代码
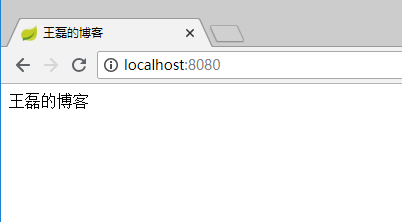
我们在controller文件夹创建index.java,代码如下:
package com.hello.springboot.controller;

import org.springframework.stereotype.Controller;

import org.springframework.web.bind.annotation.RequestMapping;

import org.springframework.web.servlet.ModelAndView;

@Controller

@RequestMapping("/")

public class Index {

    @RequestMapping("/")

    public ModelAndView index() {

        ModelAndView modelAndView = new ModelAndView("/index");

        modelAndView.addObject("name", "王磊的博客");

        return modelAndView;

    }

}
关键代码解读:
- @ResponseBody注解:如果使用该注解,返回结果会直接输出,而不是使用模板引擎渲染
- 使用ModelAndView对象,指定视图名&添加视图对象
3.3.4 创建模板,编写html代码
我们在resources/templates下创建index.html,代码如下:
<!DOCTYPE html>

<html xmlns="http://www.w3.org/1999/xhtml"

      xmlns:th="http://www.thymeleaf.org">

<head>

    <meta charset="UTF-8">

    <title>王磊的博客</title>

</head>

<body>

<span th:text="${name}"></span>

</body>

</html>
启动调试,在浏览器输入:http://localhost:8080/
效果如下:
相关代码GitHub:https://github.com/vipstone/springboot-example.git
四、参考资料
thymeleaf官方文档 Thymeleaf :https://www.thymeleaf.org/doc/tutorials/3.0/usingthymeleaf.html
thymeleaf官方文档 Spring + Thymeleaf :https://www.thymeleaf.org/doc/tutorials/3.0/thymeleafspring.html
Spring Boot (四)模板引擎Thymeleaf集成的更多相关文章
- SpringBoot系列:Spring Boot使用模板引擎Thymeleaf
一.Java模板引擎 模板引擎(这里特指用于Web开发的模板引擎)是为了使用户界面与业务数据(内容)分离而产生的,它可以生成特定格式的文档,用于网站的模板引擎就会生成一个标准的HTML文档. 在jav ...
- Spring Boot整合模板引擎thymeleaf
项目结构 引入依赖pom.xml <!-- 引入 thymeleaf 模板依赖 --> <dependency> <groupId>org.springframew ...
- spring boot: freemarket模板引擎
spring boot: freemarket模板引擎 freemarket模板引擎,可以和thymeleaf模板引擎共存 pom.xml引入 <!-- Freemarket --> &l ...
- SpringBoot系列:Spring Boot使用模板引擎FreeMarker
一.Java模板引擎 模板引擎(这里特指用于Web开发的模板引擎)是为了使用户界面与业务数据(内容)分离而产生的,它可以生成特定格式的文档,用于网站的模板引擎就会生成一个标准的HTML文档. 在jav ...
- SpringBoot系列:Spring Boot使用模板引擎JSP
一.Java模板引擎 模板引擎(这里特指用于Web开发的模板引擎)是为了使用户界面与业务数据(内容)分离而产生的,它可以生成特定格式的文档,用于网站的模板引擎就会生成一个标准的HTML文档. 在jav ...
- Spring Boot整合模板引擎freemarker
jsp本质是servlet,渲染都在服务器,freemarker模板引擎也是在服务器端渲染. 项目结构 引入依赖pom.xml <!-- 引入 freemarker 模板依赖 --> &l ...
- Spring Boot整合模板引擎jsp
jsp也算是一种模板引擎吧.整合jsp前,先说一下运行SpringBoot项目的几种方式 1. 运行SpringBoot项目的几种方式 1.1 使用内嵌Tomcat运行项目 在IDE中右键运行启动类, ...
- Spring Boot 2.0 整合Thymeleaf 模板引擎
本节将和大家一起实战Spring Boot 2.0 和thymeleaf 模板引擎 1. 创建项目 2. 使用Spring Initlizr 快速创建Spring Boot 应用程序 3. 填写项目配 ...
- spring boot(四):thymeleaf使用详解
在上篇文章springboot(二):web综合开发中简单介绍了一下thymeleaf,这篇文章将更加全面详细的介绍thymeleaf的使用.thymeleaf 是新一代的模板引擎,在spring4. ...
随机推荐
- Filter的使用(web作业)
一:什么是过滤器 Filter:Servlet过滤器Fileter是一个小型的web组件,它们通过拦截请求和响应,以便查看.提取或以某种方式操作客户端和服务器之间交换的数据,实现“过滤”的功能.Fil ...
- python之路(四)-set集合
set集合 set是一个无序且不重复的元素集合优点:访问速度快,解决重复问题 l1 = [1,2,34,5,6,7,4,3,3,] s2 = set(l1) #可以以列表元祖等作为参数传进来,set集 ...
- CSS3背景相关新增属性
background-clip border-box:充满边框和内边距,内容. padding-box:充满内边距,内容 content-box:只充满内容 background-origin bor ...
- 【洛谷P2584】【ZJOI2006】GameZ游戏排名系统题解
[洛谷P2584][ZJOI2006]GameZ游戏排名系统题解 题目链接 题意: GameZ为他们最新推出的游戏开通了一个网站.世界各地的玩家都可以将自己的游戏得分上传到网站上.这样就可以看到自己在 ...
- C#中数组、ArrayList和List三者的区别 转
在C#中数组,ArrayList,List都能够存储一组对象,那么这三者到底有什么样的区别呢. 数组 数组在C#中最早出现的.在内存中是连续存储的,所以它的索引速度非常快,而且赋值与修改元素也很简单. ...
- Python ImportError: No module named 'requests'的解决方法
import requests报错 Python ImportError: No module named 'requests'可能是requests没有安装 安装流程 1.cmd 2.cd D:\p ...
- shell 命令 grep -R 查询包含指定内容的文件
grep -R 举个栗子,在有上百个sql文件的目录下,查找使用 spark引擎 执行的文件. 代码是: grep -R spark ./* 返回的就是包含 spark 的sql文件名.
- Delphi 中的 IfThen 函数
问题来源: http://www.cnblogs.com/del/archive/2008/11/14/1120015.html#1370413 StrUtils 单元和 Math 单元 分别有一个 ...
- [编译] 2、minGW gcc在windows搭建编译win32程序环境
1.普通下载一个MinGW程序.安装之后可以直接将MinGW目录拷贝到总工程的tool里面: demo_mesh_common tree -L 2 . ├── app ├── bin ├── buil ...
- 背水一战 Windows 10 (116) - 后台任务: 前台程序激活后台任务
[源码下载] 背水一战 Windows 10 (116) - 后台任务: 前台程序激活后台任务 作者:webabcd 介绍背水一战 Windows 10 之 后台任务 前台程序激活后台任务 示例演示后 ...