K8S原来如此简单(七)存储
emptyDir临时卷
有些应用程序需要额外的存储,但并不关心数据在重启后仍然可用。
例如,缓存服务经常受限于内存大小,将不常用的数据转移到比内存慢、但对总体性能的影响很小的存储中。
再例如,有些应用程序需要以文件形式注入的只读数据,比如配置数据或密钥。
临时卷就是为此类用例设计的。因为卷会遵从 Pod 的生命周期,与 Pod 一起创建和删除, 所以停止和重新启动 Pod 时,不会受持久卷在何处可用的限制。
下面我们就通过一个临时卷,让一个pod中的两个容器实现文件共享。
apiVersion: v1

kind: Pod

metadata:

 name: emptydirpod

 namespace: chesterns

spec:

 containers:

 - name: writeinfo

   image: centos

   command: ["bash","-c","for i in {1..100};do echo $i >> /data/hello;sleep 1;done"]

   volumeMounts:

   - name: data

     mountPath: /data

 - name: readinfo

   image: centos

   command: ["bash","-c","tail -f /data/hello"]

   volumeMounts:

   - name: data

     mountPath: /data

 volumes:

 - name: data

   emptyDir: {}
验证
kubectl exec emptydirpod -c readinfo -n chesterns -- cat /data/hello
hostPath卷
挂载Node文件系统(Pod所在节点)上文件或者目录到Pod中的容器。通常用在Pod中容器需要访问宿主机文件的场景下。
下面通过一个yaml来实现hostPath卷
apiVersion: v1

kind: Pod

metadata:

 name: hostpathpod

 namespace: chesterns

spec:

 containers:

 - name: busybox

   image: busybox

   args:

    - /bin/sh

    - -c

    - sleep 36000

   volumeMounts:

   - name: data

     mountPath: /data

 volumes:

 - name: data

   hostPath:

    path: /tmp

    type: Directory
验证
kubectl  apply -f hostpath.yaml

kubectl exec hostpathpod -n chesterns -- ls /datals /tmp
网络卷NFS
NFS是一个主流的文件共享服务器。可以实现分布式系统中的文件统一管理。
yum install nfs-utils -y #每个Node上都要安装nfs-utils包
master上开启nfs-server
#master

vi /etc/exports

/tmp/chesternfs *(rw,fsid=0,no_root_squash)

mkdir -p /tmp/chesternfs

systemctl start nfs

systemctl enable nfs
定义一个deployment,使用我们刚搭建的nfssever来挂载文件
apiVersion: apps/v1

kind: Deployment

metadata:

 name: nfsdeployment

 namespace: chesterns

spec:

 selector:

  matchLabels:

   app: nginx

 replicas: 3

 template:

  metadata:

   labels:

    app: nginx

  spec:

   containers:

   - name: nginx

     image: nginx

     volumeMounts:

     - name: wwwroot

       mountPath: /usr/share/nginx/html

     ports:

     - containerPort: 80

   volumes:

   - name: wwwroot

     nfs:

      server: 192.168.43.111

      path: /tmp/chesternfs
通过新建一个a.html来验证是不是挂载进了容器
vi /tmp/chesternfs/index.html/a.html

kubectl get pod -n chesterns

kubectl exec  nfsdeployment-f846bc9c4-s2598  -n chesterns -- ls /usr/share/nginx/html

curl 10.244.36.122/a.html
PV与PVC
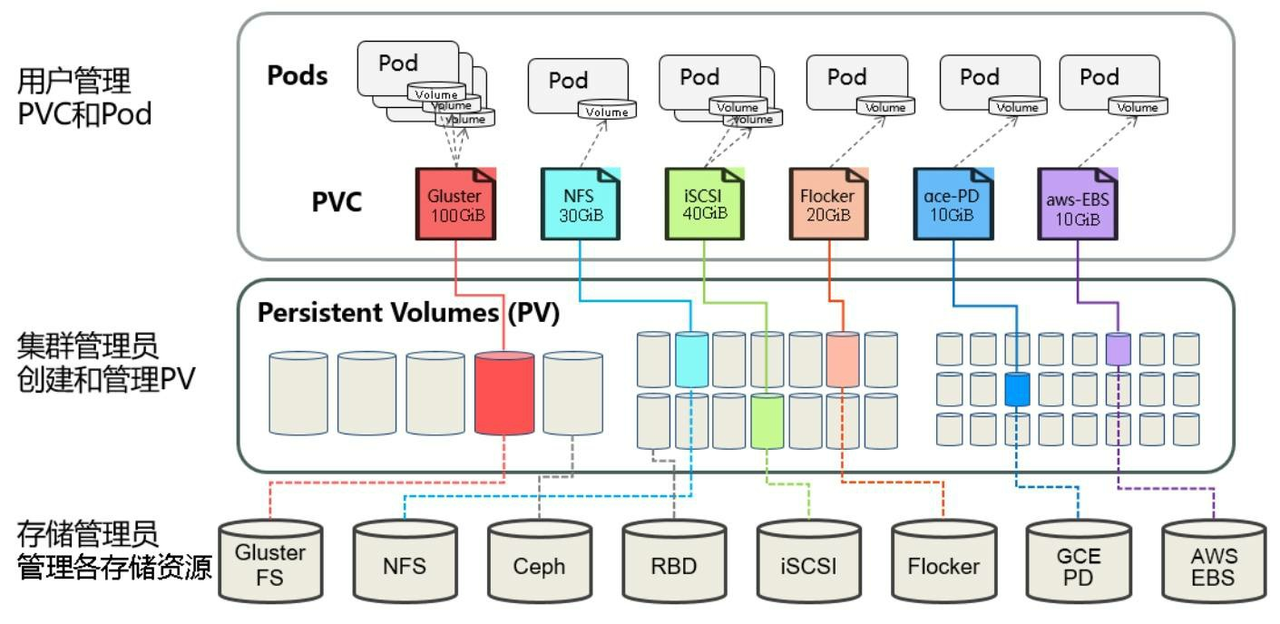
我们可以将PV看作可用的存储资源,PVC则是对存储资源的需求,PV与PVC是为了方便我们对存储资源进行系统的管理而诞生的,有了pv和pvc我们就可以对我们所有的存储资源进行合理的分配。
pv的创建又分为静态模式与动态模式。
静态模式
集群管理员手工创建许多PV,在定义PV时需要将后端存储的特性进行设置。

定义PV,声明需要5g空间
apiVersion: v1

kind: PersistentVolume

metadata:

 name: chesterpv

 namespace: chesterns

spec:

 capacity:

  storage: 5Gi

 accessModes:

 - ReadWriteMany

 nfs:

  path: /tmp/chesternfs

  server: 192.168.43.111
AccessModes(访问模式):
ReadWriteOnce(RWO):读写权限,但是只能被单个节点挂载
ReadOnlyMany(ROX):只读权限,可以被多个节点挂载
ReadWriteMany(RWX):读写权限,可以被多个节点挂载
RECLAIM POLICY(回收策略):
通过pv的persistentVolumeReclaimPolicy字段设置
Retain(保留):保留数据,需要管理员手工清理数据
Recycle(回收):清除 PV 中的数据,等同执行 rm -rf /tmp/chesternfs/*
Delete(删除):与 PV 相连的后端存储同时删除
应用pv
kubectl apply -f pv.yaml
kubectl describe pv chesterpv -n chesterns
PVSTATUS(状态):
Available(可用):表示可用状态,还未被任何 PVC 绑定
Bound(已绑定):表示 PV 已经被 PVC 绑定
Released(已释放):PVC 被删除,但是资源还未被集群重新声明
Failed(失败):表示该 PV 的自动回收失败
下面我们定义pvc,设置一样的存储空间,绑定刚刚建好的pv
apiVersion: v1

kind: PersistentVolumeClaim

metadata:

 name: chesterpvc

 namespace: chesterns

spec:

 accessModes:

 - ReadWriteMany

 resources:

  requests:

   storage: 5Gi
应用pvc
kubectl apply -f pvc.yaml

kubectl describe pvc chesterpvc -n chesterns

kubectl describe pv chesterpv -n chesterns
使用PVC,我们定义一个pod,指定挂载用的pvc
apiVersion: v1

kind: Pod

metadata:

 name: chesterpvcpod

 namespace: chesterns

spec:

 containers:

 - name: nginx

   image: nginx:latest

   ports:

   - containerPort: 80

   volumeMounts:

   - name: www

     mountPath: /usr/share/nginx/html

 volumes:

 - name: www

   persistentVolumeClaim:

    claimName: chesterpvc
通过以下命令应用,并验证
kubectl apply -f pvcpod.yaml

kubectl describe pod chesterpvcpod -n chesterns

kubectl describe pvc chesterpvc -n chesterns

kubectl describe pv chesterpv -n chesterns

curl 10.244.36.123/a.html
动态模式
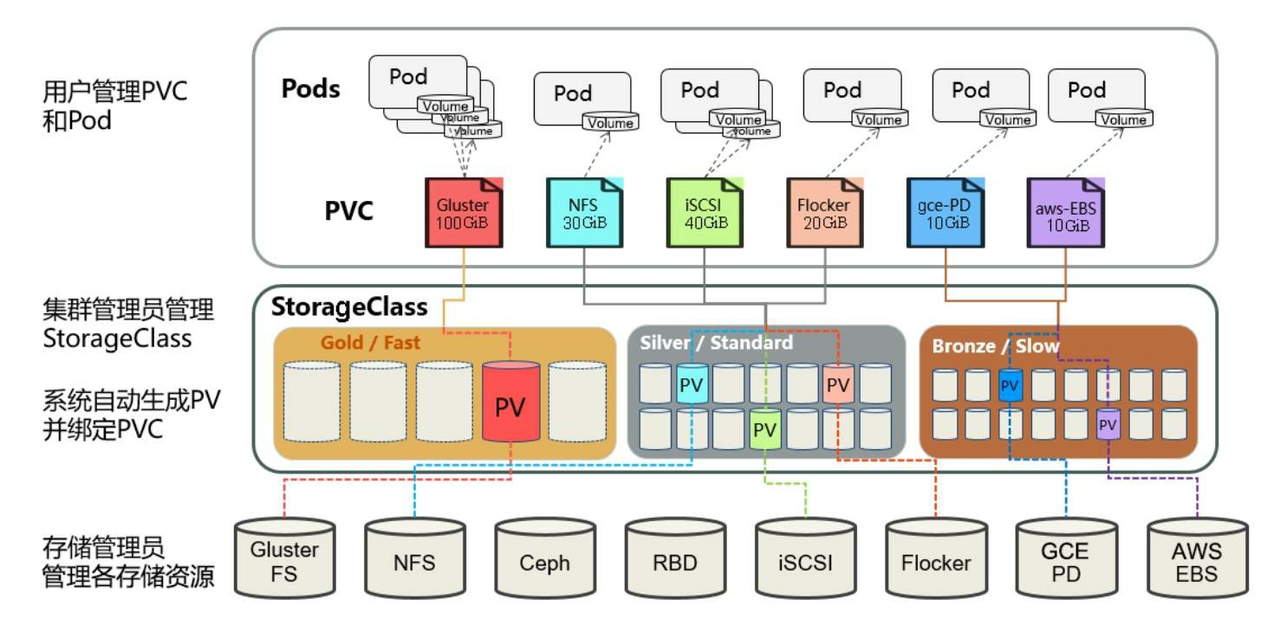
动态模式可以解放集群管理员,集群管理员无须手工创建PV,而是通过StorageClass的设置对后端存储进行描述,标记为某种类型。此时要求PVC对存储的类型进行声明,系统将自动完成PV的创建及与PVC的绑定。PVC可以声明Class为"",说明该PVC禁止使用动态模式。

K8s需要安装插件支持NFS动态供给。
项目地址:https://github.com/kubernetes-sigs/nfs-subdir-external-provisioner/tree/master/deploy
下载并安装,需要修改其中的namespace为我们自己的chesterns
kubectl apply -f nfs-rbac.yaml # 授权访问apiserver

kubectl apply -f nfs-deployment.yaml # 部署插件,需修改里面NFS服务器地址与共享目录

kubectl apply -f nfs-class.yaml # 创建存储类
下面我们定义pvc绑定我们刚建的storageclass,并且新建一个pod使用我们新建的这个pvc
apiVersion: v1

kind: PersistentVolumeClaim

metadata:

 name: chesterscpvc

 namespace: chesterns

spec:

 storageClassName: "nfs-client"

 accessModes:

 - ReadWriteMany

 resources:

  requests:

   storage: 1Gi

---

apiVersion: v1

kind: Pod

metadata:

 name: chesterpvcscpod

 namespace: chesterns

spec:

 containers:

 - name: chesterpvcscpod

   image: nginx

   volumeMounts:

   - name: nfs-pvc

     mountPath: "/usr/share/nginx/html"

 volumes:

 - name: nfs-pvc

   persistentVolumeClaim:

    claimName: chesterscpvc
验证
kubectl exec chesterpvcscpod  -n chesterns -- touch /usr/share/nginx/html/aa

ll /tmp/chesternfs/
ConfigMap
ConfigMap 是一种配置资源,用来将非机密性的数据保存到etcd键值对中。使用时,Pods可以将其用作环境变量、命令行参数或者存储卷中的配置文件。
下面就来实现一个简单的ConfigMap使用案例
定义ConfigMap
apiVersion: v1

kind: ConfigMap

metadata:

  name: game-demo

  namespace: chesterns

data:

  # 类属性键;每一个键都映射到一个简单的值

  player_initial_lives: "3"

  ui_properties_file_name: "user-interface.properties"

  # 类文件键

  game.properties: |

    enemy.types=aliens,monsters

    player.maximum-lives=5

  user-interface.properties: |

    color.good=purple

    color.bad=yellow

    allow.textmode=true
通过kubectl apply应用后,开始在pod中使用
apiVersion: v1

kind: Pod

metadata:

  name: configmap-demo-pod

  namespace: chesterns

spec:

  containers:

    - name: demo

      image: alpine

      command: ["sleep", "3600"]

      env:

        # 定义环境变量

        - name: PLAYER_INITIAL_LIVES # 请注意这里和 ConfigMap 中的键名是不一样的

          valueFrom:

            configMapKeyRef:

              name: game-demo           # 这个值来自 ConfigMap

              key: player_initial_lives # 需要取值的键

        - name: UI_PROPERTIES_FILE_NAME

          valueFrom:

            configMapKeyRef:

              name: game-demo

              key: ui_properties_file_name

      volumeMounts:

      - name: config

        mountPath: "/config"

        readOnly: true

  volumes:

    # 你可以在 Pod 级别设置卷,然后将其挂载到 Pod 内的容器中

    - name: config

      configMap:

        # 提供你想要挂载的 ConfigMap 的名字

        name: game-demo

        # 来自 ConfigMap 的一组键,将被创建为文件

        items:

        - key: "game.properties"

          path: "game.properties"

        - key: "user-interface.properties"

          path: "user-interface.properties"
验证
kubectl apply -f configmap.yaml

kubectl apply -f configmappod.yaml
Secret
Secret 类似于ConfigMap但专门用于保存机密数据。下面定义一个secret
apiVersion: v1

data:

  username: YWRtaW4=

  password: MWYyZDFlMmU2N2Rm

kind: Secret

metadata:

  name: mysecret

  namespace: chesterns
应用secret
kubectl apply -f secret.yaml

kubectl get secret -n chesterns
在Pod中使用Secret
apiVersion: v1

kind: Pod

metadata:

  name: mypod

  namespace: chesterns

spec:

  containers:

  - name: mypod

    image: redis

    volumeMounts:

    - name: foo

      mountPath: "/etc/foo"

      readOnly: true

  volumes:

  - name: foo

    secret:

      secretName: mysecret
验证
kubectl apply -f secretpod.yaml

kubectl get pod -n chesternskubectl exec mypod  -n chesterns -- ls /etc/foo
K8S原来如此简单(七)存储的更多相关文章
- K8S原来如此简单(三)Pod+Deployment
上篇我们已经安装好k8s1.23集群,现在我们开始使用k8s部署我们的项目 Pod Pod 是一组容器集合,是可以在 Kubernetes 中创建和管理的.最小的可部署的计算单元.这些容器共享存储.网 ...
- K8S原来如此简单(四)Service+Ingress
上一篇我们通过deployment实现了pod的横向扩展,但是仍然不能负载,也不能对外提供服务,现在我们来看看如何通过k8s实现负载与外网访问 Service service为一组pod提供一个统一的 ...
- K8S原来如此简单(五)Metrics Server与HPA
什么是HPA https://kubernetes.io/zh/docs/tasks/run-application/horizontal-pod-autoscale/ 我们前面有通过kubectl ...
- K8S原来如此简单(八)ServiceAccount+RBAC
ServiceAccount ServiceAccount是给运行在Pod的程序使用的身份认证,Pod容器的进程需要访问API Server时用的就是ServiceAccount账户. Service ...
- K8S原来如此简单(六)Pod调度
我们前面部署的pod调度取决于kube-scheduler,它会根据自己的算法,集群的状态来选择合适的node部署我们的pod. 下面我们来看下如何来根据我们自己的要求,来影响pod的调度. 定向no ...
- 4.深入k8s:容器持久化存储
从一个例子入手PV.PVC Kubernetes 项目引入了一组叫作 Persistent Volume Claim(PVC)和 Persistent Volume(PV)的 API 对象用于管理存储 ...
- K8S 使用简单的NFS 作为 持久存储的 StorageClass 的简单测试.
Study From https://jimmysong.io/kubernetes-handbook/practice/using-nfs-for-persistent-storage.html 1 ...
- K8S Kubernetes 简单介绍 转自 http://time-track.cn/kubernetes-trial.html Kubernetes初体验
这段时间学习了一下 git jenkins docker 最近也在看 Kubernetes 感觉写得很赞 也是对自己对于K8S 有了进一步得理解 感谢 倪 大神得Blog 也希望看到这篇Bl ...
- k8s通过ceph-csi接入存储的概要分析
kubernetes ceph-csi分析目录导航 概述 下面的分析是k8s通过ceph-csi(csi plugin)接入ceph存储(csi相关组件的分析以rbd为例进行分析),对csi系统结构. ...
随机推荐
- Note -「多项式」基础模板(FFT/NTT/多模 NTT)光速入门
进阶篇戳这里. 目录 何为「多项式」 基本概念 系数表示法 & 点值表示法 傅里叶(Fourier)变换 概述 前置知识 - 复数 单位根 快速傅里叶正变换(FFT) 快速傅里叶逆变换(I ...
- Note -「动态 DP」学习笔记
目录 「CF 750E」New Year and Old Subsequence 「洛谷 P4719」「模板」"动态 DP" & 动态树分治 「洛谷 P6021」洪水 「S ...
- Solution -「JOISC 2021」「LOJ #3489」饮食区
\(\mathcal{Description}\) Link. 呐--不想概括题意,自己去读叭~ \(\mathcal{Solution}\) 如果仅有 1. 3. 操作,能不能做? ...
- 非对称加解密 Asymmetric encryption 对称加密和非对称加密的区别
考虑这样一个问题:一切的装备文件都存储在 Git 长途库房,RAR密码破解装备文件中的一些信息又是比较灵敏的.所以,我们需求对这些灵敏信息进行加密处理.首要的加密方法分为两种:一种是同享密钥加 密(对 ...
- 详细介绍rar是什么由谁发明
RAR是一种专利文件格式,用于数据紧缩与归档打包,开发者为尤金·罗谢尔(俄语:Евгений Лазаревич Рошал,拉丁转写:Yevgeny Lazarevich Roshal),RAR的全 ...
- Django整体模型理解(1)
Django大概理解 *models: 设计一个模型,即在数据库中设计一个表,一个模型就是对应一个数据库中的表:models是一个类,类名就是表名,而类的属性就是表的字段.如下例子设计了两个表: f ...
- windows清理用户痕迹
1.日志管理器的基本使用 在这里创建自定义视图是非常重要的 在设置自定义视图不必设置的事件日志选项太多,可以按日志也可以按源进行设置,根据自己的情况来做决定 在cmd下可以使用wevtutil cl ...
- IGMP协议测试-网络测试仪实操
一.前言:IGMP协议用于IPv4系统向任何邻居组播路由器报告其组播成员资格.IP组播路由器自己本身也可以是一到多个组播组的成员.这时,组播路由器要实现协议的组播路由器部分. IGMP存在三个不同版本 ...
- 【C#表达式树 七】 反射在表达式树中的应用 ListInitExpression
以下都是反射在表达式树中的应用 对象初始化 Expression.MemberInit 反射获取成员(字段 或者属性),绑定数据,然后生成 成员表达式节点 class Animal { public ...
- [入门到吐槽系列] 微信小程序 敏感违规图片检测 mediaCheckAsync,客服接口 消息推送 的各种坑分享!
前言: 最近需要做个用户上传图片,服务端校验图片问题的需求.需要使用小程序消息推送,异步接受腾讯的图片验证回调.实在太多坑了. 相信10分钟看完本文的朋友,可以非常顺利避坑. 前期准备: 首先需要一个 ...
