【温故知新】—— React/Redux/React-router4基础知识&独立团Demo
前言:React专注View层,一切皆组件;全部使用ES6语法,最新版本为React16。
Redux是专注于状态管理的库,和react解耦;单一状态,单向数据流。【独立团github地址】
一、React基础知识
React基础语法
- import React
- class语法新建组件,render里直接使用
- render函数返回值就是输出JSX语法,会把JSX转成js执行
React的View层语法
- JS里直接写html
- Class里要写成className
- 变量用{ }包裹即可
React的Api
- 一切都是组件
- 类实现组件,使用JSX语法
- 组件间通信通过属性props传递
- 使用<组件 数据='值' >的形式传递
- 组件里使用this.props获取值
- 如果组件只有render函数,还可以用函数的形式写组件
- 组件内部通过state管理状态
- JSX本质就是js,所以直接数组.map渲染列表,【注意列表项必需有唯一key】
- Constructor构造函数设置组件初始状态,记得执行super(props)
- State就是一个不可变的对象,使用this.state获取
- 通过this.setState修改,不能直接修改
- onClick点击事件
- JSX里,onClick={this.函数名}来绑定事件
- this引用的问题,需要在构造函数里用bind绑定this,或者箭头函数直接绑定
- this.setState修改state,记得返回新的state,而不是修改
React生命周期
- 初始化周期
- 组件重新渲染生命周期
- 组件卸载声明周期
独立团Demo

import React from 'react';

class App extends React.Component{

      render(){

         let boss = '李云龙'

         return (

            <div>

               <h2>独立团,团长{boss}</h2>

               <FirstYin leader='张大喵'></FirstYin>

               <Squadron leader='孙德盛'></Squadron>

            </div>

         )

      }

}

function Squadron(props){

   return <h2>骑兵连连长{props.leader},冲啊!</h2>

}

class FirstYin extends React.Component{

   constructor(props) {

     super(props)

     this.state = {

       solders: ['虎子', '柱子', '王根生']

     }

     // this.addSolder = this.addSolder.bind(this)

   }

   componentWillMount(){

     console.log('组件马上就要加载了')

   }

   componentDidMount(){

    console.log('组件加载完成了')

   }

   addSolder = () => {

     console.log('hello add solder')

     this.setState({

       solders: [...this.state.solders, '新兵蛋子编号:'+Math.random()]

     })

   }

   render(){

      console.log('组件正在加载')

      return (

         <div>

            <h2>一营营长,{this.props.leader}</h2>

            <button onClick={this.addSolder}>新兵入伍</button>

            <ul>

              {this.state.solders.map(solder => {

                  return <li key={solder}>{solder}</li>

               })}

            </ul>

         </div>

      )

   }

}

export default App;
二、Redux基础知识
Redux核心概念
- Store:保存数据的容器,一个应用只能有一个Store。Redux提供createStore函数,创建Store
import {createStore} from 'redux';

const store = createStore(fun); //createStore的参数为reducer函数
- State:数据状态。Store在某一时刻的状态,可以通过store.getState()获取到。
const state = store.getState();
- Action:Redux改变state必需通过Action,实际上是一个JSON对象,该对象必须包含type属性,表示Action的名称。
//该函数不需要主动去调用,事实上我们在store.dispatch的时候,会自动触发。

const action = {

    type: 'ADD',   //action名称

    val: 5         //携带数据

};
- Action Creator:Action生成函数,用于创建Action,类似于工厂模式。若不使用,需要写很多Action。
function createAdd(number) {

    return {

        type: 'ADD',

        val: number

    }

}

const action = createAdd(5); store.dispatch(action):View用于触发数据变化的唯一方式
import {createStore} from 'redux';

const store = createStore(fun);

store.dispatch({   //state+5

    type: 'ADD',

    val: 5

});
- Reducer:Action改变数据状态需要遵守的规律函数。
const defaultState = 0;

//这里的reducer不需要主动去调用,我们只需要向容器中丢一块砖头(store.dispatch(action)),它会自动触发该方法

const reducer = (state = defaultState, action) => {

    switch (action.type) {

        case 'ADD':

            return state + action.val;

        case 'DEC':

            return state - action.val;

        default:

            return state;

    }

};
注意:Reducer是一个纯函数,纯函数的要求之一是不能改写参数
// 参数state和action是固定的

function reducer(state, action) {

    let newSate = {};

    return { ...state, ...newSate}

} - store.subscribe(listener):监听函数;会返回一个解除函数,调用该解除函数,就不再监听了
import { createStore } from 'redux';

const store = createStore(reducer);

let unsubscribe = store.subscribe(listener);  //监听

unsubscribe();  //解除监听
官方Demo
import { createStore } from 'redux';

/**

 * 这是一个 reducer,形式为 (state, action) => state 的纯函数。

 * 描述了 action 如何把 state 转变成下一个 state。

 *

 * state 的形式取决于你,可以是基本类型、数组、对象、

 * 甚至是 Immutable.js 生成的数据结构。惟一的要点是

 * 当 state 变化时需要返回全新的对象,而不是修改传入的参数。

 *

 * 下面例子使用 `switch` 语句和字符串来做判断,但你可以写帮助类(helper)

 * 根据不同的约定(如方法映射)来判断,只要适用你的项目即可。

 */

function reducer(state = 0, action) {

    switch (action.type) {

        case 'ADD':

            return state + action.val;

        case 'DES':

            return state - action.val;

        default:

            return state;

    }

}

// 创建 Redux store 来存放应用的状态。

// API 是 { subscribe, dispatch, getState }。

let store = createStore(reducer);

// 可以手动订阅更新,也可以事件绑定到视图层。

store.subscribe(() =>

    console.log("听到状态变化了:" + store.getState())

);

// 改变内部 state 惟一方法是 dispatch 一个 action。

// action 可以被序列化,用日记记录和储存下来,后期还可以以回放的方式执行

store.dispatch({ type: 'ADD', val: 10 });

// 10

store.dispatch({ type: 'ADD', val: 20 });

// 30

store.dispatch({ type: 'DES', val: 30 });

// 0
Redux单独使用
- src->index.js中:所有状态归redux管理(组件只负责view显示)
- reducer新建store,随时通过store.getState获取状态
import {createStore} from 'redux'

//通过reducer

//根据老的 state和 action 生成新的state

function counter(state=0, action){

    switch(action.type){

        case 'Add_GUN':

          return state+1

        case 'REMOVE_GUN':

          return state-1

        default:

          return 10

    }

}

//1、新建store

const store = createStore(counter)

const init = store.getState()

console.log(init) //10 - 需求状态变更,store.dispatch(action)来修改状态
//2、派发事件 传递action

store.dispatch({type: 'Add_GUN'})
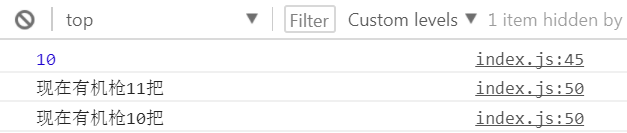
store.dispatch({type: 'REMOVE_GUN'}) - reducer函数接收state和action,返回新的state,可以用store.subscribe监听每次修改
//定义事件方法

function listener(){

    const current = store.getState();

    console.log(`现在有机枪${current}把`)

}

//3、监听事件

store.subscribe(listener)
- 安装redux
yarn add redux --sav
- 启动项目
yarn start
Redux和React一起用(手动连接)

- Redux相关内容,移到单独的文件index.redux.js单独管理:reducer+action
//action type

const Add_GUN = '加机关枪'

const REMOVE_GUN = '减机关枪'

//reducer

export function counter(state=0, action){

    switch(action.type){

        case Add_GUN:

          return state+1

        case REMOVE_GUN:

          return state-1

        default:

          return 10

    }

}

//action creator

export function addGUN(){

    return {type: Add_GUN}

}

export function removeGUN(){

    return {type: REMOVE_GUN}

} - App.js中:把store.dispatch方法传递给组件,内部可以调用修改状态
import React from 'react'; class App extends React.Component{
render(){
const store = this.props.store
const num = store.getState()
const addGUN = this.props.addGUN
const removeGUN = this.props.removeGUN
return (
<div>
<h3>现在有机枪{num}把</h3>
</div>
)
}
} export default App; - index.js中:Subscribe订阅render函数,每次修改都重新渲染
import React from 'react';

import ReactDOM from 'react-dom';

import App from './App';

import {createStore} from 'redux'

import {counter, addGUN, removeGUN} from './index.redux'

const store = createStore(counter)

function render(){

    ReactDOM.render(<App store={store} addGUN={addGUN} removeGUN={removeGUN}/>, document.getElementById('root'));

}

render()

store.subscribe(render)
Redux处理异步

- Redux默认只处理同步,异步任务需要react-thunk中间件
- 安装插件
npm install redux-thunk --save
- index.js中:使用applyMiddleware开启thunk中间件
import {createStore, applyMiddleware} from 'redux'
import thunk from 'redux-thunk'
import {addGunAsync} from './index.redux' const store = createStore(counter, applyMiddleware(thunk)) - index.redux.js中:Action可以返回函数,使用dispatch提交action
//(模拟)异步函数提交dispatch

export function addGunAsync(){

    return dispatch => {

        setTimeout(() => {

           dispatch(addGUN())

        }, 2000)

    }

}
App.js中:把store.dispatch方法传递给组件,内部可以调用修改状态
import React from 'react';

class App extends React.Component{

      render(){

         const store = this.props.store

         const num = store.getState()

         const addGunAsync = this.props.addGunAsync

         return (

            <div>

               <h3>现在有机枪{num}把</h3>

               <button onClick={() => store.dispatch(addGunAsync())}>拖两天再给</button>

            </div>

         )

      }

}
Redux调试工具

- 火狐搜索redux安装
- 项目本地安装
npm install redux-devtools-extension --save
- 新建store的时候判断window.decToolsExtension
- 使用compose组合函数结合thunk和window.devToolsExtension
import {createStore, applyMiddleware, compose} from 'redux'

const store = createStore(counter, compose(

      applyMiddleware(thunk),

      window.devToolsExtension ? window.devToolsExtension() : f => f

)) - 调试窗的redux选项卡,实时看到state
使用React-redux优雅的链接react和redux

- 安装react-redux
npm install react-redux --save
忘记subscribe,记住reducer,action和dispatch即可
React-redux提供Provider和connect两个接口来链接
index.js中:Provider组件在应用最外层,传入store即可,只用一次
import {Provider} from 'react-redux'

import {counter} from './index.redux'

ReactDOM.render(

    <Provider store={store}>

        <App />

    </Provider>,

    document.getElementById('root')

);
Connect负责从外部获取组件需要的参数(mapStateToProps, actionCreators)
import React from 'react';

import {connect} from 'react-redux'

import {addGUN, removeGUN, addGunAsync } from './index.redux'

class App extends React.Component{

      render(){

          return (

            <div>

               <h3>现在有机枪{this.props.num}把</h3>

               <button onClick={this.props.addGUN}>申请武器</button>

               <button onClick={this.props.removeGUN}>上交武器</button>

               <button onClick={this.props.addGunAsync}>拖两天再给</button>

            </div>

         )

      }

}

const mapStateToProps = (state) => {

   return {

      num: state

   }

}

const actionCreators = {addGUN, removeGUN, addGunAsync}

App = connect(mapStateToProps, actionCreators)(App)

export default App;
Connect可以用装饰器的方式来优化
弹出个性化配置
npm run eject
安转专门支持装饰器的插件
npm install babel-plugin-transform-decorators-legacy --save-dev
Package.json里babel加上plugins配置
"plugins": [

    ["@babel/plugin-proposal-decorators", { "legacy": true }],

]
优化connect
import React from 'react';

import {connect} from 'react-redux'

import {addGUN, removeGUN, addGunAsync } from './index.redux'

@connect(

    state => ({num: state})

   {addGUN, removeGUN, addGunAsync}

)  //使用装饰器方法优化connect

class App extends React.Component{

      render(){

          return (

            <div>

               <h3>现在有机枪{this.props.num}把</h3>

               <button onClick={this.props.addGUN}>申请武器</button>

               <button onClick={this.props.removeGUN}>上交武器</button>

               <button onClick={this.props.addGunAsync}>拖两天再给</button>

            </div>

         )

      }

}

export default App;
三、React-router4基础知识
React-router4
- React官方推荐路由库,4是最新版本,和之前版本不兼容,浏览器和RN均兼容
- React开发单页应用必备,践行路由即组件的概念
- 核心概念:动态路由、Route、Link、Switch
- Web中应用React-router:安装react-router-dom作为前端路由
npm install react-router-dom --save
入门组件
BrowserRouter包裹整个应用
Router路由对应渲染的组件,可嵌套
Link跳转专用
import React from 'react';
import ReactDOM from 'react-dom';
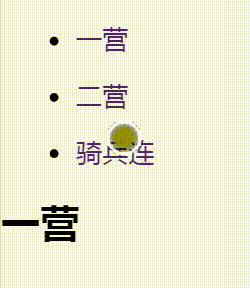
import {BrowserRouter, Route, Link} from 'react-router-dom' function Yiying(){
return <h2>一营</h2>
} function Erying(){
return <h2>二营</h2>
} function Qibinglian(){
return <h2>骑兵连</h2>
} ReactDOM.render(
<Provider store={store}>
<BrowserRouter>
<div>
<ul>
<li>
<Link to='/'>一营</Link> //点击跳到指定路由
</li>
</ul>
<ul>
<li>
<Link to='/erying'>二营</Link>
</li>
</ul>
<ul>
<li>
<Link to='/qibinglian'>骑兵连</Link>
</li>
</ul>
<Route path='/' exact component={Yiying}></Route> //exact表明路由完全匹配
<Route path='/erying' component={Erying}></Route>
<Route path='/qibinglian' component={Qibinglian}></Route> //路由对应渲染模板
</div>
</BrowserRouter>
</Provider>,
document.getElementById('root')
);
- 其它组件
- url参数,Route组件参数可用冒号标识参数
<Route path='/:location' component={Test}></Route> - Redirect组件 跳转
<Redirect to='/qibinglian'></Redirect>
- Switch只渲染命中的第一个子Route组件
<Switch>

       <Route path='/' exact component={Yiying}></Route>

       <Route path='/erying' component={Erying}></Route>

       <Route path='/qibinglian' component={Qibinglian}></Route>

</Switch>
和Redux配合
- 复杂redux应用,多个reducer,用combineReducers合并
- index.js中:引入合并后的reducer,并注入createStore中
import reducers from './reducer'  //合并后的reducer

const store = createStore(reducers, compose(

      applyMiddleware(thunk),

      window.devToolsExtension ? window.devToolsExtension() : f => f

))
reducers.js中:合并所有reducer,并返回
/**

 * 合并所有reducer 并且返回

 */

import {combineReducers} from 'redux'

import {counter} from './index.redux'

import {auth} from './Auth.redux'

export default combineReducers({counter, auth})
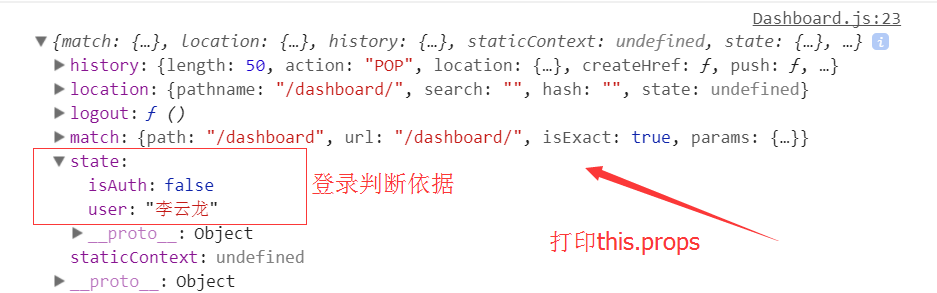
- Redirect组件 跳转
return this.props.isAuth ? app : <Redirect to='/login'></Redirect>
- Switch只渲染一个子Route组件
ReactDOM.render(

    <Provider store={store}>

        <BrowserRouter>

            <Switch>

                <Route path='/login' component={Auth}></Route>

                <Route path='/dashboard' component={Dashboard}></Route>

                <Redirect to='/dashboard'></Redirect>

            </Switch>

        </BrowserRouter>

    </Provider>,

    document.getElementById('root')

);
注:转载请注明出处
【温故知新】—— React/Redux/React-router4基础知识&独立团Demo的更多相关文章
- React:快速上手(1)——基础知识
React:快速上手(1)——基础知识 React(有时叫React.js或ReactJS)是一个为数据提供渲染为HTML视图的开源JavaScript库,用于构建用户界面. JSX.元素及渲染 1. ...
- React学习笔记(一) 基础知识
现在最热门的前端框架有AngularJS.React.Bootstrap等.自从接触了ReactJS,ReactJs的虚拟DOM(Virtual DOM)和组件化的开发深深的吸引了我. React的基 ...
- Redux学习笔记-基础知识
Redux概述 是什么:Redux是管理状态的容器,提供可预测的状态管理. 怎么做:Redux主要是用来管理组件或者应用的状态,本质上跟一个事件处理器差不多.通过分发action触发reduce来 ...
- NDK开发—基础知识实战Demo
简介 前面写了几篇NDK相关的文章: NDK开发-简介&环境搭建(Eclipse,Android Studio) NDK开发-Android Studio+gradle-experimenta ...
- React Native 入门基础知识总结
中秋在家闲得无事,想着做点啥,后来想想,为啥不学学 react native.在学习 React Native 时, 需要对前端(HTML,CSS,JavaScript)知识有所了解.对于JS,可以看 ...
- react + redux 完整的项目,同时写一下个人感悟
先附上项目源码地址和原文章地址:https://github.com/bailicangd... 做React需要会什么? react的功能其实很单一,主要负责渲染的功能,现有的框架,比如angula ...
- Flutter调研(1)-Flutter基础知识
工作需要,因客户端有部分页面要使用flutter编写,需要QA了解一下flutter相关知识,因此,做了flutter调研,包含安装,基础知识与demo编写,第二部分是安装与环境配置. —— Flut ...
- Flux --> Redux --> Redux React 基础实例教程
本文的目的很简单,介绍Redux相关概念用法 及其在React项目中的基本使用 假设你会一些ES6.会一些React.有看过Redux相关的文章,这篇入门小文应该能帮助你理一下相关的知识 一般来说,推 ...
- Flux --> Redux --> Redux React 入门 基础实例使用
本文的目的很简单,介绍Redux相关概念用法 及其在React项目中的基本使用 假设你会一些ES6.会一些React.有看过Redux相关的文章,这篇入门小文应该能帮助你理一下相关的知识 一般来说,推 ...
随机推荐
- 《c程序设计语言》读书笔记-第二个字符串任意一个在第一个字符串出现的位置,未出先返回-1
#include <stdio.h> #include <string.h> #define Num 1000 int main() { int c,i,j = 0,m = 0 ...
- BZOJ 4261: 建设游乐场
4261: 建设游乐场 Time Limit: 50 Sec Memory Limit: 256 MBSubmit: 38 Solved: 16[Submit][Status][Discuss] ...
- java集合类深入分析之PriorityQueue(二)
PriorityQueue介绍 在平时的编程工作中似乎很少碰到PriorityQueue(优先队列) ,故很多人一开始看到优先队列的时候还会有点迷惑.优先队列本质上就是一个最小堆.前面一篇文章介绍了堆 ...
- 全自动google检索后台
是不是每天为了找后台,伤破了蛋,每次在google输入”site:www.xxx.com intitle:登陆”.是不是手都累麻了,无聊又浪费时间.有了它,你的蛋就不用在碎了 直接上源码 1 2 3 ...
- [LeetCode] Evaluate Reverse Polish Notation stack 栈
Evaluate the value of an arithmetic expression in Reverse Polish Notation. Valid operators are +, -, ...
- linux下修改mysql数据库编码后无法启动解决办法
linux下老版本的Mysql修改数据库编码的方法是 修改my.cnf vi /etc/my.cnf 在[client]下添加 default-character-set=utf8 在[mysqld] ...
- vs2015部署---下一代VC运行时库系统:the Universal CRT
前言 其实the Universal CRT(通用C运行时库)已经不能算是“下一代”,因为它已经在前两年伴随着Visual Studio 2015和Windows10发布.但是由于之前使用VS2015 ...
- MVC中路由器程序
MVC中路由器程序编写方式如下例子 把地址:/home/add?id=1 改写成:/home/add/1 把地址:/home/edit?id=1&sid=2 改写成:/home/edit/1_ ...
- 在Ubuntu/Centos使用 Let's Encrypt 证书部署 HTTPS的方法
certbot地址 apache服务器(ubuntu环境): 1.获取软件包: $ sudo apt-get update $ sudo apt-get install software-proper ...
- windows下phpstorm的常用快捷键及使用技巧
1.pubf+回车 声明一个方法 2./ ** 回车 生成注释 3.Ctrl +g 跳转行 4.Ctrl + Alt + L 代码格式化 5.Ctrl +D 复制当前行到下一行 6.Ctrl ...