基于 XML 的 AOP 配置(1)
本文连接:https://www.cnblogs.com/qzhc/p/11969734.html
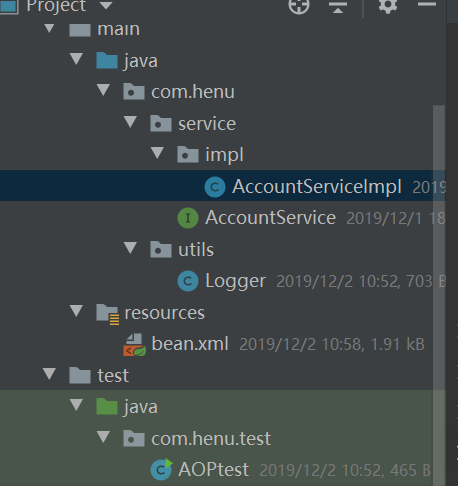
接下来我将用一个很简单的实例

1、 环境搭建
1.1、 第一步:准备必要的代码
业务层代码:
AccountServiceImpl.java
package com.henu.service.impl;

import com.henu.service.AccountService;

public class AccountServiceImpl implements AccountService {

    public void saveAccount() {

        System.out.println("执行了保存");

    }

}
测试类:
AOPtest.java
package com.henu.test;

import com.henu.service.AccountService;

import org.springframework.context.ApplicationContext;

import org.springframework.context.support.ClassPathXmlApplicationContext;

public class AOPtest {

    public static void main(String[] args) {

        ApplicationContext ac = new ClassPathXmlApplicationContext("bean.xml");

        AccountService as = (AccountService) ac.getBean("accountService");

        as.saveAccount();

    }

}
1.2、导入所需要的jar包
我的demo是用maven管理的:pom.xml
<?xml version="1.0" encoding="UTF-8"?>

<project xmlns="http://maven.apache.org/POM/4.0.0"

         xmlns:xsi="http://www.w3.org/2001/XMLSchema-instance"

         xsi:schemaLocation="http://maven.apache.org/POM/4.0.0 http://maven.apache.org/xsd/maven-4.0.0.xsd">

    <modelVersion>4.0.0</modelVersion>

    <groupId>com.henu</groupId>

    <artifactId>day03_spring_adviceType</artifactId>

    <version>1.0-SNAPSHOT</version>

    <packaging>jar</packaging>

    <dependencies>

        <dependency>

            <groupId>org.springframework</groupId>

            <artifactId>spring-context</artifactId>

            <version>5.0.2.RELEASE</version>

        </dependency>

        <dependency>

            <groupId>org.aspectj</groupId>

            <artifactId>aspectjweaver</artifactId>

            <version>1.8.7</version>

        </dependency>

    </dependencies>

</project>
1.3、创建 spring 的配置文件并导入约束和配置spring的ioc
<?xml version="1.0" encoding="UTF-8"?>

<beans xmlns="http://www.springframework.org/schema/beans"

       xmlns:xsi="http://www.w3.org/2001/XMLSchema-instance"

       xmlns:aop="http://www.springframework.org/schema/aop"

       xsi:schemaLocation="http://www.springframework.org/schema/beans

  http://www.springframework.org/schema/beans/spring-beans.xsd

  http://www.springframework.org/schema/aop

  http://www.springframework.org/schema/aop/spring-aop.xsd">

    <!--配置spring的Ioc,把service对象配置起来-->

    <bean id="accountService" class="com.henu.service.impl.AccountServiceImpl"></bean>
1.4、写一个公共类作为通知
logger.java
package com.henu.utils;

//记录日志

public class Logger {

    /**

     * 前置通知

     * */

    public void befterPrintLog(){

        System.out.println("前置通知logger开始记录日志了");

    }

    /**

     * 后置通知

     * */

    public void afterReturningPrintLog(){

        System.out.println("后置通知logger开始记录日志了");

    }

    /**

     * 异常通知

     * */

    public void afterThrowingPrintLog(){

        System.out.println("异常通知logger开始记录日志了");

    }

    /**

     * 最终通知

     * */

    public void afterPrintLog(){

        System.out.println("最终通知logger开始记录日志了");

    }

}
2、aop配置步骤(先给代码,在讲)
<?xml version="1.0" encoding="UTF-8"?>

<beans xmlns="http://www.springframework.org/schema/beans"

       xmlns:xsi="http://www.w3.org/2001/XMLSchema-instance"

       xmlns:aop="http://www.springframework.org/schema/aop"

       xsi:schemaLocation="http://www.springframework.org/schema/beans

  http://www.springframework.org/schema/beans/spring-beans.xsd

  http://www.springframework.org/schema/aop

  http://www.springframework.org/schema/aop/spring-aop.xsd">

    <!--配置spring的Ioc,把service对象配置起来-->

    <bean id="accountService" class="com.henu.service.impl.AccountServiceImpl"></bean>

    <!--配置logger类 -->

    <bean id="logger" class="com.henu.utils.Logger"></bean>

    <!--配置AOP-->

    <aop:config>

    <!--配置切面表达式 id属性用于指定表达式的唯一标示。execution属性用于指定表达式内容

        此标签写在aop:aspect标签内部只能当前切面使用

        他还可以写在aop:aspect外面,但必须至首,全局都可以使用

    -->

        <aop:pointcut id="pt1" expression="execution(* com.henu.service.impl.*.*(..))"/>

        <!--配置切面-->

        <aop:aspect id="logAdvice" ref="logger">

        <!--配置通知的类型,并且建立通知方法和切入点方法的关联-->

            <!--配置前置通知:在切入点方法执行之前-->

            <aop:before method="befterPrintLog" pointcut-ref="pt1"></aop:before>

            <!--配置后置通知:在切入点方法正常执行之后。它与异常只执行一个-->

            <aop:after-returning method="afterReturningPrintLog" pointcut-ref="pt1"></aop:after-returning>

            <!--配置异常通知:在切入点方法执行产生异常之后。它与后置只执行一个-->

            <aop:after-throwing method="afterThrowingPrintLog" pointcut-ref="pt1"></aop:after-throwing>

            <!--配置最终通知:无论切入点是否正常执行,它都会在其后面执行-->

            <aop:after method="afterPrintLog" pointcut-ref="pt1"></aop:after>

        </aop:aspect>

    </aop:config>

</beans>
2.1、把通知类用bean标签配置起来
<!--配置logger类 -->

    <bean id="logger" class="com.henu.utils.Logger"></bean>
2.2、使用aop:config声明aop配置
aop:config:
作用:用于声明开始 aop 的配置
<aop:config>
<!--配置的代码都写在此处-->
</aop:config>
2.3、使用 aop:aspect 配置切面
aop:aspect:

  作用:

    用于配置切面。

  属性:

    id:给切面提供一个唯一标识。

    ref:引用配置好的通知类 bean 的 id。

<aop:aspect id="logAdvice" ref="logger">

<!--配置通知的类型要写在此处-->

</aop:aspect>
2.4、使用 aop:pointcut 配置切入点表达式
大家看到,使用下面的方法,会使之前的代码减少很多
aop:pointcut:

作用:

用于配置切入点表达式。就是指定对哪些类的哪些方法进行增强。

属性:

expression:用于定义切入点表达式。

id:用于给切入点表达式提供一个唯一标识

<aop:pointcut id="pt1" expression="execution(* com.henu.service.impl.*.*(..))" />
2.4、使用aop:xxx配置对应的通知类型
     aop:before

        作用:

          用于配置前置通知。指定增强的方法在切入点方法之前执行

        属性:

          method:用于指定通知类中的增强方法名称

          ponitcut-ref:用于指定切入点的表达式的引用

          poinitcut:用于指定切入点表达式

        执行时间点:

          切入点方法执行之前执行

<aop:before method="beginTransaction" pointcut-ref="pt1"/>


   aop:after-returning

        作用:

          用于配置后置通知

        属性:

          method:指定通知中方法的名称。

          pointct:定义切入点表达式

          pointcut-ref:指定切入点表达式的引用

        执行时间点:

          切入点方法正常执行之后。它和异常通知只能有一个执行

<aop:after-returning method="commit" pointcut-ref="pt1"/>


   aop:after-throwing

        作用:

          用于配置异常通知

        属性:

          method:指定通知中方法的名称。

          pointct:定义切入点表达式

          pointcut-ref:指定切入点表达式的引用

        执行时间点:

          切入点方法执行产生异常后执行。它和后置通知只能执行一个

<aop:after-throwing method="rollback" pointcut-ref="pt1"/>


   aop:after

        作用:

          用于配置最终通知

        属性:

          method:指定通知中方法的名称。

          pointct:定义切入点表达式

          pointcut-ref:指定切入点表达式的引用

        执行时间点:

          无论切入点方法执行时是否有异常,它都会在其后面执行。

<aop:after method="release" pointcut-ref="pt1"/>
2.5、切入点表达式说明
execution:匹配方法的执行(常用)

        execution(表达式)

        表达式语法:execution([修饰符] 返回值类型 包名.类名.方法名(参数))

        写法说明:

        全匹配方式:

          public void com.henu.service.impl.AccountServiceImpl.saveAccount()

        访问修饰符可以省略

          void com.itheima.service.impl.AccountServiceImpl.saveAccount()

        返回值可以使用*号,表示任意返回值

          * com.henu.service.impl.AccountServiceImpl.saveAccount()

        包名可以使用*号,表示任意包,但是有几级包,需要写几个*.

          * *.*.*.*.AccountServiceImpl.saveAccount()

        使用..来表示当前包,及其子包

          * com..AccountServiceImpl.saveAccount()

        类名和方法名可以使用*号来实现通配

          * *..*.*()

        参数列表可以使用*,表示参数可以是任意数据类型,但是必须有参数

          * com..*.*(*)

        参数列表可以使用..表示有无参数均可,有参数可以是任意类型

          * com..*.*(..)

        全通配方式:

          * *..*.*(..)

    注:

        通常情况下,我们都是对业务层的方法进行增强,所以切入点表达式都是切到业务层实现类。

        execution(* com.henu.service.impl.*.*(..))
讲到这里基本都差不多了,少啥以后再补把。
基于 XML 的 AOP 配置(1)的更多相关文章
- 基于XML的AOP配置
创建spring的配置文件并导入约束 此处要导入aop的约束 <?xml version="1.0" encoding="UTF-8"?> < ...
- spring的基于xml的AOP配置案例和切入点表达式的一些写法
<?xml version="1.0" encoding="UTF-8"?><beans xmlns="http://www.spr ...
- 基于XML的AOP配置(2)-环绕通知
配置方式: <aop:config> <aop:pointcut expression="execution(* com.itheima.service.impl.*.*( ...
- 基于XML的AOP配置-转
http://www.cnblogs.com/yangy608/archive/2010/11/14/1876839.html AOP(Aspect-Oriented Programming,面向切面 ...
- Spring中AOP的基于xml开发和配置
pom文件: <?xml version="1.0" encoding="UTF-8"?> <project xmlns="http ...
- Spring中基于xml的AOP
1.Aop 全程是Aspect Oriented Programming 即面向切面编程,通过预编译方式和运行期动态代理实现程序功能的同一维护的一种技术.Aop是oop的延续,是软件开发中的 一个热点 ...
- Spring 框架的概述以及Spring中基于XML的IOC配置
Spring 框架的概述以及Spring中基于XML的IOC配置 一.简介 Spring的两大核心:IOC(DI)与AOP,IOC是反转控制,DI依赖注入 特点:轻量级.依赖注入.面向切面编程.容器. ...
- 01Spring基于xml的IOC配置--入门
01Spring基于xml的IOC配置 1.创建一个普通的maven工程 1.1 选择maven,不用骨架,点击下一步. 1.2 填写GroupId.ArtifactId.Version.填完点击下一 ...
- 面向切面编程AOP:基于XML文件的配置
除了使用AspectJ注解声明切面,Spring也支持在bean的配置文件中声明切面,这种声明是通过aop scheme中的XML元素完成的. 首先建立一个类: package com.sevenhu ...
随机推荐
- java写webservice接口
有一个需求:要求根据设备mac和终端设备类型来查询设备库存状态. 接口协议是采用webservice协议,信息交互方式为xml格式信息 输入参数存放到XML各个节点下,并转为一个String,作为接口 ...
- Java高并发程序设计学习笔记(十):并发调试和JDK8新特性
转自:https://blog.csdn.net/dataiyangu/article/details/87631574 多线程调试的方法使用Eclipse进行多线程调试线程dump及分析分析死锁案例 ...
- Delphi TIdTCPServer组件
樊伟胜
- python网络编程:TCP通讯模板、粘包及解决方案、自定义报头
一.TCP通讯模板 二.远程CMD程序 三.解决粘包问题 四.解决粘包问题2 一.TCP通讯模板 TCP客户端 import socket c = socket.socket() # 连接服务器 c. ...
- python面向编程:类继承、继承案例、单继承下属性查找、super方法
一.类的继承 二.基于继承解决类与类的代码冗余问题 三.在单继承背景下属性的查找 四.super的方法 一.类的继承 1.什么是继承? 在程序中继承是一种新建子类的方法的方式,新创建的类成为子类\派生 ...
- 很有用的shell脚本
基础知识 expect基础知识 exp_continue是匹配一行后,从当前expect块第一行开始匹配 expect块的每一行匹配后,直接退出当前expect块,往下一个expect块开始匹配 ex ...
- java使用策略模式代替if/else
平时在开发中避免不了使用大量的if else语句,但过多层的if else对于性能有很大的开销,类似如下代码 public class MainStart { public static void m ...
- Rails 用Webpack安装Bootstrap(附录webpack使用)
Rails6将默认使用webpack代替asset: 本文讲述如何自己配置. 参考: https://getbootstrap.com/docs/4.1/getting-started/webpack ...
- 我遇到的Echarts 最大值不显示&平均值不正常
用Echarts做图表的时候,遇到最大值不显示和平均值不正常的问题,如图: 找了半天,原来是X轴6个坐标有7个数据,只是最后那个数据没有显示出来,而且还是最大的,无语. 加上第七个坐标之后,就显示正常 ...
- MySQL 关于索引的操作
-- 索引分类? 1.普通索引 2.唯一索引 3.全文索引 4.组合索引 普通索引:仅加速查询,最基本的索引,没有任何限制 唯一索引:加速查询 + 列值唯一(可以有null) 全文索引:仅适用于MyI ...
