vue路由传参的几种基本方式
this.$router.push跳转
现有如下场景,点击父组件的li元素跳转到子组件中,并携带参数,便于子组件获取数据。
父组件中:
<li v-for="article in articles" @click="getDescribe(article.id)">methods:
方案一:
      getDescribe(id) {

//   直接调用$router.push 实现携带参数的跳转

        this.$router.push({

          path: `/describe/${id}`,

        })
方案一,需要对应路由配置如下:
   {

     path: '/describe/:id',

     name: 'Describe',

     component: Describe

   }
很显然,需要在path中添加/:id来对应 $router.push 中path携带的参数。在子组件中可以使用来获取传递的参数值。
this.$route.params.id方案二:
父组件中:通过路由属性中的name来确定匹配的路由,通过params来传递参数。
       this.$router.push({

          name: 'Describe',

          params: {

            id: id

          }

        })
对应路由配置: 注意这里不能使用:/id来传递参数了,因为父组件中,已经使用params来携带参数了。
 {

     path: '/describe',

     name: 'Describe',

     component: Describe

   }
子组件中: 这样来获取参数
this.$route.params.id方案三:
父组件:使用path来匹配路由,然后通过query来传递参数
这种情况下 query传递的参数会显示在url后面?id=?
    this.$router.push({

          path: '/describe',

          query: {

            id: id

          }

        })
对应路由配置:
   {

     path: '/describe',

     name: 'Describe',

     component: Describe

   }
对应子组件: 这样来获取参数
this.$route.query.id下面整理一下params传参和query传参的差别:
1、用法上的
刚才已经说了,query要用path来引入,params要用name来引入,接收参数都是类似的,分别是this.$route.query.name和this.$route.params.name。
注意接收参数的时候,已经是$route而不是$router了哦!!
2、展示上的
query更加类似于我们ajax中get传参,params则类似于post,说的再简单一点,前者在浏览器地址栏中显示参数,后者则不显示。
router-link跳转
params传参(url中显示参数)
文件结构
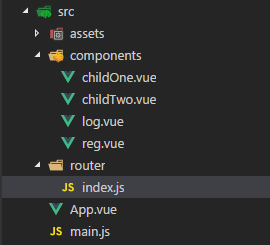
定义路由:在定义path路由路径时定义参数名和格式,如 path: "/one/login/:num" ,router>index.js文件如下
/* eslint-disable*/

//第一步:引用vue和vue-router ,Vue.use(VueRouter)

import Vue from 'vue'

import Router from 'vue-router'

Vue.use(Router)

//第二步:引用定义好的路由组件

import ChildOne from '../components/childOne'

import ChildTwo from '../components/childTwo'

import Log from '../components/log.vue'

import Reg from '../components/reg.vue'

//第三步:定义路由(路由对象包含路由名、路径、组件、参数、子路由等),每一个路由映射到一个组件

//第四步:通过new Router来创建router实例

export default new Router({

  mode: 'history',

  routes: [

    {

      path: '/one',

      name: 'ChildOne',

      component: ChildOne,

      children:[

        {

          path:'/one/log/:num',

          component:Log,

        },

        {

          path:'/one/reg/:num',

          component:Reg,

        },

      ],

    },

    {

      path: '/two',

      name: 'ChildTwo',

      component: ChildTwo

    }

  ]

})
在父路由组件上使用router-link进行路由导航,传参用<router-link to="/one/login/001">的形式向子路由组件传递参数。使用router-view进行子路由页面内容渲染,父路由组件childOne.vue 如下:
<template>

  <div style="border:1px solid red;color:red;">

    <p>这是父路由childOne对应的组件页面</p>

    <p>下面可以点击显示嵌套的子路由 </p>

    <router-link to="/one/log/123">显示登录页面</router-link>

    <router-link to="/one/reg/002">显示注册页面</router-link>

    <router-view></router-view>

  </div>

</template>
子路由通过 this.$route.params.num 的形式来获取父路由向子路由传递过来的参数,子路由组件login.vue如下:
<template>

    <div style="border:1px solid orange;color:orange;">

        <p>登录界面:这是另一个嵌套路由的内容</p>

        <h3>{{this.$route.params.num}}</h3>

    </div>

</template>
效果:
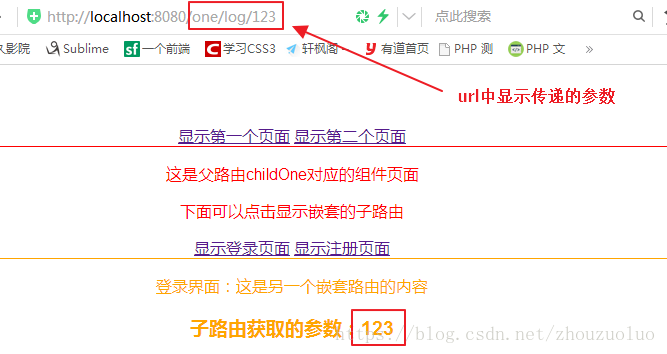
注意:如上所述路由定义的path: "/one/login/:num"路径和to="/one/login/001"必须书写正确,否则不断点击切换路由,会因为不断将传递的值显示添加到url中导致路由出错,如下:

传递的值存在url中存在安全风险,为防止用户修改,另一种方式不在url中显示传递的值
params传参(url中不显示参数)
定义路由时添加name属性给映射的路径取一个别名,router>index.js文件修改router如下:
export default new Router({

    mode: 'history',

    routes: [

        {

            path: '/one',

            name: 'ChildOne',

            component: ChildOne,

            children:[

                {

                    path:'/one/log/',

                    name:'Log',

                    component:Log,

                },

                {

                path:'/one/reg/',

                name:'Reg',

                component:Reg,

                },

            ],

        },

        {

            path: '/two',

            name: 'ChildTwo',

            component: ChildTwo

        }

    ]

})
在父路由组件上使用router-link进行路由导航,使用 <router-link :to="{name:'home',params:{id:001}}> 形式传递参数。注意 ': to= ' 前面的冒号,childOne.vue组件修改如下:
<template>

    <div style="border:1px solid red;color:red;">

        <p>这是父路由childOne对应的组件页面</p>

        <p>下面可以点击显示嵌套的子路由 </p>

        <router-link :to="{name:'Log',params:{num:666}}">显示登录页面</router-link>

        <router-link :to="{name:'Reg',params:{num:888}}">显示注册页面</router-link>

        <router-view></router-view>

    </div>

</template>
子路由组件页面获取父路由传参方式不变,reg.vue 文件如下:
<template>

    <div style="border:1px solid orange;color:orange;">

        <p>登录界面:这是另一个嵌套路由的内容</p>

        <h3>子路由获取的参数:{{this.$route.params.num}}</h3>

    </div>

</template>
注意:上述这种利用params不显示url传参的方式会导致在刷新页面的时候,传递的值会丢失;
使用Query实现路由传参
定义路由 router>index.js文件如下:
export default new Router({

  mode: 'history',

  routes: [

    {

      path: '/one',

      name: 'ChildOne',

      component: ChildOne,

      children:[

        {

          path:'/one/log/',

          component:Log,

        },

        {

          path:'/one/reg/',

          component:Reg,

        },

      ],

    },

    {

      path: '/two',

      name: 'ChildTwo',

      component: ChildTwo

    }

  ]

})
修改路由导航 <router-link :to="{path:'/one/log',query:{num:123}}"> ,childOne.vue 文件修改如下:
<template>

  <div style="border:1px solid red;color:red;">

    <p>这是父路由childOne对应的组件页面</p>

    <p>下面可以点击显示嵌套的子路由 </p>

    <router-link :to="{path:'/one/log',query:{num:123}}">显示登录页面</router-link>

    <router-link :to="{path:'/one/reg',query:{num:999}}">显示注册页面</router-link>

    <router-view></router-view>

  </div>

</template>
子路由组件通过 this.$route.query.num 来显示传递过来的参数,reg.vue 文件如下:
<template>

  <div style="border:1px solid purple;color:purple;">

    <p>注册界面:这是二级路由页面</p>

    <h3>{{this.$route.query.num}}</h3>

  </div>

</template>
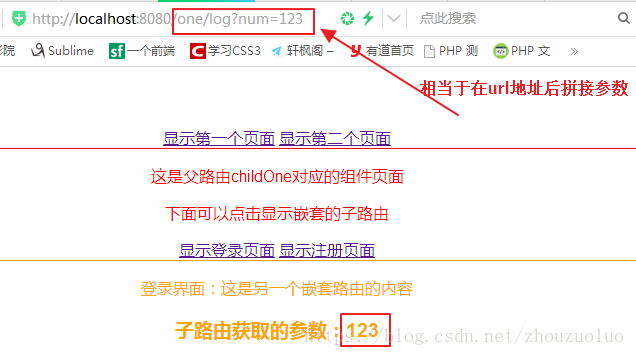
效果如下:
PS: 在第一步的定义路由中我们都使用了mode:history 作用就是去除路由跳转时路由路径前的 “#”
常用的mode模式有两种:
默认为hash模式,最明显的标志是,URL上有#号 localhost:8080/#/,路由会监听#后面的信息变化进行路由匹配
另一种为history模式,不会有#出现,很大程度上对URL进行了美化。需要**注意**history模式在打包后的路由跳转需要服务器配合
默认不使用mode:history 如下

返回目录
vue路由传参的几种基本方式的更多相关文章
- vue路由传参的三种基本方式
现有如下场景,点击父组件的li元素跳转到子组件中,并携带参数,便于子组件获取数据. 父组件中: <li v-for="article in articles" @click= ...
- Vue路由传参的几种方式
原 Vue路由传参的几种方式 2018年07月28日 23:52:40 广积粮缓称王 阅读数 12613 前言:顾名思义,vue路由传参是指嵌套路由时父路由向子路由传递参数,否则操作无效.传参方式 ...
- vue路由传参的三种方式以及解决vue路由传参页面刷新参数丢失问题
最近项目中涉及到跨页面传参数和后台进行数据交互,看到需求之后第一反应就是用路由传参来解决:Vue中给我们提供了三种路由传参方式,下面我们一个一个的来看一下: 方法一:params传参: this.$r ...
- vue路由传参的三种方式区别(params,query)
最近在做一个项目涉及到列表到详情页的参数的传递,网上搜索一下路由传参,结合自己的写法找到一种适合自己的,不过也对三种写法都有了了解,在此记录一下 <ul class="table_in ...
- vue 路由传参的三种基本模式
路由是连接各个页面的桥梁,而参数在其中扮演者异常重要的角色,在一定意义上,决定着两座桥梁是否能够连接成功. 在vue路由中,支持3中传参方式. 场景,点击父组件的li元素跳转到子组件中,并携带参数,便 ...
- vue路由传参的三种方式
方式一 通过query方式传参 这种情况下 query传递的参数会显示在url后面 this.$router.push({ path: '/detail', query: { id: id } }) ...
- vue 路由传参的三种方法
API在这里 https://router.vuejs.org/guide/essentials/navigation.html 第一种传参 通过路由属性中的name来确定匹配的路由,通过param ...
- vue --- 路由传参的几种方式
方案一: getDescribe(id) { // 直接调用$router.push 实现携带参数的跳转 this.$router.push({ path: `/describe/${id}`, }) ...
- vue路由传参及组件传参和组件方法调用
VUE路由和组件传参 第一种vue自带的路由传参的三种基本方式 1.通过name :id传参 子组件通过$route.name接收参数 { path: '/particulars/:id', name ...
随机推荐
- 如何低成本搭建dnslog服务器
DNSLog,简单来说,就是通过记录对于域名的DNS请求,通过dns请求这个相对"隐蔽"的渠道,来委婉地获取到想要获得的信息. 例如,在一个针对mysql数据库的注入中,如果没有回 ...
- struts2之单文件上传(7)
前台页面jsp <!-- 拦截的时候用这个 <s:form action="uploadAction" enctype="multipart/form-dat ...
- 长春理工大学第十四届程序设计竞赛D Capture The Flag——哈希&&打表
题目 链接 题意:给定一个字符串 $s$,求不同于 $s$ 的字符串 $t$,使得 $Hash(s) = Hash(t)$,其中 $\displaystyle Hash(s) = \sum_0^{le ...
- 在maven项目中如何引入另外一个项目(转)
原文链接:https://blog.csdn.net/jianfpeng241241/article/details/52654352 1 在Myeclipse中准备两个maven demo. , ...
- [ES2015] Number.isNaN instead of isNaN
const result = Number('55px'); // isNaN "NaN" console.log(isNaN(result)); // true console. ...
- How to Set Up Chinese Characters on Windows 7
How to Change the Display Language of non-Unicode Programs in Windows http://www.7tutorials.com/chan ...
- E. Intergalaxy Trips
完全图,\(1 \leq n \leq 1000\)每一天边有 \(p_{i,j}=\frac{A_{i,j}}{100}\) 的概率出现,可以站在原地不动,求 \(1\) 号点到 \(n\) 号点期 ...
- 使用horovod构建分布式深度学习框架
最近两周一直在尝试着分布式深度学习的架构,主要的原因一方面是几台机子全是1060卡,利用深度网络在较大数据样本上训练的效率极其低下,所以尝试着将几台机子做成分布式,看看能否提高训练效率:第二方面是有人 ...
- AT3912 Antennas on Tree
AT3912 Antennas on Tree %%zzt 只能考虑性质了. 把最后选择的k个点的连通块求出来,连通块内部的点表示都是互异的 连通块外部的点只能形成若干条链,并且这k个点的每一个最多与 ...
- Difference Between static and default methods in interface
I was learning through interfaces when I noticed that you can now define static and default methods ...