Ubuntu学习总结-03 安装软件 & 技巧
1 UBuntu 安装 Googole Chrome
首先下载软件
- wget https://dl.google.com/linux/direct/google-chrome-stable_current_amd64.deb
然后尝试安装它
- sudo dpkg -i google-chrome-stable_current_amd64.deb
安装成功后如果安装其他软件会安装失败,在安装信息中会有如下提示:
- google-chrome-stable : Depends: libappindicator1 but it is not going to be installed
需要运行如下命令来安装chrome依赖的库文件。
- sudo apt-get -f install libappindicator1 libindicator7
2 Ubuntu root 密码忘记-恢复
如果用户具有sudo权限,那么直接可以运行如下命令更改密码:
- sudo su root
- passwd
或者直接运行sudo passwd root命令就可以直接更改root密码。
有关sudo su的区别:
1.共同点:都是root用户的权限;
2.不同点:su仅仅取得root权限,工作环境不变,还是在切换之前用户的工作环境;sudo是完全取得root的权限和root的工作环境。
3 vi 中查找字符串内容的方法
使用vi编辑器编辑长文件时,常常是头昏眼花,也找不到需要更改的内容。这时使用查找功能尤为重要。
方法如下:
1、命令模式下输入“/字符串”,例如“/Section 3”。
2、如果查找下一个,按“n”即可。
按shift + g 跳转到文件底部,要自当前光标位置向上搜索,请使用以下命令:
/pattern Enter
其中,pattern表示要搜索的特定字符序列。
要自当前光标位置向下搜索,请使用以下命令:
?pattern Enter
按下 Enter键后,vi 将搜索指定的pattern,并将光标定位在 pattern的第一个字符处。例如,要向上搜索 place一词,请键入:
4 查看Ubuntu版本
方法1:在终端中执行下列指令,可以查看当前正在运行的 Ubuntu 的版本号。
- cat /etc/issue
方法2: 在终端中执行下列指令,也可以查看 Ubuntu 的版本号,但内容更为详细。
- sudo lsb_release -a
查看内核版本号,在终端中输入以下 指令:
- uname -r
5 UBuntu 配置软件源解决安装依赖包问题
1. 使用以下命令备份/etc/apt/sources.list文件
- cp -a /etc/apt/sources.list /etc/apt/sources.list.bak
2. 修改 /etc/apt/sources.list文件,在最前面添加以下内容
- deb http://mirrors.aliyun.com/ubuntu/ precise main restricted universe multiverse
- deb http://mirrors.aliyun.com/ubuntu/ precise-security main restricted universe multiverse
- deb http://mirrors.aliyun.com/ubuntu/ precise-updates main restricted universe multiverse
- deb http://mirrors.aliyun.com/ubuntu/ precise-proposed main restricted universe multiverse
- deb http://mirrors.aliyun.com/ubuntu/ precise-backports main restricted universe multiverse
- deb-src http://mirrors.aliyun.com/ubuntu/ precise main restricted universe multiverse
- deb-src http://mirrors.aliyun.com/ubuntu/ precise-security main restricted universe multiverse
- deb-src http://mirrors.aliyun.com/ubuntu/ precise-updates main restricted universe multiverse
- deb-src http://mirrors.aliyun.com/ubuntu/ precise-proposed main restricted universe multiverse
- deb-src http://mirrors.aliyun.com/ubuntu/ precise-backports main restricted universe multiverse
测试下面数据源
- deb-src http://archive.ubuntu.com/ubuntu xenial main restricted #Added by software-properties
- deb http://mirrors.aliyun.com/ubuntu/ xenial main restricted
- deb-src http://mirrors.aliyun.com/ubuntu/ xenial main restricted multiverse universe #Added by software-properties
- deb http://mirrors.aliyun.com/ubuntu/ xenial-updates main restricted
- deb-src http://mirrors.aliyun.com/ubuntu/ xenial-updates main restricted multiverse universe #Added by software-properties
- deb http://mirrors.aliyun.com/ubuntu/ xenial universe
- deb http://mirrors.aliyun.com/ubuntu/ xenial-updates universe
- deb http://mirrors.aliyun.com/ubuntu/ xenial multiverse
- deb http://mirrors.aliyun.com/ubuntu/ xenial-updates multiverse
- deb http://mirrors.aliyun.com/ubuntu/ xenial-backports main restricted universe multiverse
- deb-src http://mirrors.aliyun.com/ubuntu/ xenial-backports main restricted universe multiverse #Added by software-properties
- deb http://archive.canonical.com/ubuntu xenial partner
- deb-src http://archive.canonical.com/ubuntu xenial partner
- deb http://mirrors.aliyun.com/ubuntu/ xenial-security main restricted
- deb-src http://mirrors.aliyun.com/ubuntu/ xenial-security main restricted multiverse universe #Added by software-properties
- deb http://mirrors.aliyun.com/ubuntu/ xenial-security universe
- deb http://mirrors.aliyun.com/ubuntu/ xenial-security multiverse
使用以下命令更新数据源列表
- apt-get update
6 解决Ubuntu/debian的Apt-get 由于依赖关系安装失败的问题
由于ubuntu/debian软件库中有时候不同的库更新速度不一致,apt-get 出出现如下的错误提示
- Some packages could not be installed. This may mean that you have
- requested an impossible situation or if you are using the unstable
- distribution that some required packages have not yet been created
- or been moved out of Incoming.
- The following information may help to resolve the situation:
- The following packages have unmet dependencies:
- libssl-dev: Depends: libssl0.9.8 (= 0.9.8k-7ubuntu8) but 0.9.8k-7ubuntu8. is to be installed
使用这个工具,当某个库依赖的库与当前版本不一致时,aptitude 会尝试降级当前这个库的版本,同时解决降级这个库对其它软件的依赖性的影响, 最终成功安装apt-get 没法安装的软件。使用以下命令安装 aptitude.
- sudo apt-get install aptitude
7 php的安装和配置
1. 安装php
- sudo apt-get install php5
2.让Apache支持php
- sudo apt-get install libapache2-mod-php5
如果安装不成功,使用以下命令安装
- sudo aptitude install libapache2-mod-php5
3.安装php5-gd模块
- sudo apt-get install php5-gd
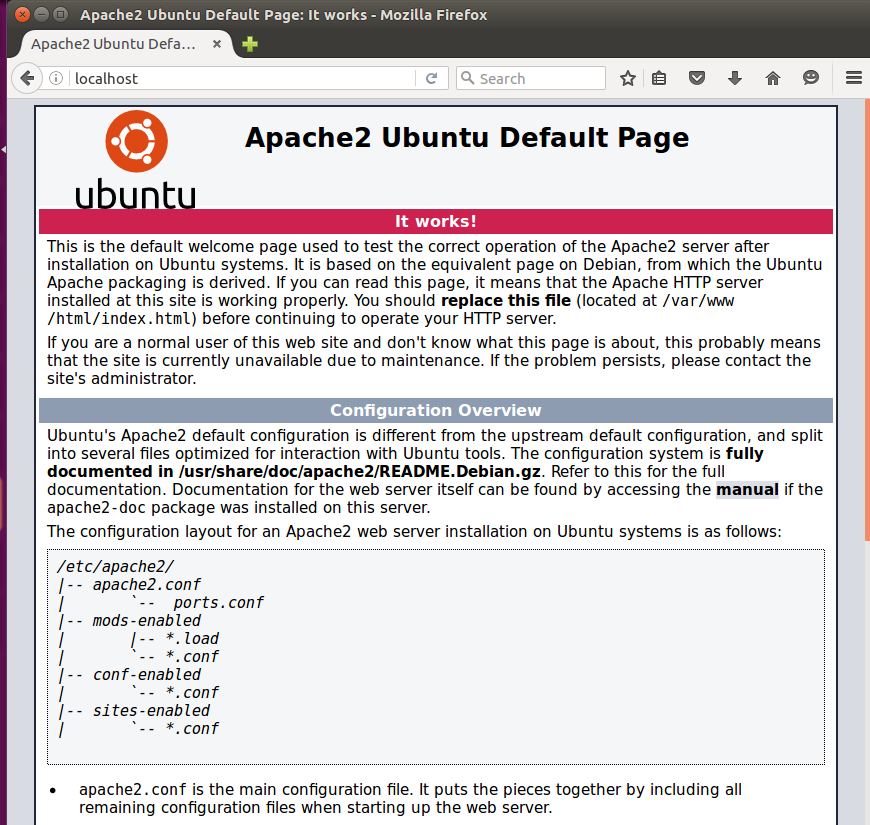
4. 安装apache2
- sudo apt-get install apache2
安装成功后,在浏览器访问 http://localhost 或 http://127.0.0.1, 就可以看到一段文字如图
在 /var/www/html下新建 info.php 输入以下内容:
- <?php
- phpinfo();
- ?>
然后重启 apache
- sudo /etc/init.d/apache2 restart
在浏览器输入 http://localhost/info.php 就可以看到 php的配置信息了
另一种安装php的命令:
- sudo apt-get install -y language-pack-en-base
sudo LC_ALL=en_US.UTF-8 add-apt-repository ppa:ondrej/php
sudo add-apt-repository ppa:ondrej/php
sudo apt-get update
apt-cache search php5
sudo apt-get install php5.5-common
sudo apt-get install libapache2-mod-php5.5
8 安装 vim
UBuntu自带的vim不是很好用,比如默认不支持小键盘及方向键等,可以使用以下命令更新一下
- sudo apt-get install vim
1 vi的基本概念
基本上vi可以分为三种状态,分别是命令模式(command mode)、插入模式(Insert mode)和底行模式(last line mode),各模式的功能区分如下:
1) 命令行模式command mode)
控制屏幕光标的移动,字符、字或行的删除,移动复制某区段及进入Insert mode下,或者到 last line mode。
2) 插入模式(Insert mode)
只有在Insert mode下,才可以做文字输入,按「ESC」键可回到命令行模式。
3) 底行模式(last line mode)
将文件保存或退出vi,也可以设置编辑环境,如寻找字符串、列出行号……等。
不过一般我们在使用时把vi简化成两个模式,就是将底行模式(last line mode)也算入命令行模式command mode)。
2、vi的基本操作
a) 进入vi
在系统提示符号输入vi及文件名称后,就进入vi全屏幕编辑画面:
- $ vi myfile
不过有一点要特别注意,就是您进入vi之后,是处于「命令行模式(command mode)」,要切换到「插入模式(Insert mode)」才能够输入文字。
b) 切换至插入模式(Insert mode)编辑文件
在「命令行模式(command mode)」下按一下字母「i」就可以进入「插入模式(Insert mode)」,这时候你就可以开始输入文字了。
c) Insert 的切换
您目前处于「插入模式(Insert mode)」,您就只能一直输入文字,如果您发现输错了字!想用光标键往回移动,将该字删除,就要先按一下「ESC」键转到「命令行模式(command mode)」再删除文字。
d) 退出vi及保存文件
在「命令行模式(command mode)」下,按一下「:」冒号键进入「Last line mode」,例如:
- : w filename (输入 「w filename」将文章以指定的文件名filename保存)
- : wq (输入「wq」,存盘并退出vi)
- : q! (输入q!, 不存盘强制退出vi)
3、命令行模式(command mode)功能键
1). 插入模式
按「i」切换进入插入模式「insert mode」,按“i”进入插入模式后是从光标当前位置开始输入文件;
按「a」进入插入模式后,是从目前光标所在位置的下一个位置开始输入文字;
按「o」进入插入模式后,是插入新的一行,从行首开始输入文字。
2). 从插入模式切换为命令行模式
按「ESC」键。
9 安装sublineText
从以下sublineText官网下载Ubuntu下的sublineText.
- http://www.sublimetext.com/3
安装文件 sublime-text_build-3114_amd64.deb上传到Ubuntu,然后使用以下命令安装sublineText .
- dpkg -i sublime-text_build-3114_amd64.deb
插件安装方法参考 React Native 开发之 (02) 用Sublime 3作为React Native的开发IDE
10 安装Git
使用以下ubuntu命令安装高端,大气,上档次的分布式版本控制系统。
- apt-get install git
11 关闭防火墙
使用以下命令关闭UBuntu的防火墙
- sudo ufw disable
12 安装输入法
在UBuntu安装搜狗输入法,安装方法参考下列地址
- http://pinyin.sogou.com/linux/help.php
切换输入法
- http://jingyan.baidu.com/article/adc815134f4b92f722bf7350.html
13 远程登录服务器,ssh的安装和配置
1 打开终端窗口,更新源列表
- sudo apt-get update
2 安装ssh
输入以下命令安装ssh server,按照提示输入回车,直到安装完成。
- sudo apt-get install openssh-server
3 查看ssh服务
输入以下命令,查看是否启动ssh服务。查看是否有sshd字符串,如果有说明ssh服务已经启动。
- sudo ps -ef | grep ssh
如果没有启动,输入以下命令启动ssh服务。
- sudo service ssh start
停止ssh服务
- sudo service ssh stop
重启ssh服务
- sudo service ssh restart
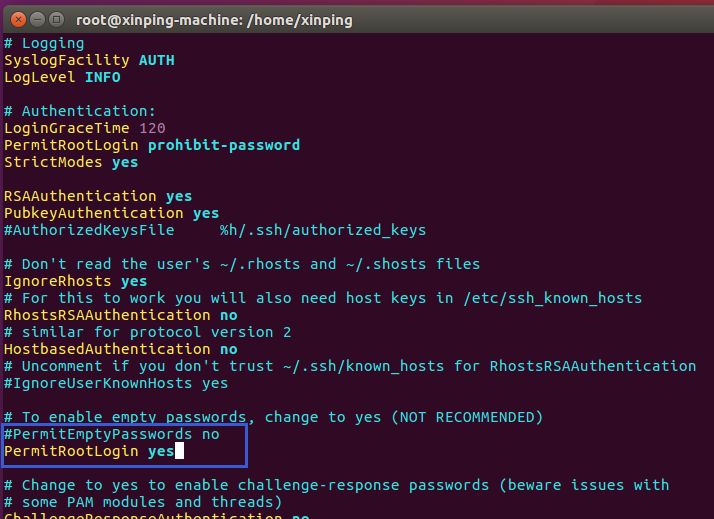
4 修改配置文件"/etc/ssh/sshd_config"
输入以下命令修改ssh的配置文件。
- vi /etc/ssh/sshd_config
1)把配置文件中的"PermitRootLogin without-password"加一个"#"号,把它注释掉
2)再增加一句 "PermitRootLogin yes"
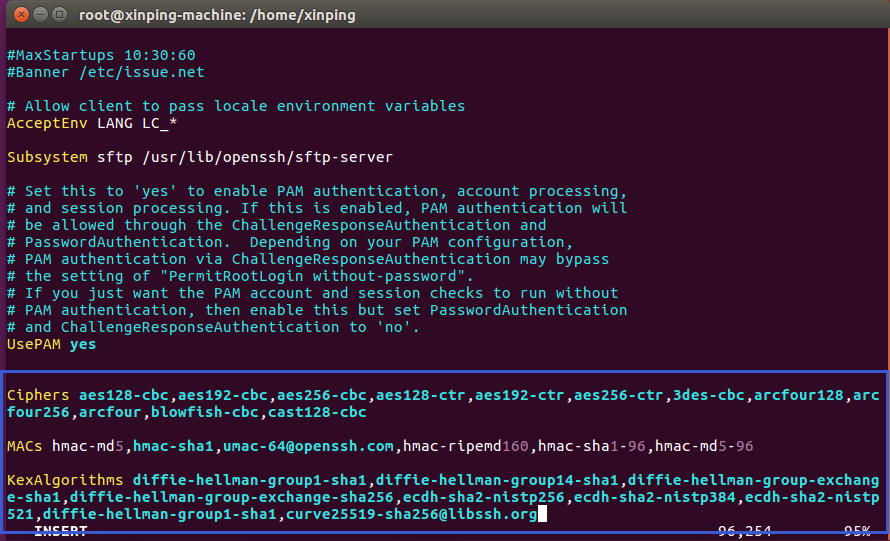
解决问题:SSH Secure Shell Client 连接VMware Ubuntu系统报错: Ubuntu SSH Algorithm negotiation failed
解决方法:
当使用SSH Secure Shell Client 连接VMware Ubuntu系统报错,解决方法是修改sshd的配置文件 /etc/ssh/sshd_config
- vi /etc/ssh/sshd_config
在/etc/ssh/sshd_config配置文件中,添加以下内容。
- Ciphers aes128-cbc,aes192-cbc,aes256-cbc,aes128-ctr,aes192-ctr,aes256-ctr,3des-cbc,arcfour128,arcfour256,arcfour,blowfish-cbc,cast128-cbc
- MACs hmac-md5,hmac-sha1,umac-@openssh.com,hmac-ripemd160,hmac-sha1-,hmac-md5-
- KexAlgorithms diffie-hellman-group1-sha1,diffie-hellman-group14-sha1,diffie-hellman-group-exchange-sha1,diffie-hellman-group-exchange-sha256,ecdh-sha2-nistp256,ecdh-sha2-nistp384,ecdh-sha2-nistp521,diffie-hellman-group1-sha1,curve25519-sha256@libssh.org
修改完成后,重新启动sshd服务。
- service sshd restart
重启sshd服务后,即可正常连接, 导致此问题的原因是ssh升级后,为了安全,默认不再采用原来一些加密算法,手工添加进去即可。另外Ubuntu的默认root密码是随机改变,需要通过sudo passwd root命令来指定.
14 切换中文语言
一般安装Ubuntu的时候使用英语安装的。如果安装完后,需要切换到中文语言,可以按照以下步骤来实现。
1 更新安装包
已root账号登陆terminal, 输入以下命令更新安装包。
- apt-get update
- apt-get install -f
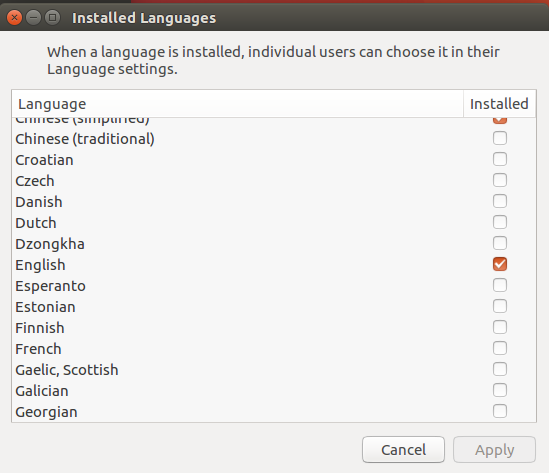
2 从system settings –>language support 点击 install/remove languages 勾选 chinese(simplified) 点击apply changes 输入密码,等待下载安装。
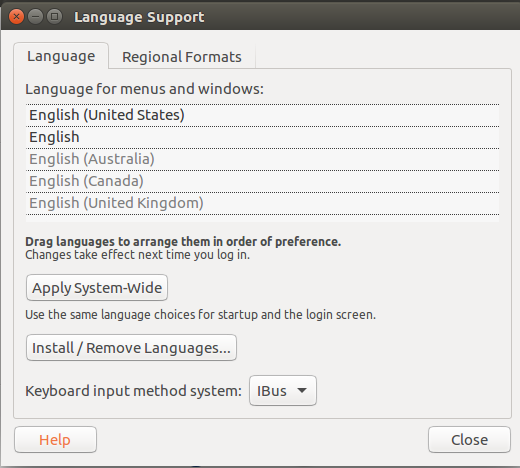
点击language support,再点击 install/remove languages,然后勾选 chinese(simplified)
3 安装完后语言还是英文的,刚才只是下载了语言包,还需要切换系统语言。回到刚才 language support 的language for menus and windows 的最底下看到灰色的汉语(中国)需要把他拖到english之上这是字体变成黑色,重启便可使用中文语言了。

设置完毕后,输入以下命令重启系统,UBuntu就会切换到中文语言。
- sudo reboot
15 设置Ubuntu自动休眠时间
在使用Ubuntu的过程中会遇到每隔一段时间,Ubuntu就会自动休眠,这时候就需要从新输入密码,这样就在不知不觉中浪费了宝贵的时间,那么就需要简单设置下关闭Ubuntu自动休眠时间。
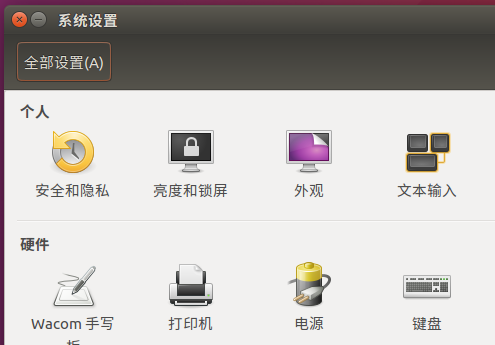
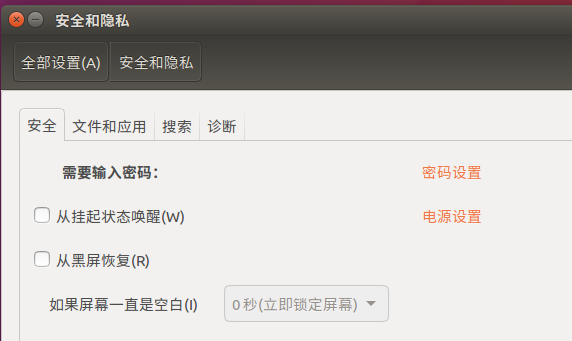
1)首先,进入系统设置中,选择 "安全和隐私"
2)然后直接修改如下,把“从挂起状态唤醒”和“从黑屏恢复”前面的钩去掉。
16 抓包
在Ubuntu下抓取数据包命令。
- tcpdump -i eth0 -nn 'host 192.9.100.177 and port 8081' -w ./bao.cap
17 安装 Notepad++
从官网下载Notepad++的unbuntu版本
https://notepad-plus-plus.org/
18 分辨率设置
参考百度经验的文章
http://jingyan.baidu.com/article/0964eca2351ed58285f5361d.html
注意:
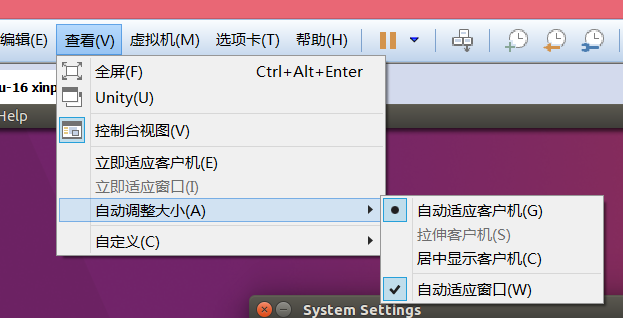
设置完屏幕分辨率后,还可以让ubuntu 自动适应屏幕。在VMware的查看菜单里,选择"自动调整大小",然后选择 "自动适应客户机"和"自动适应窗口"。如下图所示。
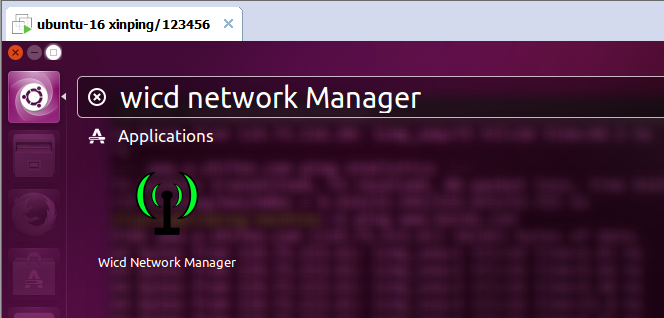
19 使用wifi
使用命令
- sudo apt-get install wicd
然后在程序菜单点击运行wicd network manager,就可以看到搜索出来的无线网络
20 删除命令
rm 命令是一个双刃剑,破坏力太强,使用的时候一定要注意,如果带了参数 -rf ,一定要确保rm所在目录和它的子目录都是要删除的,否则后果很严重。
你预想中的后果。
实际发生的后果。

这个危险命令还是现在虚拟机练习熟练了,在到真实环境用吧。否则后果很严重。某移动公司增值业务系统的数据库误删事故。
参考资料:
http://www.cnblogs.com/ljf181275034/archive/2011/09/14/2176704.html
http://www.w3school.com.cn/php/php_syntax.asp
http://jingyan.baidu.com/article/dca1fa6f43c965f1a540524d.html
Ubuntu学习总结-03 安装软件 & 技巧的更多相关文章
- Ubuntu不支持rpm安装软件解决方法
Ubuntu不支持rpm安装软件解决方法 以前经常使用的是RedHat Linux,习惯使用rpm方法安装软件.最近发现Ubuntu系统居然不支持rpm方法安装软件,提示信息如下: root@root ...
- 学习Linux系列--安装软件环境
本系列文章记录了个人学习过程的点点滴滴. 回到目录 10.安装Lamp套件. 最简单的方式,如下 sudo tasksel install lamp-server Apache 菜鸟教程 Ubuntu ...
- Ubuntu学习总结-09 安装 Pycharm
一 下载 PyCharm 从以下网址下载Linux版本的Pycharm,这里使用的版本是pycharm-professional-2016.2.3.tar.gz . http://www.jetbra ...
- Ubuntu学习总结-06 安装 Nginx
Nginx是由俄罗斯人(zhan dou min zu)开发的一款高性能的http和反向代理服务器,也可以用来作为邮件代理.相比较于其他的服务器,具有占用内存少,稳定性高等优势. 一 Ubuntu源码 ...
- Ubuntu学习总结-01 安装Ubuntu
Ubuntu(友帮拓.优般图.乌班图)是一个以桌面应用为主的开源GNU/Linux操作系统,Ubuntu 是基于Debian GNU/Linux,支持x86.amd64(即x64)和ppc架构,由全球 ...
- Ubuntu 20.04.1 安装软件和系统配置脚本
#!/bin/bash # https://launchpad.net/ubuntu # https://www.easyicon.net # https://download-chromium.ap ...
- Ubuntu学习总结-05 安装和学习MySQL
1 更新源列表 在终端窗口输入以下命令更新安装源. sudo apt-get update 效果如下图所示: 2 安装MySQL 在终端输入如下命令安装MySQL, sudo apt-get inst ...
- 学习Linux系列--安装Ubuntu
最近学习Linux,使用虚拟机太不方便,于是购买了阿里云最便宜的云主机作为学习设备. 本系列文章记录了个人学习过程的点点滴滴. 学习Linux系列--安装Ubuntu 学习Linux系列--安装软件环 ...
- Ubuntu学习小结(一) 基础知识,系统安装,软件安装,解压缩
这段时间,抽空研究了一下Ubuntu,虽然也有过到目前为止使用计算机最作死的经历,但目前已经学会了一些最基本的操作.在这里简单的记录一下,算是吸取的教训,供其他人借鉴. 1.装Ubuntu系统.装Ub ...
随机推荐
- WPF技巧-Canvas转为位图
转自:http://www.cnblogs.com/tmywu/archive/2010/09/14/1825650.html 在WPF中我们可以将Canvas当成一种画布,将Canvas中的控件当成 ...
- 【转】【C#】判断两个文件是否相同
使用System.security.Cryptography.HashAlgorithm类为每个文件生成一个哈希码,然后比较两个哈希码是否相同 该哈希算法为一个文件生成一个小的二进制“指纹”,从统计学 ...
- SqlDevlepor注册表监听器设置
1.打开plsqldev. 2. 键入环境变量 NLS_LANG SIMPLIFIED CHINESE_CHINA.ZHS16GBK 3.下载sqldevclient. http://pa ...
- [py]导入模块3种方法
import os <--通过os.system()引用 from os import * <---直接system()引用,不建议使用 from os import argv i ...
- 1从零开始学习Xamarin.iOS安装篇
安装和配置xamarin.ios 最近.net 开源新闻很火呀,于是想学习xamarin,早1年前就了解过这个东西,但是一直没有时间来学习,我这里装的是MAC上面的版本,废话不多说开始第一步安装. 概 ...
- 网络最大流问题之Ford-Fulkerson算法原理详解
前言 最大流问题是网络优化中典型的问题,用形象的语言来描述就是在满足容量约束的前提下将尽可能多的流从源节点(始点)到汇节点(终点).解决此问题的经典方法很多,本文介绍广为人熟知的Ford-Fulker ...
- linux(centos 6.4)下安装php memcache服务端及其客户端(详细教程)
前言 在搭建个人博客时,由于没有使用任何框架,纯手工code前台和后台,导致遇到许多问题,其中一个问题就是mysql连接导致的页面相应速度异常低.在查询各种途径后,只能考虑使用memcache缓存.在 ...
- [CareerCup] 14.3 Final Finally Finalize 关键字比较
14.3 What is the difference between final, finally, and finalize? 这道题考察我们Java中的三个看起来很相似的关键字final,fin ...
- 《Java程序设计》课程总结
课程总结 每周读书笔记链接汇总 第一周读书笔记 第二周读书笔记 第三周读书笔记 第四周读书笔记 第五周读书笔记 第六周读书笔记 第七周读书笔记 第八周读书笔记 第九周读书笔记 第十周读书笔记 实验报告 ...
- ASP.NET MVC 5 入门教程 (3) 路由route
文章来源: Slark.NET-博客园 http://www.cnblogs.com/slark/p/mvc-5-get-started-route.html 上一节:ASP.NET MVC 5 入门 ...