Springboot集成Jedis + Redisson(已自测)
原文:https://blog.csdn.net/c_zyer/article/details/79415728
本文主要跟大家分享在Springboot中集成Jedis和Redisson的方法。为什么要集成两个redis客户端?那是因为它们各有所长也各有所缺,合在一起才能完善彼此。Jedis作为Redis客户端的java版实现实现了绝大部分的Redis原生功能,但是却没有对分布式线程控制做很好的支持。而Redisson是Redis官方推荐的支持分布式操作的Redis Java版客户端,但它却不支持一些基础的Redis原生功能,所以Jedis和Redisson只有整合到一起使用,才能更好的满足用户的需求。
接下来,分几个步骤分享给大家如何在Springboot中集成Jedis和Redisson。
首先,通过start.spring.io生成一个支持redis的web项目

将生成的项目导入IDE,e.g., Intellij IDEA.

在pom文件中加入redisson依赖 (添加完后,可以做下Maven -> Reimport)

为每个环境创建一套配置文件

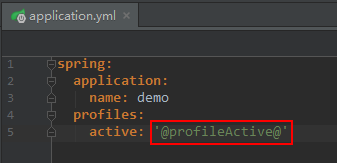
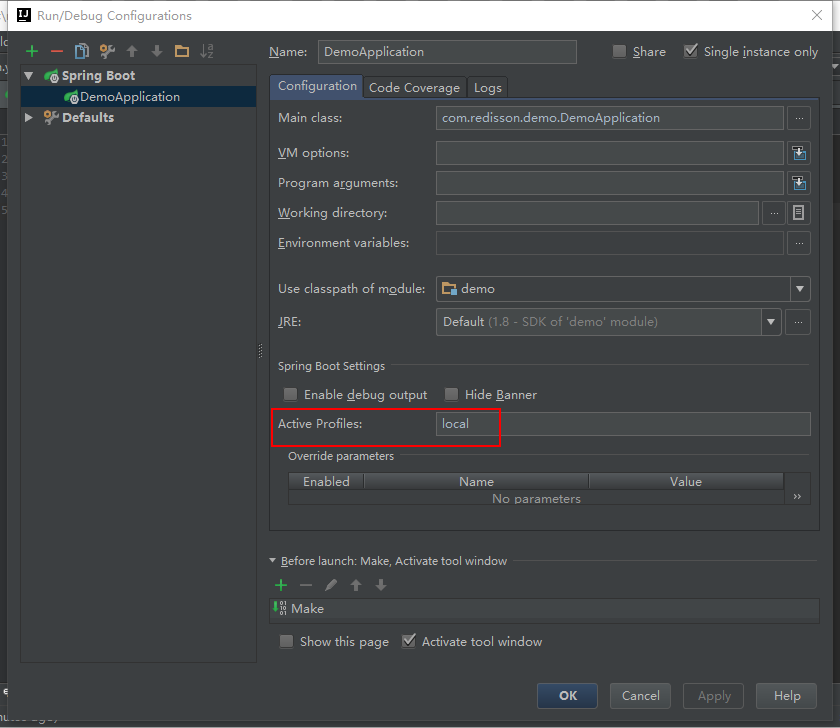
本地开发环境以-local结尾,测试环境以-test结尾,生产环境以-prod结尾。然后在application.yml配置文件中指定激活那个环境的配置文件

spring:

  application:

    name: demo

  profiles:

    active: '@profileActive@'
此处别忘了

在相应环境的application配置文件中添加相应的Redis配置(Redis服务做成了哨兵模式),比如,在application-local.yml加入

spring:

  redis:

    database: 0

    password: 12345678 #密码

    port: 6379

    timeout: 0

    pool:

      max-active: 8 #最大连接数

      max-idle: 8 #最大空闲连接数

      max-wait: -1 #最大等待时间

      min-idle: 0

    sentinel:

      master: master1

      nodes: 172.16.33.216:16001,172.16.33.216:16002

server:

port: 9090在相应环境的Redisson配置文件中加入Redisson的配置信息(配置来源Redisson官方,点击查看)

---

sentinelServersConfig:

  idleConnectionTimeout: 10000

  pingTimeout: 1000

  connectTimeout: 10000

  timeout: 3000

  retryAttempts: 3

  retryInterval: 1500

  reconnectionTimeout: 3000

  failedAttempts: 3

  password: 12345678

  subscriptionsPerConnection: 5

  clientName: null

  loadBalancer: !<org.redisson.connection.balancer.RoundRobinLoadBalancer> {}

  slaveSubscriptionConnectionMinimumIdleSize: 1

  slaveSubscriptionConnectionPoolSize: 50

  slaveConnectionMinimumIdleSize: 10

  slaveConnectionPoolSize: 64

  masterConnectionMinimumIdleSize: 10

  masterConnectionPoolSize: 64

  readMode: "SLAVE"

  sentinelAddresses:

  - "redis://172.16.33.216:16001"

  - "redis://172.16.33.216:16002"

  masterName: "master1"

  database: 0

threads: 0

nettyThreads: 0

codec: !<org.redisson.codec.JsonJacksonCodec> {}

useLinuxNativeEpoll: false
配置文件配好后,还需要注册一个Springboot的启动类(DemoApplication.java)中注册一个RedissonClient Bean,方法如下:
@Autowired

private Environment env;

@Bean(destroyMethod = "shutdown")

public RedissonClient redissonClient() throws IOException {

	String[] profiles = env.getActiveProfiles();

	String profile = "";

	if(profiles.length > 0) {

		profile = "-" + profiles[0];

	}

	return Redisson.create(

			Config.fromYAML(new ClassPathResource("redisson" + profile + ".yml").getInputStream())

	);

}
Everything is ready. Now let's rock.
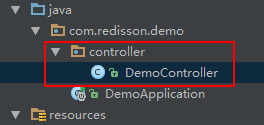
创建一个Controller类

@RestController

@RequestMapping("/demo")

public class DemoController {

    private static Logger logger = LoggerFactory.getLogger(DemoController.class);

    @Autowired

    private RedisTemplate<String, String> redisTemplate;

    @Autowired

    private RedissonClient redissonClient;

    @ResponseBody

    @RequestMapping("/lock")

    public String lock(@RequestParam("sid") String serverId) {

        Long counter = redisTemplate.opsForValue().increment("COUNTER", 1);

        RLock lock = redissonClient.getLock("TEST");

        try {

            lock.lock();

            logger.info("Request Thread - " + counter + "[" + serverId +"] locked and begun...");

            Thread.sleep(5000); // 5 sec

            logger.info("Request Thread - " + counter + "[" + serverId +"] ended successfully...");

        } catch (Exception ex) {

            logger.error("Error occurred");

        } finally {

            lock.unlock();

            logger.info("Request Thread - " + counter + "[" + serverId +"] unlocked...");

        }

        return "lock-" + counter + "[" + serverId +"]";

    }

}
Code 完成,启动程序,在浏览器中试一把先
=================================================================
以下自己实现的
import java.io.IOException;

import org.redisson.Redisson;

import org.redisson.api.RedissonClient;

import org.redisson.config.Config;

import org.springframework.beans.factory.annotation.Autowired;

import org.springframework.context.annotation.Bean;

import org.springframework.core.env.Environment;

import org.springframework.core.io.ClassPathResource;

import org.springframework.stereotype.Component;

@Component

public class RedissonClientConfig {

    @Autowired

    private Environment env;

    @Bean(destroyMethod = "shutdown")

    public RedissonClient redissonClient() throws IOException {

        String[] profiles = env.getActiveProfiles();

        String profile = "";

        if(profiles.length > 0) {

            profile = "-" + profiles[0];

        }

        return Redisson.create(Config.fromYAML(new ClassPathResource("redisson" + profile + ".yml").getInputStream()));

    }

}
配置文件 redisson-prod.yml
singleServerConfig:

  idleConnectionTimeout: 10000

  pingTimeout: 1000

  connectTimeout: 10000

  timeout: 3000

  retryAttempts: 3

  retryInterval: 1500

  reconnectionTimeout: 3000

  failedAttempts: 3

  password: null

  subscriptionsPerConnection: 5

  clientName: null

  address: "redis://192.168.20.123:6379"

  password: 123456

  subscriptionConnectionMinimumIdleSize: 1

  subscriptionConnectionPoolSize: 50

  connectionMinimumIdleSize: 32

  connectionPoolSize: 64

  database: 15

  dnsMonitoring: false

  dnsMonitoringInterval: 5000

threads: 0

nettyThreads: 0

codec: !<org.redisson.codec.JsonJacksonCodec> {}

"transportMode": "NIO"
controller
import java.util.concurrent.TimeUnit;

import org.redisson.api.RLock;

import org.redisson.api.RedissonClient;

import org.slf4j.Logger;

import org.slf4j.LoggerFactory;

import org.springframework.beans.factory.annotation.Autowired;

import org.springframework.data.redis.core.RedisTemplate;

import org.springframework.web.bind.annotation.RequestMapping;

import org.springframework.web.bind.annotation.RequestParam;

import org.springframework.web.bind.annotation.ResponseBody;

import org.springframework.web.bind.annotation.RestController;

@RestController

@RequestMapping("/demo")

public class DemoController {

    private static Logger logger = LoggerFactory.getLogger(DemoController.class);

    @Autowired

    private RedisTemplate<String, String> redisTemplate;

    @Autowired

    private RedissonClient redissonClient;

    public static int COUNT = 3;

    @ResponseBody

    @RequestMapping("/lock")

    public String lock(@RequestParam("sid") String serverId) {

        Long counter = redisTemplate.opsForValue().increment("COUNTER", 1);

        redisTemplate.expire("COUNTER", 43200, TimeUnit.SECONDS);

        if (counter>3) {

            return "大于3了";

        }

        RLock lock = redissonClient.getFairLock("TEST");

        try {

            lock.lock(5, TimeUnit.SECONDS);

            logger.info("Request Thread - " + counter + "[" + serverId +"] locked and begun...");

            if (COUNT > 0) {

                COUNT = COUNT - 1;

                Thread.sleep(1000);

            } else {

                return "为0了";

            }

            logger.info("Request Thread - " + counter + "[" + serverId +"] ended successfully...");

        } catch (Exception ex) {

            logger.error("Error occurred");

        } finally {

            if (lock != null && lock.isLocked()) {

                lock.unlock();

            }

            logger.info("Request Thread - " + counter + "[" + serverId +"] unlocked...");

        }

        return "卖出lock-" + counter + "[" + serverId +"]" + COUNT;

    }

}
写个多线程测试
import java.util.HashMap;

import java.util.Map;

import java.util.concurrent.CountDownLatch;

import com.hyb.util.HttpClientUtil;

//多线程的写法1

public class Thread12 {

    private static Map<String,String> parms = new HashMap<String,String>();

    public static void main(String[] args) {

        testCountDownLatch();

    }

    public static void testCountDownLatch(){

        int threadCount = 2000;

        final CountDownLatch latch = new CountDownLatch(threadCount);

        for(int i=0; i< threadCount; i++){

            new Thread(new Runnable() {

                @Override

                public void run() {

                    System.out.println("线程" + Thread.currentThread().getId() + "开始出发");

                    try {

                        parms.put("sid", "线程id=" +Thread.currentThread().getId());

                        String result = HttpClientUtil.doGet("http://192.168.20.234:8061/demo/lock", parms, 20000);

                        System.out.println("线程result" + result);

                    } catch (Exception e) {

                        e.printStackTrace();

                    }

                    System.out.println("线程" + Thread.currentThread().getId() + "已到达终点");

                    latch.countDown();

                }

            }).start();

        }

        try {

            latch.await();

        } catch (InterruptedException e) {

            e.printStackTrace();

        }

        System.out.println(threadCount+"个线程已经执行完毕");

    }

}
import java.util.HashMap;

import java.util.Map;

import com.hyb.util.HttpClientUtil;

//多线程的写法1

public class Thread12 {

public static void main(String args[]) {

MyThread myThread =new MyThread();

//myThread.run();

//把这个MyThread包装称为Thread

Thread t1 =new Thread(myThread);

Thread t2=new Thread(myThread);

Thread t3=new Thread(myThread);

Thread t4=new Thread(myThread);

Thread t5=new Thread(myThread);

Thread t6=new Thread(myThread);

Thread t7=new Thread(myThread);

Thread t8=new Thread(myThread);

Thread t9=new Thread(myThread);

Thread t10=new Thread(myThread);

Thread t11=new Thread(myThread);

Thread t12=new Thread(myThread);

t1.start();

t2.start();

t3.start();

t4.start();

t5.start();

t6.start();

t7.start();

t8.start();

t9.start();

t10.start();

t11.start();

t12.start();

}

}

class MyThread implements Runnable {

    private static Map<String,String> parms = new HashMap<String,String>();

    @Override

    public void run() {

        parms.put("sid", Thread.currentThread().getName());

        String result = HttpClientUtil.doGet("http://192.168.20.234:8061/demo/lock", parms, 20000);

        System.out.println("返回:"+result);

    }

}
Springboot集成Jedis + Redisson(已自测)的更多相关文章
- SpringBoot 集成Jedis操作set
题外话: Redis是个有趣的东西,相信搞java的或多或少都会用到,面试时也总离不开问Redis,之前觉得redis只是用做缓存,飞快!也因为最初在封装底层的时候,使用Redisson,所以大部分都 ...
- [转帖]SpringBoot集成redisson分布式锁
SpringBoot集成redisson分布式锁 https://www.cnblogs.com/yangzhilong/p/7605807.html 前几天同事刚让增加上这一块东西. 百度查一下 啥 ...
- Windows环境下springboot集成redis的安装与使用
一,redis安装 首先我们需要下载Windows版本的redis压缩包地址如下: https://github.com/MicrosoftArchive/redis/releases 连接打开后如下 ...
- springboot集成websocket实现向前端浏览器发送一个对象,发送消息操作手动触发
工作中有这样一个需示,我们把项目中用到代码缓存到前端浏览器IndexedDB里面,当系统管理员在后台对代码进行变动操作时我们要更新前端缓存中的代码怎么做开始用想用版本方式来处理,但这样的话每次使用代码 ...
- 基于Springboot集成security、oauth2实现认证鉴权、资源管理
1.Oauth2简介 OAuth(开放授权)是一个开放标准,允许用户授权第三方移动应用访问他们存储在另外的服务提供者上的信息,而不需要将用户名和密码提供给第三方移动应用或分享他们数据的所有内容,OAu ...
- springBoot集成redisCluster
本文主要内容:springBoot简介,在SpringBoot中如何集成Redis,可配置Redis集群. 关于SpringBoot 你想要的,这里都有:https://spring.io/proje ...
- springBoot集成Redis遇到的坑(择库)源码分析为什么择库失败
提示: springboot提供了一套链接redis的api,也就是个jar包,用到的连接类叫做LettuceConnectionConfiguration,所以我们引入pom时是这样的 <de ...
- RabbitMQ学习笔记(一):安装及Springboot集成
前言 MQ,即消息队列Message Queue的缩写. RabbitMQ 是MQ的一种,就像招商银行是银行的一种一样.主要是用来实现应用程序的异步和解耦,同时也能起到消息缓冲,消息分发的作用. 消息 ...
- springboot集成swagger2构建RESTful API文档
在开发过程中,有时候我们需要不停的测试接口,自测,或者交由测试测试接口,我们需要构建一个文档,都是单独写,太麻烦了,现在使用springboot集成swagger2来构建RESTful API文档,可 ...
随机推荐
- strptime和strptime函数理解
#include <stdio.h> #include <time.h> int main() { struct tm tm; char buf[255]; strptime( ...
- 洛谷P2827 蚯蚓 题解
洛谷P2827 蚯蚓 题解 题目描述 本题中,我们将用符号 ⌊c⌋ 表示对 c 向下取整. 蛐蛐国最近蚯蚓成灾了!隔壁跳蚤国的跳蚤也拿蚯蚓们没办法,蛐蛐国王只好去请神刀手来帮他们消灭蚯蚓. 蛐蛐国里现 ...
- linux tar gzip 命令用法
语法:tar [主选项+辅选项] 文件或者目录 使用该命令时,主选项是必须要有的,它告诉tar要做什么事情,辅选项是辅助使用的,可以选用. 主选项: -c: 建立压缩档案-x:解压-t:查看内容-r: ...
- matlab下mex 调用opencv库
1. 首先写好待编译的.cpp文件,使用混合编程,以人脸检测为例 #include "mex.h" // Required for the use of MEX files // ...
- 配置自己的ubuntu
终端 zsh 安装zsh apt install zsh 3 安装oh-my-zsh bash -c "$(wget https://raw.githubusercontent.com/ro ...
- 竹间智能科技(Emotibot)
竹间智能简仁贤:表情识别准确率达到81.57%,语义理解是主要的商用落地场景 北京-招聘机器学习(实习生) 深圳-招聘图像识别工程师
- 2017/11/20 Leetcode 日记
2017/11/14 Leetcode 日记 442. Find All Duplicates in an Array Given an array of integers, 1 ≤ a[i] ≤ n ...
- 选择器(UIPickerView)
Apple提供了两种形式的选择器:日期选择器(UIDatePicker)与自定义选择器(UIPickerView). 当用户使用日期选择器选定一个时间后,调用datePickerID.date可以直接 ...
- Redis学习篇(一)之String类型及其操作
SET 作用: 设置key对应的值, 返回ok 语法: SET key value [EX seconds] [PX milliseconds] [NX] [XX] 如果key已经存在,同名会产生覆盖 ...
- New Year Tree 【DFS序+线段树区间查询修改+二进制保存状态】
题目链接[http://codeforces.com/problemset/problem/620/E] 题意:给出n个数,每个数有一个初始的颜色.由这n个数组成一颗树.有两种操作1.将以节点u为根的 ...
