UNITY的UI之Pivot与Anchor区别
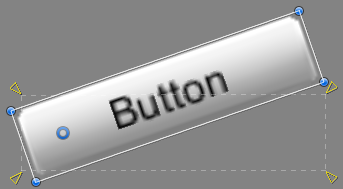
Pivot
Rotations, size, and scale modifications occur around the pivot so the position of the pivot affects the outcome of a rotation, resizing, or scaling. When the toolbar Pivot button is set to Pivot mode, the pivot of a Rect Transform can be moved in the Scene View.
Anchors
Rect Transforms include a layout concept called anchors. Anchors are shown as four small triangular handles in the Scene View and anchor information is also shown in the Inspector.
If the parent of a Rect Transform is also a Rect Transform, the child Rect Transform can be anchored to the parent Rect Transform in various ways. For example, the child can be anchored to the center of the parent, or to one of the corners.
 UI element anchored to the center of the parent. The element maintains a fixed offset to the center.
 UI element anchored to the lower right corner of the parent. The element maintains a fixed offset to the lower right corner.
The anchoring also allows the child to stretch together with the width or height of the parent. Each corner of the rectangle has a fixed offset to its corresponding anchor, i.e. the top left corner of the rectangle has a fixed offset to the top left anchor, etc. This way the different corners of the rectangle can be anchored to different points in the parent rectangle.
 UI element with left corners anchored to lower left corner of the parent and right corners anchored to lower right. The corners of the element maintains fixed offsets to their respective anchors.
The positions of the anchors are defined in fractions (or percentages) of the parent rectangle width and height. 0.0 (0%) corresponds to the left or bottom side, 0.5 (50%) to the middle, and 1.0 (100%) to the right or top side. But anchors are not limited to the sides and middle; they can be anchored to any point within the parent rectangle.
 UI element with left corners anchored to a point a certain percentage from the left side of the parent and right corners anchored to a point a certain percentage from the right side of the parent rectangle.
You can drag each of the anchors individually, or if they are together, you can drag them together by clicking in the middle in between them and dragging. If you hold down Shift key while dragging an anchor, the corresponding corner of the rectangle will move together with the anchor.
A useful feature of the anchor handles is that they automatically snap to the anchors of sibling rectangles to allow for precise positioning.
Anchor presets
In the Inspector, the Anchor Preset button can be found in the upper left corner of the Rect Transform component. Clicking the button brings up the Anchor Presets dropdown. From here you can quickly select from some of the most common anchoring options. You can anchor the UI element to the sides or middle of the parent, or stretch together with the parent size. The horizontal and vertical anchoring is independent.
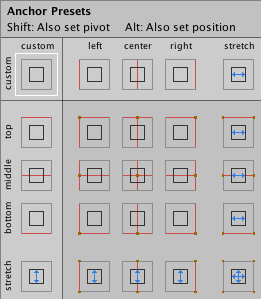
The Anchor Presets buttons displays the currently selected preset option if there is one. If the anchors on either the horizontal or vertical axis are set to different positions than any of the presets, the custom options is shown.
Anchor and position fields in the Inspector
You can click the Anchors expansion arrow to reveal the anchor number fields if they are not already visible. Anchor Min corresponds to the lower left anchor handle in the Scene View, and Anchor Max corresponds to the upper right handle.
The position fields of rectangle are shown differently depending on whether the anchors are together (which produces a fixed width and height) or separated (which causes the rectangle to stretch together with the parent rectangle).
![]()
When all the anchor handles are together the fields displayed are Pos X, Pos Y, Width and Height. The Pos X and Pos Y values indicate the position of the pivot relative to the anchors.
When the anchors are separated the fields can change partially or completely to Left, Right, Top and Bottom. These fields define the padding inside the rectangle defined by the anchors. The Left and Right fields are used if the anchors are separated horizontally and the Top and Bottom fields are used if they are separated vertically.
Note that changing the values in the anchor or pivot fields will normally counter-adjust the positioning values in order to make the rectangle stay in place. If cases where this is not desired, the Raw Mode can be enabled using a small button in the Inspector. This causes the anchor and pivot value to be able to be changed without any other values changing as a result. This will likely cause the rectangle to be visually moved or resized, since its position and size is dependent on the anchor and pivot values.
UNITY的UI之Pivot与Anchor区别的更多相关文章
- Unity的UI究竟为什么可以合批
1.UI/Default代码研究首先,我想到的是,既然是对图集纹理进行采样,而且又不能统一更改材质的纹理UV值,我们通常写的shader都是直接根据模型UV值对主纹理进行采样,那会不会是shader中 ...
- 关于如何在 Unity 的 UI 菜单中默认创建出的控件 Raycast Target 属性默认为 false
关于如何在 Unity 的 UI 菜单中默认创建出的控件 Raycast Target 属性默认为 false 我们在 Unity 中通过 UI 菜单创建的各种控件,比如 Text, Image 等, ...
- C#程序员整理的Unity 3D笔记(十五):Unity 3D UI控件至尊–NGUI
目前,UGUI问世不过半年(其随着Unity 4.6发布问世),而市面上商用的产品,UI控件的至尊为NGUI:影响力和广度(可搜索公司招聘Unity 3D,常常能看到对NGUI关键词). NGUI虽然 ...
- Unity在UI界面上显示3D模型/物体,控制模型旋转
Unity3D物体在UI界面的显示 本文提供全流程,中文翻译. Chinar 坚持将简单的生活方式,带给世人!(拥有更好的阅读体验 -- 高分辨率用户请根据需求调整网页缩放比例) Chinar -- ...
- 关于Unity中UI中的Image节点以及它的Image组件
一.图片的Inspector面板属性 Texture Type:一般是选择sprite(2D and UI) Sprite Mode:一般是选择Single Packing Tag:打包的标志值,最后 ...
- 关于Unity中NGUI的Pivot和锚点
Pivot 1.创建一个Sprite类型的Sprite1节点,关联一个图集和一张贴图,用图中的六个按钮调整这个贴图的Pivot点,一共有八个点可以选择 2.再创建一个Sprite类型的Sprite2节 ...
- Unity 3D UI Essentials 学习
Chapter 1: Looking Back,LookingForward Chapter 2: Building Layouts Chapter 3: Control, Control, You ...
- 关于Unity中UI中的Mask组件、Text组件和布局
一.Mask组件 遮罩,Rect Mask矩形Mask(Rect Mask2D组件),图片Mask(Mask组件)(图片Mask的透明度不为0的部分显示子图片,为0的部分不显示子图片) Rect Ma ...
- 关于Unity中UI中的RawImage节点以及制作地图滚动效果
一.贴图的Texture Type属性类型 Texture:会把贴图的大小转换为最相近的2的n次方,比如400X1369会转换为512X1024. Sprite 2D:是贴图的原始大小. 二.RawI ...
随机推荐
- hadoop之 HDFS-Hadoop存档
每个文件按块方式存储, 每个块的元数据存储在namenode的内存中 Hadoop存档文件或HAR文件是一个更高效的文件存档工具,它将文件存入HDFS块,在减少内存使用的同时,允许对文件进行透明地访问 ...
- php+ajax+jquery 定时刷新页面数据
testajax.php <!DOCTYPE html PUBLIC "-//W3C//DTD XHTML 1.0 Transitional//EN" "http: ...
- linux中控操作相关
1.首先生成无密码登陆密钥 一般使用rsa 2.编写shell脚本 work_dir=$(pwd) 3.远程拷贝 work_dir=$(pwd) ..} do ¥{host_prefix}$i:$ e ...
- erlang里面中文相关处理
在控制台输出的话 Name = "测试数据", io:format("~ts~n",[Name]). 如果是和客户端通信,假如都是utf8编码 服务器获取的时候 ...
- (转)Inno Setup入门(一)——最简单的安装脚本
本文转载自:http://blog.csdn.net/Augusdi/article/details/8564788 一个最简单的安装脚本: 1.最简单的安装文件脚本: [setup] AppName ...
- java web 程序---在线时长
思路:toLocalString()这个方法 <body> <% long t=session.getLastAccessedTime(); long t2=session.getC ...
- 【UVA】1595 Symmetry(模拟)
题目 题目 分析 理清思路,上模拟. 代码 #include <bits/stdc++.h> using namespace std; const int maxn=100 ...
- 【洛谷】P2904 [USACO08MAR]跨河River Crossing(dp)
题目描述 Farmer John is herding his N cows (1 <= N <= 2,500) across the expanses of his farm when ...
- C++ 11 自旋锁
// Spin lock implementation. // BasicLockable. // Async-signal safe. // unlock() "synchronizes ...
- POJ-3273 Monthly Expense (最大值最小化问题)
/* Monthly Expense Time Limit: 2000MS Memory Limit: 65536K Total Submissions: 10757 Accepted: 4390 D ...