Unity3d之将terrain转化成mesh
Unity3d中,terrain还是比较耗的,为了优化性能,可能需要将terrain转化成mesh。
现提供一工具,思路是根据terrain高度图生成mesh等。
可参考: http://wiki.unity3d.com/index.php?title=TerrainObjExporter
转载请注明出处:
http://www.cnblogs.com/jietian331/p/5831062.html
代码如下:
 using UnityEditor;

 using UnityEngine;

 public class TerrainToMeshConverter : ScriptableObject

 {

     [MenuItem("Custom/Convert terrain to mesh")]

     static void Init()

     {

         if (Selection.objects.Length <= )

         {

             Debug.Log("Selection.objects.Length <= 0");

             return;

         }

         var terrainObj = Selection.objects[] as GameObject;

         if (terrainObj == null)

         {

             Debug.Log("terrainObj == null");

             return;

         }

         var terrain = terrainObj.GetComponent<Terrain>();

         if (terrain == null)

         {

             Debug.Log("terrain == null");

             return;

         }

         var terrainData = terrain.terrainData;

         if (terrainData == null)

         {

             Debug.Log("terrainData == null");

             return;

         }

         int vertexCountScale = ;       // [dev] 将顶点数稀释 vertexCountScale*vertexCountScale 倍

         int w = terrainData.heightmapWidth;

         int h = terrainData.heightmapHeight;

         Vector3 size = terrainData.size;

         float[, ,] alphaMapData = terrainData.GetAlphamaps(, , terrainData.alphamapWidth, terrainData.alphamapHeight);

         Vector3 meshScale = new Vector3(size.x / (w - 1f) * vertexCountScale, , size.z / (h - 1f) * vertexCountScale);

         Vector2 uvScale = new Vector2(1f / (w - 1f), 1f / (h - 1f)) * vertexCountScale * (size.x / terrainData.splatPrototypes[].tileSize.x);     // [dev] 此处有问题,若每个图片大小不一,则出问题。日后改善

         w = (w - ) / vertexCountScale + ;

         h = (h - ) / vertexCountScale + ;

         Vector3[] vertices = new Vector3[w * h];

         Vector2[] uvs = new Vector2[w * h];

         Vector4[] alphasWeight = new Vector4[w * h];            // [dev] 只支持4张图片

         // 顶点,uv,每个顶点每个图片所占比重

         for (int i = ; i < w; i++)

         {

             for (int j = ; j < h; j++)

             {

                 int index = j * w + i;

                 float z = terrainData.GetHeight(i * vertexCountScale, j * vertexCountScale);

                 vertices[index] = Vector3.Scale(new Vector3(i, z, j), meshScale);

                 uvs[index] = Vector2.Scale(new Vector2(i, j), uvScale);

                 // alpha map

                 int i2 = (int)(i * terrainData.alphamapWidth / (w - 1f));

                 int j2 = (int)(j * terrainData.alphamapHeight / (h - 1f));

                 i2 = Mathf.Min(terrainData.alphamapWidth - , i2);

                 j2 = Mathf.Min(terrainData.alphamapHeight - , j2);

                 var alpha0 = alphaMapData[j2, i2, ];

                 var alpha1 = alphaMapData[j2, i2, ];

                 var alpha2 = alphaMapData[j2, i2, ];

                 var alpha3 = alphaMapData[j2, i2, ];

                 alphasWeight[index] = new Vector4(alpha0, alpha1, alpha2, alpha3);

             }

         }

         /*

          * 三角形

          *     b       c

          *      *******

          *      *   * *

          *      * *   *

          *      *******

          *     a       d

          */

         int[] triangles = new int[(w - ) * (h - ) * ];

         int triangleIndex = ;

         for (int i = ; i < w - ; i++)

         {

             for (int j = ; j < h - ; j++)

             {

                 int a = j * w + i;

                 int b = (j + ) * w + i;

                 int c = (j + ) * w + i + ;

                 int d = j * w + i + ;

                 triangles[triangleIndex++] = a;

                 triangles[triangleIndex++] = b;

                 triangles[triangleIndex++] = c;

                 triangles[triangleIndex++] = a;

                 triangles[triangleIndex++] = c;

                 triangles[triangleIndex++] = d;

             }

         }

         Mesh mesh = new Mesh();

         mesh.vertices = vertices;

         mesh.uv = uvs;

         mesh.triangles = triangles;

         mesh.tangents = alphasWeight;       // 将地形纹理的比重写入到切线中

         string transName = "[dev]MeshFromTerrainData";

         var t = terrainObj.transform.parent.Find(transName);

         if (t == null)

         {

             GameObject go = new GameObject(transName, typeof(MeshFilter), typeof(MeshRenderer), typeof(MeshCollider));

             t = go.transform;

         }

         // 地形渲染

         MeshRenderer mr = t.GetComponent<MeshRenderer>();

         Material mat = mr.sharedMaterial;

         if (!mat)

             mat = new Material(Shader.Find("Custom/Environment/TerrainSimple"));

         for (int i = ; i < terrainData.splatPrototypes.Length; i++)

         {

             var sp = terrainData.splatPrototypes[i];

             mat.SetTexture("_Texture" + i, sp.texture);

         }

         t.parent = terrainObj.transform.parent;

         t.position = terrainObj.transform.position;

         t.gameObject.layer = terrainObj.layer;

         t.GetComponent<MeshFilter>().sharedMesh = mesh;

         t.GetComponent<MeshCollider>().sharedMesh = mesh;

         mr.sharedMaterial = mat;

         t.gameObject.SetActive(true);

         terrainObj.SetActive(false);

         Debug.Log("Convert terrain to mesh finished!");

     }

 }
TerrainToMeshConverter
渲染地形的shader如下(不支持光照):
 Shader "Custom/Environment/TerrainSimple"

 {

     Properties

     {

         _Texture0 ("Texture 1", 2D) = "white" {}

         _Texture1 ("Texture 2", 2D) = "white" {}

         _Texture2 ("Texture 3", 2D) = "white" {}

         _Texture3 ("Texture 4", 2D) = "white" {}

     }

     SubShader

     {

         Tags { "RenderType" = "Opaque" }

         LOD

         Pass

         {

             CGPROGRAM

             #pragma vertex vert

             #pragma fragment frag

             sampler2D _Texture0;

             sampler2D _Texture1;

             sampler2D _Texture2;

             sampler2D _Texture3;

             struct appdata

             {

                 float4 vertex : POSITION;

                 float2 uv : TEXCOORD0;

                 float4 tangent : TANGENT;

             };

             struct v2f

             {

                 float4 pos : SV_POSITION;

                 float2 uv : TEXCOORD0;

                 float4 weight : TEXCOORD1;

             };

             v2f vert(appdata v)

             {

                 v2f o;

                 o.pos = UnityObjectToClipPos(v.vertex);

                 o.weight = v.tangent;

                 o.uv = v.uv;

                 return o;

             }

             fixed4 frag(v2f i) : SV_TARGET

             {

                 fixed4 t0 = tex2D(_Texture0, i.uv);

                 fixed4 t1 = tex2D(_Texture1, i.uv);

                 fixed4 t2 = tex2D(_Texture2, i.uv);

                 fixed4 t3 = tex2D(_Texture3, i.uv);

                 fixed4 tex = t0 * i.weight.x + t1 * i.weight.y + t2 * i.weight.z + t3 * i.weight.w;

                 return tex;

             }

             ENDCG

         }

     }

     Fallback "Diffuse"

 }
Custom/Environment/TerrainSimple
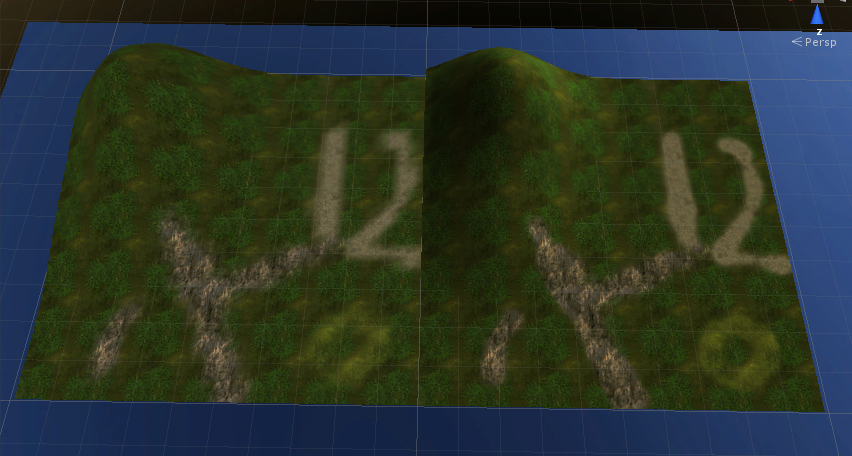
生成的mesh与原terrain对比如下,左边为mesh,右边为terrain:
另提供一支持光照的地形shader:
 // Upgrade NOTE: replaced 'mul(UNITY_MATRIX_MVP,*)' with 'UnityObjectToClipPos(*)'

 Shader "Custom/Environment/LightedTerrain"

 {

     Properties

     {

         _Texture0 ("Texture 1", 2D) = "white" {}

         _Texture1 ("Texture 2", 2D) = "white" {}

         _Texture2 ("Texture 3", 2D) = "white" {}

         _Texture3 ("Texture 4", 2D) = "white" {}

     }

     SubShader

     {

         Tags { "RenderType" = "Opaque" }

         LOD

         Pass

         {

             Tags

             {

                 "LightMode" = "ForwardBase"

             }

             CGPROGRAM

             #pragma vertex vert

             #pragma fragment frag

             #pragma multi_compile_fwdbase

             #pragma multi_compile_fog

             #include "UnityCG.cginc"

             #include "Lighting.cginc"

             #include "AutoLight.cginc"

             sampler2D _Texture0;

             sampler2D _Texture1;

             sampler2D _Texture2;

             sampler2D _Texture3;

             struct appdata

             {

                 float4 vertex : POSITION;

                 float2 uv : TEXCOORD0;

                 float4 tangent : TANGENT;

                 float3 normal : NORMAL;

             };

             struct v2f

             {

                 float4 pos : SV_POSITION;

                 float2 uv : TEXCOORD0;

                 float4 weight : TEXCOORD1;

                 float3 worldPos : TEXCOORD2;

                 float3 worldNormal : TEXCOORD3;

                 SHADOW_COORDS()

                 UNITY_FOG_COORDS()

             };

             v2f vert(appdata v)

             {

                 v2f o;

                 o.pos = UnityObjectToClipPos(v.vertex);

                 o.weight = v.tangent;

                 o.uv = v.uv;

                 o.worldPos = mul(unity_ObjectToWorld, v.vertex);

                 o.worldNormal = UnityObjectToWorldNormal(v.normal);

                 TRANSFER_SHADOW(o);

                 UNITY_TRANSFER_FOG(o, o.pos);

                 return o;

             }

             fixed4 frag(v2f i) : SV_TARGET

             {

                 fixed4 t0 = tex2D(_Texture0, i.uv);

                 fixed4 t1 = tex2D(_Texture1, i.uv);

                 fixed4 t2 = tex2D(_Texture2, i.uv);

                 fixed4 t3 = tex2D(_Texture3, i.uv);

                 fixed4 tex = t0 * i.weight.x + t1 * i.weight.y + t2 * i.weight.z + t3 * i.weight.w;

                 fixed3 albedo = tex.rgb;

                 fixed3 ambient = albedo * UNITY_LIGHTMODEL_AMBIENT.rgb;

                 float3 worldLight = normalize(UnityWorldSpaceLightDir(i.worldPos));

                 float halfLambert = dot(worldLight, i.worldNormal) * 0.5 + 0.5;

                 fixed3 diffuse = albedo * _LightColor0.rgb * halfLambert;

                 float3 worldView = normalize(UnityWorldSpaceViewDir(i.worldPos));

                 float3 halfDir = normalize(worldView + worldLight);

                 fixed3 specular = albedo * _LightColor0.rgb * max(dot(halfDir, i.worldNormal), );

                 UNITY_LIGHT_ATTENUATION(atten, i, i.worldPos);

                 fixed4 col = fixed4(ambient + (diffuse + specular) * atten, tex.a);

                 UNITY_APPLY_FOG(i.fogCoord, col);

                 return col;

             }

             ENDCG

         }

         Pass

         {

             Tags

             {

                 "LightMode" = "ForwardAdd"

             }

             Blend One One

             CGPROGRAM

             #pragma vertex vert

             #pragma fragment frag

             #pragma multi_compile_fwdadd

             #include "UnityCG.cginc"

             #include "Lighting.cginc"

             #include "AutoLight.cginc"

             sampler2D _Texture0;

             sampler2D _Texture1;

             sampler2D _Texture2;

             sampler2D _Texture3;

             struct appdata

             {

                 float4 vertex : POSITION;

                 float2 uv : TEXCOORD0;

                 float4 tangent : TANGENT;

                 float3 normal : NORMAL;

             };

             struct v2f

             {

                 float4 pos : SV_POSITION;

                 float2 uv : TEXCOORD0;

                 float4 weight : TEXCOORD1;

                 float3 worldPos : TEXCOORD2;

                 float3 worldNormal : TEXCOORD3;

                 SHADOW_COORDS()

             };

             v2f vert(appdata v)

             {

                 v2f o;

                 o.pos = UnityObjectToClipPos(v.vertex);

                 o.weight = v.tangent;

                 o.uv = v.uv;

                 o.worldPos = mul(unity_ObjectToWorld, v.vertex);

                 o.worldNormal = UnityObjectToWorldNormal(v.normal);

                 TRANSFER_SHADOW(o);

                 return o;

             }

             fixed4 frag(v2f i) : SV_TARGET

             {

                 fixed4 t0 = tex2D(_Texture0, i.uv);

                 fixed4 t1 = tex2D(_Texture1, i.uv);

                 fixed4 t2 = tex2D(_Texture2, i.uv);

                 fixed4 t3 = tex2D(_Texture3, i.uv);

                 fixed4 tex = t0 * i.weight.x + t1 * i.weight.y + t2 * i.weight.z + t3 * i.weight.w;

                 fixed3 albedo = tex.rgb;

                 float3 worldLight = normalize(UnityWorldSpaceLightDir(i.worldPos));

                 float halfLambert = dot(worldLight, i.worldNormal) * 0.5 + 0.5;

                 fixed3 diffuse = albedo * _LightColor0.rgb * halfLambert;

                 float3 worldView = normalize(UnityWorldSpaceViewDir(i.worldPos));

                 float3 halfDir = normalize(worldView + worldLight);

                 fixed3 specular = albedo * _LightColor0.rgb * max(dot(halfDir, i.worldNormal), );

                 UNITY_LIGHT_ATTENUATION(atten, i, i.worldPos);

                 fixed4 col = fixed4((diffuse + specular ) * atten, tex.a);

                 return col;

             }

             ENDCG

         }

     }

     Fallback "Diffuse"

 }
Custom/Environment/LightedTerrain
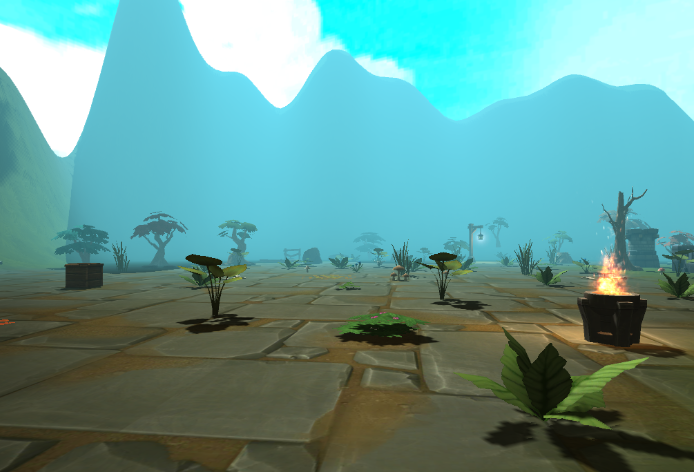
光照效果如下:
Unity3d之将terrain转化成mesh的更多相关文章
- 【Unity3D】利用Shader以及更改Mesh实现2D游戏的动态阴影效果
最近看到一个非常有趣的益智小游戏,是一个盗贼进入房子偷东西的, 其实这种游戏市面上已经很多了,吸引我的是那个类似手电筒的效果, 主角走到哪里,光就到哪里,被挡住的地方还有阴影.有点类似策略游戏里的战争 ...
- [原]Unity3D深入浅出 - 导航网格自动寻路(Navigation Mesh)
NavMesh(导航网格)是3D游戏世界中用于实现动态物体自动寻路的一种技术,将游戏中复杂的结构组织关系简化为带有一定信息的网格,在这些网格的基础上通过一系列的计算来实现自动寻路..导航时,只需要给导 ...
- Unity3D学习笔记——游戏组件之Mesh(网格组件)
Mesh:网格组件.主要用于设置外形和外表. Mesh Filter:网格过滤器.就是为游戏对象添加一个外形. 例:设置外形为Sphere 如果获取的网格拥有蒙皮信患,Unity将自动创建一个skn ...
- Unity3d修炼之路:用Mesh绘制一个Cube
#pragma strict function Awake(){ var pMeshFilter : MeshFilter = gameObject.AddComponent(typeof(MeshF ...
- mesh合并
[风宇冲]Unity3D性能优化:DrawCall优化 (2013-03-05 15:39:27) 转载▼ 标签: it unity unity3d unity3d教程 分类: Unity3d之优化 ...
- Axiom3D:手动创建ManualObject与Mesh,以及如何使用Cg着色器语言
在开始正文前,先说下Axiom3D里遇到的二个BUG. 1.在启动axiom生成的程序中,我发现输出里总是有一些如"billboard_type","billboard_ ...
- three.js 根据png生成heightmap
Three.js: render real world terrain from heightmap using open data By jos.dirksen on Tue, 07/17/2012 ...
- [转]Cryengine渲染引擎剖析
转篇Napoleon314 大牛的分析,排版好乱,见谅,耐心读,这是个好东西,注意看他自己的实现,是个技术狂人啊,Ogre焕发次时代的光芒啊~~~努力 ------------------------ ...
- Unity3D根据游戏的发展Terrain Toolkit地形生产
今天我们继续给我Unity3D游戏开发系列.今天我们来通过Terrain Toolkit为了使地形. 虽然Unity3D它为我们提供了一个地形渲染工具,我们发现,这个地形绘制工具并不能满足我们的 ...
随机推荐
- Array对象 识记
1.Array 创建 new Array(); new Array(size); new Array(element0, element1, ..., elementn); 2.Array 对象属性 ...
- iOS7之后的文本高度封装
#import "NSString+Util.h" @implementation NSString (Util) +(CGFloat)changeStationWidth:(NS ...
- CSS预处理器 Less Sass,Scss 编译 Sourcemap调试
sass.less和stylus的安装使用和入门实践 SASS用法指南 Sass Basics CSS预处理器 css preprocessor 预处理器即preprocessor,预处 ...
- Python 2.X-关于函数返回的数值类型
在使用同一个函数,相同的参数的时候,参数在传递的过程中使用了不同的形式(有无小数点)决定了该函数返回的值的类型. # -*- coding:utf-8 -*- def return_types(one ...
- Python os.path模板函数
os.path.abspath(path) #返回绝对路径 os.path.basename(path) #返回文件名 os.path.commonprefix(list) #返回list(多个路径) ...
- WCF初接触实作
我们通过实现一个简单的示例来对WCF有个直观而浅显的认识,希望对初次涉及WCF的朋友有所帮助. 可以简单地认为WCF程序分为4部分:契约.服务.宿主.客户端.我们通过一个例子来逐步完成各部分,示例程序 ...
- 第七十六节,css颜色和透明度,盒子阴影和轮廓,光标样式
css颜色和透明度,盒子阴影和轮廓,光标样式 学习要点: 1.颜色和透明度 2.盒子阴影和轮廓 3.光标样式 一.颜色和透明度 颜色我们之前其实已经用的很多了,比如字体颜色.背景颜色.边框颜色.但除了 ...
- apt-get dpkg lock 和 debconf 问题
一: 在用sudo apt-get install 安装软件时,由于速度太慢,想换个软件源,直接关闭了终端,apt-get但进程没有结束,结果终端提示 E: Could not get lock /v ...
- Spring Security(13)——session管理
1.1 检测session超时 1.2 concurrency-control 1.3 session 固定攻击保护 Spring Security通过http元素下的子元素s ...
- linux命令 time
功能:用于计算命令执行的世界 语法: time command 例如: hbg@root:~/dl$ time ls111 apple.sh b.txt duplic ...