N63050 第十周运维作业
十九、VPN服务
1、firewalld和最新技术nft实现防火墙功能(65分钟)
2、open-v-p-n介绍和环境准备(48分钟)
3、open-v-p-n实现CA证书(45分钟)
4、open-v-p-n服务和客户端实现(65分钟)
5、open-v-p-n高级管理功能(49分钟)
6、阿里云释放资源(7分钟)
7、数据库基础原理(47分钟)
8、关系型数据库理论(44分钟)
二十、Mysql数据库一
1、MySQL安装和安全加固(58分钟)
2、MySQL的基本使用和二进制安装(54分钟)
3、MySQL的编译安装和SQL语言介绍(44分钟)
4、MySQL多实例和SQL语句分类(54分钟)
5、SQL的数据库管理和表创建(55分钟)
6、DML和DQL语句(45分钟)
7、SQL的单表和多表查询(62分钟)
就业(全程班)第十周作业
一、在阿里云服务器搭建openv-p-n(有条件的同学再做)
实验搭建图
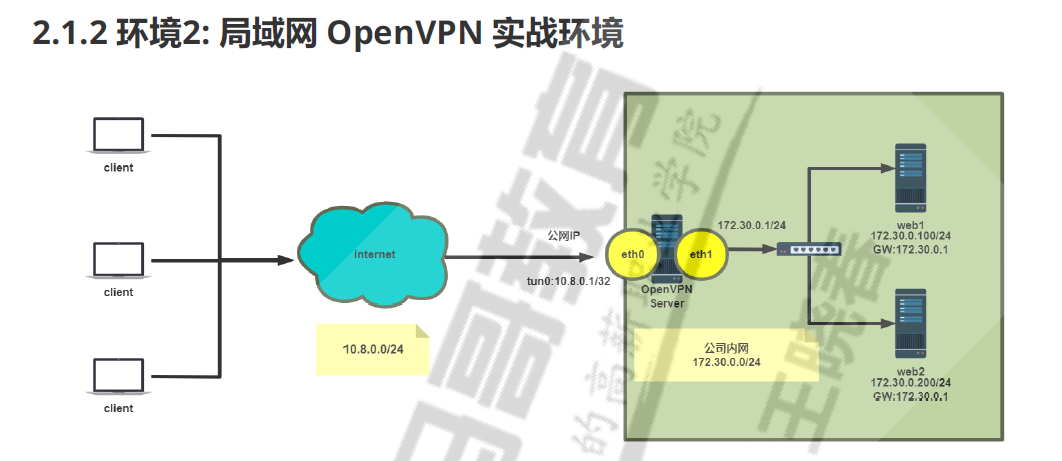
1.配置阿里服务器及环境

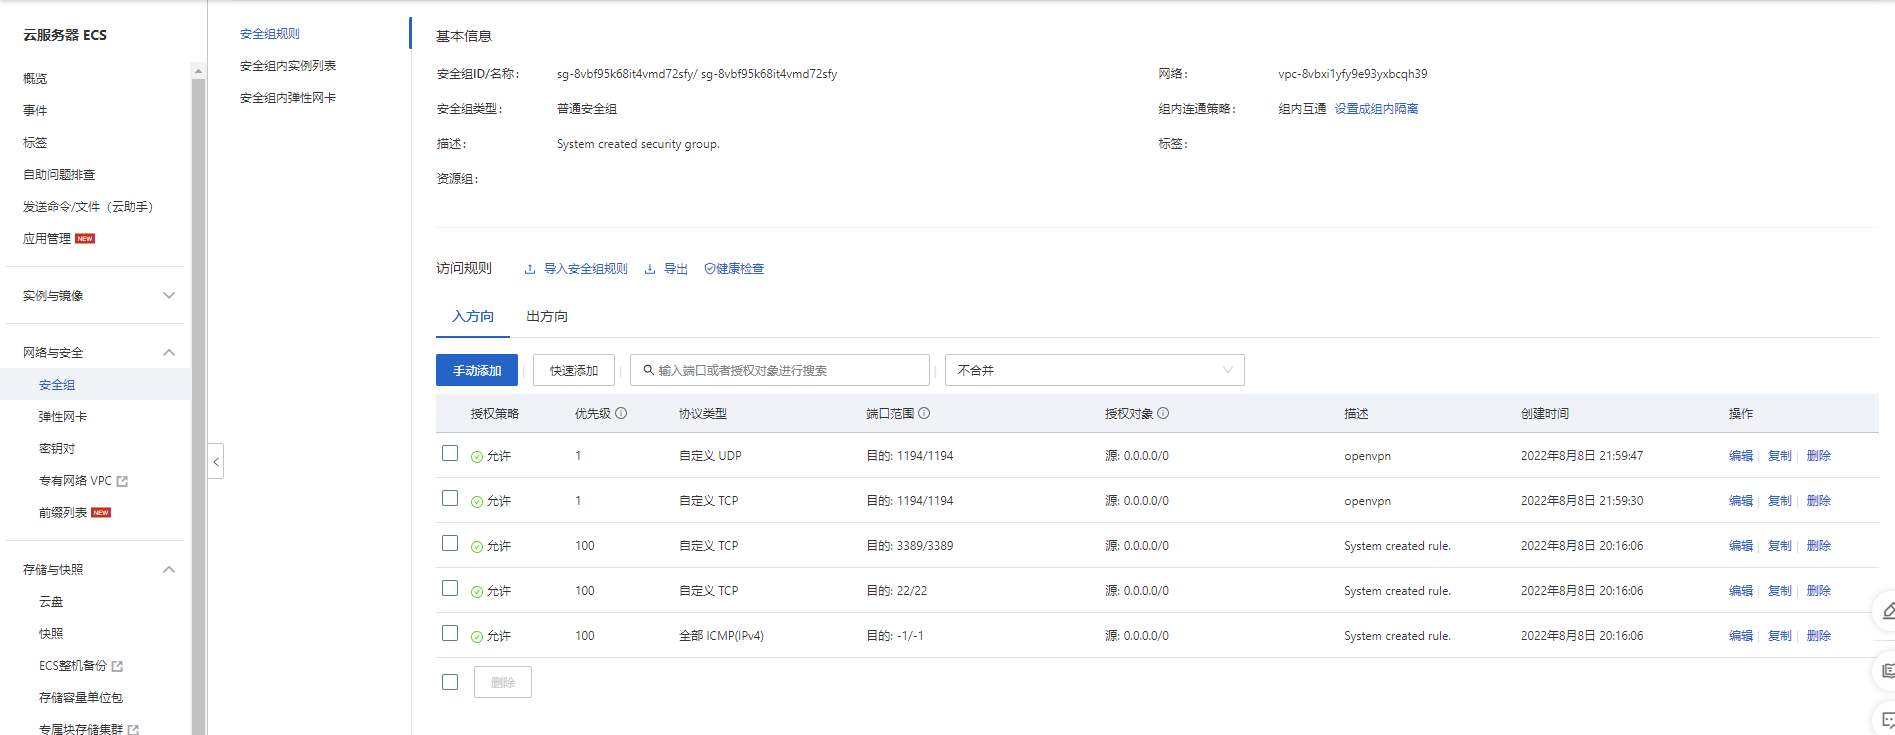

2.连接阿里云服务器,并实现3台主机的key验证
#连接阿里云公网服务器

[root@centos8 ~]#ssh 47.92.28.209

The authenticity of host '47.92.28.209 (47.92.28.209)' can't be established.

ECDSA key fingerprint is SHA256:iqkaIyE2yXmNj6RDF4x7785Gmd/uSmXUqi2INxPgfwI.

Are you sure you want to continue connecting (yes/no/[fingerprint])? yes

Warning: Permanently added '47.92.28.209' (ECDSA) to the list of known hosts.

root@47.92.28.209's password:

Welcome to Alibaba Cloud Elastic Compute Service !

Activate the web console with: systemctl enable --now cockpit.socket

Last login: Mon Aug  8 20:36:26 2022 from 47.96.60.214

[root@openvpn-server-main ~]# ip a

1: lo: <LOOPBACK,UP,LOWER_UP> mtu 65536 qdisc noqueue state UNKNOWN group default qlen 1000

    link/loopback 00:00:00:00:00:00 brd 00:00:00:00:00:00

    inet 127.0.0.1/8 scope host lo

       valid_lft forever preferred_lft forever

    inet6 ::1/128 scope host

       valid_lft forever preferred_lft forever

2: eth0: <BROADCAST,MULTICAST,UP,LOWER_UP> mtu 1500 qdisc fq_codel state UP group default qlen 1000

    link/ether 00:16:3e:04:8c:93 brd ff:ff:ff:ff:ff:ff

    inet 172.30.0.1/24 brd 172.30.0.255 scope global dynamic noprefixroute eth0

       valid_lft 315357152sec preferred_lft 315357152sec

    inet6 fe80::216:3eff:fe04:8c93/64 scope link

       valid_lft forever preferred_lft forever

[root@openvpn-server-main ~]# ssh-keygen

Generating public/private rsa key pair.

Enter file in which to save the key (/root/.ssh/id_rsa):

Enter passphrase (empty for no passphrase):

Enter same passphrase again:

Your identification has been saved in /root/.ssh/id_rsa.

Your public key has been saved in /root/.ssh/id_rsa.pub.

The key fingerprint is:

SHA256:gWYPRHt0Dilr/dLbjR4D3q1K4FSjGqE7DaL8sQF+1T8 root@openvpn-server-main

The key's randomart image is:

+---[RSA 3072]----+

|     .o o..      |

|     ..+.+       |

|      B+o +      |

|     ++=.+ .     |

| .. oo..So.      |

|o....+ =oooo .   |

|.o +o o .Eoo+o.  |

|  o +.   .o o+.  |

|   o      .oo    |

+----[SHA256]-----+

[root@openvpn-server-main ~]#

[root@openvpn-server-main ~]#

[root@openvpn-server-main ~]# ssh-copy-id 127.0.0.1

/usr/bin/ssh-copy-id: INFO: Source of key(s) to be installed: "/root/.ssh/id_rsa.pub"

The authenticity of host '127.0.0.1 (127.0.0.1)' can't be established.

ECDSA key fingerprint is SHA256:iqkaIyE2yXmNj6RDF4x7785Gmd/uSmXUqi2INxPgfwI.

Are you sure you want to continue connecting (yes/no/[fingerprint])? yes

/usr/bin/ssh-copy-id: INFO: attempting to log in with the new key(s), to filter out any that are already installed

/usr/bin/ssh-copy-id: INFO: 1 key(s) remain to be installed -- if you are prompted now it is to install the new keys

root@127.0.0.1's password:

Number of key(s) added: 1

Now try logging into the machine, with:   "ssh '127.0.0.1'"

and check to make sure that only the key(s) you wanted were added.

[root@openvpn-server-main ~]# cd .ssh

[root@openvpn-server-main .ssh]# ls

authorized_keys  id_rsa  id_rsa.pub  known_hosts

[root@openvpn-server-main ~]# rsync -av .ssh 172.30.0.100:/root/

root@172.30.0.100's password:

sending incremental file list

.ssh/

.ssh/authorized_keys

.ssh/id_rsa

.ssh/id_rsa.pub

.ssh/known_hosts

sent 4,619 bytes  received 102 bytes  269.77 bytes/sec

total size is 4,285  speedup is 0.91

[root@openvpn-server-main ~]# rsync -av .ssh 172.30.0.200:/root/

root@172.30.0.200's password:

sending incremental file list

.ssh/

.ssh/authorized_keys

.ssh/id_rsa

.ssh/id_rsa.pub

.ssh/known_hosts

sent 4,619 bytes  received 102 bytes  858.36 bytes/sec

total size is 4,285  speedup is 0.91

[root@openvpn-server-main ~]# ssh 172.30.0.100

Welcome to Alibaba Cloud Elastic Compute Service !

Activate the web console with: systemctl enable --now cockpit.socket

Last failed login: Mon Aug  8 21:47:22 CST 2022 from 172.30.0.1 on ssh:notty

There was 1 failed login attempt since the last successful login.

Last login: Mon Aug  8 21:45:38 2022 from 172.30.0.1
3.安装OpenVPN及证书管理工具
#OpenVPN服务器端

[root@openvpn-server-main ~]#yum -y install openvpn

#证书管理工具

[root@openvpn-server-main ~]#yum -y install easy-rsa
4.准备相关配置文件
#生成服务器配置文件

[root@openvpn-server-main ~]# cp /usr/share/doc/openvpn/sample/sample-config-files/server.conf

/etc/openvpn/

#准备证书签发相关文件

[root@openvpn-server-main ~]# cp -r /usr/share/easy-rsa/ /etc/openvpn/easy-rsa-server

#准备签发证书相关变量的配置文件

[root@openvpn-server-main ~]# cp /usr/share/doc/easy-rsa/vars.example /etc/openvpn/easy-rsa-server/3/vars

[root@openvpn-server-main ~]# vim /etc/openvpn/easy-rsa-server/3/vars

#建议修改给CA和OpenVPN服务器颁发的证书的有效期,可适当加长

[root@centos8 ~]#vim /etc/openvpn/easy-rsa-server/3/vars

#CA的证书有效期默为为10年,可以适当延长,比如:36500天

#set_var EASYRSA_CA_EXPIRE 3650

set_var EASYRSA_CA_EXPIRE 36500

#服务器证书默为为825天,可适当加长,比如:3650天

#set_var EASYRSA_CERT_EXPIRE 825

#将上面行修改为下面

set_var EASYRSA_CERT_EXPIRE 3650

[root@openvpn-server-main ~]# tree /etc/openvpn/

/etc/openvpn/

├── client

├── easy-rsa-server

│   ├── 3 -> 3.0.8

│   ├── 3.0 -> 3.0.8

│   └── 3.0.8

│       ├── easyrsa

│       ├── openssl-easyrsa.cnf

│       ├── vars

│       └── x509-types

│           ├── ca

│           ├── client

│           ├── code-signing

│           ├── COMMON

│           ├── email

│           ├── kdc

│           ├── server

│           └── serverClient

├── server

└── server.conf

7 directories, 12 files
4.1初始化PKI
[root@openvpn-server-main 3]# cd /etc/openvpn/easy-rsa-server/3/

[root@openvpn-server-main 3]# ls

easyrsa  openssl-easyrsa.cnf  vars  x509-types

#初始化数据,在当前目录下生成pki目录及相关文件

[root@openvpn-server-main 3]# ./easyrsa init-pki

Note: using Easy-RSA configuration from: /etc/openvpn/easy-rsa-server/3.0.8/vars

init-pki complete; you may now create a CA or requests.

Your newly created PKI dir is: /etc/openvpn/easy-rsa-server/3/pki

[root@openvpn-server-main 3]# tree

.

├── easyrsa

├── openssl-easyrsa.cnf

├── pki              #生成一个新目录及相关文件

│   ├── openssl-easyrsa.cnf

│   ├── private

│   ├── reqs

│   └── safessl-easyrsa.cnf

├── vars

└── x509-types

    ├── ca

    ├── client

    ├── code-signing

    ├── COMMON

    ├── email

    ├── kdc

    ├── server

    └── serverClient

4 directories, 13 files

[root@openvpn-server-main 3]# cd /etc/openvpn/easy-rsa-server/3

[root@openvpn-server-main 3]# tree pki

pki

├── openssl-easyrsa.cnf

├── private

├── reqs

└── safessl-easyrsa.cnf

2 directories, 2 files
4.2创建CA并自签名
#创建CA并自签名

[root@openvpn-server-main 3]# ./easyrsa build-ca nopass

Note: using Easy-RSA configuration from: /etc/openvpn/easy-rsa-server/3.0.8/vars

Using SSL: openssl OpenSSL 1.1.1g FIPS  21 Apr 2020

Generating RSA private key, 2048 bit long modulus (2 primes)

.......................................................................+++++

........................................+++++

e is 65537 (0x010001)

You are about to be asked to enter information that will be incorporated

into your certificate request.

What you are about to enter is what is called a Distinguished Name or a DN.

There are quite a few fields but you can leave some blank

For some fields there will be a default value,

If you enter '.', the field will be left blank.

-----

Common Name (eg: your user, host, or server name) [Easy-RSA CA]:

CA creation complete and you may now import and sign cert requests.

Your new CA certificate file for publishing is at:

/etc/openvpn/easy-rsa-server/3/pki/ca.crt     #生成的CA证书

[root@openvpn-server-main 3]# tree pki

pki

├── ca.crt

├── certs_by_serial

├── index.txt

├── index.txt.attr

├── issued

├── openssl-easyrsa.cnf

├── private

│   └── ca.key

├── renewed

│   ├── certs_by_serial

│   ├── private_by_serial

│   └── reqs_by_serial

├── reqs

├── revoked

│   ├── certs_by_serial

│   ├── private_by_serial

│   └── reqs_by_serial

├── safessl-easyrsa.cnf

└── serial

12 directories, 7 files

[root@openvpn-server-main 3]# openssl x509 -in pki/ca.crt -noout -text

Certificate:

    Data:

        Version: 3 (0x2)

        Serial Number:

            5a:89:6b:65:55:9d:b9:45:d3:f9:4a:fc:6c:b2:d2:22:77:7c:36:c0

        Signature Algorithm: sha256WithRSAEncryption

        Issuer: CN = Easy-RSA CA

        Validity

            Not Before: Aug  8 14:40:16 2022 GMT

            Not After : Aug  5 14:40:16 2032 GMT

        Subject: CN = Easy-RSA CA

        Subject Public Key Info:

            Public Key Algorithm: rsaEncryption

                RSA Public-Key: (2048 bit)

                Modulus:

                    00:a1:b9:92:73:8e:7d:fc:51:45:18:eb:f3:8e:31:

                    14:42:2b:ed:84:ec:a4:90:8c:ee:38:79:5f:27:95:

                    d8:10:ac:56:fa:74:fc:8d:1d:36:4b:01:0d:ab:07:

                    5c:81:7d:78:1f:3d:4f:40:90:ca:95:27:71:18:61:

                    73:6b:38:a9:5f:5d:11:5b:6d:9c:b5:82:76:9a:b0:

                    95:1e:4c:48:5b:97:94:1f:32:c1:fa:12:41:1c:8b:

                    27:9e:19:ae:54:76:62:63:ce:7f:c9:bf:4d:42:76:

                    93:b7:bd:03:3f:56:2c:84:1d:4f:2b:0d:c9:b0:76:

                    bb:92:37:2d:5e:fc:e6:82:2c:cd:b5:b6:09:f8:ff:

                    7f:49:10:14:3f:cf:ec:04:2d:36:9c:2f:d8:1e:76:

                    a2:1e:05:bb:69:08:76:9c:4b:09:f5:ef:97:e2:56:

                    5c:ca:6e:48:09:cb:50:63:5f:77:5b:0d:33:b9:a3:

                    db:d8:93:05:ca:51:a0:34:2c:87:06:3d:63:ee:09:

                    2c:15:4f:f3:08:e1:7d:6e:f4:8f:00:9e:21:85:2b:

                    44:8f:e1:2b:37:e6:6f:8e:66:19:e8:4b:4d:a4:3c:

                    84:56:81:a4:35:f6:31:b6:85:dc:78:bd:f9:8a:91:

                    41:34:9a:3f:3a:ae:68:6f:a1:6c:3c:6f:8a:ec:f7:

                    f2:8b

                Exponent: 65537 (0x10001)

        X509v3 extensions:

            X509v3 Subject Key Identifier:

                DE:DD:41:BE:B6:AD:6B:08:EF:DB:7D:48:9B:A9:22:3A:79:7E:02:81

            X509v3 Authority Key Identifier:

                keyid:DE:DD:41:BE:B6:AD:6B:08:EF:DB:7D:48:9B:A9:22:3A:79:7E:02:81

                DirName:/CN=Easy-RSA CA

                serial:5A:89:6B:65:55:9D:B9:45:D3:F9:4A:FC:6C:B2:D2:22:77:7C:36:C0

            X509v3 Basic Constraints:

                CA:TRUE

            X509v3 Key Usage:

                Certificate Sign, CRL Sign

    Signature Algorithm: sha256WithRSAEncryption

         2c:63:db:ad:e6:fb:0c:ae:eb:42:0c:fb:8d:2e:e3:14:15:54:

         1c:55:be:f4:c9:b4:7b:e4:37:67:74:e9:e6:37:08:45:05:82:

         a2:72:87:82:4c:82:7c:f0:73:45:65:a7:23:05:0d:2e:3d:3d:

         5f:92:03:2d:19:e1:50:e0:35:ef:39:25:d2:8c:c7:27:dd:da:

         5b:31:a1:f7:09:45:a5:c4:be:0f:69:76:f8:5b:93:4c:3e:8e:

         e8:f5:04:0a:45:e4:5b:8e:f9:aa:07:24:1b:7e:a7:59:58:9b:

         85:3c:bd:e9:28:8b:3b:25:a5:b6:6c:e8:5c:ad:57:73:74:e6:

         ff:85:3c:1a:b7:6e:8f:9d:6a:a7:b1:15:a6:61:cf:f5:89:fd:

         dc:40:cd:ba:ec:71:c8:90:c0:51:f3:2d:5c:9f:5d:8e:2e:eb:

         62:b3:2f:81:ab:8c:89:5e:25:ce:b3:c6:6f:3b:e7:3c:dd:4c:

         84:0e:f8:da:ee:e8:82:c9:f1:67:70:a4:79:7a:35:7d:87:1a:

         f4:2d:33:6f:55:14:e0:3e:81:28:01:5b:b4:10:f6:64:b5:05:

         a3:a1:ac:54:1e:52:07:99:9b:80:62:3b:a1:58:ad:be:10:d9:

         92:63:fe:19:61:f2:47:41:42:fa:fd:53:51:02:93:7a:fe:ac:

         b2:2a:33:48

#查看生成的自签名证书

[root@openvpn-server-main 3]#cat pki/ca.crt

[root@openvpn-server-main 3]# sz pki/ca/crt

-bash: sz: command not found

[root@openvpn-server-main 3]# yum -y install lrzsz    #安装sz工具

14 directories, 18 files

[root@openvpn-server-main 3]sz pki/ca.crt    #拷到win下

[root@openvpn-server-main 3]#
5 创建服务器端证书申请
[root@openvpn-server-main 3]# cd /etc/openvpn/easy-rsa-server/3

#创建服务器证书申请文件,其中server是文件前缀

[root@openvpn-server-main 3]# ./easyrsa gen-req server nopass

Note: using Easy-RSA configuration from: /etc/openvpn/easy-rsa-server/3.0.8/vars

Using SSL: openssl OpenSSL 1.1.1g FIPS  21 Apr 2020

Generating a RSA private key

.................................................................................................+++++

........................+++++

writing new private key to '/etc/openvpn/easy-rsa-server/3/pki/easy-rsa-26484.lfNdNM/tmp.BZuLss'

-----

You are about to be asked to enter information that will be incorporated

into your certificate request.

What you are about to enter is what is called a Distinguished Name or a DN.

There are quite a few fields but you can leave some blank

For some fields there will be a default value,

If you enter '.', the field will be left blank.

-----

Common Name (eg: your user, host, or server name) [server]:

Keypair and certificate request completed. Your files are:

req: /etc/openvpn/easy-rsa-server/3/pki/reqs/server.req

key: /etc/openvpn/easy-rsa-server/3/pki/private/server.key

[root@openvpn-server-main 3]# tree pki

pki

├── ca.crt

├── certs_by_serial

├── index.txt

├── index.txt.attr

├── issued

├── openssl-easyrsa.cnf

├── private

│   ├── ca.key

│   └── server.key        #服务器私钥文件

├── renewed

│   ├── certs_by_serial

│   ├── private_by_serial

│   └── reqs_by_serial

├── reqs

│   └── server.req         #服务器请求文件

├── revoked

│   ├── certs_by_serial

│   ├── private_by_serial

│   └── reqs_by_serial

├── safessl-easyrsa.cnf

└── serial

12 directories, 9 files

#将上面server.req的申请,颁发server类型的证书

[root@openvpn-server-main 3]# ./easyrsa sign server server

Note: using Easy-RSA configuration from: /etc/openvpn/easy-rsa-server/3.0.8/vars

Using SSL: openssl OpenSSL 1.1.1g FIPS  21 Apr 2020

You are about to sign the following certificate.

Please check over the details shown below for accuracy. Note that this request

has not been cryptographically verified. Please be sure it came from a trusted

source or that you have verified the request checksum with the sender.

Request subject, to be signed as a server certificate for 825 days:

subject=

    commonName                = server

Type the word 'yes' to continue, or any other input to abort.

  Confirm request details: yes

Using configuration from /etc/openvpn/easy-rsa-server/3/pki/easy-rsa-26514.sJWU62/tmp.tKyEVX

Check that the request matches the signature

Signature ok

The Subject's Distinguished Name is as follows

commonName            :ASN.1 12:'server'

Certificate is to be certified until Nov 10 14:55:40 2024 GMT (825 days)

Write out database with 1 new entries

Data Base Updated

Certificate created at: /etc/openvpn/easy-rsa-server/3/pki/issued/server.crt

[root@openvpn-server-main 3]# tree pki

pki

├── ca.crt

├── certs_by_serial

│   └── ACC5AB97F9C4E738AD99B57FF352BF91.pem

├── index.txt

├── index.txt.attr

├── index.txt.attr.old

├── index.txt.old

├── issued

│   └── server.crt

├── openssl-easyrsa.cnf

├── private

│   ├── ca.key

│   └── server.key

├── renewed

│   ├── certs_by_serial

│   ├── private_by_serial

│   └── reqs_by_serial

├── reqs

│   └── server.req

├── revoked

│   ├── certs_by_serial

│   ├── private_by_serial

│   └── reqs_by_serial

├── safessl-easyrsa.cnf

├── serial

└── serial.old

12 directories, 14 files

[root@openvpn-server-main 3]# tree

.

├── easyrsa

├── openssl-easyrsa.cnf

├── pki

│   ├── ca.crt

│   ├── certs_by_serial

│   │   └── ACC5AB97F9C4E738AD99B57FF352BF91.pem    #服务器证书文件

│   ├── index.txt

│   ├── index.txt.attr

│   ├── index.txt.attr.old

│   ├── index.txt.old

│   ├── issued

│   │   └── server.crt          #服务器证书文件

│   ├── openssl-easyrsa.cnf

│   ├── private

│   │   ├── ca.key

│   │   └── server.key

│   ├── renewed

│   │   ├── certs_by_serial

│   │   ├── private_by_serial

│   │   └── reqs_by_serial

│   ├── reqs

│   │   └── server.req

│   ├── revoked

│   │   ├── certs_by_serial

│   │   ├── private_by_serial

│   │   └── reqs_by_serial

│   ├── safessl-easyrsa.cnf

│   ├── serial

│   └── serial.old

├── vars

└── x509-types

    ├── ca

    ├── client

    ├── code-signing

    ├── COMMON

    ├── email

    ├── kdc

    ├── server

    └── serverClient

14 directories, 25 files

[root@openvpn-server-main 3]# cat pki/index.txt

V	241110145540Z		ACC5AB97F9C4E738AD99B57FF352BF91	unknown	/CN=server

6 创建 Diffie-Hellman 密钥
[root@openvpn-server-main ~]# cd /etc/openvpn/easy-rsa-server/3

[root@openvpn-server-main 3]# 3]#./easyrsa gen-dh

-bash: 3]#./easyrsa: No such file or directory

[root@openvpn-server-main 3]# ./easyrsa gen-dh

Note: using Easy-RSA configuration from: /etc/openvpn/easy-rsa-server/3.0.8/vars

Using SSL: openssl OpenSSL 1.1.1g FIPS  21 Apr 2020

Generating DH parameters, 2048 bit long safe prime, generator 2

This is going to take a long time

.............................................................................+.................................+........+.........................................................................+...............................................+......++*++*++*++*

DH parameters of size 2048 created at /etc/openvpn/easy-rsa-server/3/pki/dh.pem

[root@openvpn-server-main 3]# ll pki/dh.pem

-rw------- 1 root root 424 Aug  9 09:31 pki/dh.pem
7准备客户端证书环境
7.1配置客户端证书
[root@openvpn-server-main ~]# cp -r /usr/share/easy-rsa/ /etc/openvpn/easy-rsa-client

#切到客户端目录

[root@openvpn-server-main ~]# cd /etc/openvpn//easy-rsa-client/3/

[root@openvpn-server-main 3]# tree

.

├── easyrsa

├── openssl-easyrsa.cnf

└── x509-types

    ├── ca

    ├── client

    ├── code-signing

    ├── COMMON

    ├── email

    ├── kdc

    ├── server

    └── serverClient

1 directory, 10 files

#生成证书申请所需目录pki和文件

[root@openvpn-server-main 3]# ./easyrsa init-pki

init-pki complete; you may now create a CA or requests.

Your newly created PKI dir is: /etc/openvpn/easy-rsa-client/3/pki

[root@openvpn-server-main 3]# tree

.

├── easyrsa

├── openssl-easyrsa.cnf

├── pki

│   ├── openssl-easyrsa.cnf

│   ├── private

│   ├── reqs

│   └── safessl-easyrsa.cnf

└── x509-types

    ├── ca

    ├── client

    ├── code-signing

    ├── COMMON

    ├── email

    ├── kdc

    ├── server

    └── serverClient

4 directories, 12 files

#生成客户端用户的证书申请

[root@openvpn-server-main 3]# ./easyrsa gen-req bruce nopass

Using SSL: openssl OpenSSL 1.1.1g FIPS  21 Apr 2020

Generating a RSA private key

...............+++++

.+++++

writing new private key to '/etc/openvpn/easy-rsa-client/3/pki/easy-rsa-1338.u4LE79/tmp.Tyx63D'

-----

You are about to be asked to enter information that will be incorporated

into your certificate request.

What you are about to enter is what is called a Distinguished Name or a DN.

There are quite a few fields but you can leave some blank

For some fields there will be a default value,

If you enter '.', the field will be left blank.

-----

Common Name (eg: your user, host, or server name) [bruce]:

Keypair and certificate request completed. Your files are:

req: /etc/openvpn/easy-rsa-client/3/pki/reqs/bruce.req      #证书申请文件

key: /etc/openvpn/easy-rsa-client/3/pki/private/bruce.key   #私钥文件

[root@openvpn-server-main 3]# tree

.

├── easyrsa

├── openssl-easyrsa.cnf

├── pki

│   ├── openssl-easyrsa.cnf

│   ├── private

│   │   └── bruce.key     #私钥文件

│   ├── reqs

│   │   └── bruce.req     #证书申请文件

│   └── safessl-easyrsa.cnf

└── x509-types

    ├── ca

    ├── client

    ├── code-signing

    ├── COMMON

    ├── email

    ├── kdc

    ├── server

    └── serverClient

4 directories, 14 files

[root@openvpn-server-main 3]# pwd

/etc/openvpn/easy-rsa-client/3

#回到服务器端

[root@openvpn-server-main 3]# cd /etc/openvpn/easy-rsa-server/3

[root@openvpn-server-main 3]# pwd

/etc/openvpn/easy-rsa-server/3

#将客户端证书请求文件复制到CA的工作目录(也可以用cp复制到相应目录)

[root@openvpn-server-main 3]# ./easyrsa import-req /etc/openvpn/easy-rsa-client/3/pki/reqs/bruce.req bruce

Note: using Easy-RSA configuration from: /etc/openvpn/easy-rsa-server/3.0.8/vars

Using SSL: openssl OpenSSL 1.1.1g FIPS  21 Apr 2020

The request has been successfully imported with a short name of: bruce

You may now use this name to perform signing operations on this request.

[root@openvpn-server-main 3]# tree pki

pki

├── ca.crt

├── certs_by_serial

│   └── ACC5AB97F9C4E738AD99B57FF352BF91.pem

├── dh.pem

├── index.txt

├── index.txt.attr

├── index.txt.attr.old

├── index.txt.old

├── issued

│   └── server.crt

├── openssl-easyrsa.cnf

├── private

│   ├── ca.key

│   └── server.key

├── renewed

│   ├── certs_by_serial

│   ├── private_by_serial

│   └── reqs_by_serial

├── reqs

│   ├── bruce.req   #导入的申请文件

│   └── server.req

├── revoked

│   ├── certs_by_serial

│   ├── private_by_serial

│   └── reqs_by_serial

├── safessl-easyrsa.cnf

├── serial

└── serial.old

12 directories, 16 files

#修改给客户端颁发的证书的有效期

[root@centos8 3]#vim vars

#建议修改给客户端颁发证书的有效期,可适当减少,比如:90天

#set_var EASYRSA_CERT_EXPIRE 825

#将上面行修改为下面

set_var EASYRSA_CERT_EXPIRE 90

#签发客户端证书

[root@openvpn-server-main 3]# ./easyrsa sign client bruce

Note: using Easy-RSA configuration from: /etc/openvpn/easy-rsa-server/3.0.8/vars

Using SSL: openssl OpenSSL 1.1.1g FIPS  21 Apr 2020

You are about to sign the following certificate.

Please check over the details shown below for accuracy. Note that this request

has not been cryptographically verified. Please be sure it came from a trusted

source or that you have verified the request checksum with the sender.

Request subject, to be signed as a client certificate for 90 days:

subject=

    commonName                = bruce

Type the word 'yes' to continue, or any other input to abort.

  Confirm request details: yes

Using configuration from /etc/openvpn/easy-rsa-server/3/pki/easy-rsa-1432.B5ZAzK/tmp.cDgOFn

Check that the request matches the signature

Signature ok

The Subject's Distinguished Name is as follows

commonName            :ASN.1 12:'bruce'

Certificate is to be certified until Nov  7 01:45:02 2022 GMT (90 days)

Write out database with 1 new entries

Data Base Updated

Certificate created at: /etc/openvpn/easy-rsa-server/3/pki/issued/bruce.crt    #已生成客户端证书

[root@openvpn-server-main 3]# tree

.

├── easyrsa

├── openssl-easyrsa.cnf

├── pki

│   ├── ca.crt

│   ├── certs_by_serial

│   │   ├── ACC5AB97F9C4E738AD99B57FF352BF91.pem

│   │   └── F953A07AB54009224A331A4A56488058.pem

│   ├── dh.pem

│   ├── index.txt

│   ├── index.txt.attr

│   ├── index.txt.attr.old

│   ├── index.txt.old

│   ├── issued

│   │   ├── bruce.crt

│   │   └── server.crt

│   ├── openssl-easyrsa.cnf

│   ├── private

│   │   ├── ca.key

│   │   └── server.key

│   ├── renewed

│   │   ├── certs_by_serial

│   │   ├── private_by_serial

│   │   └── reqs_by_serial

│   ├── reqs

│   │   ├── bruce.req

│   │   └── server.req

│   ├── revoked

│   │   ├── certs_by_serial

│   │   ├── private_by_serial

│   │   └── reqs_by_serial

│   ├── safessl-easyrsa.cnf

│   ├── serial

│   └── serial.old

├── vars

└── x509-types

    ├── ca

    ├── client

    ├── code-signing

    ├── COMMON

    ├── email

    ├── kdc

    ├── server

    └── serverClient

14 directories, 29 files
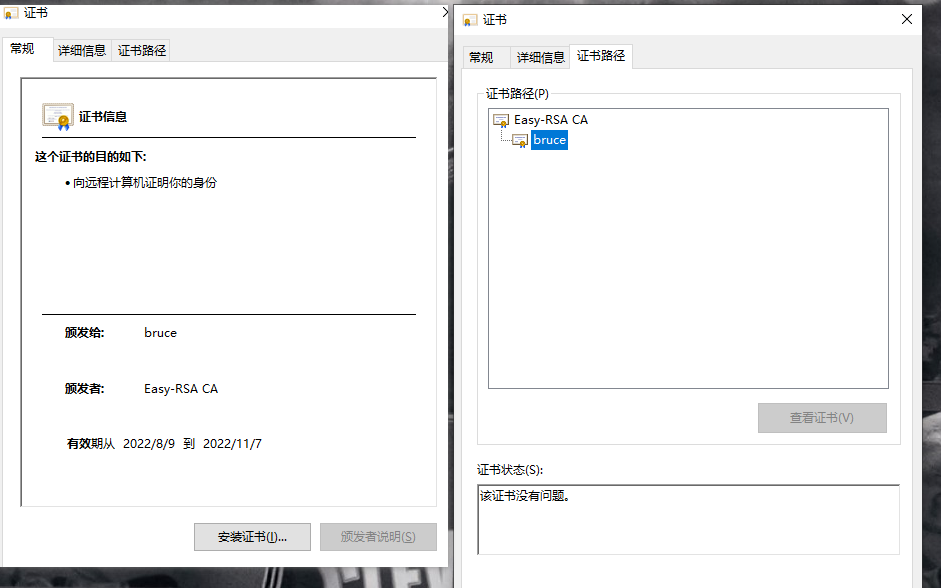
7.2客户端证书自动颁发脚本
(PDF复制出来脚本格式不对)
vim 打开 输出 :set paste
[root@openvpn-server-main ~]# vim openvpn-user-crt.sh

#!/bin/bash

read -p "请输入用户的姓名拼音(如:${NAME}): " NAME

cd /etc/openvpn/easy-rsa-client/3

./easyrsa gen-req ${NAME} nopass <<EOF

EOF

cd /etc/openvpn/easy-rsa-server/3

./easyrsa import-req /etc/openvpn/easy-rsa-client/3/pki/reqs/${NAME}.req ${NAME}

./easyrsa sign client ${NAME} <<EOF

yes

EOF
8 将CA和服务器证书相关文件复制到服务器相应的目录
[root@openvpn-server-main ~]# mkdir /etc/openvpn/certs

[root@openvpn-server-main ~]# cp /etc/openvpn/easy-rsa-server/3/pki/ca.crt /etc/openvpn/certs/

[root@openvpn-server-main ~]# cp /etc/openvpn/easy-rsa-server/3/pki/issued/server.crt /etc/openvpn/certs/

[root@openvpn-server-main ~]# cp /etc/openvpn/easy-rsa-server/3/pki/private/server.key /etc/openvpn/certs/

[root@openvpn-server-main ~]# cp /etc/openvpn/easy-rsa-server/3/pki/dh.pem /etc/openvpn/certs/

[root@openvpn-server-main ~]# ll /etc/openvpn/certs/

total 20

-rw------- 1 root root 1204 Aug  9 11:20 ca.crt

-rw------- 1 root root  424 Aug  9 11:22 dh.pem

-rw------- 1 root root 4608 Aug  9 11:20 server.crt

-rw------- 1 root root 1704 Aug  9 11:21 server.key
将客户端私钥与证书相关文件复制到服务器相关的目录
[root@openvpn-server-main client]# mkdir /etc/openvpn/client/bruce/

[root@openvpn-server-main ~]#find /etc/openvpn/ -name "bruce.key" -o -name "bruce.crt" -o -name ca.crt

[root@openvpn-server-main client]# find /etc/openvpn/ \( -name "bruce.key" -o -name "bruce.crt" -o -name ca.crt \)  -exec cp {} /etc/openvpn/client/bruce \;

[root@openvpn-server-main client]# tree /etc/openvpn/client/bruce

/etc/openvpn/client/bruce

├── bruce.crt

├── bruce.key

└── ca.crt

0 directories, 3 files

[root@openvpn-server-main client]#
9准备 OpenVPN 服务器配置文件
9.1服务器端配置文件说明
[root@openvpn-server-main ~]# vim /etc/openvpn/server.conf

#脚本先清空原有的,vim输入:%d

port 1194

proto tcp

dev tun

ca /etc/openvpn/certs/ca.crt

cert /etc/openvpn/certs/server.crt

key /etc/openvpn/certs/server.key # This file should be kept secret

dh /etc/openvpn/certs/dh.pem

server 10.8.0.0 255.255.255.0

push "route 172.30.0.0 255.255.255.0"

keepalive 10 120

cipher AES-256-CBC

compress lz4-v2

push "compress lz4-v2"

max-clients 2048

user openvpn

group openvpn

status /var/log/openvpn/openvpn-status.log

log-append /var/log/openvpn/openvpn.log

verb 3

mute 20

#准备目志相关目录

[root@openvpn-server-main ]# getent passwd openvpn

openvpn:x:989:985:OpenVPN:/etc/openvpn:/sbin/nologin

[root@openvpn-server-main ]# mkdir /var/log/openvpn

[root@openvpn-server-main ]# chown openvpn.openvpn /var/log/openvpn

[root@openvpn-server-main ]# ll -d /var/log/openvpn

drwxr-xr-x 2 openvpn openvpn 6 Aug  9 16:53 /var/log/openvpn
9.2准备 iptables 规则和内核参数
#在服务器开启ip_forward转发功能

[root@openvpn-server-main ~]# echo net.ipv4.ip_forward = 1 >> /etc/sysctl.conf

[root@openvpn-server-main ~]# sysctl -p

vm.swappiness = 0

kernel.sysrq = 1

net.ipv4.neigh.default.gc_stale_time = 120

net.ipv4.conf.all.rp_filter = 0

net.ipv4.conf.default.rp_filter = 0

net.ipv4.conf.default.arp_announce = 2

net.ipv4.conf.lo.arp_announce = 2

net.ipv4.conf.all.arp_announce = 2

net.ipv4.tcp_max_tw_buckets = 5000

net.ipv4.tcp_syncookies = 1

net.ipv4.tcp_max_syn_backlog = 1024

net.ipv4.tcp_synack_retries = 2

net.ipv4.tcp_slow_start_after_idle = 0

net.ipv4.ip_forward = 1

#添加SNAT规则

[root@openvpn-server-main ~]# echo 'iptables -t nat -A POSTROUTING -s 10.8.0.0/24 -j MASQUERADE' >> /etc/rc.d/rc.local

[root@openvpn-server-main ~]# chmod +x /etc/rc.d/rc.local

[root@openvpn-server-main ~]# /etc/rc.d/rc.local

[root@openvpn-server-main ~]# iptables -vnL -t nat

Chain PREROUTING (policy ACCEPT 0 packets, 0 bytes)

 pkts bytes target     prot opt in     out     source               destination

Chain INPUT (policy ACCEPT 0 packets, 0 bytes)

 pkts bytes target     prot opt in     out     source               destination

Chain POSTROUTING (policy ACCEPT 0 packets, 0 bytes)

 pkts bytes target     prot opt in     out     source               destination

    0     0 MASQUERADE  all  --  *      *       10.8.0.0/24          0.0.0.0/0

Chain OUTPUT (policy ACCEPT 0 packets, 0 bytes)

 pkts bytes target     prot opt in     out     source               destination
10启动 OpenVPN 服务
[root@centos7 ~]#rpm -ql openvpn|grep systemd

/usr/lib/systemd/system/openvpn-client@.service

/usr/lib/systemd/system/openvpn-server@.service

/usr/lib/systemd/system/openvpn@.service    #缺少此配置文件

/usr/share/doc/openvpn-2.4.9/README.systemd

#CentOS8 缺失unit文件,从CentOS7复制文件或自己创建一个

[root@openvpn-server-main ~]# rpm -ql openvpn|grep systemd

/usr/lib/systemd/system/openvpn-client@.service

/usr/lib/systemd/system/openvpn-server@.service

/usr/share/doc/openvpn/README.systemd

[root@centos7 ~]#cat /usr/lib/systemd/system/openvpn@.service

[Unit]

Description=OpenVPN Robust And Highly Flexible Tunneling Application On %I

After=network.target

[Service]

Type=notify

PrivateTmp=true

ExecStart=/usr/sbin/openvpn --cd /etc/openvpn/ --config %i.conf

[Install]

WantedBy=multi-user.target

#创建一个配置文件

[root@openvpn-server-main ~]# vim /usr/lib/systemd/system/openvpn@.service

[Unit]

Description=OpenVPN Robust And Highly Flexible Tunneling Application On %I

After=network.target

[Service]

Type=notify

PrivateTmp=true

ExecStart=/usr/sbin/openvpn --cd /etc/openvpn/ --config %i.conf

[Install]

WantedBy=multi-user.target

#启动OpenVPN服务,注意service名称和文件名不一致

[root@openvpn-server-main ~]# systemctl daemon-reload

[root@openvpn-server-main ~]# systemctl enable --now openvpn@server

Created symlink /etc/systemd/system/multi-user.target.wants/openvpn@server.service → /usr/lib/systemd/system/openvpn@.service.

#查看服务状态

[root@openvpn-server-main ~]# systemctl status openvpn@server

● openvpn@server.service - OpenVPN Robust And Highly Flexible Tunneling Application On server

   Loaded: loaded (/usr/lib/systemd/system/openvpn@.service; enabled; vendor preset: disabled)

   Active: active (running) since Tue 2022-08-09 17:30:17 CST; 24s ago

 Main PID: 1384 (openvpn)

   Status: "Initialization Sequence Completed"

    Tasks: 1 (limit: 22988)

   Memory: 2.5M

   CGroup: /system.slice/system-openvpn.slice/openvpn@server.service

           └─1384 /usr/sbin/openvpn --cd /etc/openvpn/ --config server.conf

Aug 09 17:30:17 openvpn-server-main systemd[1]: Starting OpenVPN Robust And Highly Flexible Tunneling Application On server...

Aug 09 17:30:17 openvpn-server-main systemd[1]: Started OpenVPN Robust And Highly Flexible Tunneling Application On server.

[root@openvpn-server-main ~]# ss -ntulp

Netid        State         Recv-Q         Send-Q                 Local Address:Port                 Peer Address:Port

udp          UNCONN        0              0                          127.0.0.1:323                       0.0.0.0:*            users:(("chronyd",pid=728,fd=6))

udp          UNCONN        0              0                              [::1]:323                          [::]:*            users:(("chronyd",pid=728,fd=7))

tcp          LISTEN        0              32                           0.0.0.0:1194                      0.0.0.0:*            users:(("openvpn",pid=1384,fd=8))

tcp          LISTEN        0              128                          0.0.0.0:22                        0.0.0.0:*            users:(("sshd",pid=1027,fd=5))

[root@openvpn-server-main ~]# ip a

1: lo: <LOOPBACK,UP,LOWER_UP> mtu 65536 qdisc noqueue state UNKNOWN group default qlen 1000

    link/loopback 00:00:00:00:00:00 brd 00:00:00:00:00:00

    inet 127.0.0.1/8 scope host lo

       valid_lft forever preferred_lft forever

    inet6 ::1/128 scope host

       valid_lft forever preferred_lft forever

2: eth0: <BROADCAST,MULTICAST,UP,LOWER_UP> mtu 1500 qdisc fq_codel state UP group default qlen 1000

    link/ether 00:16:3e:04:8c:93 brd ff:ff:ff:ff:ff:ff

    inet 172.30.0.1/24 brd 172.30.0.255 scope global dynamic noprefixroute eth0

       valid_lft 315356714sec preferred_lft 315356714sec

    inet6 fe80::216:3eff:fe04:8c93/64 scope link

       valid_lft forever preferred_lft forever

3: tun0: <POINTOPOINT,MULTICAST,NOARP,UP,LOWER_UP> mtu 1500 qdisc fq_codel state UNKNOWN group default qlen 100

    link/none

    inet 10.8.0.1 peer 10.8.0.2/32 scope global tun0

       valid_lft forever preferred_lft forever

    inet6 fe80::1e70:f96d:5b21:6a0/64 scope link stable-privacy

       valid_lft forever preferred_lft forever
10.1生成客户端用户的配置文件
修改配置文件,内容如下
root@centos8 ~]#cat /etc/openvpn/client/wangxiaochun/client.ovpn

client

dev tun

proto tcp

remote 10.0.0.8 1194 #生产中为OpenVPN公网IP

resolv-retry infinite

nobind

#persist-key

#persist-tun

ca ca.crt

cert wangxiaochun.crt

key wangxiaochun.key

remote-cert-tls server

#tls-auth ta.key 1

cipher AES-256-CBC

verb 3 #此值不能随意指定,否则无法通信

compress lz4-v2 #此项在OpenVPN2.4.X版本使用,需要和服务器端保持一致,如不

指定,默认使用comp-lz压缩

#自己创建client.ovpn

[root@openvpn-server-main ~]# vim /etc/openvpn/client/bruce/client.ovpn

client

dev tun

proto tcp

remote 47.92.87.184 1194

resolv-retry infinite

nobind

#persist-key

#persist-tun

ca ca.crt

cert bruce.crt

key bruce.key

remote-cert-tls server

#tls-auth ta.key 1

cipher AES-256-CBC

verb 3

compress lz4-v2
11 Windows 安装 OpenVPN 客户端
官方客户端下载地址:
https://openvpn.net/community-downloads/
Windows 客户端配置准备
保存证书到openvpn 客户端安装目录:C:\Program Files\OpenVPN\config
#在服务器打包证书并下载发送给windows客户端

[root@openvpn-server-main ~]# cd /etc/openvpn/client/bruce/

[root@openvpn-server-main bruce]# tar cf bruce.tar ./

tar: ./bruce.tar: file is the archive; not dumped

[root@openvpn-server-main bruce]# ll

total 40

-rw------- 1 root root  4491 Aug  9 11:39 bruce.crt

-rw------- 1 root root  1704 Aug  9 11:39 bruce.key

-rw-r--r-- 1 root root 20480 Aug  9 21:06 bruce.tar

-rw------- 1 root root  1204 Aug  9 11:39 ca.crt

-rw-r--r-- 1 root root   230 Aug  9 18:06 client.ovpn

[root@openvpn-server-main bruce]# tar tf bruce.tar

./

./bruce.crt

./ca.crt

./bruce.key

./client.ovpn
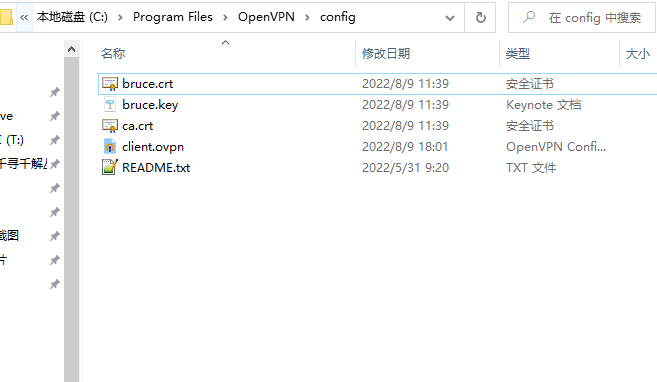
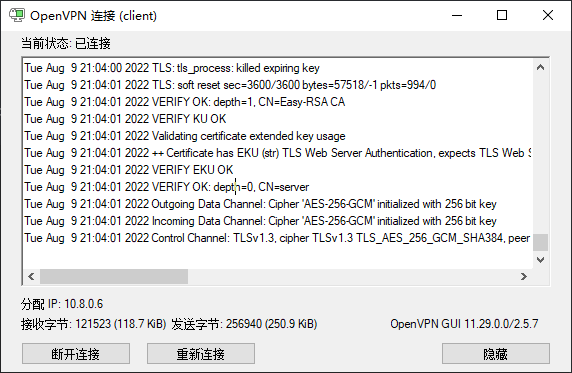

12账户证书管理
主要是证书的创建和吊销,对应的员工的入职和离职
12.1证书自动过期
过期时间以服务器时间为准,如果过期,需要重新颁发证书
[root@openvpn-server-main ~]# grep EASYRSA_CERT_EXPIRE /etc/openvpn/easy-rsa-server/3/vars

set_var EASYRSA_CERT_EXPIRE	90
如果证书过期,在服务器端可以看到以下日志
#让服务器时间改为2年后时间

[root@centos8 ~]#date -s '2 year'

Thu Aug 4 17:41:04 CST 2022

#服务器端日志中会显示用户证书过期

[root@centos8 ~]#tail -n0 /var/log/openvpn/openvpn.log -f

Thu Aug 4 17:42:22 2022 TCP connection established with [AF_INET]10.0.0.1:11324

Thu Aug 4 17:42:23 2022 10.0.0.1:11324 TLS: Initial packet from

[AF_INET]10.0.0.1:11324, sid=a2957674 874cf1f7

Thu Aug 4 17:42:24 2022 10.0.0.1:11324 VERIFY OK: depth=1, CN=Easy-RSA CA

Thu Aug 4 17:42:24 2022 10.0.0.1:11324 VERIFY ERROR: depth=0, error=certificate

has expired: CN=magedu

Thu Aug 4 17:42:24 2022 10.0.0.1:11324 OpenSSL: error:1417C086:SSL

routines:tls_process_client_certificate:certificate verify failed

Thu Aug 4 17:42:24 2022 10.0.0.1:11324 TLS_ERROR: BIO read tls_read_plaintext

error

Thu Aug 4 17:42:24 2022 10.0.0.1:11324 TLS Error: TLS object -> incoming

plaintext read error

Thu Aug 4 17:42:24 2022 10.0.0.1:11324 TLS Error: TLS handshake failed

Thu Aug 4 17:42:24 2022 10.0.0.1:11324 Fatal TLS error (check_tls_errors_co),

restarting

Thu Aug 4 17:42:24 2022 10.0.0.1:11324 SIGUSR1[soft,tls-error] received,

client-instance restarting
12.2证书手动注销
查看当前证书的有效性,有效为V,无效为R
[root@openvpn-server-main ~]# cat /etc/openvpn/easy-rsa-server/3/pki/index.txt

V	241110145540Z		ACC5AB97F9C4E738AD99B57FF352BF91	unknown	/CN=server

V	221107014502Z		F953A07AB54009224A331A4A56488058	unknown	/CN=bruce

V	221107022916Z		3645DBC6FED12AC04ABD4A568B3A0768	unknown	/CN=magee

V	221107124656Z		B17B331DC38C53B9ED7C21F301691FB2	unknown	/CN=li
吊销指定的用户的证书
3]#./easyrsa revoke
查看当前证书的有效性,有效为V,无效为R
[root@openvpn-server-main 3]# cat /etc/openvpn/easy-rsa-server/3/pki/index.txt

V	241110145540Z		ACC5AB97F9C4E738AD99B57FF352BF91	unknown	/CN=server

R	221107014502Z	220809131517Z	F953A07AB54009224A331A4A56488058	unknown	/CN=bruce

V	221107022916Z		3645DBC6FED12AC04ABD4A568B3A0768	unknown	/CN=magee

V	221107124656Z		B17B331DC38C53B9ED7C21F301691FB2	unknown	/CN=li

#当前断开客户端连接,magedu用户仍然能连接成功
生成证书吊销列表
每次吊销证书后都需要更新证书吊销列表文件,并且需要重启OpenVPN服务
传到windows上,修改文件后缀为crl,双击就可以打开此文件,看到下面显示信息,改成crl后缀名
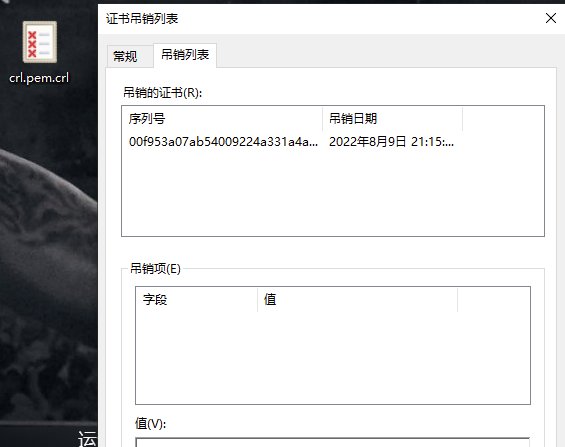
将吊销列表文件发布
#第一次吊销证时需要编辑配置文件调用吊销证书的文件,后续吊销无需此步

[root@openvpn-server-main 3]# vim /etc/openvpn/server.conf

crl-verify /etc/openvpn/easy-rsa-server/3/pki/crl.pem          #末尾添加

[root@openvpn-server-main 3]# systemctl restart openvpn@server.service
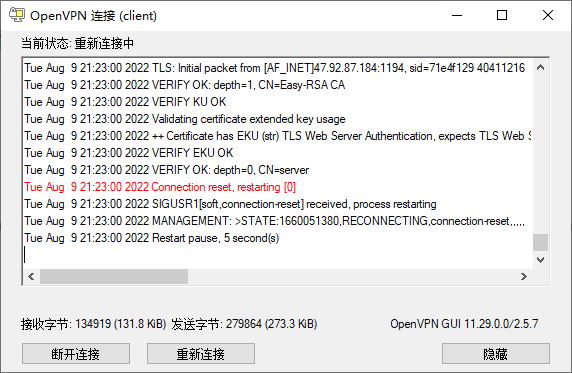
用户端连接失败,吊销成功
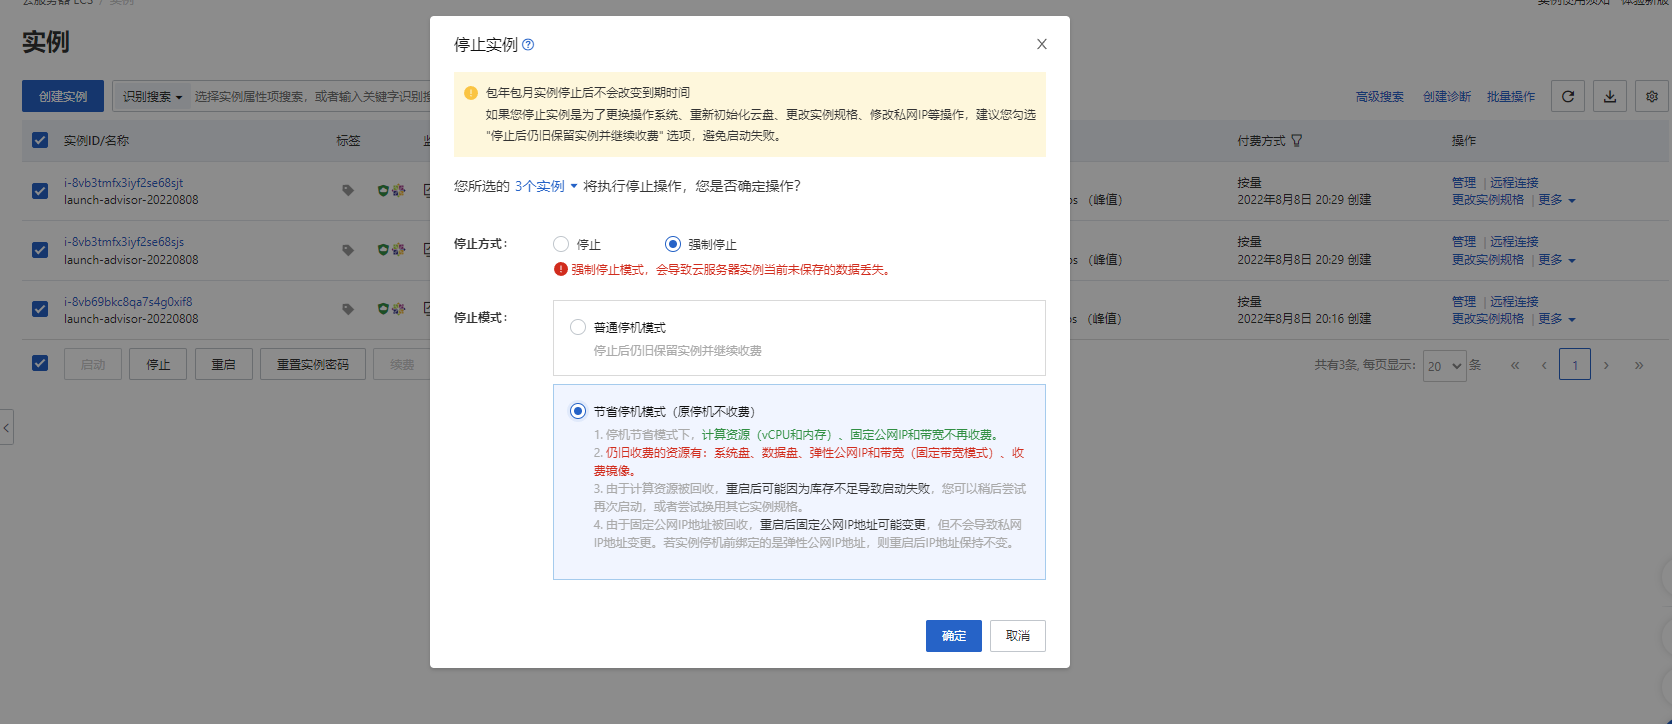
13释放服务器
二、通过编译、二进制安装MySQL5.7
二进制安装MySQL5.7
清华源镜像地址:https://mirrors.tuna.tsinghua.edu.cn/mysql/
进入网站有三个大分类,下面来介绍一下:

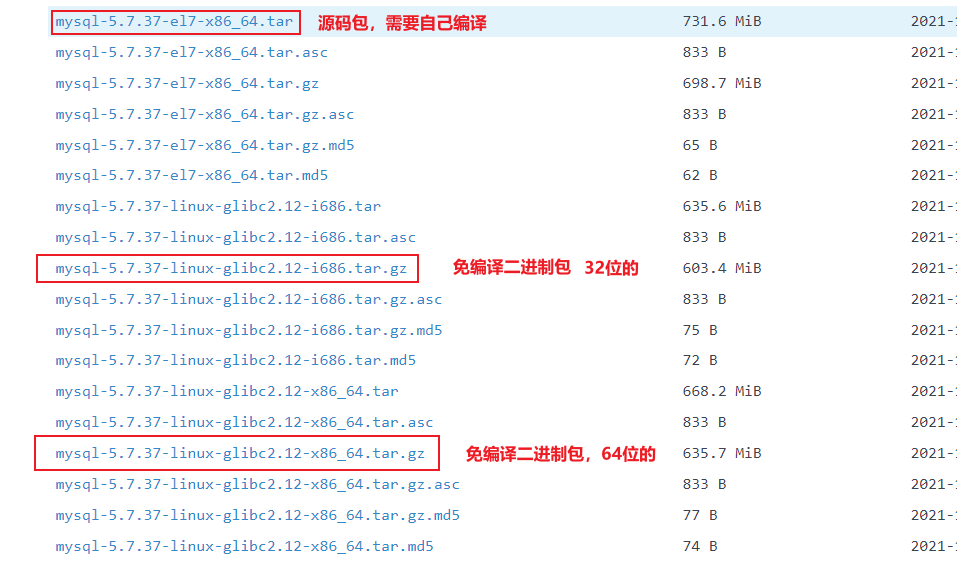 ‘
‘
下载免编译二进制包
1、先查看自己的系统是多少位的
[root@node3 ~]# uname -i

x86_64

12
2、下载对应64位的免编译二进制包
[root@node3 ~]# yum install -y wget

[root@node3 ~]# wget https://mirrors.tuna.tsinghua.edu.cn/mysql/downloads/MySQL-5.7/mysql-5.7.35-linux-glibc2.12-x86_64.tar.gz --no-check-certificate               #有的不需要"--no-check-certificate",表示不用证书检查。
初始化
基本操作
tar -xzvf mysql-5.7.35-linux-glibc2.12-x86_64.tar.gz

[root@centos7 ~]#mv mysql-5.7.35-linux-glibc2.12-x86_64 /usr/local/mysql

[root@centos7 ~]#useradd -s /sbin/nologin mysql      #创建mysql用户,因为启动mysql需要该用户

[root@centos7 ~]#mkdir -p /data/mysql                #创建datadir,数据库文件会放在这里

[root@centos7 ~]#chown -R mysql:mysql /data/mysql/     #更改权限,此文件需要使用mysql用户进行操作,要不然操作会报错

[root@centos7 ~]#vim my.cnf

[mysqld]

datadir=/data/mysql           #存放数据库文件的目录

socket=/tmp/mysql.sock      #mysql的套接字文件路径,套接字用于mysql进程之间通信,用于mysql Server和Client之间通信。

innodb_buffer_pool_size=128M  #缓存池大小

port=3306                     #定义mysql端口,如果不写,默认也是3306

basedir=/usr/local/mysql/     #存档mysql程序的目录

pid_file = /data/mysql/mysql.pid

# Disabling symbolic-links is recommended to prevent assorted security risks

symbolic-links=0

# Settings user and group are ignored when systemd is used.

# If you need to run mysqld under a different user or group,

# customize your systemd unit file for mariadb according to the

# instructions in http://fedoraproject.org/wiki/Systemd

[mysqld_safe]

log-error=/var/log/mariadb/mariadb.log

pid-file=/var/run/mariadb/mariadb.pid

#

# include all files from the config directory

#

!includedir /etc/my.cnf.d
2、创建pid,log文件,并授权
以下操作对应的是/etc/my.cnf文件中的[mysqld_safe]部分
[root@centos7 ~]#mkdir /var/log/mariadb/

[root@centos7 ~]#touch /var/log/mariadb/mariadb.log

[root@centos7 ~]#mkdir /var/run/mariadb/

[root@centos7 ~]#touch /var/run/mariadb/mariadb.pid

[root@centos7 ~]#chown -R mysql:mysql /var/log/mariadb/

[root@centos7 ~]#chown -R mysql:mysql /var/run/mariadb/
3、初始化mysql
[root@centos7 ~]#yum install -y libaio          #安装初始化mysql所依赖的包

[root@centos7 ~]#/usr/local/mysql/bin/mysqld --initialize --user=mysql --basedir=/usr/local/mysql --datadir=/data/mysql

#初始化mysql,初始化成功会在/data/mysql下面生成一大堆目录和文件,该命令执行成功后会有一个临时密码,用于登陆mysql

2022-08-14T05:24:06.349511Z 0 [Warning] TIMESTAMP with implicit DEFAULT value is deprecated. Please use --explicit_defaults_for_timestamp server option (see documentation for more details).

2022-08-14T05:24:06.568705Z 0 [Warning] InnoDB: New log files created, LSN=45790

2022-08-14T05:24:06.602675Z 0 [Warning] InnoDB: Creating foreign key constraint system tables.

2022-08-14T05:24:06.669161Z 0 [Warning] No existing UUID has been found, so we assume that this is the first time that this server has been started. Generating a new UUID: 514ef9bb-1b91-11ed-b444-000c292ae00e.

2022-08-14T05:24:06.669799Z 0 [Warning] Gtid table is not ready to be used. Table 'mysql.gtid_executed' cannot be opened.

2022-08-14T05:24:08.191170Z 0 [Warning] A deprecated TLS version TLSv1 is enabled. Please use TLSv1.2 or higher.

2022-08-14T05:24:08.191191Z 0 [Warning] A deprecated TLS version TLSv1.1 is enabled. Please use TLSv1.2 or higher.

2022-08-14T05:24:08.191795Z 0 [Warning] CA certificate ca.pem is self signed.

2022-08-14T05:24:08.285714Z 1 [Note] A temporary password is generated for root@localhost: ZSb6#qWi*s/(

# A temporary password is generated for root@localhost: ZSb6#qWi*s/(    ZSb6#qWi*s/(  为临时密码
补充:如果发现初始化写错了咋办?直接删除数据库的数据即可
rm -rf /data/mysql/*
3、启动mysql服务
vim .bash_profile

PATH=$PATH:$HOME/bin:/usr/local/mysql/bin       #将/usr/loca/mysql/bin添加上

#刷新变量

source .bash_profile

#复制启动项

cp /usr/local/mysql/support-files/mysql.server /etc/init.d/mysqld

#添加启动项

chkconfig --add mysqld

#开启mysql服务

systemctl restart mysqld

#如果出现See "systemctl status mysqld.service" and "journalctl -xe" for details,检查vim my.cnf配置文件内容

#查看端口3306

[root@node3 ~]# ss -ntpul

...

tcp   LISTEN     0      80                                                 [::]:3306                                                           [::]:*                   users:(("mysqld",pid=1173,fd=28))

...
[root@centos7 ~]#systemctl status mysqld

● mysqld.service - LSB: start and stop MySQL

   Loaded: loaded (/etc/rc.d/init.d/mysqld; bad; vendor preset: disabled)

   Active: active (running) since Sun 2022-08-14 13:53:35 CST; 2h 5min ago

     Docs: man:systemd-sysv-generator(8)

  Process: 835 ExecStart=/etc/rc.d/init.d/mysqld start (code=exited, status=0/SUCCESS)

   CGroup: /system.slice/mysqld.service

           ├─ 865 /bin/sh /usr/local/mysql//bin/mysqld_safe --datadir=/data/mysql --pid-file=/data/mysql/centos7.magedu.org.pid

           └─1173 /usr/local/mysql/bin/mysqld --basedir=/usr/local/mysql/ --datadir=/data/mysql --plugin-dir=/usr/local/mysql//lib/plugin --user=mysql --log-error=/...
4、设置新密码,并登录进mysql
[root@centos7 ~]#mysqladmin -uroot -p`ZSb6#qWi*s/(` passwd `123456`

[root@node3 ~]# mysql -uroot -p123456

mysql: [Warning] Using a password on the command line interface can be insecure.

Welcome to the MySQL monitor.  Commands end with ; or \g.

Your MySQL connection id is 4

Server version: 5.7.35 MySQL Community Server (GPL)

Copyright (c) 2000, 2021, Oracle and/or its affiliates.

Oracle is a registered trademark of Oracle Corporation and/or its

affiliates. Other names may be trademarks of their respective

owners.

Type 'help;' or '\h' for help. Type '\c' to clear the current input statement.

mysql>         #可以看到成功登陆

mysql> create database test;        #创建个数据库

Query OK, 1 row affected (0.00 sec)
三、编译安装MySQL5.7
#安装相关依赖包

[root@centos17 ~]#yum -y install gcc gcc-c++ cmake bison bison-devel zlib-devel libcurl-devel libarchive-devel boost-devel  ncurses-devel gnutls-devel libxml2-devel openssl-devel libevent-devel libaio-devel perl-Data-Dumper ncurses-static ncurses-term

#做准备用户和数据目录

[root@centos17 ~]#useradd -r -s /sbin/nologin -d /data/mysql mysql

#准备数据库目录

[root@centos17 ~]#mkdir /data/mysql

[root@centos17 ~]#chown mysql.mysql /data/mysql

#下载并解压缩源码包,需带boost版本

[root@centos17 ~]#wget https://cdn.mysql.com/archives/mysql-5.7/mysql-boost-5.7.36.tar.gz

[root@centos17 ~]#tar xf mysql-boost-5.7.36.tar.gz -C /usr/local/src/

#源码编译安装 MySQL,需增加-DWITH_BOOST这个选项,与mysql5.6不同点

[root@centos27 ~]#cd /usr/local/src/mysql-5.7.36/

[root@centos27 ~]#cmake . \

-DCMAKE_INSTALL_PREFIX=/apps/mysql \

-DMYSQL_DATADIR=/data/mysql/ \

-DSYSCONFDIR=/etc/ \

-DMYSQL_USER=mysql \

-DWITH_INNOBASE_STORAGE_ENGINE=1 \

-DWITH_ARCHIVE_STORAGE_ENGINE=1 \

-DWITH_BLACKHOLE_STORAGE_ENGINE=1 \

-DWITH_PARTITION_STORAGE_ENGINE=1 \

-DWITHOUT_MROONGA_STORAGE_ENGINE=1 \

-DWITH_DEBUG=0 \

-DWITH_READLINE=1 \

-DWITH_SSL=system \

-DWITH_ZLIB=system \

-DWITH_LIBWRAP=0 \

-DENABLED_LOCAL_INFILE=1 \

-DMYSQL_UNIX_ADDR=/data/mysql/mysql.sock \

-DDEFAULT_CHARSET=utf8 \

-DDEFAULT_COLLATION=utf8_general_ci \

-DWITH_BOOST=./boost/boost_1_59_0

提示:如果出错,执行rm -f CMakeCache.txt

#编译需要较长时间,内存4G以上,CPU 核数越多越好

[root@centos17 mysql-5.7.36]#make && make install

#准备环境变量

[root@centos17 ~]#echo 'PATH=/apps/mysql/bin:$PATH' > /etc/profile.d/mysql.sh

[root@centos17 ~]#. /etc/profile.d/mysql.sh

#生成数据库文件

[root@centos17 ~]#cd /apps/mysql/bin/

[root@centos17 bin]#./mysqld --initialize-insecure --user=mysql --datadir=/data/mysql

#准备配置文件

[root@centos17 ~]#cat > /etc/my.cnf <<EOF

[mysqld]

datadir=/data/mysql

skip_name_resolve=1

socket=/data/mysql/mysql.sock

log-error=/data/mysql/mysql.log

pid-file=/data/mysql/mysql.pid

skip-grant-tables		#比5.6多这一行

EOF

#准备启动脚本,并启动服务

[root@centos17 ~]#cp -b /apps/mysql/support-files/mysql.server /etc/init.d/mysqld

[root@centos17 ~]#chkconfig --add mysqld

[root@centos17 ~]#service mysqld start

#安全初始化

[root@centos17 ~]#mysql_secure_installation

#登录

[root@centos27 bin]#mysql

Welcome to the MySQL monitor.  Commands end with ; or \g.

Your MySQL connection id is 2

Server version: 5.7.36 Source distribution

Copyright (c) 2000, 2021, Oracle and/or its affiliates.

Oracle is a registered trademark of Oracle Corporation and/or its

affiliates. Other names may be trademarks of their respective

owners.

Type 'help;' or '\h' for help. Type '\c' to clear the current input statement.

mysql>
二进制安装mariadb10.4
#安装相关包

[root@centos8 ~]#yum install libaio numactl-libs ncurses-compat-libs ncurses-c++-libs -y

#用户和组

[root@centos8 ~]#groupadd mysql

[root@centos8 ~]#useradd -r -g mysql -s /bin/false mysql

#准备数据库目录

[root@centos8 ~]#mkdir /data/mysql

[root@centos8 ~]#chown mysql.mysql /data/mysql

#下载mariadb并解压改权限

[root@centos8 ~]#wget https://mirrors.aliyun.com/mariadb/mariadb-10.9.2/bintar-linux-systemd-x86_64/mariadb-10.9.2-linux-systemd-x86_64.tar.gz

[root@centos8 ~]#tar xf mariadb-10.9.2-linux-systemd-x86_64.tar.gz -C /usr/local/

[root@centos8 ~]#cd /usr/local

[root@centos8 local]#ln -s mariadb-10.9.2-linux-systemd-x86_64/ mysql

[root@centos8 local]#chown -R root.root /usr/local/mysql/

#准备环境变量

[root@centos8 local]#echo 'PATH=/usr/local/mysql/bin:$PATH' > /etc/profile.d/mysql.sh

[root@centos8 local]#. /etc/profile.d/mysql.sh

#准备配置文件

[root@centos8 local]#cat > /etc/my.cnf <<EOF

[mysqld]

datadir=/data/mysql

skip_name_resolve=1

socket=/data/mysql/mysql.sock

log-error=/data/mysql/mysql.log

pid-file=/data/mysql/mysql.pid

[client]

socket=/data/mysql/mysql.sock

EOF

[root@centos8 local]#cd mysql

[root@centos8 mysql]#pwd

/usr/local/mysql

#生成 root 空密码

[root@centos8 mysql]#scripts/mariadb-install-db --datadir=/data/mysql --user=mysql

Installing MariaDB/MySQL system tables in '/data/mysql' ...

OK

#准备服务脚本和启动

[root@centos8 mysql]#cp /usr/local/mysql/support-files/mysql.server /etc/init.d/mysqld

[root@centos8 mysql]#chkconfig --add mysql

error reading information on service mysql: No such file or directory

[root@centos8 mysql]#chkconfig --add mysqld

[root@centos8 mysql]#service mysqld start

Starting mysqld (via systemctl):                           [  OK  ]

#修改前面生成的空密码为指定密码

[root@centos8 mysql]#mysqladmin -uroot password magedu

#再次登陆

[root@centos8 mysql]#mysql -u root -pmagedu

Welcome to the MariaDB monitor.  Commands end with ; or \g.

Your MariaDB connection id is 5

Server version: 10.9.2-MariaDB MariaDB Server

Copyright (c) 2000, 2018, Oracle, MariaDB Corporation Ab and others.

Type 'help;' or '\h' for help. Type '\c' to clear the current input statement.

MariaDB [(none)]> Ctrl-C -- exit!
点击查看代码
N63050 第十周运维作业的更多相关文章
- 20155326 第十周课下作业-IPC
20155326 第十周课下作业-IPC 学习题目: 研究Linux下IPC机制:原理,优缺点,每种机制至少给一个示例,提交研究博客的链接 共享内存 管道 FIFO 信号 消息队列 学习过程 -IPC ...
- 第十周课下作业-IPC
第十周课下作业-IPC 题目:研究Linux下IPC机制:原理,优缺点,每种机制至少给一个示例,提交研究博客的链接 共享内存 管道 FIFO 信号 消息队列 共享内存 共享内存允许两个或多个进程进程共 ...
- 2017-2018-1 20155320第十周课下作业-IPC
2017-2018-1 20155320第十周课下作业-IPC 研究Linux下IPC机制:原理,优缺点,每种机制至少给一个示例,提交研究博客的链接 共享内存 管道 FIFO 信号 消息队列 共享内存 ...
- 20155339 《信息安全系统设计》第十周课下作业-IPC
20155339 <信息安全系统设计>第十周课下作业-IPC 共享内存 共享内存是在多个进程之间共享内存区域的一种进程间的通信方式,由IPC为进程创建的一个特殊地址范围,它将出现在该进程的 ...
- 20155322 2017-2018-1《信息安全系统设计》第十周 课下作业-IPC
20155322 2017-2018-1<信息安全系统设计>课下作业-IPC 作业内容 研究Linux下IPC机制:原理,优缺点,每种机制至少给一个示例,提交研究博客的链接. 共享内存 管 ...
- 第十周Java实验作业
实验十 泛型程序设计技术 实验时间 2018-11-1 1.实验目的与要求 (1) 理解泛型概念: 泛型:也称参数化类型,就是在定义类,接口和方法时,通过类型参数只是将要处理的类型对象.(如Arra ...
- 老男孩python自动化运维作业2
拿到要求真不知道怎么写,不能还要写个商城页面吧: 最后还是用了input()模拟用户操作吧- -!不就操作个字典吗(字典模拟商品数据). python版本: >>>import sy ...
- 老男孩python自动化运维作业1
#!/usr/bin/env pthon #字典操作三级菜单 “b”返回上一级菜单,“q”退出. menu={"BJ":{"cp":{1:1,2:2,3:3}, ...
- 20165234 《Java程序设计》第十周课下作业
相关知识点的总结 泛型 Java 泛型的主要目的是可以建立具有类型安全的集合框架,如链表.散列映射等数据结构. 可以使用“class 名称<泛型列表>”声明一个类,为了和普通的类有所区别, ...
- 20155219 第十周课下作业-IPC
题目:研究Linux下IPC机制:原理,优缺点,每种机制至少给一个示例,提交研究博客的链接 共享内存 管道 FIFO 信号 消息队列 1.共享内存 共享内存就是允许两个不相关的进程访问同一个逻辑内存. ...
随机推荐
- [OpenCV实战]11 基于OpenCV的二维码扫描器
目录 1 二维码(QRCode)扫描 2 结果 3 参考 在这篇文章中,我们将看到如何使用OpenCV扫描二维码.您将需要OpenCV3.4.4或4.0.0及更高版本来运行代码. 1 二维码(QRCo ...
- Linux基础操作-01
Linux操作系统 很多IC设计的EDA工具都是在Linux系统中进行运行的,在IC设计的从业者都需要熟练掌握Linux操做.可以不掌握Linux原理,但是操作要熟练. Linux 操作系统的特点 多 ...
- CSS中知
1CSS特性 1.3优先级 1.4权重叠加计算 2Chrome调试工具 2.1查错流程 3CSS盒子模型 3.1内容的宽度和高度 3.2边框(border)-连写形式 ...
- VSCode 创建flutter项目和运行、调试、热更新项目
1.创建--在終端輸入命令 flutter create 项目名 2.普通运行--在终端输入命令 flutter run 3.打开你的虚拟机或者是连上手机等待页面加载 4.普通運行情況下修改代碼后想要 ...
- 视图,触发器,存储过程,流程控制等MySQL小知识点
视图,触发器,存储过程,流程控制等MySQL小知识点 一.SQL注入问题 登录: import pymysql conn = pymysql.connect( host='127.0.0.1', po ...
- Cubase11/12 安装破解图文教程 【2022年12月29日亲测有效】
Cubase11/12安装破解图文教程 下载安装包工具 Cubase官网:点击官网进行下载 Cubase11/12工具包:点击立即下载 Cubase12完成破解教程:点击立即查看 安装Cubase11 ...
- MQ 消息队列 比较
为什么需要消息队列 削峰 业务系统在超高并发场景中,由于后端服务来不及同步处理过多.过快的请求,可能导致请求堵塞,严重时可能由于高负荷拖垮Web服务器. 为了能支持最高峰流量,我们通常采取短平快的方式 ...
- 学习Java Day20
类的导入的第一种方式就是使用完全限定名,就是包名后面跟着类名 java.time.LocalDate totay=java.time.LocalDate.now(); 另一种可以直接用import j ...
- 2021级《JAVA语言程序设计》上机考试试题4
现在就是写学生,学生查看个人信息,,修改个人密码,学生功能页的页面,代码最一开始给了 然后,这三个比较紧密,所以一起写了 学生功能页 <%@ page language="java&q ...
- Nacos服务发现原理分析
微服务将自己的实例注册到nacos注册中心,nacos服务端存储了注册列表,然后通过ribbon调用服务,具体是如何调用?如果nacos服务挂了,还能正常调用服务吗?调用的服务列表发生变化,调用方是如 ...
