Postman如何通过xmysql工具的Restful API 接口访问MySQL
- GreatSQL社区原创内容未经授权不得随意使用,转载请联系小编并注明来源。
导语
有时候用 Postman 接口测试需要获取MySQL的查询结果做接口输出的校验,这里介绍下 Postman 通过 Restful API 接口访问 MySQL 的工具xmysql的使用方法。
步骤
一、使用nmp安装xmysql
注:npm的安装和配置自行百度,这里主要讲xmysql,就不赘述了
C:\Users\wmp>node -v

v12.16.3

C:\Users\wmp>

C:\Users\wmp> npm install -g xmysql

C:\Users\wmp\AppData\Roaming\npm\xmysql -> C:\Users\wmp\AppData\Roaming\npm\node_modules\xmysql\bin\index.js

> es5-ext@0.10.59 postinstall C:\Users\wmp\AppData\Roaming\npm\node_modules\xmysql\node_modules\es5-ext

> node -e "try{require('./_postinstall')}catch(e){}"

+ xmysql@0.5.1

added 131 packages from 68 contributors in 22.806s
安装完输入xmysql可以查看具体参数,同时也表示安装成功
C:\Users\wmp>xmysql

Usage: index [options]

Options:

  -V, --version            output the version number

  -h, --host <n>           hostname of database / localhost by default

  -u, --user <n>           username of database / root by default

  -p, --password <n>       password of database / empty by default

  -d, --database <n>       database schema name

  -r, --ipAddress <n>      IP interface of your server / localhost by default

  -n, --portNumber <n>     port number for app / 3000 by default

  -o, --port <n>           port number for mysql / 3306 by default

  -S, --socketPath <n>     unix socket path / not used by default

  -s, --storageFolder <n>  storage folder / current working dir by default / available only with local

  -i, --ignoreTables <n>   comma separated table names to ignore

  -a, --apiPrefix <n>      api url prefix / "/api/" by default

  -y, --readOnly           readonly apis / false by default

  -c, --useCpuCores <n>    use number of CPU cores (using cluster) / 1 by default

  -h, --help               output usage information

  Examples:

    $ xmysql -u username -p password -d databaseSchema

Error: password for database is missing

Error: database name is missing

C:\Users\wmp>
连接数据库:
xmysql -h host_name -o port -u user_name -p user_password -d database_name
C:\Users\wmp>xmysql -h 192.168.5.103 -u root -p 123456 -o 3301 -d test

          Generating REST APIs at the speed of your thought..

 - - - - - - - - - - - - - - - - - - - - - - - - - - - - - -

          Database              :    test

          Number of Tables      :    3   【test库表的数量】

          REST APIs Generated   :    62  【生成的api数量】

          Xmysql took           :    0 seconds

          API's base URL        :    localhost:3000   【api的访问方式,端口3000可以通过参数 -n进行修改为其他】

 - - - - - - - - - - - - - - - - - - - - - - - - - - - - - -
xmysql的默认端口是3000,下面用postman调用api的方式试下数据库的增删改查(注: 在postman中执行sql语句时,cmd窗口和msqll都不可以关闭)
API Overview
| HTTP Type | API URL | Comments |
|---|---|---|
| GET | / | 获取所有 REST API |
| GET | /api/tableName | 列出表的行 |
| POST | /api/tableName | 创建一个新行 |
| PUT | /api/tableName | 用新行替换现有行 |
| POST | /api/tableName/bulk | 创建多行 - 在请求正文中发送对象数组 |
| GET | /api/tableName/bulk | 列出多行 - /api/tableName/bulk?_ids=1,2,3 |
| DELETE | /api/tableName/bulk | 删除多行 - /api/tableName/bulk?_ids=1,2,3 |
| GET | /api/tableName/:id | 按主键检索一行 |
| PATCH | /api/tableName/:id | 按主键更新行元素 |
| DELETE | /api/tableName/:id | 按主键删除一行 |
| GET | /api/tableName/findOne | 作为列表工作,但获得单个记录匹配条件 |
| GET | /api/tableName/count | 计算表中的行数 |
| GET | /api/tableName/distinct | 表中的不同行 - /api/tableName/distinct?_fields=col1 |
| GET | /api/tableName/:id/exists | 是否存在行 |
| GET | /api/parentTable/:id/childTable | 获取具有父表外键的子表行列表 |
| GET | /api/tableName/aggregate | 汇总数字列的结果 |
| GET | /api/tableName/groupby | 按列的结果分组 |
| GET | /api/tableName/ugroupby | 使用一次调用按结果进行多个分组 |
| GET | /api/tableName/chart | 基于 (min,max,step) 或 (step array) 或 (automagic) 的数值列分布 |
| GET | /api/tableName/autochart | 与 Chart 相同,但会自动识别哪些是数字列 |
| GET | /api/xjoin | 处理连接 |
| GET | /dynamic | 使用参数执行动态 mysql 语句 |
| GET | /upload | 上传单个文件 |
| GET | /uploads | 上传多个文件 |
| GET | /download | 下载文件 |
| GET | /api/tableName/describe | 描述每个表的列 |
| GET | /api/tables | 获取数据库中的所有表 |
| GET | /_health | 获取进程和 mysql 的运行状况 |
| GET | /_version | 获取 Xmysql、mysql、node 的版本 |
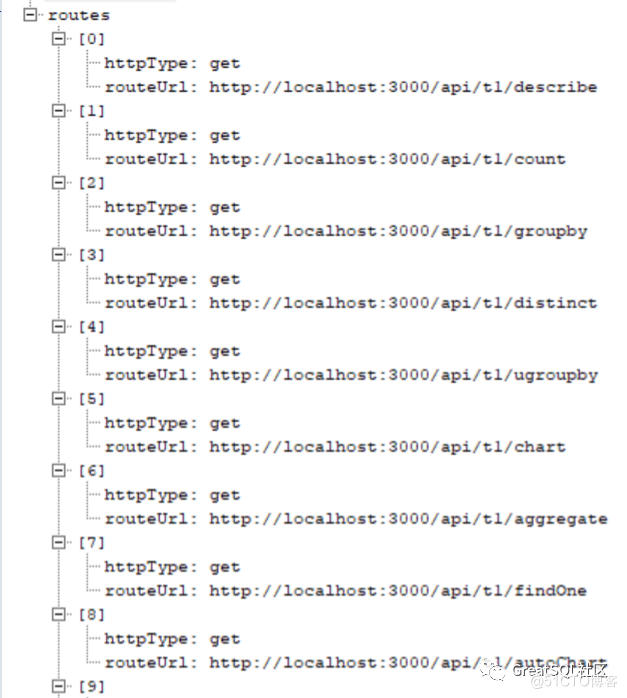
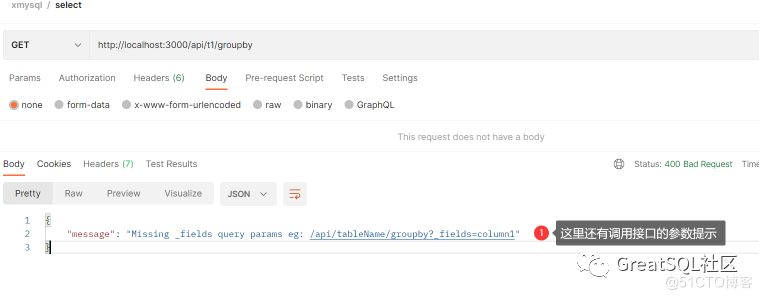
查看对象表下所有可用的接口,可以参数调用并查看结果
以下是t1表可用的接口:
用t1表做一个简单的查询测试:

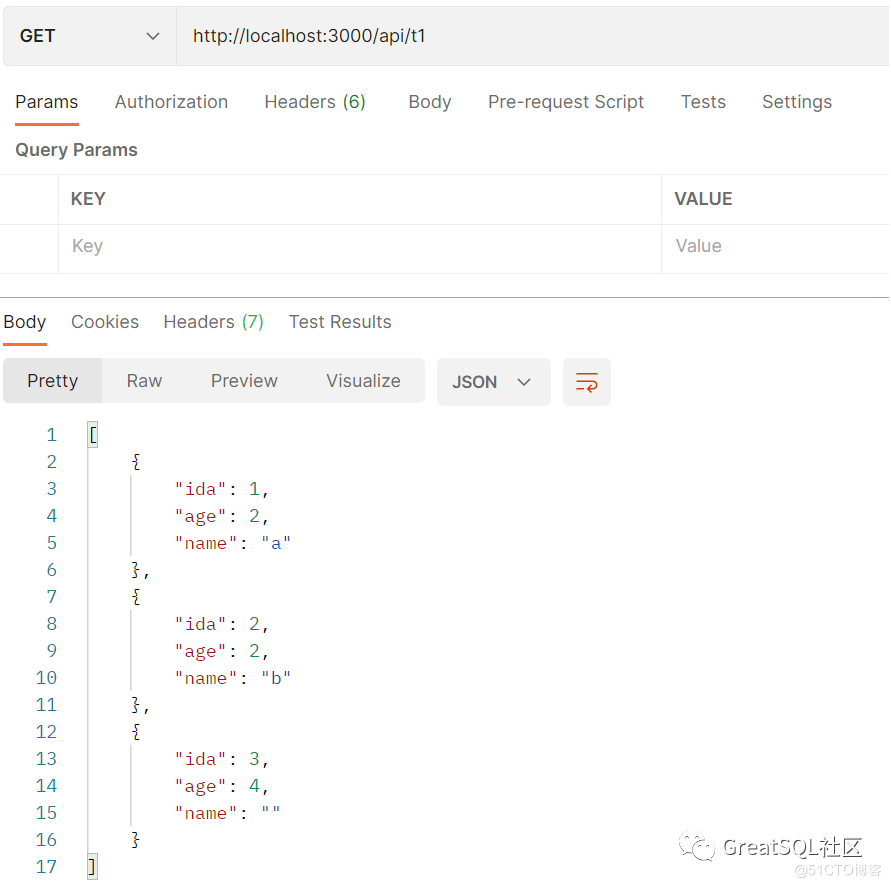
1、查询t1的整表数据
GET /api/t1

SQL: select  *  from `t1` ;
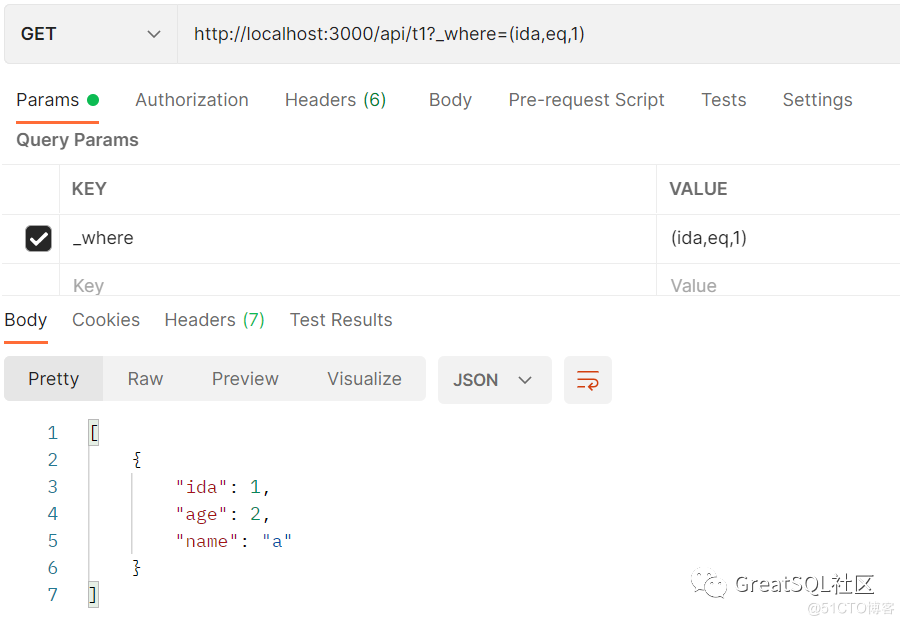
2、带条件查询
GET /api/t1?_where=(ida,eq,1)

SQL: select  *  from `t1`  where `ida`=1;
3、分页查询
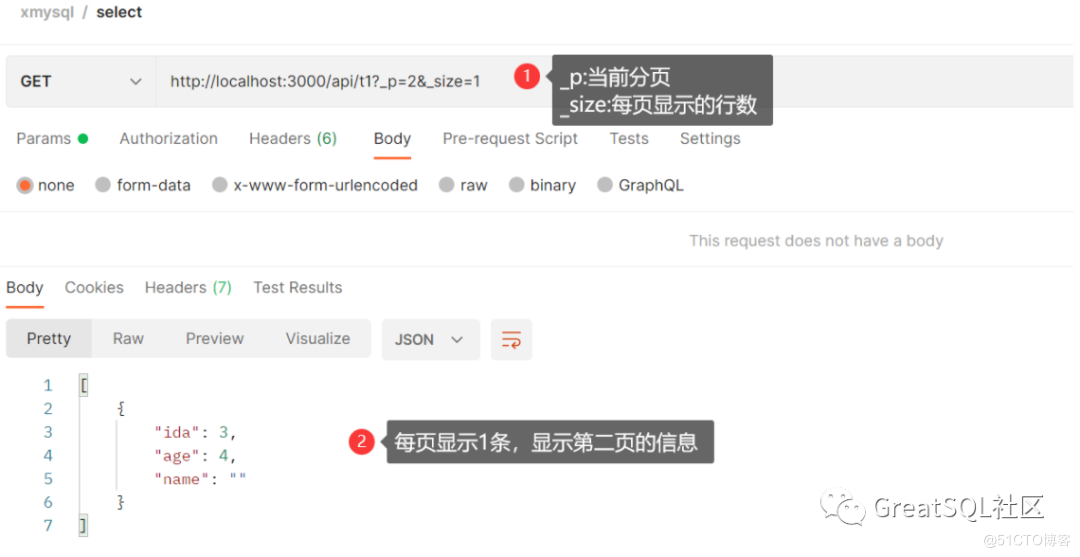
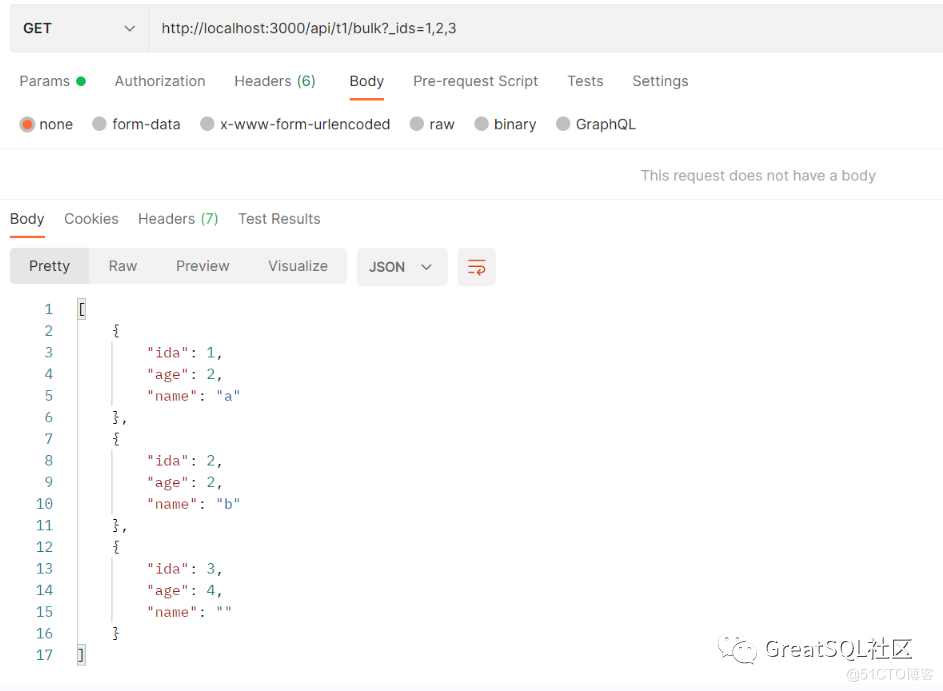
4、in查询
GET /api/t1/bulk?_ids=1,2,3

SQL: select  *  from `t1`  where `ida` in (1,2,3)  limit 0,20;
其他的增删改参考上述的API Overview,下面演示下xmysql在postman接口测试中的应用:
应用一:接口测试数据校验
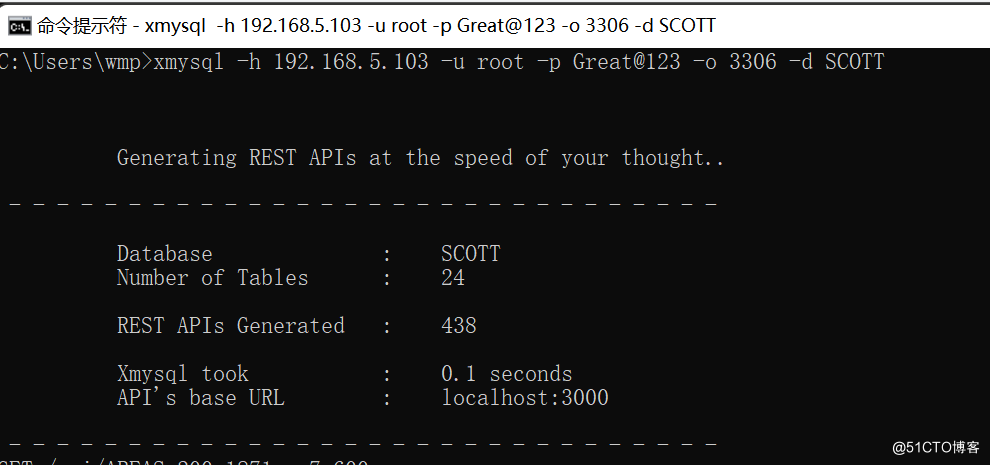
- 启动xmysql服务:(测试时保持服务启动状态不要关闭)
xmysql -h 192.168.5.103 -u root -p Great@123 -o 3306 -d SCOTT
- 创建postman测试collection,包含测试接口和xmysql获取mysql数据接口
#测试接口1:获取全国行政区划

http://127.0.0.1:8369/query?fid={{pregion_code}}

#接口2:xmysql获取mysql数据接口

http://localhost:3000/api/AREAS?_where=(parent_region_code,eq,{{pregion_code}})
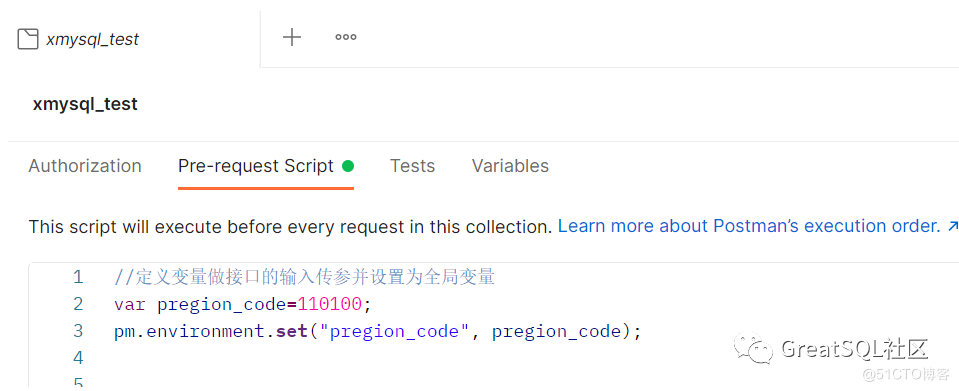
接口参数化,可在postman collection中设置全局参数并赋值
//定义变量做接口的输入传参并设置为全局变量

var pregion_code=110100;

pm.environment.set("pregion_code", pregion_code);
接口输出参数化设置:
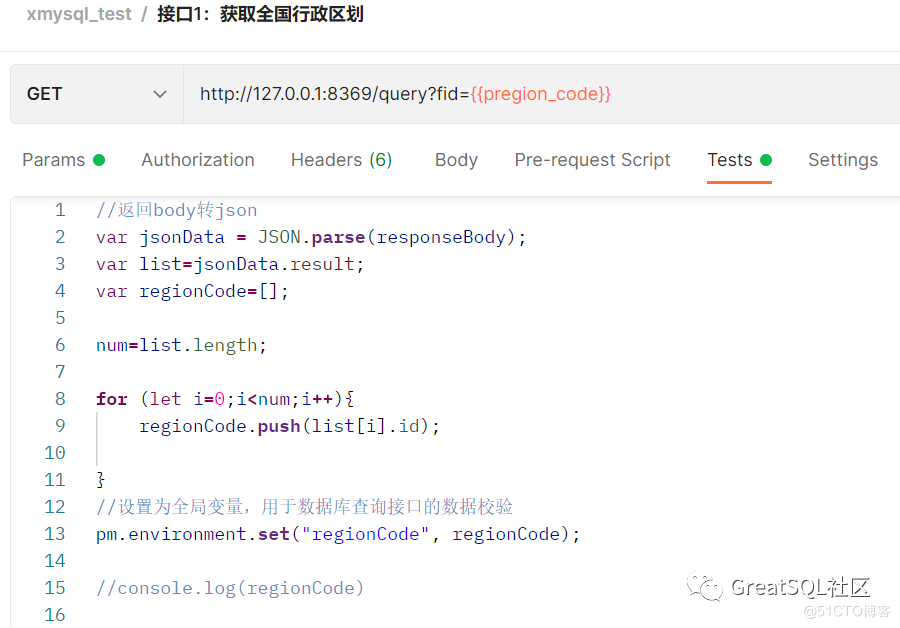
在接口1Tests中用js脚本对接口输出结果需要断言的部分转参数并设置环境变量,以便在接口2的数据库输出中进行比较
//返回body转json

var jsonData = JSON.parse(responseBody);

var list=jsonData.result;

var regionCode=[];

num=list.length;

for (let i=0;i<num;i++){

    regionCode.push(list[i].id);

}

//设置为全局变量,用于数据库查询接口的数据校验

pm.environment.set("regionCode", regionCode);

//console.log(regionCode)
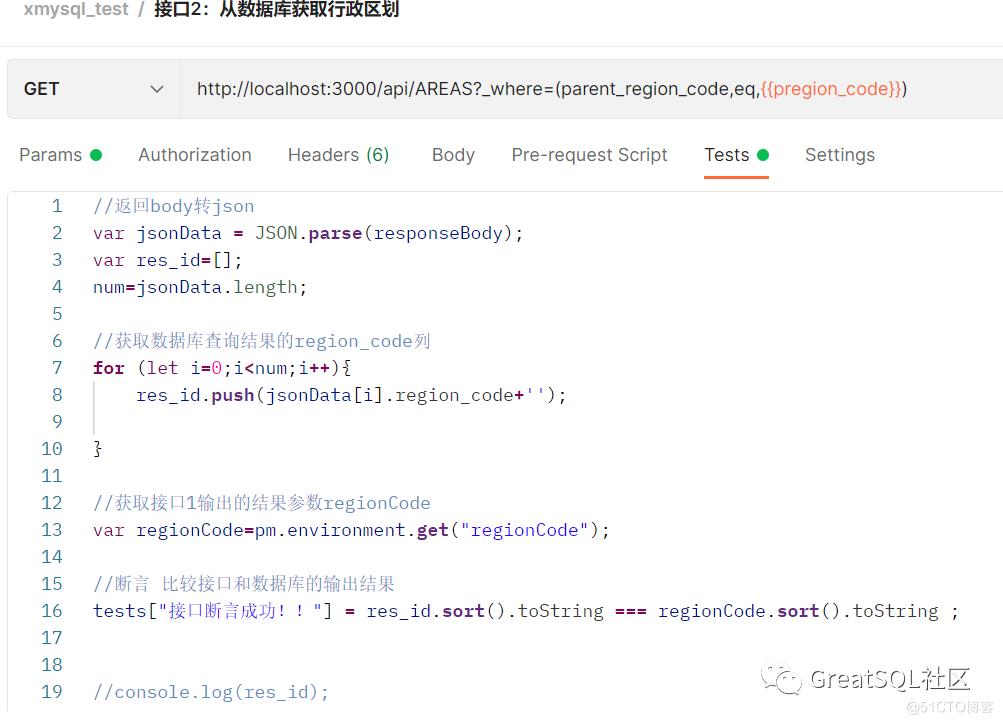
接口2Tests中用js脚本对数据库查询到的json脚本进行处理,获取需要的数据,参数化后与接口1的输出进行比较
//返回body转json

var jsonData = JSON.parse(responseBody);

var res_id=[];

num=jsonData.length;

//获取数据库查询结果的region_code列

for (let i=0;i<num;i++){

    res_id.push(jsonData[i].region_code+'');

}

//获取接口1输出的结果参数regionCode

var regionCode=pm.environment.get("regionCode");

//断言 比较接口和数据库的输出结果

tests["接口断言成功!!"] = res_id.sort().toString === regionCode.sort().toString ;

//console.log(res_id);
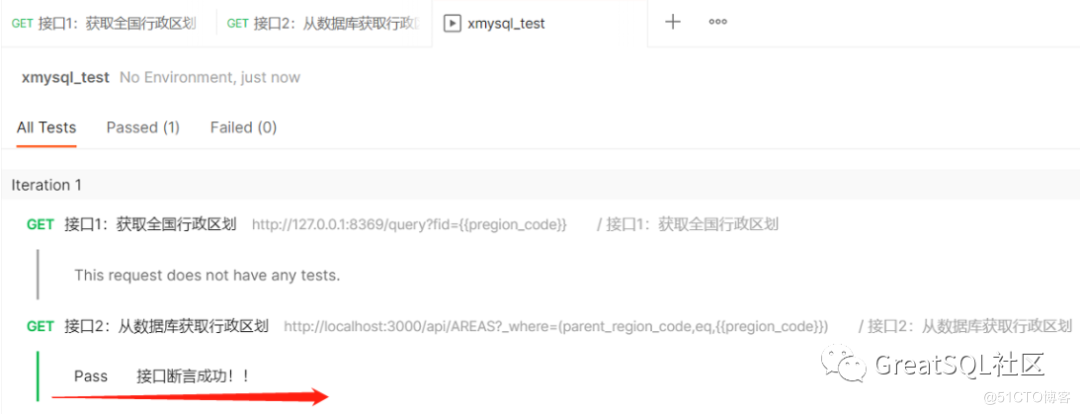
- 运行测试collection
应用二:利用postman+xmysql实现MySQL快速生成大量测试数据
建表脚本
drop table if exists t1;

CREATE TABLE  t1

(

id int NOT NULL AUTO_INCREMENT PRIMARY KEY comment '用户ID',

person_name varchar(30) comment '用户名称'

)
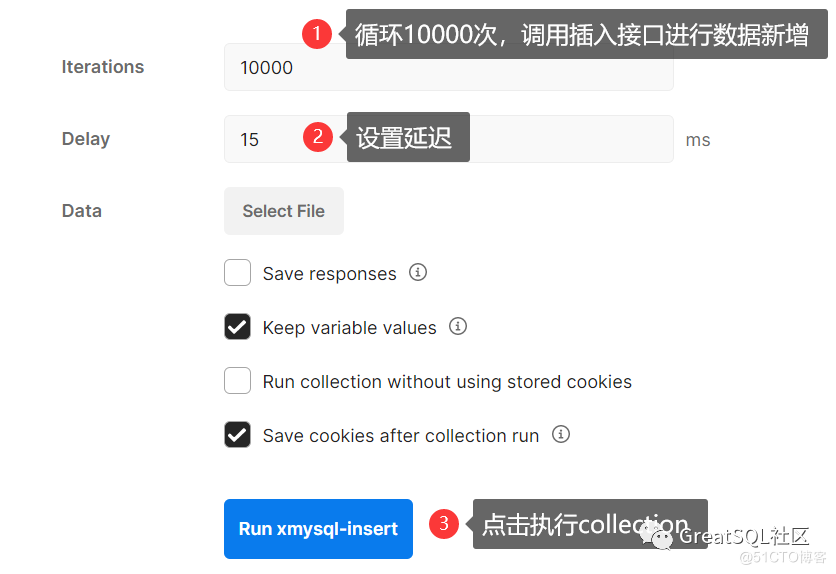
这里演示插入10000条:
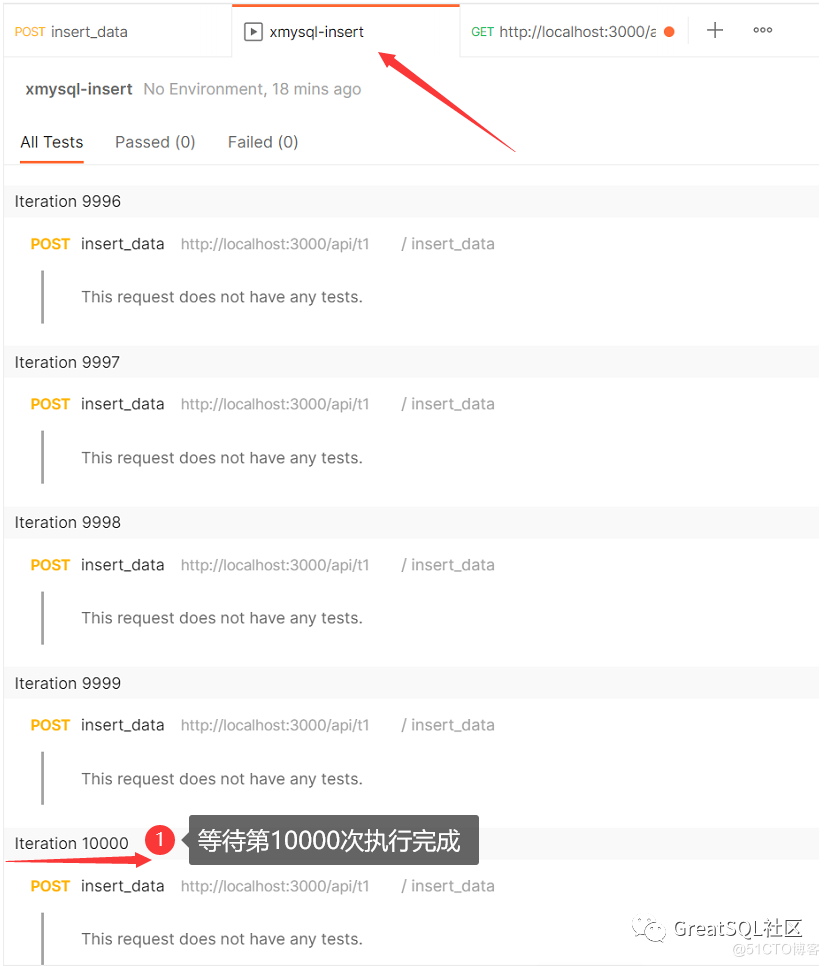
- 创建insert 接口


- 设置collection并执行
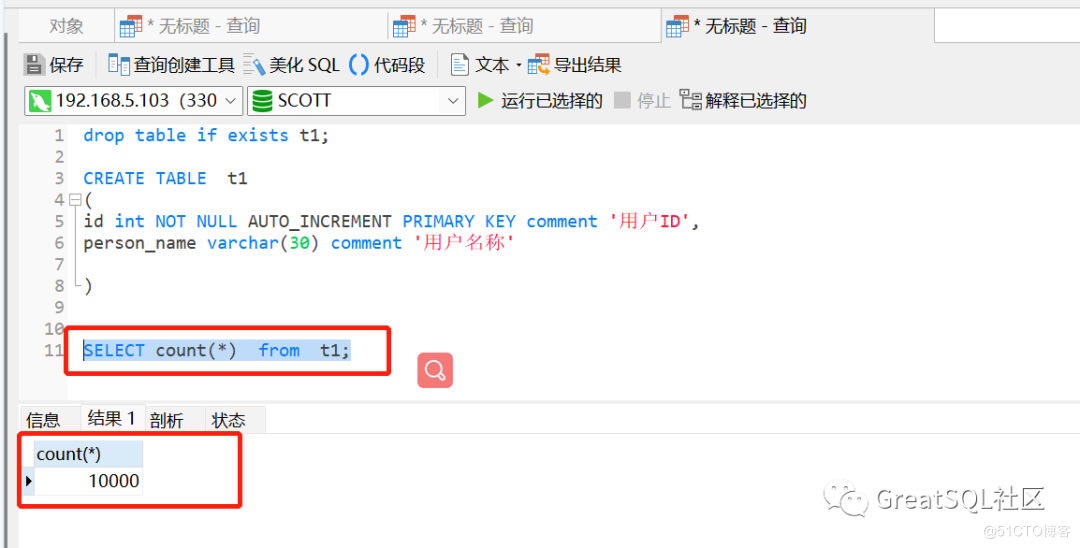
3、执行完毕,查看表数量
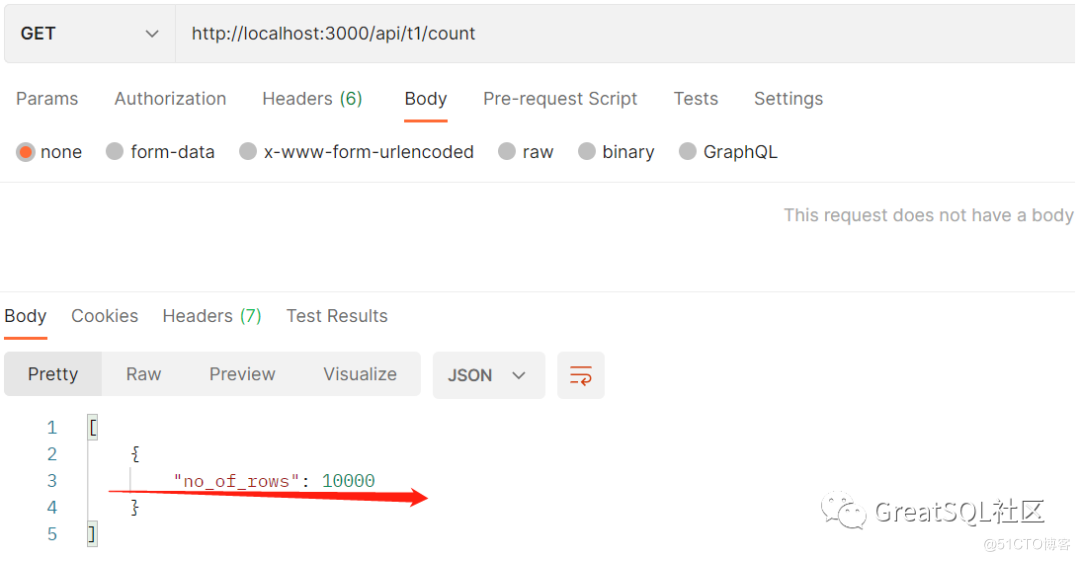
调用表行数查询接口查询结果:
声明:xmysql工具主要用于测试环境,结合接口测试等,主要用于内部测试,在生产还是不建议使用,因为这款工具会造成严重的数据安全问题。
参考文档:
https://gitee.com/thinkyoung/xmysql
Enjoy GreatSQL
文章推荐:
面向金融级应用的GreatSQL正式开源
https://mp.weixin.qq.com/s/cI_wPKQJuXItVWpOx_yNTg
Changes in GreatSQL 8.0.25 (2021-8-18)
https://mp.weixin.qq.com/s/qcn0lmsMoLtaGO9hbpnhVg
MGR及GreatSQL资源汇总
https://mp.weixin.qq.com/s/qXMct_pOVN5FGoLsXSD0MA
GreatSQL MGR FAQ
https://mp.weixin.qq.com/s/J6wkUpGXw3YkyEUJXiZ9xA
在Linux下源码编译安装GreatSQL/MySQL
https://mp.weixin.qq.com/s/WZZOWKqSaGSy-mpD2GdNcA
关于 GreatSQL
GreatSQL是由万里数据库维护的MySQL分支,专注于提升MGR可靠性及性能,支持InnoDB并行查询特性,是适用于金融级应用的MySQL分支版本。
Gitee:
https://gitee.com/GreatSQL/GreatSQL
GitHub:
https://github.com/GreatSQL/GreatSQL
Bilibili:
https://space.bilibili.com/1363850082/video
微信&QQ群:
可搜索添加GreatSQL社区助手微信好友,发送验证信息“加群”加入GreatSQL/MGR交流微信群
QQ群:533341697
微信小助手:wanlidbc
本文由博客一文多发平台 OpenWrite 发布!
Postman如何通过xmysql工具的Restful API 接口访问MySQL的更多相关文章
- Java 调用Restful API接口的几种方式--HTTPS
摘要:最近有一个需求,为客户提供一些Restful API 接口,QA使用postman进行测试,但是postman的测试接口与java调用的相似但并不相同,于是想自己写一个程序去测试Restful ...
- SpringMVC Restful api接口实现
[前言] 面向资源的 Restful 风格的 api 接口本着简洁,资源,便于扩展,便于理解等等各项优势,在如今的系统服务中越来越受欢迎. .net平台有WebAPi项目是专门用来实现Restful ...
- 整合swagger2生成Restful Api接口文档
整合swagger2生成Restful Api接口文档 swagger Restful文档生成工具 2017-9-30 官方地址:https://swagger.io/docs/specificati ...
- Spring Boot入门系列(二十)快速打造Restful API 接口
spring boot入门系列文章已经写到第二十篇,前面我们讲了spring boot的基础入门的内容,也介绍了spring boot 整合mybatis,整合redis.整合Thymeleaf 模板 ...
- 用 shell 脚本做 restful api 接口监控
问题的提出 基于历史原因,公司有一个"三无"采集服务--无人员.无运维.无监控--有能力做的部门不想接.接了的部门没能力.于是就一直这样裸奔,直到前几天一个依赖于这个采集服务的大数 ...
- 初识restful api接口
一.restful api接口举例 实现功能 传统方式 restful方式 url HTTP方法 url HTTP方法 查询 /user/query?name=knyel GET /user?name ...
- 使用Flask设计带认证token的RESTful API接口
大数据时代 Just a record. 使用Flask设计带认证token的RESTful API接口[翻译] 上一篇文章, 使用python的Flask实现一个RESTful API服务器端 简 ...
- Spring Boot入门系列(二十一)如何优雅的设计 Restful API 接口版本号,实现 API 版本控制!
前面介绍了Spring Boot 如何快速实现Restful api 接口,并以人员信息为例,设计了一套操作人员信息的接口.不清楚的可以看之前的文章:https://www.cnblogs.com/z ...
- Restful API 接口设计标准及规范
Restful API 接口设计标准以及规范 RESTful概念 理解和评估以网络为基础的应用软件的架构设计,得到一个功能强.性能好.适宜通信的架构.REST指的是一组架构约束条件和原则." ...
随机推荐
- 513. Find Bottom Left Tree Value - LeetCode
Question 513. Find Bottom Left Tree Value Solution 题目大意: 给一个二叉树,求最底层,最左侧节点的值 思路: 按层遍历二叉树,每一层第一个被访问的节 ...
- CentOS6.x静默安装Oracle12c
一.准备 1.1 安装环境 系统要求 内存 > 2G 安装目录空间 > 6.5G /tmp目录空间 > 1G 操作系统 cat /etc/redhat-release 用rpm命令确 ...
- 汇编语言中loop循环编程
(1)向内存0:200~ 0:23f依次传送数据0~63(3FH) (2)同上简化后的代码,要求九行以内
- AOSP查看当前要打进系统里的都有哪些包
发现问题: 修改系统时常常需要预置APK,这就要修改PRODUCT_PACKAGES这个变量,那么如何查看这个数组的值呢?我们可能直接在mk文件中去打印它,后来发现打印它只会显示继承关系(即继承自了哪 ...
- pymysql.err.OperationalError: (1054, "Unknown column 'aa' in 'field list'")(已解决)
错误描述: 今天使用python连接mysql数据库进行数据添加时,出现报错"pymysql.err.OperationalError: (1054, "Unknown colum ...
- python之名称空间与函数对象
目录 名称空间 内置名称空间 全局名称空间 局部名称空间 名称的查找顺序 作用域 global关键字 nonlocal关键字 函数名的多种用法 函数的嵌套 名称空间 名称空间就是变量名与变量值绑定关系 ...
- elementUI 函数自定义传参
<div v-for="(item,i) in ruleContent" :key="i"> <!-- eg:想通过循环将[i]传进函数rul ...
- 配置中心Nacos(服务发现)
服务演变之路 单体应用架构 在刚开始的时候,企业的用户量.数据量规模都⽐较⼩,项⽬所有的功能模块都放在⼀个⼯程中编码.编译.打包并且部署在⼀个Tomcat容器中的架构模式就是单体应用架构,这样的架构既 ...
- C++primer第二章
第二章 :变量和基本类型 2.1 基本内置类型 C++定义了一套包含算术类型(arithmetic type)和空类型(void)在内的基本数据类型 2.1.1 算术类型 算术类型的分类: 整型(in ...
- 手把手教你 Docker搭建mysql并配置远程访问
一.使用docker部署mysql 1.在docker中搜索要安装的mysql docker search mysql (这步其实可以跳过O(∩_∩)O哈哈~) 2.拉取mysql镜像 docker ...
