[转载] Apache Lucene初探
转载自http://www.cnblogs.com/xing901022/p/3933675.html
讲解之前,先来分享一些资料
首先呢,学习任何一门新的亦或是旧的开源技术,百度其中一二是最简单的办法,先了解其中的大概,思想等等。这里就贡献一个讲解很到位的ppt。已经被我转成了PDF,便于搜藏。
其次,关于第一次编程初探,建议还是查看官方资料。百度到的资料,目前Lucene已经更新到4.9版本,这个版本需要1.7以上的JDK,所以如果还用1.6甚至是1.5的小盆友,请参考低版本,由于我用的1.6,因此在使用Lucene4.0。
这是Lucene4.0的官网文档:http://lucene.apache.org/core/4_0_0/core/overview-summary.html
这里非常佩服Lucene的开元贡献者,可以阅读Lucene in Action,作者最初想要写软件赚钱,最后贡献给了Apache,跑题了。
最后,提醒学习Lucene的小盆友们,这个开源软件的版本更新不慢,版本之间的编程风格亦是不同,所以如果百度到的帖子,可能这段代码,用了4.0或者3.6就会不好使。
比如,以前版本的申请IndexWriter时,是这样的:
IndexWriter indexWriter = new IndexWriter(indexDir,luceneAnalyzer, true );
但是4.0,我们需要配置一个conf,把配置内容放到这个对象中:
    IndexWriterConfig config = new IndexWriterConfig(Version.LUCENE_CURRENT, analyzer);

    IndexWriter iwriter = new IndexWriter(directory, config);
所以,请一定要参考官方文档的编程风格,进行代码的书写。
最后的最后,从官网上面下载下来的文件,已经上传至百度网盘,欢迎下载。

这是其中最常用的五个文件:
第一个,也是最重要的,Lucene-core-4.0.0.jar,其中包括了常用的文档,索引,搜索,存储等相关核心代码。
第二个,Lucene-analyzers-common-4.0.0.jar,这里面包含了各种语言的词法分析器,用于对文件内容进行关键字切分,提取。
第三个,Lucene-highlighter-4.0.0.jar,这个jar包主要用于搜索出的内容高亮显示。
第四个和第五个,Lucene-queryparser-4.0.0.jar,提供了搜索相关的代码,用于各种搜索,比如模糊搜索,范围搜索,等等。
废话说到这里,下面我们简单的讲解一下什么是全文检索。
比如,我们一个文件夹中,或者一个磁盘中有很多的文件,记事本、world、Excel、pdf,我们想根据其中的关键词搜索包含的文件。例如,我们输入Lucene,所有内容含有Lucene的文件就会被检查出来。这就是所谓的全文检索。
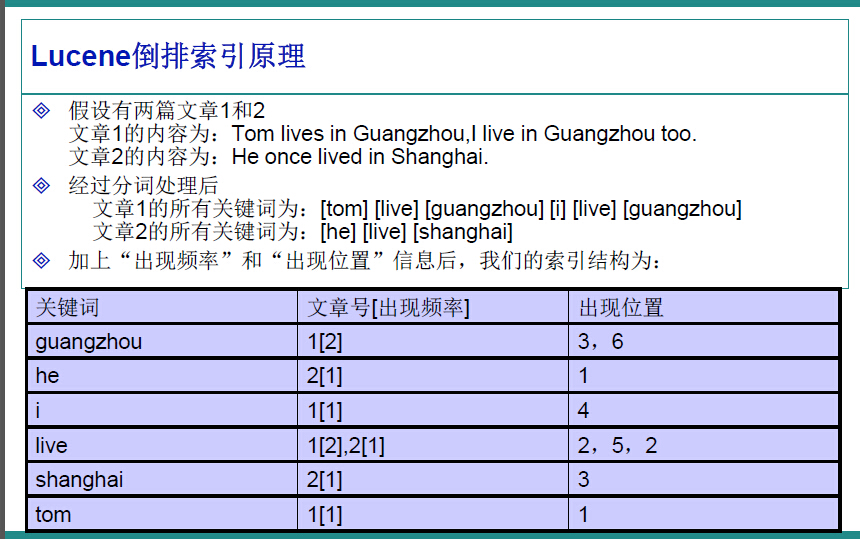
因此,很容易的我们想到,应该建立一个关键字与文件的相关映射,盗用ppt中的一张图,很明白的解释了这种映射如何实现。

在Lucene中,就是使用这种“倒排索引”的技术,来实现相关映射。
有了这种映射关系,我们就来看看Lucene的架构设计。
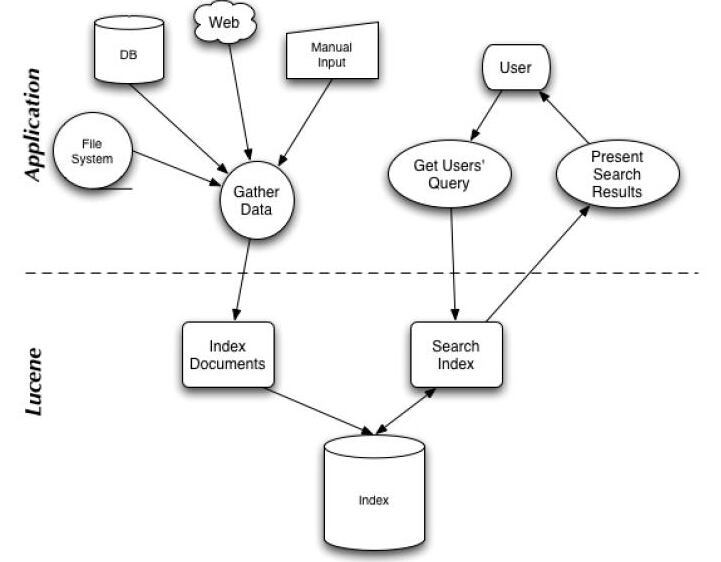
下面是Lucene的资料必出现的一张图,但也是其精髓的概括。

我们可以看到,Lucene的使用主要体现在两个步骤:
1 创建索引,通过IndexWriter对不同的文件进行索引的创建,并将其保存在索引相关文件存储的位置中。
2 通过索引查寻关键字相关文档。
下面针对官网上面给出的一个例子,进行分析:

 1   Analyzer analyzer = new StandardAnalyzer(Version.LUCENE_CURRENT);

 2

 3     // Store the index in memory:

 4     Directory directory = new RAMDirectory();

 5     // To store an index on disk, use this instead:

 6     //Directory directory = FSDirectory.open("/tmp/testindex");

 7     IndexWriterConfig config = new IndexWriterConfig(Version.LUCENE_CURRENT, analyzer);

 8     IndexWriter iwriter = new IndexWriter(directory, config);

 9     Document doc = new Document();

10     String text = "This is the text to be indexed.";

11     doc.add(new Field("fieldname", text, TextField.TYPE_STORED));

12     iwriter.addDocument(doc);

13     iwriter.close();

14

15     // Now search the index:

16     DirectoryReader ireader = DirectoryReader.open(directory);

17     IndexSearcher isearcher = new IndexSearcher(ireader);

18     // Parse a simple query that searches for "text":

19     QueryParser parser = new QueryParser(Version.LUCENE_CURRENT, "fieldname", analyzer);

20     Query query = parser.parse("text");

21     ScoreDoc[] hits = isearcher.search(query, null, 1000).scoreDocs;

22     assertEquals(1, hits.length);

23     // Iterate through the results:

24     for (int i = 0; i < hits.length; i++) {

25       Document hitDoc = isearcher.doc(hits[i].doc);

26       assertEquals("This is the text to be indexed.", hitDoc.get("fieldname"));

27     }

28     ireader.close();

29     directory.close();

索引的创建
首先,我们需要定义一个词法分析器。
比如一句话,“我爱我们的中国!”,如何对他拆分,扣掉停顿词“的”,提取关键字“我”“我们”“中国”等等。这就要借助的词法分析器Analyzer来实现。这里面使用的是标准的词法分析器,如果专门针对汉语,还可以搭配paoding,进行使用。
1 Analyzer analyzer = new StandardAnalyzer(Version.LUCENE_CURRENT);
参数中的Version.LUCENE_CURRENT,代表使用当前的Lucene版本,本文环境中也可以写成Version.LUCENE_40。
第二步,确定索引文件存储的位置,Lucene提供给我们两种方式:
1 本地文件存储
Directory directory = FSDirectory.open("/tmp/testindex");
2 内存存储
Directory directory = new RAMDirectory();
可以根据自己的需要进行设定。
第三步,创建IndexWriter,进行索引文件的写入。
IndexWriterConfig config = new IndexWriterConfig(Version.LUCENE_CURRENT, analyzer);

IndexWriter iwriter = new IndexWriter(directory, config);
这里的IndexWriterConfig,据官方文档介绍,是对indexWriter的配置,其中包含了两个参数,第一个是目前的版本,第二个是词法分析器Analyzer。
第四步,内容提取,进行索引的存储。
Document doc = new Document();

String text = "This is the text to be indexed.";

doc.add(new Field("fieldname", text, TextField.TYPE_STORED));

iwriter.addDocument(doc);

iwriter.close();
第一行,申请了一个document对象,这个类似于数据库中的表。
第二行,是我们即将索引的字符串。
第三行,把字符串存储起来(因为设置了TextField.TYPE_STORED,如果不想存储,可以使用其他参数,详情参考官方文档),并存储“表明”为"fieldname".
第四行,把doc对象加入到索引创建中。
第五行,关闭IndexWriter,提交创建内容。
这就是索引创建的过程。
关键字查询:
第一步,打开存储位置
DirectoryReader ireader = DirectoryReader.open(directory);
第二步,创建搜索器
IndexSearcher isearcher = new IndexSearcher(ireader);
第三步,类似SQL,进行关键字查询

QueryParser parser = new QueryParser(Version.LUCENE_CURRENT, "fieldname", analyzer);

Query query = parser.parse("text");

ScoreDoc[] hits = isearcher.search(query, null, 1000).scoreDocs;

assertEquals(1, hits.length);

for (int i = 0; i < hits.length; i++) {

    Document hitDoc = isearcher.doc(hits[i].doc);

    assertEquals("This is the text to be indexed.",hitDoc.get("fieldname"));

}

这里,我们创建了一个查询器,并设置其词法分析器,以及查询的“表名“为”fieldname“。查询结果会返回一个集合,类似SQL的ResultSet,我们可以提取其中存储的内容。
关于各种不同的查询方式,可以参考官方手册,或者推荐的PPT
第四步,关闭查询器等。
ireader.close();

directory.close();
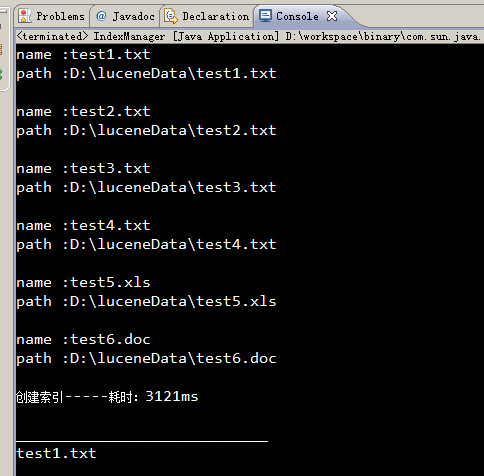
最后,博猪自己写了个简单的例子,可以对一个文件夹内的内容进行索引的创建,并根据关键字筛选文件,并读取其中的内容。
创建索引:

/**

     * 创建当前文件目录的索引

     * @param path 当前文件目录

     * @return 是否成功

     */

    public static boolean createIndex(String path){

        Date date1 = new Date();

        List<File> fileList = getFileList(path);

        for (File file : fileList) {

            content = "";

            //获取文件后缀

            String type = file.getName().substring(file.getName().lastIndexOf(".")+1);

            if("txt".equalsIgnoreCase(type)){

                content += txt2String(file);

            }else if("doc".equalsIgnoreCase(type)){

                content += doc2String(file);

            }else if("xls".equalsIgnoreCase(type)){

                content += xls2String(file);

            }

            System.out.println("name :"+file.getName());

            System.out.println("path :"+file.getPath());

//            System.out.println("content :"+content);

            System.out.println();

            try{

                analyzer = new StandardAnalyzer(Version.LUCENE_CURRENT);

                directory = FSDirectory.open(new File(INDEX_DIR));

                File indexFile = new File(INDEX_DIR);

                if (!indexFile.exists()) {

                    indexFile.mkdirs();

                }

                IndexWriterConfig config = new IndexWriterConfig(Version.LUCENE_CURRENT, analyzer);

                indexWriter = new IndexWriter(directory, config);

                Document document = new Document();

                document.add(new TextField("filename", file.getName(), Store.YES));

                document.add(new TextField("content", content, Store.YES));

                document.add(new TextField("path", file.getPath(), Store.YES));

                indexWriter.addDocument(document);

                indexWriter.commit();

                closeWriter();

            }catch(Exception e){

                e.printStackTrace();

            }

            content = "";

        }

        Date date2 = new Date();

        System.out.println("创建索引-----耗时:" + (date2.getTime() - date1.getTime()) + "ms\n");

        return true;

    }

进行查询:

/**

     * 查找索引,返回符合条件的文件

     * @param text 查找的字符串

     * @return 符合条件的文件List

     */

    public static void searchIndex(String text){

        Date date1 = new Date();

        try{

            directory = FSDirectory.open(new File(INDEX_DIR));

            analyzer = new StandardAnalyzer(Version.LUCENE_CURRENT);

            DirectoryReader ireader = DirectoryReader.open(directory);

            IndexSearcher isearcher = new IndexSearcher(ireader);

            QueryParser parser = new QueryParser(Version.LUCENE_CURRENT, "content", analyzer);

            Query query = parser.parse(text);

            ScoreDoc[] hits = isearcher.search(query, null, 1000).scoreDocs;

            for (int i = 0; i < hits.length; i++) {

                Document hitDoc = isearcher.doc(hits[i].doc);

                System.out.println("____________________________");

                System.out.println(hitDoc.get("filename"));

                System.out.println(hitDoc.get("content"));

                System.out.println(hitDoc.get("path"));

                System.out.println("____________________________");

            }

            ireader.close();

            directory.close();

        }catch(Exception e){

            e.printStackTrace();

        }

        Date date2 = new Date();

        System.out.println("查看索引-----耗时:" + (date2.getTime() - date1.getTime()) + "ms\n");

    }

全部代码:
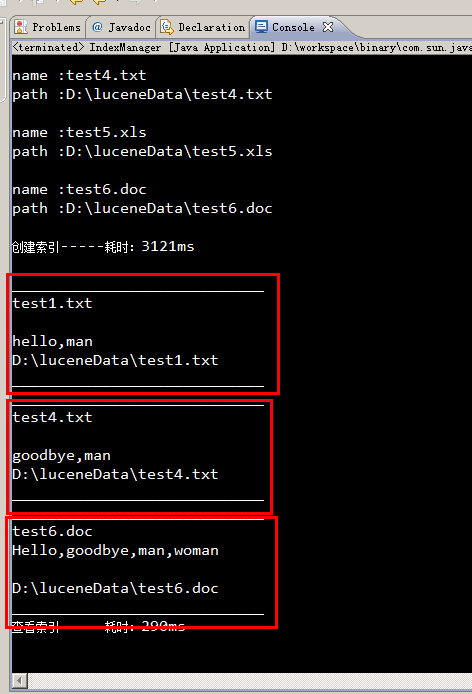
运行结果:
所有包含man关键字的文件,都被筛选出来了。


参考资料
JAVA读取文本大全:http://blog.csdn.net/csh624366188/article/details/6785817
Lucene官方文档:http://lucene.apache.org/core/4_0_0/core/overview-summary.html
[转载] Apache Lucene初探的更多相关文章
- 【手把手教你全文检索】Apache Lucene初探 (zhuan)
http://www.cnblogs.com/xing901022/p/3933675.html *************************************************** ...
- 【手把手教你全文检索】Apache Lucene初探
PS: 苦学一周全文检索,由原来的搜索小白,到初次涉猎,感觉每门技术都博大精深,其中精髓亦是不可一日而语.那小博猪就简单介绍一下这一周的学习历程,仅供各位程序猿们参考,这其中不涉及任何私密话题,因此也 ...
- Apache Lucene初探
讲解之前,先来分享一些资料 首先,学习任何一门新的亦或是旧的开源技术,百度其中一二是最简单的办法,先了解其中的大概,思想等等.这里就贡献一个讲解很到位的ppt 这是Lucene4.0的官网文档:htt ...
- Apache Lucene学习笔记
Hadoop概述 Apache lucene: 全球第一个开源的全文检索引擎工具包 完整的查询引擎和搜索引擎 部分文本分析引擎 开发人员在此基础建立完整的全文检索引擎 以下为转载:http://www ...
- lucene 初探
前言: window文件管理右上角, 有个搜索功能, 可以根据文件名进行搜索. 那如果从文件名上判断不出内容, 我岂不是要一个一个的打开文件, 查看文件的内容, 去判断是否是我要的文件? 几个, 十几 ...
- Apache Lucene(全文检索引擎)—分词器
目录 返回目录:http://www.cnblogs.com/hanyinglong/p/5464604.html 本项目Demo已上传GitHub,欢迎大家fork下载学习:https://gith ...
- Apache Lucene(全文检索引擎)—搜索
目录 返回目录:http://www.cnblogs.com/hanyinglong/p/5464604.html 本项目Demo已上传GitHub,欢迎大家fork下载学习:https://gith ...
- Apache Lucene(全文检索引擎)—创建索引
目录 返回目录:http://www.cnblogs.com/hanyinglong/p/5464604.html 本项目Demo已上传GitHub,欢迎大家fork下载学习:https://gith ...
- Apache Lucene 4.5 发布,Java 搜索引擎
Apache Lucene 4.5 发布了,该版本提供基于磁盘的文档值以及改进了过滤器的缓存.Lucene 4.5 的文档请看这里. Lucene 是apache软件基金会一个开放源代码的全文检索引擎 ...
随机推荐
- HDU1300 Pearls
+)*= +)*= .总共需要的花费是150+=++)*= .在两组数据看来.珍珠都买了高品质的了,而且花费也少了!问题是怎么样能花费最少买珍珠! Add:合并肯定是相邻的合并.比如啊a<b&l ...
- hadoop配置文件详解,安装及相关操作
一. Hadoop伪分布配置 1. 在conf/hadoop-env.sh文件中增加:export JAVA_HOME=/home/Java/jdk1.6 2. 在conf/core-s ...
- Hibernate操作数据库的回调机制--Callback
1:一般情况下,在使用Hibernate Session存取数据库的代码中,基本上大部分是相同的,如下两个方法所示, //查询Teacher操作 ublic Teacher getTeacher ...
- 替代PhotoShop:GIMP图形编辑器的使用
GIMP最早是linux环境下用于图形编辑的一款开源软件,目前的功能很已经很丰富,如果使用得当,在很多的图形编辑操作上完全可以替代收费的Photoshop(PS).目前GIMP已经发展成了多平台的开源 ...
- MySQL中变量的总结
本文对MySQL中局部变量.用户变量.系统变量的理解进行总结. 一.局部变量 局部变量由DECLARE语句声明: DECLARE var_name[,...] type [DEFAULT value] ...
- 当谈到 GitLab CI 的时候,我们都该聊些什么(下篇)
上篇主要介绍了 GitLab WorkFlow 以及 CI/CD 做的事情,并且详细分析 GitLab CI 跟 Runner 信息交互是如何进行的.接下来将为大家讲解 Executor 的实现,再通 ...
- 使用Xshell5连接虚拟机VMware中安装的CentOS7系统
使用Xshell5连接VMware中安装的CentOS7系统 准备材料 Xshell 下载地址 VMware Workstation 12 Pro 下载地址 CentOS 7 64位系统 下载地址 安 ...
- 在 JPA、Hibernate 和 Spring 中配置 Ehcache 缓存
jpa, hibernate 和 spring 时配置 ehcache 二级缓存的步骤. 缓存配置 首先在 persistence.xml 配置文件中添加下面内容: <property name ...
- Android性能优化之启动速度优化
Android性能优化之启动速度优化 Android app 启动速度优化,首先谈谈为什么会走到优化这一步,如果一开始创建 app 项目的时候就把这个启动速度考虑进去,那么肯定就不需要重新再来优化 ...
- windows7 安装TensorFlow
Win7 TensorFlow安装步骤: 1.安装python,参考http://www.zhimengzhe.com/windows/283058.html#0-tsina-1-12530-3972 ...
