VB6之图像灰度与二值化
老代码备忘,我对图像处理不是太懂。
注:部分代码引援自网上,话说我到底自己写过什么代码。。。
 Private Declare Function GetBitmapBits Lib "gdi32" (ByVal hbitmap As Long, _

     ByVal dwCount As Long, _

     lpBits As Any) As Long

 Private Declare Function SetBitmapBits Lib "gdi32" (ByVal hbitmap As Long, _

     ByVal dwCount As Long, _

     lpBits As Any) As Long

 Private Declare Function GetDIBits Lib "gdi32" (ByVal aHDC As Long, _

     ByVal hbitmap As Long, _

     ByVal nStartScan As Long, _

     ByVal nNumScans As Long, _

     lpBits As Any, _

     lpBI As BitMapInfo, _

     ByVal wUsage As Long) As Long

 Private Declare Function SetDIBits Lib "gdi32" (ByVal hdc As Long, _

     ByVal hbitmap As Long, _

     ByVal nStartScan As Long, _

     ByVal nNumScans As Long, _

     lpBits As Any, _

     lpBI As BitMapInfo, _

     ByVal wUsage As Long) As Long

 Private Declare Function SelectObject Lib "gdi32" (ByVal hdc As Long, _

     ByVal hObject As Long) As Long

 Private Declare Function CreateDC Lib "gdi32" Alias "CreateDCA" (ByVal lpDriverName As String, _

     ByVal lpDeviceName As String, _

     ByVal lpOutput As String, _

     lpInitData As Long) As Long

 Private Declare Function DeleteDC Lib "gdi32" (ByVal hdc As Long) As Long

 Private Type BitMapInfoHeader

     biSize As Long

     biWidth As Long

     biHeight As Long

     biPlanes As Integer

     biBitCount As Integer

     biCompression As Long

     biSizeImage As Long

     biXPelsPerMeter As Long

     biYPelsPerMeter As Long

     biClrUsed As Long

     biClrImportant As Long

 End Type

 Private Type RGBQuad

     rgbBlue As Byte

     rgbGreen As Byte

     rgbRed As Byte

     ''rgbReserved As Byte

 End Type

 Private Type BitMapInfo

     bmiHeader As BitMapInfoHeader

     bmiColors As RGBQuad

 End Type

 Private Sub Command1_Click()

     Dim pic As StdPicture

     Set pic = LoadPicture("D:\My Documents\Downloads\119562132_21n.jpg")

     Dim w As Long

     Dim h As Long

     With pic

         w = ScaleX(.Width, vbHimetric, vbPixels)

         h = ScaleY(.Height, vbHimetric, vbPixels)

     End With

     Dim hdc As Long

     hdc = CreateDC("DISPLAY", vbNullString, vbNullString, &)

     Call SelectObject(hdc, pic.Handle)

     Dim bits() As Byte

     ReDim bits(, w, h) As Byte

     Dim bi As BitMapInfo

     With bi.bmiHeader

         .biBitCount = &

         .biCompression = &

         .biPlanes = &

         .biSize = Len(bi.bmiHeader)

         .biWidth = w

         .biHeight = h

     End With

     Call GetDIBits(hdc, pic.Handle, , h, bits(, , ), bi, &)

     '灰度化

     Dim x As Long

     Dim y As Long

     Dim g As Byte

     For x =  To w

         For y =  To h

             '灰度公式:Gray=R×0.299+G×0.587+B×0.114

             '貌似有更好的方案:g=(bits(0, ix, iy) ^ 2.2 * 0.0722 + bits(1, ix, iy) ^ 2.2 * 0.7152 + bits(2, ix, iy) ^ 2.2 * 0.2126) ^ (1 / 2.2)

             '不过,肉眼看不出差别来 (>_<)

             g = bits(, x, y) * 0.114 + bits(, x, y) * 0.587 + bits(, x, y) * 0.299

             bits(, x, y) = g

             bits(, x, y) = g

             bits(, x, y) = g

         Next

     Next

     Picture1.Picture = Picture1.Image

     Call SetDIBits(Picture1.hdc, Picture1.Picture.Handle, &, h, bits(, , ), bi, &)

     Picture1.Picture = Picture1.Image

     Dim threshold As Byte

     threshold = GetThreshold(bits, w, h)

     '二值化,阈值通过[最大类间方差法(Otsu)]取得

     For x =  To w

         For y =  To h

             If bits(, x, y) > threshold Then

                 bits(, x, y) =

                 bits(, x, y) =

                 bits(, x, y) =

             Else

                 bits(, x, y) =

                 bits(, x, y) =

                 bits(, x, y) =

             End If

         Next

     Next

     Picture2.Picture = Picture2.Image

     Call SetDIBits(Picture2.hdc, Picture2.Picture.Handle, &, h, bits(, , ), bi, &)

     Picture2.Picture = Picture2.Image

     Erase bits

     Call DeleteDC(hdc)

     Set pic = Nothing

 End Sub

 Private Function GetThreshold(ByRef Pixels() As Byte, _

     ByVal Width As Long, _

     ByVal Height As Long) As Byte

     '最大类间方差法(Otsu)

     '这个函数是我根据百度文库一个文档里提供的C代码翻译过来的

     '@http://wenku.baidu.com/link?url=wVl9A7eZiRddxpaCPPLcAIb-VDlyrV__-Zfw6j6o50FEUochgV9G_zRVsMHVDxN2ilOUXiRbSSM-as_ELJpjxnWEvERlABlvVoVK6-FDQpW

     Dim hist() As Long

     Dim x As Long

     Dim y As Long

     Dim i As Long

     For i =  To : hist(i) = : Next

     For y =  To Height

         For x =  To Width

             hist(Pixels(, x, y)) = hist(Pixels(, x, y)) +

         Next

     Next

     Dim p() As Double

     Dim ut As Double

     Dim uk As Double

     Dim sigma As Double

     Dim mk As Double

     Dim maxk As Byte

     Dim maxs As Double

     Dim total As Long

     Dim EPSTLON As Double

     EPSILON = 0.000001 '10 ^ -6

     total = Width * Height

     ut =

     For i =  To

         p(i) = hist(i) / total

         ut = ut + i * hist(i)

     Next

     ut = ut / total

     wk =

     uk =

     maxs =

     For i =  To

         uk = uk + i * p(i)

         wk = wk + p(i)

         If wk <= EPSTLON Or wk >= (# - EPSTLON) Then

         Else

             sigma = (ut * wk - uk)

             sigma = (sigma * sigma) / (wk * (# - wk))

             If sigma > maxs Then

                 maxs = sigma

                 maxk = i

             End If

         End If

     Next

     GetThreshold = maxk

 End Function
上张图,看看效果:
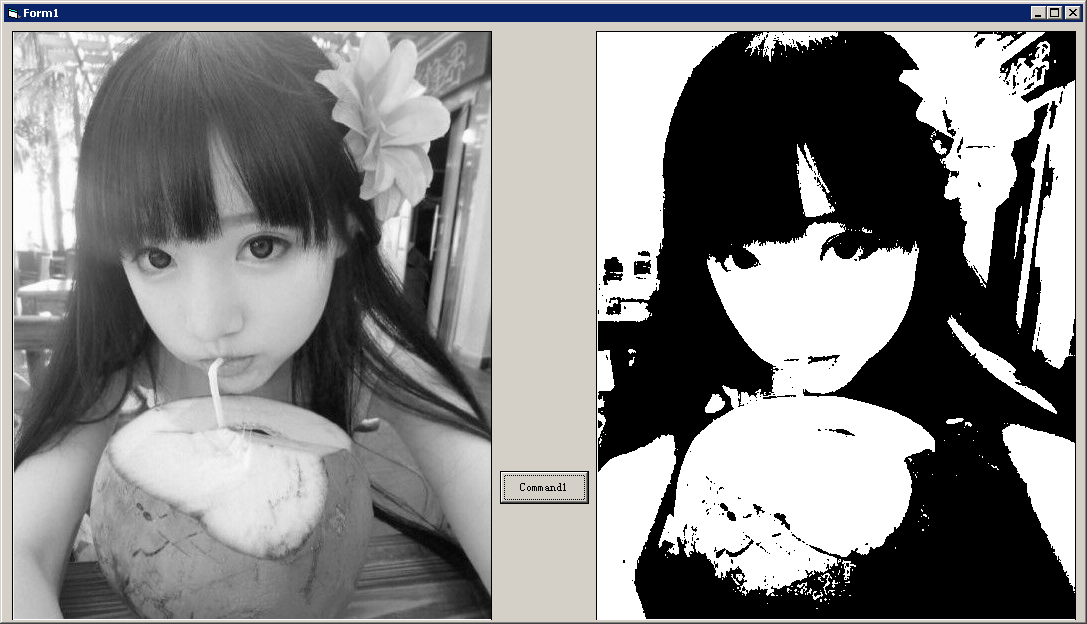
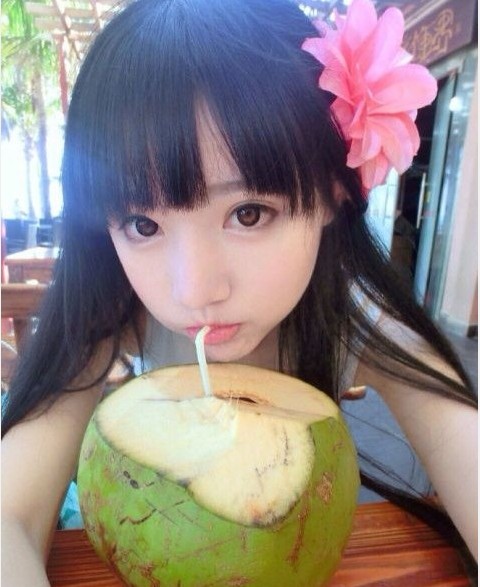
原图:
VB6之图像灰度与二值化的更多相关文章
- [iOS OpenCV的使用,灰度和二值化]
看网上方法很多,但版本都不够新,我看了网上一些知识,总结了下,来个最新版Xcode6.1的. 最近主要想做iOS端的车牌识别,所以开始了解OpenCV.有兴趣的可以跟我交流下哈. 一.Opencv的使 ...
- OpenCV:图像的普通二值化
首先我们来看看图像二值化的过程,opencv一共有好几种不同的二值化算法可以使用,一般来说图像的像素,亮度等条件如果超过了某个或者低于了某个阈值,就会恒等于某个值,可以用于某些物体轮廓的监测: 导包: ...
- opencv-python图像二值化函数cv2.threshold函数详解及参数cv2.THRESH_OTSU使用
cv2.threshold()函数的作用是将一幅灰度图二值化,基本用法如下: #ret:暂时就认为是设定的thresh阈值,mask:二值化的图像 ret,mask = cv2.threshold(i ...
- openCV_java 图像二值化
较为常用的图像二值化方法有:1)全局固定阈值:2)局部自适应阈值:3)OTSU等. 局部自适应阈值则是根据像素的邻域块的像素值分布来确定该像素位置上的二值化阈值.这样做的好处在于每个像素位置处的二值化 ...
- OpenCV_基于局部自适应阈值的图像二值化
在图像处理应用中二值化操作是一个很常用的处理方式,例如零器件图片的处理.文本图片和验证码图片中字符的提取.车牌识别中的字符分割,以及视频图像中的运动目标检测中的前景分割,等等. 较为常用的图像二值化方 ...
- 【转】Emgu CV on C# (五) —— Emgu CV on 局部自适应阈值二值化
局部自适应阈值二值化 相对全局阈值二值化,自然就有局部自适应阈值二值化,本文利用Emgu CV实现局部自适应阈值二值化算法,并通过调节block大小,实现图像的边缘检测. 一.理论概述(转载自< ...
- [转载+原创]Emgu CV on C# (五) —— Emgu CV on 局部自适应阈值二值化
局部自适应阈值二值化 相对全局阈值二值化,自然就有局部自适应阈值二值化,本文利用Emgu CV实现局部自适应阈值二值化算法,并通过调节block大小,实现图像的边缘检测. 一.理论概述(转载自< ...
- Opencv实现图像的灰度处理,二值化,阀值选择
前几天接触了图像的处理,发现用OPencv处理确实比較方便.毕竟是非常多东西都封装好的.可是要研究里面的东西,还是比較麻烦的,首先,你得知道图片处理的一些知识,比方腐蚀,膨胀,仿射,透射等,还有非常多 ...
- Java基于opencv实现图像数字识别(三)—灰度化和二值化
Java基于opencv实现图像数字识别(三)-灰度化和二值化 一.灰度化 灰度化:在RGB模型中,如果R=G=B时,则彩色表示灰度颜色,其中R=G=B的值叫灰度值:因此,灰度图像每个像素点只需一个字 ...
随机推荐
- CountDownLatch, CyclicBarrier and Semaphore
Reference: [1] http://shazsterblog.blogspot.co.uk/2011/12/comparison-of-countdownlatch.html CountDow ...
- OpenCV探索之路(十四):绘制点、直线、几何图形
绘制点和圆 void cvCircle( CvArr* img, CvPoint center, int radius, CvScalar color, int thickness=1, int li ...
- React源码学习——ReactClass
前言 之前一直在使用react做开发,但是对其内部的工作机制却一点儿都不了解,说白了就是一直在套api,毫无成就感.趁最近比较闲,对源码做了一番研究,并通过博客的方式做一些记录. 进入正题 通过编写自 ...
- hexo摸爬滚打之进阶教程
本文首发在我的个人博客:http://muyunyun.cn/ 写博客有三个层次,第一层次是借鉴居多的博文,第二层次是借鉴后经过消化后有一定量产出的博文,第三层次是原创好文居多的博文.在参考了大量前辈 ...
- id 生成器介绍
背景介绍 在一般的业务场景中, 初始的时候简单的自增数(比如MySQL 自增键)就可以很好的满足需求, 不过随着业务的发展和驱动, 尤其是在分布式的场景中, 如何生成全局的唯一 id 便成了需要慎重考 ...
- javascript基础-HTML5
跨文档消息(Web Messaging cross-document messaging) 原理 往有关联(同一框架/弹出)的文档传递数据. Message Channel在javascript基础- ...
- SQL Server 中函数的理解总结
T-SQL语言为我们提供了更加灵活的方式操作数据,那就是函数,函数总的分为三大类:标量函数:(传入一个参数,再传出一个参数)聚合函数(传入多个参数,传出一个参数),表值函数(传入一个结果集对象,让我们 ...
- 每天一个JS 小demo之日历制作。主要知识点:日期函数
<!DOCTYPE html><html lang="en"><head> <meta charset="UTF-8" ...
- 生成JSON数据--Gson(谷歌)方法
Gson生成JSON数据方法: 创建相应的类,然后创建对象,toJson()进去就可以了 要求:生成如下JSON数据 1.{"age":4,"name":&qu ...
- postgresql 多表联查
使用语句的先后顺序并不是优先级的排序: 连接分为:内连接和外连接,外连接分为左外连接,右外连接,全连接 概念上解释,表之间联合后数据如何整合. 返回的数据条数,可以通过集合求算.假如A集合有10条数据 ...