Netty源码学习(六)ChannelPipeline
0. ChannelPipeline简介
ChannelPipeline = Channel + Pipeline,也就是说首先它与Channel绑定,然后它是起到类似于管道的作用:字节流在ChannelPipeline上流动,流动的过程中被ChannelHandler修饰,最终输出。
1. ChannelPipeline类图
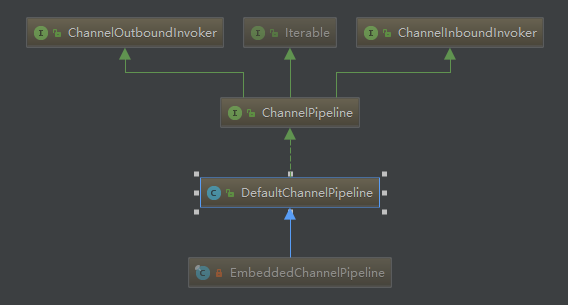
ChannelPipeline只有两个子类,直接一起放上来好了,其中EmbeddedChannelPipeline主要用于测试,本文只介绍DefaultChannelPipeline
2. ChannelPipeline的初始化
跟踪一下DefaultChannelPipeline的构造方法就能发现
ChannelPipeline是在AbstractChannel的构造方法中被初始化的,而AbstractChannel的构造方法有两个,我只选取其中一个做分析了:
AbstractChannel()

    protected AbstractChannel(Channel parent) {

        this.parent = parent;

        id = newId();

        unsafe = newUnsafe();

        pipeline = newChannelPipeline();

    }

AbstractChannel.newChannelPipeline()

    protected DefaultChannelPipeline newChannelPipeline() {

        return new DefaultChannelPipeline(this);

    }

    protected DefaultChannelPipeline(Channel channel) {

        this.channel = ObjectUtil.checkNotNull(channel, "channel");

        succeededFuture = new SucceededChannelFuture(channel, null);

        voidPromise =  new VoidChannelPromise(channel, true);

        tail = new TailContext(this);

        head = new HeadContext(this);

        head.next = tail;

        tail.prev = head;

    }
可以看到,DefaultChannelPipeline中维护了对关联的Channel的引用
而且,Pipeline内部维护了一个双向链表,head是链表的头,tail是链表的尾,链表指针是AbstractChannelHandlerContext类型。
在DefaultChannelPipeline初始化完成的时候,其内部结构是下面这个样子的:
HeadContext <----> TailContext
HeadContext与TailContext都继承于AbstractChannelHandlerContext,基本上是起到占位符的效果,没有什么功能性的作用。
3. 向pipeline添加节点
举一个很简单的例子:
bootstrap.childHandler(new ChannelInitializer<SocketChannel>() {

     @Override

     public void initChannel(SocketChannel ch) throws Exception {

         ChannelPipeline p = ch.pipeline();

         p.addLast(new Decoder());//解码

         p.addLast(new BusinessHandler())//业务逻辑

         p.addLast(new Encoder());//编码

     }

});
在pipeline中,从网卡收到的数据流先被Decoder解码,然后被BusinessHandler处理,然后再被Encoder编码,最后写回到网卡中。
此时pipeline的内部结构为:
HeadContext <----> Decoder <----> BusinessHandler <----> Encoder <----> TailContext
pipeline的修改,是在Channel初始化时,由ChannelInitializer进行的。
ChannelInitializer调用用户自定义的initChannel方法,然后调用Pipeline.addLast()方法修改pipeline的结构,关键代码位于DefaultChannelPipeline.addLast()中:
    public final ChannelPipeline addLast(EventExecutorGroup group, String name, ChannelHandler handler) {

        final AbstractChannelHandlerContext newCtx;

        synchronized (this) {//很重要,用当前的DefaultChannelPipeline作为同步对象,使pipeline的addLast方法串行化

            checkMultiplicity(handler);//禁止非Sharable的handler被重复add到不同的pipeline中

            newCtx = newContext(group, filterName(name, handler), handler);//将Handler包装成DefaultChannelHandlerContext并插入pipeline中


            addLast0(newCtx);//将ChannelHandlerContext插入pipeline

            // If the registered is false it means that the channel was not registered on an eventloop yet.

            // In this case we add the context to the pipeline and add a task that will call

            // ChannelHandler.handlerAdded(...) once the channel is registered.

            if (!registered) {//如果channel没有与eventloop绑定,则创建一个任务,这个任务会在channel被register的时候调用

                newCtx.setAddPending();

                callHandlerCallbackLater(newCtx, true);

                return this;

            }

            EventExecutor executor = newCtx.executor();

            if (!executor.inEventLoop()) {

                newCtx.setAddPending();

                executor.execute(new Runnable() {

                    @Override

                    public void run() {

                        callHandlerAdded0(newCtx);

                    }

                });

                return this;

            }

        }

        callHandlerAdded0(newCtx);

        return this;

    }

    private void addLast0(AbstractChannelHandlerContext newCtx) {//向双链表插入节点

        AbstractChannelHandlerContext prev = tail.prev;

        newCtx.prev = prev;

        newCtx.next = tail;

        prev.next = newCtx;

        tail.prev = newCtx;

    }

    private void callHandlerAdded0(final AbstractChannelHandlerContext ctx) {

        try {

            ctx.handler().handlerAdded(ctx);//触发handler的handlerAdded回调函数

            ctx.setAddComplete();

        } catch (Throwable t) {//异常处理

            boolean removed = false;

            try {

                remove0(ctx);

                try {

                    ctx.handler().handlerRemoved(ctx);

                } finally {

                    ctx.setRemoved();

                }

                removed = true;

            } catch (Throwable t2) {

                if (logger.isWarnEnabled()) {

                    logger.warn("Failed to remove a handler: " + ctx.name(), t2);

                }

            }

            if (removed) {

                fireExceptionCaught(new ChannelPipelineException(

                        ctx.handler().getClass().getName() +

                        ".handlerAdded() has thrown an exception; removed.", t));

            } else {

                fireExceptionCaught(new ChannelPipelineException(

                        ctx.handler().getClass().getName() +

                        ".handlerAdded() has thrown an exception; also failed to remove.", t));

            }

        }

    }
小结:
a. addLast方法的作用就是将传入的handler添加到当前Pipeline的双向链表中
b. 在后续处理的时候,可以通过遍历链表,找到channel关联的pipeline上注册的所有handler
c. 贴出的代码中没有涉及,但又很重要的一点是:在添加handler的过程中,会根据handler继承于ChannelInboundHandler或者ChannelOutboundHandler来判定这个handler是用于处理in事件还是out事件的,然后会以此为依据来设置AbstractChannelHandlerContext的inbound和outbound位。
4. 一个读事件在pipeline中的流转过程
在第三节的示例中,如果一个已经register完毕的Channel收到一个数据包,会发生什么事情呢?
首先,这个Channel必然是与某个NioEventLoop绑定的,这个Channel上的可读事件会触发NioEventLoop.processSelectedKey方法:
    private void processSelectedKey(SelectionKey k, AbstractNioChannel ch) {

        final AbstractNioChannel.NioUnsafe unsafe = ch.unsafe();

        ...........

        try{

            // Also check for readOps of 0 to workaround possible JDK bug which may otherwise lead

            // to a spin loop

            if ((readyOps & (SelectionKey.OP_READ | SelectionKey.OP_ACCEPT)) != 0 || readyOps == 0) {

                unsafe.read();//触发

            }

        } catch (CancelledKeyException ignored) {

            unsafe.close(unsafe.voidPromise());

        }

    }
可以看到这会触发AbstractNioChannel.NioUnsafe的read方法,其实现位于AbstractNioByteChannel.NioByteUnsafe中:
        @Override

        public final void read() {

            ...........

                do {

                    byteBuf = allocHandle.allocate(allocator);//创建一个ByteBuf作为缓冲区

                    allocHandle.lastBytesRead(doReadBytes(byteBuf));//读取数据到ByteBuf

                    if (allocHandle.lastBytesRead() <= 0) {

                        // nothing was read. release the buffer.

                        byteBuf.release();

                        byteBuf = null;

                        close = allocHandle.lastBytesRead() < 0;

                        break;

                    }

                    allocHandle.incMessagesRead(1);

                    readPending = false;

                    pipeline.fireChannelRead(byteBuf);//触发pipeline的读事件

                    byteBuf = null;

                } while (allocHandle.continueReading());

                allocHandle.readComplete();

                pipeline.fireChannelReadComplete();

           .............

        }

    }
fireChannelRead的实现位于DefaultChannelPipeline中:
DefaultChannelPipeline.fireChannelRead()

    @Override

s0. public final ChannelPipeline fireChannelRead(Object msg) {

        AbstractChannelHandlerContext.invokeChannelRead(head, msg);//这里传入的是pipeline的head节点

        return this;

    }

AbstractChannelHandlerContext.invokeChannelRead()

s1. static void invokeChannelRead(final AbstractChannelHandlerContext next, Object msg) {

        final Object m = next.pipeline.touch(ObjectUtil.checkNotNull(msg, "msg"), next);//这行代码可能是为了检查内存泄漏

        EventExecutor executor = next.executor();

        if (executor.inEventLoop()) {//同步或者异步的调用传入的AbstractChannelHandlerContext的invokeChannelRead方法,

            next.invokeChannelRead(m);

        } else {

            executor.execute(new Runnable() {

                @Override

                public void run() {

                    next.invokeChannelRead(m);

                }

            });

        }

    }

s2. private void invokeChannelRead(Object msg) {

        if (invokeHandler()) {

            try {

                ((ChannelInboundHandler) handler()).channelRead(this, msg);//第一次调用时,handler为HeadContext,后续调用时为pipeline中自定义的类型为inbound的handler

            } catch (Throwable t) {

                notifyHandlerException(t);

            }

        } else {

            fireChannelRead(msg);

        }

    }

HeadContext.channelRead()

            @Override

s3. public void channelRead(ChannelHandlerContext ctx, Object msg) throws Exception {

            ctx.fireChannelRead(msg);

        }

AbstractChannelHandlerContext.fireChannelRead()

    @Override

s4. public ChannelHandlerContext fireChannelRead(final Object msg) {

        invokeChannelRead(findContextInbound(), msg);//先找到pipeline上当前AbstractChannelHandlerContext节点之后的第一个inbound类型的AbstractChannelHandlerContext,然后调用其invokeChannelRead()方法,这样就又调转回到s1了

        return this;

    }

    //从pipeline的当前AbstractChannelHandlerContext向后遍历,找到第一个类型为inbound的AbstractChannelHandlerContext节点

s5. private AbstractChannelHandlerContext findContextInbound() {

        AbstractChannelHandlerContext ctx = this;

        do {

            ctx = ctx.next;

        } while (!ctx.inbound);

        return ctx;

    }
可以看出,流入的msg会先被送到HeadContext中,然后HeadContext会将其转发到pipeline中的下一个类型为inbound的AbstractChannelHandlerContext,然后调用关联的Handler来处理数据包
如果Handler的channelRead方法中又调用了ctx.fireChannelRead(msg),那么这个msg会继续被转发到pipeline中下一个类型为inbound的AbstractChannelHandlerContext中进行处理
那么问题来了,如果pipeline中的最后一个自定义的类型为inbound的AbstractChannelHandlerContext中接着调用ctx.fireChannelRead(msg),会发生什么呢?
只需要查看pipeline链表的真正尾结点TailContext的源码就行了:
    @Override

    public void channelRead(ChannelHandlerContext ctx, Object msg) throws Exception {

        onUnhandledInboundMessage(msg);

    }

    /**

     * Called once a message hit the end of the {@link ChannelPipeline} without been handled by the user

     * in {@link ChannelInboundHandler#channelRead(ChannelHandlerContext, Object)}. This method is responsible

     * to call {@link ReferenceCountUtil#release(Object)} on the given msg at some point.

     */

    protected void onUnhandledInboundMessage(Object msg) {

        try {

            logger.debug(

                    "Discarded inbound message {} that reached at the tail of the pipeline. " +

                            "Please check your pipeline configuration.", msg);

        } finally {

            ReferenceCountUtil.release(msg);//释放内存

        }

    }
原来只是使用debug级别输出一行日志罢了。
小结:
a. 读事件会触发Channel所关联的EventLoop的processSelectedKey方法
b. 触发AbstractNioByteChannel.NioByteUnsafe的read方法,其中会调用JDK底层提供的nio方法,将从网卡上读取到的数据包装成ByteBuf类型的消息msg
c. 触发Channel关联的DefaultChannelPipeline的fireChannelRead方法
d. 触发DefaultChannelPipeline中维护的双向链表的头结点HeadContext的invokeChannelRead方法
e. 触发DefaultChannelPipeline中维护的双向链表的后续类型为inBound的AbstractChannelHandlerContext的invokeChannelRead方法
f. 如果用户自定义的Handler的channelRead方法中又调用了ctx.fireChannelRead(msg),那么这个msg会继续沿着pipeline向后传播
g. 如果TailContext的channelRead收到了msg,则以debug级别输出日志
5. 一个写事件在pipeline中的流转过程
上一小节中,我们分析了Netty中读事件的流转过程, 本节我们会分析Netty是如何将数据写入到网卡中的。
还是以最简单的EchoSever为例,其自定义Handler的channelRead方法为:
                                @Override

                                public void channelRead(ChannelHandlerContext ctx,

                                        Object msg) { //ehco to client

                                    ctx.writeAndFlush(msg);

                                }
代码就简单的一行,将从网卡收到的数据包(此处被包装为ByteBuf对象),直接写回到当前ChannelHandlerContext中,其调用链如下所示:
AbstractChannelHandlerContext.writeAndFlush()

    @Override

    public ChannelFuture writeAndFlush(Object msg) {

        return writeAndFlush(msg, newPromise());

    }

    @Override

    public ChannelFuture writeAndFlush(Object msg, ChannelPromise promise) {

        if (msg == null) {//不允许写入null

            throw new NullPointerException("msg");

        }

        if (isNotValidPromise(promise, true)) {

            ReferenceCountUtil.release(msg);

            // cancelled

            return promise;

        }

        write(msg, true, promise);

        return promise;

    }

    private void write(Object msg, boolean flush, ChannelPromise promise) {

        AbstractChannelHandlerContext next = findContextOutbound();//在pipeline中找到HeadContext

        final Object m = pipeline.touch(msg, next);

        EventExecutor executor = next.executor();

        if (executor.inEventLoop()) {//同步或者异步的处理写事件

            if (flush) {//根据flush属性的设置与否,决定是调用AbstractChannelHandlerContext的invokeWriteAndFlush还是invokeWrite方法

                next.invokeWriteAndFlush(m, promise);

            } else {

                next.invokeWrite(m, promise);

            }

        } else {

            AbstractWriteTask task;

            if (flush) {

                task = WriteAndFlushTask.newInstance(next, m, promise);

            }  else {

                task = WriteTask.newInstance(next, m, promise);

            }

            safeExecute(executor, task, promise, m);

        }

    }

    private AbstractChannelHandlerContext findContextOutbound() {//逆序遍历pipeline,找到与当前AbstractChannelHandlerContext最接近的类型为outBound的AbstractChannelHandlerContext,在当前场景中,就是Pipeline的HeadContext了

        AbstractChannelHandlerContext ctx = this;

        do {

            ctx = ctx.prev;

        } while (!ctx.outbound);

        return ctx;

    }

    private void invokeWriteAndFlush(Object msg, ChannelPromise promise) {

        if (invokeHandler()) {

            invokeWrite0(msg, promise);

            invokeFlush0();

        } else {

            writeAndFlush(msg, promise);

        }

    }

    private void invokeWrite(Object msg, ChannelPromise promise) {

        if (invokeHandler()) {

            invokeWrite0(msg, promise);

        } else {

            write(msg, promise);

        }

    }

    private void invokeWrite0(Object msg, ChannelPromise promise) {

        try {

            ((ChannelOutboundHandler) handler()).write(this, msg, promise);//获取当前handler,调用其write方法

        } catch (Throwable t) {

            notifyOutboundHandlerException(t, promise);

        }

    }

    private void invokeFlush0() {

        try {

            ((ChannelOutboundHandler) handler()).flush(this);//获取当前handler,调用其flush方法

        } catch (Throwable t) {

            notifyHandlerException(t);

        }

    }
在EchoServer的场景中,负责写入数据的handler是pipeline的HeadContext,其write/flush方法的调用链如下所示:
DefaultChannelPipeline.HeadContext.write()

        public void write(ChannelHandlerContext ctx, Object msg, ChannelPromise promise) throws Exception {

            unsafe.write(msg, promise);//这里的unsafe是NioSocketChannel.NioSocketChannelUnsafe,但write方法的实际实现位于AbstractChannel.AbstractUnsafe中

        }

AbstractChannel.AbstractUnsafe.write()

        @Override

        public final void write(Object msg, ChannelPromise promise) {

            assertEventLoop();

            ChannelOutboundBuffer outboundBuffer = this.outboundBuffer;//获取当前channel的写缓冲区

            if (outboundBuffer == null) {

                // If the outboundBuffer is null we know the channel was closed and so

                // need to fail the future right away. If it is not null the handling of the rest

                // will be done in flush0()

                // See https://github.com/netty/netty/issues/2362

                safeSetFailure(promise, WRITE_CLOSED_CHANNEL_EXCEPTION);

                // release message now to prevent resource-leak

                ReferenceCountUtil.release(msg);

                return;

            }

            int size;

            try {

                msg = filterOutboundMessage(msg);//如果msg是heap buffer,将其转换为direct buffer

                size = pipeline.estimatorHandle().size(msg);//计算msg的大小

                if (size < 0) {

                    size = 0;

                }

            } catch (Throwable t) {

                safeSetFailure(promise, t);

                ReferenceCountUtil.release(msg);

                return;

            }

            outboundBuffer.addMessage(msg, size, promise);//将msg挂载到当前channel的写缓冲区中

        }

DefaultChannelPipeline.HeadContext.flush()

        @Override

        public void flush(ChannelHandlerContext ctx) throws Exception {

            unsafe.flush();//与write方法一样,其实现位于AbstractChannel.AbstractUnsafe

        }

AbstractChannel.AbstractUnsafe.flush()

        @Override

        public final void flush() {

            assertEventLoop();

            ChannelOutboundBuffer outboundBuffer = this.outboundBuffer;

            if (outboundBuffer == null) {

                return;

            }

            outboundBuffer.addFlush();//向当前channel的写缓冲区传入一个flush信号

            flush0();//调用nio方法,将缓冲区的数据刷入网卡

        }

        @SuppressWarnings("deprecation")

        protected void flush0() {

            if (inFlush0) {

                // Avoid re-entrance

                return;

            }

            final ChannelOutboundBuffer outboundBuffer = this.outboundBuffer;

            if (outboundBuffer == null || outboundBuffer.isEmpty()) {

                return;

            }

            inFlush0 = true;

            // Mark all pending write requests as failure if the channel is inactive.

            if (!isActive()) {

                try {

                    if (isOpen()) {

                        outboundBuffer.failFlushed(FLUSH0_NOT_YET_CONNECTED_EXCEPTION, true);

                    } else {

                        // Do not trigger channelWritabilityChanged because the channel is closed already.

                        outboundBuffer.failFlushed(FLUSH0_CLOSED_CHANNEL_EXCEPTION, false);

                    }

                } finally {

                    inFlush0 = false;

                }

                return;

            }

            try {

                doWrite(outboundBuffer);//真正的写入数据,其实现位于NioSocketChannel.NioSocketChannelUnsafe中

            } catch (Throwable t) {

                if (t instanceof IOException && config().isAutoClose()) {

                    /**

                     * Just call {@link #close(ChannelPromise, Throwable, boolean)} here which will take care of

                     * failing all flushed messages and also ensure the actual close of the underlying transport

                     * will happen before the promises are notified.

                     *

                     * This is needed as otherwise {@link #isActive()} , {@link #isOpen()} and {@link #isWritable()}

                     * may still return {@code true} even if the channel should be closed as result of the exception.

                     */

                    close(voidPromise(), t, FLUSH0_CLOSED_CHANNEL_EXCEPTION, false);

                } else {

                    outboundBuffer.failFlushed(t, true);

                }

            } finally {

                inFlush0 = false;

            }

        }
代码逻辑不算复杂,很容易可以看出,AbstractChannel.AbstractUnsafe中维护了一个ChannelOutboundBuffer,数据会先被写入到这个ChannelOutboundBuffer中(ChannelOutboundBuffer我们将在下一小节中详细介绍),后续调用doWrite方法会把缓冲区的数据刷入网卡:
NioSocketChannel.NioSocketChannelUnsafe.doWrite()

    @Override

    protected void doWrite(ChannelOutboundBuffer in) throws Exception {

        for (;;) {

            int size = in.size();//获取缓冲区中可以flush的数据大小

            if (size == 0) {

                // All written so clear OP_WRITE

                clearOpWrite();

                break;

            }

            long writtenBytes = 0;

            boolean done = false;

            boolean setOpWrite = false;

            // Ensure the pending writes are made of ByteBufs only.

            ByteBuffer[] nioBuffers = in.nioBuffers();

            int nioBufferCnt = in.nioBufferCount();

            long expectedWrittenBytes = in.nioBufferSize();

            SocketChannel ch = javaChannel();//获取Java nio的原生channel

            // Always us nioBuffers() to workaround data-corruption.

            // See https://github.com/netty/netty/issues/2761

            switch (nioBufferCnt) {

                case 0:

                    // We have something else beside ByteBuffers to write so fallback to normal writes.

                    super.doWrite(in);//这里会调用AbstractNioByteChannel.NioByteUnsafe.doWrite()方法

                    return;

                case 1://只有一块数据需要写入

                    // Only one ByteBuf so use non-gathering write

                    ByteBuffer nioBuffer = nioBuffers[0];//获取待写入的ByteBuffer

                    for (int i = config().getWriteSpinCount() - 1; i >= 0; i --) {//自旋重试写入数据,默认最多尝试16次

                        final int localWrittenBytes = ch.write(nioBuffer);//调用Java NIO提供的原生write方法写入数据

                        if (localWrittenBytes == 0) {

                            setOpWrite = true;

                            break;

                        }

                        expectedWrittenBytes -= localWrittenBytes;

                        writtenBytes += localWrittenBytes;

                        if (expectedWrittenBytes == 0) {

                            done = true;

                            break;

                        }

                    }

                    break;

                default://有多块数据需要写入

                    for (int i = config().getWriteSpinCount() - 1; i >= 0; i --) {//自旋重试写入数据,默认最多尝试16次

                        final long localWrittenBytes = ch.write(nioBuffers, 0, nioBufferCnt);//调用Java NIO提供的原生write方法写入数据

                        if (localWrittenBytes == 0) {

                            setOpWrite = true;

                            break;

                        }

                        expectedWrittenBytes -= localWrittenBytes;

                        writtenBytes += localWrittenBytes;

                        if (expectedWrittenBytes == 0) {

                            done = true;

                            break;

                        }

                    }

                    break;

            }

            // Release the fully written buffers, and update the indexes of the partially written buffer.

            in.removeBytes(writtenBytes);//移除缓冲区中已被写入的数据

            if (!done) {//本次写入没有把缓冲区中的数据全部写完

                // Did not write all buffers completely.

                incompleteWrite(setOpWrite);

                break;

            }

        }

    }

    protected final void incompleteWrite(boolean setOpWrite) {

        // Did not write completely.

        if (setOpWrite) {

            setOpWrite();

        } else {

            // Schedule flush again later so other tasks can be picked up in the meantime

            Runnable flushTask = this.flushTask;//先把机会让给EventLoop中的其他的Channel,当前Channel的写入任务下次会接着运行

            if (flushTask == null) {

                flushTask = this.flushTask = new Runnable() {

                    @Override

                    public void run() {

                        flush();

                    }

                };

            }

            eventLoop().execute(flushTask);

        }

    }
现在我们已经把Netty的写入数据的流程大致分析了一遍,其实还有很多细节没有写到,但是如果全部写出来,这篇文章就太长了(实际上已经很长了,而且感觉过于流水账,没抓到重点)
小结:
a. 调用ChannelHandlerContext的writeAndFlush方法
b. 在Pipeline中逆序寻找找到与当前ChannelHandlerContext最接近的类型为outBound的ChannelHandlerContext(在当前场景中为HeadContext)
c. 向当前Channel维护的写缓冲区(ChannelOutboundBuffer)中挂载需要写入的数据,然后向写缓存区中发送一个flush信号
d. 调用Java的nio提供的方法,将写缓冲区中的数据刷到网卡中
6. ChannelOutboundBuffer的实现原理
ChannelOutboundBuffer是写缓冲区,Netty在收到写命令后,会将数据暂存在这个缓冲区中。直到收到flush指令,才将这些数据写到网卡中。
ChannelOutboundBuffer是由链表实现的,其节点为自定义的Entry类型,每个Entry对应于一个需要被写入的msg
ChannelOutboundBuffer中有三个关键的变量:flushedEntry/unflushedEntry/tailEntry
源码中的解释是这样的:
// Entry(flushedEntry) --> ... Entry(unflushedEntry) --> ... Entry(tailEntry)
//
// The Entry that is the first in the linked-list structure that was flushed
private Entry flushedEntry;
// The Entry which is the first unflushed in the linked-list structure
private Entry unflushedEntry;
// The Entry which represents the tail of the buffer
private Entry tailEntry;
// The number of flushed entries that are not written yet
private int flushed;
tailEntry是链表的尾指针,addMessage方法传入的新msg会被包装为Entry格式并挂载到链表末端
从unflushedEntry到tailEntry的这一段都是未经过flush操作的
从flushedEntry到unflushedEntry的这一段是已经被flush操作标记过的,这些数据是可以被安全的写入网卡的
其关键函数源码如下:
//向待写入的msg添加到缓存中,标准的链表插入操作

    public void addMessage(Object msg, int size, ChannelPromise promise) {

        Entry entry = Entry.newInstance(msg, size, total(msg), promise);

        if (tailEntry == null) {

            flushedEntry = null;

            tailEntry = entry;

        } else {

            Entry tail = tailEntry;

            tail.next = entry;

            tailEntry = entry;

        }

        if (unflushedEntry == null) {//标记当前entry为unflush段的起点

            unflushedEntry = entry;

        }

        // increment pending bytes after adding message to the unflushed arrays.

        // See https://github.com/netty/netty/issues/1619

        incrementPendingOutboundBytes(entry.pendingSize, false);//维护计数

    }

//向缓存中添加一个flush信号,主要作用是修改unflushedEntry指针为null,addFlush方法完成时,链表中从flushedEntry以后的所有节点都是flushed状态

    /**

     * Add a flush to this {@link ChannelOutboundBuffer}. This means all previous added messages are marked as flushed

     * and so you will be able to handle them.

     */

    public void addFlush() {

        // There is no need to process all entries if there was already a flush before and no new messages

        // where added in the meantime.

        //

        // See https://github.com/netty/netty/issues/2577

        Entry entry = unflushedEntry;//获取unflush段的起点

        if (entry != null) {

            if (flushedEntry == null) {

                // there is no flushedEntry yet, so start with the entry

                flushedEntry = entry;

            }

            do {

                flushed ++;//维护计数

                if (!entry.promise.setUncancellable()) {

                    // Was cancelled so make sure we free up memory and notify about the freed bytes

                    int pending = entry.cancel();

                    decrementPendingOutboundBytes(pending, false, true);

                }

                entry = entry.next;

            } while (entry != null);//遍历链表中所有unflush的节点

            // All flushed so reset unflushedEntry

            unflushedEntry = null;//链表中所有unflush的节点都过了一遍,所以将unflushedEntry设置为null

        }

    }

    /**

     * Returns an array of direct NIO buffers if the currently pending messages are made of {@link ByteBuf} only.

     * {@link #nioBufferCount()} and {@link #nioBufferSize()} will return the number of NIO buffers in the returned

     * array and the total number of readable bytes of the NIO buffers respectively.

     * <p>

     * Note that the returned array is reused and thus should not escape

     * {@link AbstractChannel#doWrite(ChannelOutboundBuffer)}.

     * Refer to {@link NioSocketChannel#doWrite(ChannelOutboundBuffer)} for an example.

     * </p>

     */

    public ByteBuffer[] nioBuffers() {//本方法返回的是从flushedEntry到unflushedEntry区间内的这一段链表关联的所有ByteBuffer,可以用于将数据写入到网卡中

        long nioBufferSize = 0;

        int nioBufferCount = 0;

        final InternalThreadLocalMap threadLocalMap = InternalThreadLocalMap.get();

        ByteBuffer[] nioBuffers = NIO_BUFFERS.get(threadLocalMap);

        Entry entry = flushedEntry;

        while (isFlushedEntry(entry) && entry.msg instanceof ByteBuf) {//从flushedEntry向后遍历链表,直到遍历到unflushedEntry指针为止

            if (!entry.cancelled) {

                ByteBuf buf = (ByteBuf) entry.msg;

                final int readerIndex = buf.readerIndex();

                final int readableBytes = buf.writerIndex() - readerIndex;

                if (readableBytes > 0) {

                    if (Integer.MAX_VALUE - readableBytes < nioBufferSize) {

                        // If the nioBufferSize + readableBytes will overflow an Integer we stop populate the

                        // ByteBuffer array. This is done as bsd/osx don't allow to write more bytes then

                        // Integer.MAX_VALUE with one writev(...) call and so will return 'EINVAL', which will

                        // raise an IOException. On Linux it may work depending on the

                        // architecture and kernel but to be safe we also enforce the limit here.

                        // This said writing more the Integer.MAX_VALUE is not a good idea anyway.

                        //

                        // See also:

                        // - https://www.freebsd.org/cgi/man.cgi?query=write&sektion=2

                        // - http://linux.die.net/man/2/writev

                        break;

                    }

                    nioBufferSize += readableBytes;

                    int count = entry.count;

                    if (count == -1) {

                        //noinspection ConstantValueVariableUse

                        entry.count = count =  buf.nioBufferCount();

                    }

                    int neededSpace = nioBufferCount + count;

                    if (neededSpace > nioBuffers.length) {

                        nioBuffers = expandNioBufferArray(nioBuffers, neededSpace, nioBufferCount);

                        NIO_BUFFERS.set(threadLocalMap, nioBuffers);

                    }

                    if (count == 1) {//msg可能是CompositeByteBuf,由多个buffer组成,需要做额外处理

                        ByteBuffer nioBuf = entry.buf;

                        if (nioBuf == null) {

                            // cache ByteBuffer as it may need to create a new ByteBuffer instance if its a

                            // derived buffer

                            entry.buf = nioBuf = buf.internalNioBuffer(readerIndex, readableBytes);

                        }

                        nioBuffers[nioBufferCount ++] = nioBuf;

                    } else {

                        ByteBuffer[] nioBufs = entry.bufs;

                        if (nioBufs == null) {

                            // cached ByteBuffers as they may be expensive to create in terms

                            // of Object allocation

                            entry.bufs = nioBufs = buf.nioBuffers();

                        }

                        nioBufferCount = fillBufferArray(nioBufs, nioBuffers, nioBufferCount);

                    }

                }

            }

            entry = entry.next;

        }

        this.nioBufferCount = nioBufferCount;

        this.nioBufferSize = nioBufferSize;

        return nioBuffers;

    }

    /**

     * Removes the fully written entries and update the reader index of the partially written entry.

     * This operation assumes all messages in this buffer is {@link ByteBuf}.

     */

    public void removeBytes(long writtenBytes) {//在数据被写入到网卡后调用,传入已经写入网卡的数据的长度,移除从flushedEntry指针往后的已经被写入到网卡的Entry,并修改flushedEntry指针

        for (;;) {

            Object msg = current();//获取flushedEntry指针

            if (!(msg instanceof ByteBuf)) {

                assert writtenBytes == 0;

                break;

            }

            final ByteBuf buf = (ByteBuf) msg;

            final int readerIndex = buf.readerIndex();

            final int readableBytes = buf.writerIndex() - readerIndex;

            if (readableBytes <= writtenBytes) {//如果writtenBytes还没用完,则再移除一个Entry

                if (writtenBytes != 0) {

                    progress(readableBytes);

                    writtenBytes -= readableBytes;

                }

                remove();//从链表中移除这个Entry,并更新flushedEntry指针的位置

            } else { // readableBytes > writtenBytes

                if (writtenBytes != 0) {

                    buf.readerIndex(readerIndex + (int) writtenBytes);//修改Entry中ByteBuf的读指针的位置

                    progress(writtenBytes);

                }

                break;

            }

        }

        clearNioBuffers();

    }
小结:
a. ChannelOutboundBuffer是一个由链表组成的缓冲区,内部维护了三个指针,flushedEntry/unflushedEntry/tailEntry
b. 调用addMessage方法可以将待写入的数据挂载到链表结尾,如果unflushedEntry为null,则将其设置为当前Entry
c. addFlush方法会将unflushedEntry指针设置为null,表示链表中,flushedEntry以后的所有Entry都可以写入网卡了
d. nioBuffers方法会将从flushedEntry到unflushedEntry指针内的所有Entry转换为Java原生nio的ByteBuffer数组并返回,Netty会将这些ByteBuffer数组中的数据写入网卡中,并记录已经成功写入网卡的数据的长度,然后调用removeBytes方法
e. removeBytes方法会根据传入的writtenBytes参数,从flushedEntry开始,逐个移除Entry,直到把所有已经成功写入网卡的Entry全部移除为止
Netty源码学习(六)ChannelPipeline的更多相关文章
- 【Netty源码学习】ChannelPipeline(一)
ChannelPipeline类似于一个管道,管道中存放的是一系列对读取数据进行业务操作的ChannelHandler. 1.ChannelPipeline的结构图: 在之前的博客[Netty源码学习 ...
- 【Netty源码学习】DefaultChannelPipeline(三)
上一篇博客中[Netty源码学习]ChannelPipeline(二)我们介绍了接口ChannelPipeline的提供的方法,接下来我们分析一下其实现类DefaultChannelPipeline具 ...
- 【Netty源码分析】ChannelPipeline(二)
在上一篇博客[Netty源码学习]ChannelPipeline(一)中我们只是大体介绍了ChannelPipeline相关的知识,其实介绍的并不详细,接下来我们详细介绍一下ChannelPipeli ...
- Netty 源码学习——EventLoop
Netty 源码学习--EventLoop 在前面 Netty 源码学习--客户端流程分析中我们已经知道了一个 EventLoop 大概的流程,这一章我们来详细的看一看. NioEventLoopGr ...
- Netty 源码学习——客户端流程分析
Netty 源码学习--客户端流程分析 友情提醒: 需要观看者具备一些 NIO 的知识,否则看起来有的地方可能会不明白. 使用版本依赖 <dependency> <groupId&g ...
- Netty源码学习系列之4-ServerBootstrap的bind方法
前言 今天研究ServerBootstrap的bind方法,该方法可以说是netty的重中之重.核心中的核心.前两节的NioEventLoopGroup和ServerBootstrap的初始化就是为b ...
- 【Netty源码学习】ServerBootStrap
上一篇博客[Netty源码学习]BootStrap中我们介绍了客户端使用的启动服务,接下来我们介绍一下服务端使用的启动服务. 总体来说ServerBootStrap有两个主要功能: (1)调用父类Ab ...
- 【Netty源码学习】EventLoopGroup
在上一篇博客[Netty源码解析]入门示例中我们介绍了一个Netty入门的示例代码,接下来的博客我们会分析一下整个demo工程运行过程的运行机制. 无论在Netty应用的客户端还是服务端都首先会初始化 ...
- (一)Netty源码学习笔记之概念解读
尊重原创,转载注明出处,原文地址:http://www.cnblogs.com/cishengchongyan/p/6121065.html 博主最近在做网络相关的项目,因此有契机学习netty,先 ...
随机推荐
- Oracle 11g数据库安装与卸载的方法图解(windows)
一.Oracle 11g安装 安装之前要先确定自己的电脑配置,以windows为例,如果是win7以下系统如xp等,可以选择Oracle 10g.因为10g的程序文件只有200多兆,而11g及达到了2 ...
- 剑指Offer - 九度1367 - 二叉搜索树的后序遍历序列
剑指Offer - 九度1367 - 二叉搜索树的后序遍历序列2013-11-23 03:16 题目描述: 输入一个整数数组,判断该数组是不是某二叉搜索树的后序遍历的结果.如果是则输出Yes,否则输出 ...
- Json 转换 1 转成 true 0 转成false
- Cannot create a secure XMLInputFactory --CXF调用出错
在调用方法前加上下面三句即可调用成功: Properties props = System.getProperties(); props.setProperty("org.apache.cx ...
- 5.修改haproxy配置文件
需求: 1.查 输入:www.oldboy.org 获取当前backend下的所有记录 2.新建 输入: arg = { 'backend': 'www.oldboy.org', 'record':{ ...
- 第一天docker入门
[01 入门] docker 最核心为三部分组成 镜像,仓库和容器 镜像:一个只读的模板 仓库:代码仓库,镜像的集合 容器:镜像的实例化进程 我们可以这样理解 容器就是一个沙箱,docker利用容器运 ...
- ASP.NET Core 2.1 源码学习之 Options[3]:IOptionsMonitor 【转】
原文链接:https://www.cnblogs.com/RainingNight/p/strongly-typed-options-ioptions-monitor-in-asp-net-core. ...
- 孤荷凌寒自学python第二十七天python的datetime模块及初识datetime.date模块
孤荷凌寒自学python第二十七天python的datetime模块及初识datetime.date模块 (完整学习过程屏幕记录视频地址在文末,手写笔记在文末) 一.datetime模块 dateti ...
- vue vscode 开始
E:\Html\4 Vue版>npm config set registry https://registry.npm.taobao.org E:\Html\4 Vue版>npm i &g ...
- Nginx和Squid配合搭建的Web服务器前端系统
这个架构是目前我个人觉得比较稳妥并且最方便的架构,易于多数人接受: 前端的lvs和squid,按照安装方法,把epoll打开,配置文件照搬,基本上问题不多. 这个架构和app_squid架构的区别,也 ...