Python Paramiko模块与MySQL数据库操作
Paramiko模块批量管理:
通过调用ssh协议进行远程机器的批量命令执行.
要使用paramiko模块那就必须先安装这个第三方模块,仅需要在本地上安装相应的软件(python以及PyCrypto),对远程服务器没有配置要求,对于连接多台服务器,进行复杂的连接操作特别有帮助。
一、安装:
1:安装gcc和python-devel
- yum install gcc gcc-c++ python-devel #安装所需环境
2: paramiko依赖pycrypto模块,要先下载pycrypto安装
- wget http://ftp.dlitz.net/pub/dlitz/crypto/pycrypto/pycrypto-2.6.tar.gz
解压后进入主目录执行下面命令:
- python setup.py build
- python setup.py install
3:下载paramiko进行安装
- wget http://www.lag.net/paramiko/download/paramiko-1.7.7.1.tar.gz
解压后进入主目录执行下面命令
- python setup.py build
- python setup.py install
4: 修改配置
在python的命令行模式下面导入模块,进行测试:
- import paramiko
结果提示错误如下:
- Traceback (most recent call last):
- File "<stdin>", line 1, in <module>
- File "/usr/lib/python2.6/site-packages/paramiko-1.7.7.1-py2.6.egg/paramiko/__init__.py", line 69, in <module>
- from transport import SecurityOptions, Transport
- File "/usr/lib/python2.6/site-packages/paramiko-1.7.7.1-py2.6.egg/paramiko/transport.py", line 32, in <module>
- from paramiko import util
- File "/usr/lib/python2.6/site-packages/paramiko-1.7.7.1-py2.6.egg/paramiko/util.py", line 32, in <module>
- from paramiko.common import *
- File "/usr/lib/python2.6/site-packages/paramiko-1.7.7.1-py2.6.egg/paramiko/common.py", line 98, in <module>
- from Crypto import Random
- File "/usr/lib64/python2.6/site-packages/Crypto/Random/__init__.py", line 29, in <module>
- from Crypto.Random import _UserFriendlyRNG
- File "/usr/lib64/python2.6/site-packages/Crypto/Random/_UserFriendlyRNG.py", line 38, in <module>
- from Crypto.Random.Fortuna import FortunaAccumulator
- File "/usr/lib64/python2.6/site-packages/Crypto/Random/Fortuna/FortunaAccumulator.py", line 39, in <module>
- import FortunaGenerator
- File "/usr/lib64/python2.6/site-packages/Crypto/Random/Fortuna/FortunaGenerator.py", line 34, in <module>
- from Crypto.Util.number import ceil_shift, exact_log2, exact_div
- File "/usr/lib64/python2.6/site-packages/Crypto/Util/number.py", line 56, in <module>
- if _fastmath is not None and not _fastmath.HAVE_DECL_MPZ_POWM_SEC:
- AttributeError: 'module' object has no attribute 'HAVE_DECL_MPZ_POWM_SEC'
解决方法:
进入/usr/lib64/python2.6/site-packages/Crypto/Util/number.py ,注解下面两行
- #if _fastmath is not None and not _fastmath.HAVE_DECL_MPZ_POWM_SEC:
- # _warn("Not using mpz_powm_sec. You should rebuild using libgmp >= 5 to avoid timing attack vulnerability.", PowmInsecureWarning)
二、paramiko模块:
SSHClient
用于连接远程服务器并执行基本命令
基于用户名密码连接:
- #!/usr/bin/env python
- # encoding: utf-8
- import paramiko
- #记录日志
- paramiko.util.log_to_file('paramiko.log')
- #创建SSH对象
- ssh = paramiko.SSHClient()
- # 允许连接不在know_hosts文件中的主机
- ssh.set_missing_host_key_policy(paramiko.AutoAddPolicy())
- # 连接远程主机
- ssh.connect(hostname='10.10.100.100',port=22,username='root',password='******')
- #执行命令(输入,输出,错误返回结果)
- stdin,stdout,stderr=ssh.exec_command('free -m')
- #读取stdout命令结果
- result = stdout.read()
- #输出并打印出结果.
- print result
- # 关闭连接
- SSHClient 封装 Transport:
- import paramiko
- paramiko.util.log_to_file('paramilo.log')
- transport = paramiko.Transport(('10.10.100.110', 22))
- transport.connect(username='www', password='***')
- ssh = paramiko.SSHClient()
- ssh._transport = transport
- stdin, stdout, stderr = ssh.exec_command('df -Th')
- print stdout.read()
- transport.close()
SSHClient 封装 Transport
三、使用Key连接远程:
本机生成key :ssh-keygen
- #!/usr/bin/env python
- # encoding: utf-8
- import paramiko
- private_key = paramiko.RSAKey.from_private_key_file('/home/www/.ssh/id_rsa') #本机私钥文件
- # 创建SSH对象
- ssh = paramiko.SSHClient()
- # 允许连接不在know_hosts文件中的主机
- ssh.set_missing_host_key_policy(paramiko.AutoAddPolicy())
- # 连接服务器
- ssh.connect(hostname='ip', port=22, username='www', pkey=private_key)
- # 执行命令
- stdin, stdout, stderr = ssh.exec_command('df')
- # 获取命令结果
- result = stdout.read()
- # 关闭连接
- ssh.close()
- import paramiko
- private_key = paramiko.RSAKey.from_private_key_file('/home/www/.ssh/id_rsa')
- transport = paramiko.Transport(('hostname', 22))
- transport.connect(username='www', pkey=private_key)
- ssh = paramiko.SSHClient()
- ssh._transport = transport
- stdin, stdout, stderr = ssh.exec_command('df')
- transport.close()
SSHClient 封装 Transport
SFTPClient
用于连接远程服务器并执行上传下载
基于用户名密码上传下载:
- import paramiko
- transport = paramiko.Transport(('hostname',22))
- transport.connect(username='www',password='****')
- sftp = paramiko.SFTPClient.from_transport(transport)
- # 将location.py 上传至服务器 /tmp/test.py
- sftp.put('/tmp/parmiko1.py', '/tmp/test.py')
- # 将remove_path 下载到本地 local_path
- sftp.get('remove_path', 'local_path')
- transport.close()
基于公钥密钥上传下载:
- import paramiko
- private_key = paramiko.RSAKey.from_private_key_file('/home/www/.ssh/id_rsa')
- transport = paramiko.Transport(('hostname', 22))
- transport.connect(username='www', pkey=private_key )
- sftp = paramiko.SFTPClient.from_transport(transport)
- # 将location.py 上传至服务器 /tmp/test.py
- sftp.put('/tmp/paramiko1.py', '/tmp/test.py')
- # 将remove_path 下载到本地 local_path
- sftp.get('remove_path', 'local_path')
- transport.close
Python paramiko模块使用实例:
- #!/usr/bin/env python
- #coding:utf-8
- import paramiko
- print """iplist.txt
- 10.10.100.127 user1 user1@123
- 10.10.100.128 user1 user1@123
- 10.10.100.129 user1 user1@123
- 10.10.100.130 user1 user1@123
- """
- def param_login():
- # paramiko.util.log_to_file('paramiko.log')
- # s = paramiko.SSHClient()
- # s.set_missing_host_key_policy(paramiko.AutoAddPolicy())
- # try:
- # s.connect(hostname=ip,port=22,username=username,password=passwd)
- # stdin, stdout, stderr = s.exec_command('free -m')
- # print u"ip地址是%s的执行结果为:" %(ip),"\n",stdout.read()
- # except:
- # return "None"
- # s.close()
- #SSHClient 封装 Transport:
- paramiko.util.log_to_file('paramilo.log')
- try:
- transport = paramiko.Transport((ip, 22))
- transport.connect(username=username, password=passwd)
- ssh = paramiko.SSHClient()
- ssh._transport = transport
- stdin, stdout, stderr = ssh.exec_command('df -Th')
- print u"\033[32;1mip地址是%s的执行结果为:\033[0m" %(ip),"\n",stdout.read()
- except:
- return "None"
- transport.close()
- #用于连接远程服务器并执行上传下载
- def sshftp():
- transport = paramiko.Transport((ip,22))
- transport.connect(username=username,password=passwd)
- sftp = paramiko.SFTPClient.from_transport(transport)
- # 将本地/tmp/目录下文件上传至服务器/tmp目录下并改名
- sftp.put('/tmp/1.txt', '/tmp/2.txt')
- # 将remove_path 下载到本地 local_path
- #sftp.get('remove_path', 'local_path')
- sftp.get('/tmp/2.txt','/tmp/2.txt')
- transport.close()
- if __name__ == "__main__":
- with open('iplist.txt','r') as userlist:
- for i in userlist.readlines(): #循环读取文件
- m = i.strip() #去除空行
- #print m
- ip,username,passwd = m.split()
- param_login()
- sshftp()
登录机器并执行命令
- #!/usr/bin/env python
- #coding:utf-8
- import sys
- import time
- import paramiko
- class paramiko_ssh(object):
- def __init__(self,hostname,username,passwd):
- self.Hostname = hostname
- self.port = 22
- self.Username = username
- self.Passwd = passwd
- def ssh_login(self):
- #SSHClient 封装 Transport:
- paramiko.util.log_to_file('paramilo.log')
- try:
- transport = paramiko.Transport((self.Hostname, 22))
- transport.connect(username=self.Username, password=self.Passwd)
- ssh = paramiko.SSHClient()
- ssh._transport = transport
- stdin, stdout, stderr = ssh.exec_command('df -Th')
- print u"\033[32;1mip地址是%s的执行结果为:\033[0m" %(self.Hostname),"\n",stdout.read()
- except:
- return "None"
- time.sleep(3)
- sys.exit()
- transport.close()
- #用于连接远程服务器并执行上传下载
- def sshftp(self):
- transport = paramiko.Transport((self.Hostname,22))
- transport.connect(username=self.Username,password=self.Passwd)
- sftp = paramiko.SFTPClient.from_transport(transport)
- #将本地/tmp/目录下文件上传至服务器/tmp目录下并改名
- sftp.put('/tmp/1.txt', '/tmp/2.txt')
- # 将remove_path 下载到本地 local_path
- #sftp.get('remove_path', 'local_path')
- sftp.get('/tmp/2.txt','/tmp/2.txt')
- transport.close()
- if __name__ == "__main__":
- with open('iplist.txt','r') as userlist:
- for i in userlist.readlines(): #循环读取文件
- m = i.strip() #去除空行
- #print m
- hostname,username,passwd = m.split()
- p = paramiko_ssh(hostname,username,passwd)
- p.ssh_login()
- p.sshftp()
通过类执行登录操作
Python的paramiko模块块基于SSH用于连接远程服务器并执行相关操作. 堡垒机就是基于盖模块而开发的.

实现思路:
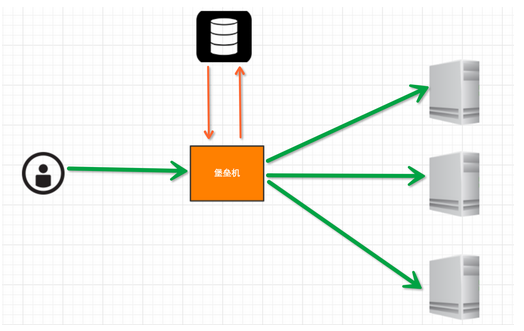
堡垒机执行流程:
- 管理员为用户在服务器上创建账号(将公钥放置服务器,或者使用用户名密码)
- 用户登陆堡垒机,输入堡垒机用户名密码,现实当前用户管理的服务器列表
- 用户选择服务器,并自动登陆
- 执行操作并同时将用户操作记录
注:配置.brashrc实现ssh登陆后自动执行脚本,如:/usr/bin/python /home/www/menu.py
未完代写.........................

Python 操作 Mysql 模块的安装:
- linux:
- yum install MySQL-python
- window:
- http://files.cnblogs.com/files/wupeiqi/py-mysql-win.zip
SQL基本使用
1、数据库操作
- show databases;
- use [databasename];
- create database [name];
2、数据表操作
- show tables;
- create table students
- (
- id int not null auto_increment primary key, #自动增长,主键
- name char(8) not null,
- sex char(4) not null,
- age tinyint unsigned not null,
- tel char(13) null default "-"
- );
- CREATE TABLE `wb_blog` (
- `id` smallint(8) unsigned NOT NULL,
- `catid` smallint(5) unsigned NOT NULL DEFAULT '',
- `title` varchar(80) NOT NULL DEFAULT '',
- `content` text NOT NULL,
- PRIMARY KEY (`id`),
- UNIQUE KEY `catename` (`catid`)
- ) ;
3、数据操作:
- insert into students(name,sex,age,tel) values('www','man',18,'')
- delete from students where id =2;
- update students set name = 'toom' where id =1;
- select * from students
4、其他
- 主键 主键是表里面唯一识别记录的字段,一般是id
- 外键 外键是该表与另一个表之间联接的字段 ,必须为另一个表中的主键 用途是确保数据的完整性
- 左右连接 分左连接,右连接,内连接
Python MySQL API
一、插入数据
- import MySQLdb
- # 打开数据库连接
- conn = MySQLdb.connect(host='127.0.0.1',user='root',passwd='',db='mydb')
- # 使用cursor()方法获取操作游标
- cur = conn.cursor()
- # 使用execute方法执行SQL语句
#reCount = cur.execute("create table UserInfo(id int,name varchar(20),nat varchar(30))") 创建表.- reCount = cur.execute('insert into UserInfo(Name,Address) values(%s,%s)',('toom','usa'))
- #提交sql语句
- conn.commit()
- # 关闭数据库连接
- cur.close()
conn.close()- print reCount
- #execute(self, query, args)
- #执行单条sql语句,接收的参数为sql语句本身和使用的参数列表,返回值为受影响的行数
- executemany(self, query, args)
- #执行单挑sql语句,但是重复执行参数列表里的参数,返回值为受影响的行数,可以一次插入多条值
- import MySQLdb
- conn = MySQLdb.connect(host='127.0.0.1',user='root',passwd='',db='mydb')
- cur = conn.cursor()
- li =[
- ('www','usa'),
- ('toom','jpan'),
- ]
- reCount = cur.executemany('insert into UserInfo(Name,Address) values(%s,%s)',li)
- conn.commit()
- cur.close()
- conn.close()
- print reCount
批量插入数据
注意:cur.lastrowid
二、删除数据:
- import MySQLdb
- conn = MySQLdb.connect(host='127.0.0.1',user='root',passwd='',db='mydb')
- cur = conn.cursor()
- reCount = cur.execute('delete from UserInfo where id=1')
- conn.commit() #提交数据
- cur.close() #关闭游标
- conn.close() #关闭数据库连接
- print reCount
三、修改数据
- import MySQLdb
- conn = MySQLdb.connect(host='127.0.0.1',user='root',passwd='',db='mydb')
- cur = conn.cursor()
- reCount = cur.execute('update UserInfo set Name = %s',('alin',))
#reCount = cur.execute('update UserInfo set sex="man" where Name="alin"') 将Name名是alin的用户的sex改成“man”,set部分将改变.- conn.commit()
- cur.close()
- conn.close()
- print reCount
四、查数据
- # ############################## fetchone/fetchmany(num) ##############################
- import MySQLdb
- conn = MySQLdb.connect(host='127.0.0.1',user='root',passwd='',db='mydb')
- cur = conn.cursor()
- reCount = cur.execute('select * from UserInfo')
- print cur.fetchone()
- print cur.fetchone()
- cur.scroll(-1,mode='relative')
- print cur.fetchone()
- print cur.fetchone()
- cur.scroll(0,mode='absolute')
- print cur.fetchone()
- print cur.fetchone()
- cur.close()
- conn.close()
- print reCount
- # ############################## fetchall ##############################
- import MySQLdb
- conn = MySQLdb.connect(host='127.0.0.1',user='root',passwd='',db='mydb')
- #cur = conn.cursor(cursorclass = MySQLdb.cursors.DictCursor)
- cur = conn.cursor()
- reCount = cur.execute('select Name,Address from UserInfo')
- nRet = cur.fetchall()
- cur.close()
- conn.close()
- print reCount
- print nRet
- for i in nRet:
- print i[0],i[1]
- # ############################## fetchmany ##############################
- import MySQLdb
- conn = MySQLdb.connect(host='127.0.0.1',user='root',passwd='',db='mydb')
- #cur = conn.cursor(cursorclass = MySQLdb.cursors.DictCursor)
- cur = conn.cursor()
- reCount = cur.execute('select Name,Address from UserInfo')
- #读出表中的所有数据
- info = cur.fetchmany(reCount)
- for ii in info:
- print ii
- cur.close()
- conn.commit()
- conn.close()
cursor方法执行与返回值
cursor方法提供两类操作:1.执行命令,2.接收返回值 。
cursor用来执行命令的方法:
- #cursor用来执行命令的方法:
callproc(self, procname, args) //用来执行存储过程,接收的参数为存储过程名和参数列表,返回值为受影响的行数- execute(self, query, args) //执行单条sql语句,接收的参数为sql语句本身和使用的参数列表,返回值为受影响的行数
- executemany(self, query, args) //执行单挑sql语句,但是重复执行参数列表里的参数,返回值为受影响的行数
- nextset(self) //移动到下一个结果集
- #cursor用来接收返回值的方法:
- fetchall(self) //接收全部的返回结果行.
- fetchmany(self, size=None) //接收size条返回结果行.如果size的值大于返回的结果行的数量,则会返回cursor.arraysize条数据
- fetchone(self) //返回一条结果行
- scroll(self, value, mode='relative') //移动指针到某一行.如果mode='relative',则表示从当前所在行移动value条,如果mode='absolute',则表示从结果集的第一行移动value条
- rowcount //这是一个只读属性,并返回执行execute()方法后影响的行数
另附MySQL安装:
yum库安装MySQL
系统CenOS6.4
1.查看CentOS自带mysql是否已安装
- yum list installed | grep mysql
2.若有自带安装的mysql,如何卸载CentOS系统自带mysql数据库?
- yum -y remove mysql-*
3.查看yum库上的mysql版本信息(CentOS系统需要正常连接网络)。
- yum list | grep mysql 或 yum -y list mysql*
4.使用yum安装mysql数据库。
- yum -y install mysql-server mysql mysql-devel
注:安装mysql只是安装了数据库,只有安装mysql-server才相当于安装了客户端。
5.查看刚安装mysql数据库版本信息。
- rpm -qi mysql-server
至此,MySQL安装完成!
Python Paramiko模块与MySQL数据库操作的更多相关文章
- [Python] 学习笔记之MySQL数据库操作
1 Python标准数据库接口DB-API介绍 Python标准数据库接口为 Python DB-API,它为开发人员提供了数据库应用编程接口.Python DB-API支持很多种的数据库,你可以选择 ...
- python笔记二(mysql数据库操作)
python2.x使用MySQLdb python3.x使用pymysql代替MySQLdb 不过我使用的是python3.5,MySQLdb还是可以在python3.5使用的. #!/usr/bin ...
- python 2 如何安装 MySQL 数据库操作库
我试了好几种网上的办法,在 windows 10 VS2017 环境下不是缺了头文件,就是缺 .lib,反正十分繁琐,以后我也懒得搞了,都用 annaconda 来搞定就好了,时间宝贵. 在 控制台中 ...
- Python进行MySQL数据库操作
最近开始玩Python,慢慢开始喜欢上它了,以前都是用shell来实现一些自动化或者监控的操作,现在用Python来实现,感觉更棒,Python是一门很强大的面向对象语言,所以作为一个运维DBA或者运 ...
- python之(mysql数据库操作)
前言:关心3步骤(此文章只针对python自动化根基展开描述) 什么是mysql数据库操作? 答:利用python对mysql数据库进行增, 删, 改, 查 操作 为什么要用python对mysql ...
- Python/MySQL(四、MySQL数据库操作)
Python/MySQL(四.MySQL数据库操作) 一.数据库条件语句: case when id>9 then ture else false 二.三元运算: if(isnull(xx)0, ...
- Python数据存储 — MySQL数据库操作
本地安装MySQL 调试环境python3.6,调试python操作mysql数据库,首先要在本地或服务器安装mysql数据库. 安装参考:https://mp.csdn.net/postedit/8 ...
- python程序中使用MySQL数据库
目录 python程序中使用MySQL数据库 1 pymysql连接数据库 2 sql 注入 3 增删改查操作 4 pymysql使用总结 python程序中使用MySQL数据库 1.python中使 ...
- python paramiko模块学习分享
python paramiko模块学习分享 paramiko是用python语言写的一个模块,遵循SSH2协议,支持以加密和认证的方式,进行远程服务器的连接.paramiko支持Linux, Sola ...
随机推荐
- 如何让ie 7 支持box-shadow
box-shadow是一个很好用并且也常用的css 3属性,但是,如果我们要保证它能在ie 8及更低的版本下运行的话,需要借助一些其他的插件或文件.在这里我主要讲一下,如何用PIE.htc来解决ie ...
- Java多线程与并发库高级应用-线程池
线程池 线程池的思想 线程池的概念与Executors类的应用 > 创建固定大小的线程池 > 创建缓存线程池 > 创建单一线程池(如何实现线程死掉后重新启动?) 关闭线程池 > ...
- Leetcode Integer Replacement
Given a positive integer n and you can do operations as follow: If n is even, replace n with n/2. If ...
- 【caffe】epoch,[batch_size],iteration的含义
@tags caffe 概念 一个epoch表示"大层面上的一次迭代",也就是指,(假定是训练阶段)处理完所有训练图片,叫一个epoch 但是每次训练图片可能特别多,内存/显存塞不 ...
- 【BZOJ-1009】GT考试 KMP+DP+矩阵乘法+快速幂
1009: [HNOI2008]GT考试 Time Limit: 1 Sec Memory Limit: 162 MBSubmit: 2745 Solved: 1694[Submit][Statu ...
- 设置CentOS6.5时钟同步
一.测试ntp服务 # rpm -q ntp ntp-4.2.4p8-2.el6.x86_64 // 这表示已安装了,如果没有安装,这是空白. 二./etc/ntp.conf 红色部分是修改的. 配置 ...
- 百度地图学习(Ⅰ)-Android端地图的显示及简单应用
ps:(1.地图应用一定要在真机测试: 2.Design By:Android Stdio: 3.百度地图官方参考链接(http://developer.baidu.com/map/index.php ...
- Unity 联网小测试(WWW)
研究了很多联网的方式,甚至把TCP/IP,shock,HTTP的关系都搞清楚了,终于弄明白怎么在Unity中用GET或POST的方式通信了,还是有点小激动的,但是不排除有更好的方式,听说Unity还是 ...
- AngularJs angular.Module模块接口配置
angular.Module Angular模块配置接口. 方法: provider(name,providerType); name:服务名称. providerType:创建一个服务的实例的构造函 ...
- Appium for IOS testing on Mac
一:环境 1.Mac OS X 10.9.1 2.Xcod 5.0.2 3.Appium 1.3.6 下载地址:https://bitbucket.org/appium/appium.app/down ...