堡垒机-jumpserver
官方网站
Jumpserver 软件包环境要求:
Python = 3.6.x
Mysql Server ≥ 5.6
Mariadb Server ≥ 5.5.56
Redis
** 生产环境部署建议部署 1.4.8 版本 **
环境
jumpserver服务端:
[root@jumpserver ~]# cat /etc/redhat-release

CentOS Linux release 7.4.1708 (Core)

[root@jumpserver ~]# uname -r

3.10.0-693.el7.x86_64

[root@jumpserver ~]# uname -n

jumpserver

[root@jumpserver ~]# uname -m

x86_64

[root@jumpserver ~]# ifconfig ens33 | grep "inet "|awk '{print $2}'

10.0.0.161
jumpserver被管理端:
[root@jumpserver-client ~]# cat /etc/redhat-release

CentOS Linux release 7.4.1708 (Core)

[root@jumpserver-client ~]# uname -r

3.10.0-693.el7.x86_64

[root@jumpserver-client ~]# uname -n

jumpserver-client

[root@jumpserver-client ~]# uname -m

x86_64

[root@jumpserver-client ~]# ifconfig ens33 | grep "inet " | awk '{ print $2}'

10.0.0.162
准备所需软件:
jumpserver: https://github.com/jumpserver/jumpserver
luna: https://demo.jumpserver.org/download/luna
coco: https://github.com/jumpserver/coco
                    **在线下载代码方式: **

                        git clone https://github.com/jumpserver/coco.git && cd coco && git
python: wget https://www.python.org/ftp/python/3.6.1/Python-3.6.1.tar.xz
手动本地jumpserver-服务端搭建
初始化一些系统环境设置:
1. 创建软件包放置目录:
[root@jumpserver ~]# mkdir /server/sources -p
将所需软件全部放在/server/sources/ 目录里
软件包打包下载:
链接:https://pan.baidu.com/s/1ZJzXrLnsXqsqIMkLjKbrIw
提取码:be45
复制这段内容后打开百度网盘手机App,操作更方便哦
[root@jumpserver ~]# cd /server/sources/

[root@jumpserver sources]# ls

coco        luna.tar.gz   Python-3.6.1.tar.xz

jumpserver  python-package
2. 关闭防火墙
[root@jumpserver sources]# systemctl stop firewalld

[root@jumpserver sources]# systemctl disable firewalld

[root@jumpserver sources]# systemctl status firewalld

● firewalld.service - firewalld - dynamic firewall daemon

   Loaded: loaded (/usr/lib/systemd/system/firewalld.service; disabled; vendor preset: enabled)

   Active: inactive (dead)

     Docs: man:firewalld(1)

[root@jumpserver sources]# systemctl status firewalld

● firewalld.service - firewalld - dynamic firewall daemon

   Loaded: loaded (/usr/lib/systemd/system/firewalld.service; disabled; vendor preset: enabled)

   Active: inactive (dead)

     Docs: man:firewalld(1)
3. 关闭selinux
[root@jumpserver sources]# setenforce 0

[root@jumpserver sources]# getenforce

只要显示Permissive或者Disabled就是成功

将/etc/selinux/config配置文件里的SELINUX=enforcing改为SELINUX=disabled

使其永久生效
4. 如果生产环境需要开启selinux和防火墙的情况下则使用(直接复制整段进命令行运行即可):
echo -e "\033[31m 1. 防火墙 Selinux 设置 \033[0m" \

&& if [ "$(systemctl status firewalld | grep running)" != "" ]; then firewall-cmd --zone=public --add-port=80/tcp --permanent; firewall-cmd --zone=public --add-port=2222/tcp --permanent; firewall-cmd --permanent --add-rich-rule="rule family="ipv4" source address="172.17.0.0/16" port protocol="tcp" port="8080" accept"; firewall-cmd --reload; fi \

&& if [ "$(getenforce)" != "Disabled" ]; then setsebool -P httpd_can_network_connect 1; fi
5. 配置中文环境(整段复制到命令行运行即可):
ln -sf /usr/share/zoneinfo/Asia/Shanghai /etc/localtime \

&& yum -y install kde-l10n-Chinese \

&& localedef -c -f UTF-8 -i zh_CN zh_CN.UTF-8 \

&& export LC_ALL=zh_CN.UTF-8 \

&& echo 'LANG="zh_CN.UTF-8"' > /etc/locale.conf
重新登录命令行终端即可生效
安装相关软件
依赖软件
所需依赖软件:
wget #下载;

epel-release #扩展源;

sqlite-devel #数据库;

xz #解压;

gcc #编译器;

automake #编译相关;

zlib-devel #压缩;

openssl-devel #加密;

git #git相关
[root@jumpserver ~]# yum -y install wget epel-release sqlite-devel xz gcc automake zlib-devel openssl-devel epel-release git
编译安装python3.6.1
[root@jumpserver ~]# cd /server/sources/

[root@jumpserver sources]# ls

coco        luna.tar.gz          python-package

jumpserver  Python-3.6.1.tar.xz

[root@jumpserver sources]# ./configure  &&  make  && make install

[root@jumpserver ~]# cd /server/sources/

[root@jumpserver sources]# tar xf Python-3.6.1.tar.xz

[root@jumpserver sources]# cd Python-3.6.1

[root@jumpserver sources]# ./configure  &&  make  -j 4 && make install
使用 Python 虚拟环境(使多版本的python互不影响,共存)
[root@jumpserver Python-3.6.1]# cd /opt/

[root@jumpserver opt]# python3 -m venv py3   #在opt目录下创建一个py3的虚拟环境

[root@jumpserver opt]# source /opt/py3/bin/

activate          easy_install-3.6  python

activate.csh      pip               python3

activate.fish     pip3

easy_install      pip3.6

[root@jumpserver opt]# source /opt/py3/bin/activate

(py3) [root@jumpserver opt]#    #切换成功的,前面有一个(py3)标识
安装 Jumpserver
这里用的版本是 Jumpserver 1.0.0
重新打开一个10.0.0.161的shell连接窗口(注意前面没有py3所以不是在python3的虚拟环境下运行)
①. 安装rpm依赖
[root@jumpserver ~]# cd /server/sources/jumpserver/requirements

[root@jumpserver requirements]# cat rpm_requirements.txt

libtiff-devel libjpeg-devel libzip-devel freetype-devel lcms2-devel libwebp-devel tcl-devel tk-devel sshpass openldap-devel mysql-devel libffi-devel openssh-clients

[root@jumpserver requirements]# yum install -y `cat rpm_requirements.txt`
②. 安装 Python 库依赖
在之前的 (py3) [root@jumpserver ~]# 窗口下进行
确保是这样的提示状态:
(py3) [root@jumpserver ~]#
如果不是请运行
 [root@jumpserver ~]# source /opt/py3/bin/activate

 (py3) [root@jumpserver ~]#    #进入py3虚拟环境
(py3) [root@jumpserver ~]# pip -V

pip 9.0.1 from /opt/py3/lib/python3.6/site-packages (python 3.6)

(py3) [root@jumpserver requirements]# cd /server/sources/jumpserver/requirements  #pip在线安装

(py3) [root@jumpserver ~]# pip install --upgrade pip  -i https://mirrors.aliyun.com/pypi/simple/

(py3) [root@jumpserver ~]# pip install -r /opt/jumpserver/requirements/requirements.txt -i https://mirrors.aliyun.com/pypi/simple/
③. 安装 Redis, Jumpserver 使用 Redis 做 cache 和 celery broke
(注意命令行的提示前缀;这里都不是py3虚拟环境)
[root@jumpserver requirements]# yum  -y install redis

[root@jumpserver requirements]# systemctl enable redis

Created symlink from /etc/systemd/system/multi-user.target.wants/redis.service to /usr/lib/systemd/system/redis.service.

[root@jumpserver requirements]# systemctl start redis
④. 安装 MySQL
[root@jumpserver requirements]# yum  install mariadb mariadb-devel mariadb-server   -y

[root@jumpserver requirements]#  systemctl enable mariadb;systemctl start mariadb
⑤. 建数据库 Jumpserver 并授权
[root@jumpserver requirements]# mysql

MariaDB [(none)]> create database jumpserver default charset 'utf8';

MariaDB [(none)]> grant all on jumpserver.* to 'jumpserver'@'127.0.0.1' identified by '123456';

MariaDB [(none)]> exit;
⑥. 改 Jumpserver 配置文件
将下载来的jumpserver移动到app目录下
[root@jumpserver requirements]# mkdir -p /server/app

[root@jumpserver requirements]# cd /server/app/

[root@jumpserver app]# cp -r /server/sources/jumpserver/ .

[root@jumpserver app]# ls

jumpserver

[root@jumpserver jumpserver]#  cp config_example.py config.py

[root@jumpserver jumpserver]# vim config.py

#编辑class DevelopmentConfig(Config):这一段;因为默认使用该配置

class DevelopmentConfig(Config):

    DEBUG = True

    DB_ENGINE = 'mysql'

    DB_HOST = '127.0.0.1'

    DB_PORT = 3306

    DB_USER = 'jumpserver'

    DB_PASSWORD = '123456'

    DB_NAME = 'jumpserver'

最终效果:

[root@jumpserver jumpserver]# cat config.py

"""

    jumpserver.config

    ~~~~~~~~~~~~~~~~~

    Jumpserver project setting file

    :copyright: (c) 2014-2017 by Jumpserver Team

    :license: GPL v2, see LICENSE for more details.

"""

import os

BASE_DIR = os.path.dirname(os.path.abspath(__file__))

class Config:

    # Use it to encrypt or decrypt data

    # SECURITY WARNING: keep the secret key used in production secret!

    SECRET_KEY = os.environ.get('SECRET_KEY') or '2vym+ky!997d5kkcc64mnz06y1mmui3lut#(^wd=%s_qj$1%x'

    # Django security setting, if your disable debug model, you should setting that

    ALLOWED_HOSTS = ['*']

    # Development env open this, when error occur display the full process track, Production disable it

    DEBUG = True

    # DEBUG, INFO, WARNING, ERROR, CRITICAL can set. See https://docs.djangoproject.com/en/1.10/topics/logging/

    LOG_LEVEL = 'DEBUG'

    LOG_DIR = os.path.join(BASE_DIR, 'logs')

    # Database setting, Support sqlite3, mysql, postgres ....

    # See https://docs.djangoproject.com/en/1.10/ref/settings/#databases

    # SQLite setting:

    DB_ENGINE = 'sqlite3'

    DB_NAME = os.path.join(BASE_DIR, 'data', 'db.sqlite3')

    # MySQL or postgres setting like:

    # DB_ENGINE = 'mysql'

    # DB_HOST = '127.0.0.1'

    # DB_PORT = 3306

    # DB_USER = 'root'

    # DB_PASSWORD = ''

    # DB_NAME = 'jumpserver'

    # When Django start it will bind this host and port

    # ./manage.py runserver 127.0.0.1:8080

    HTTP_BIND_HOST = '0.0.0.0'

    HTTP_LISTEN_PORT = 8080

    # Use Redis as broker for celery and web socket

    REDIS_HOST = '127.0.0.1'

    REDIS_PORT = 6379

    REDIS_PASSWORD = ''

    BROKER_URL = 'redis://%(password)s%(host)s:%(port)s/3' % {

        'password': REDIS_PASSWORD,

        'host': REDIS_HOST,

        'port': REDIS_PORT,

    }

    def __init__(self):

        pass

    def __getattr__(self, item):

        return None

#class DevelopmentConfig(Config):

#    pass

class DevelopmentConfig(Config):

    DEBUG = True

    DB_ENGINE = 'mysql'

    DB_HOST = '127.0.0.1'

    DB_PORT = 3306

    DB_USER = 'jumpserver'

    DB_PASSWORD = '123456'

    DB_NAME = 'jumpserver'

class TestConfig(Config):

    pass

class ProductionConfig(Config):

    pass

# Default using Config settings, you can write if/else for different env

config = DevelopmentConfig()
⑦. 数据库表结构和初始化数据
(py3)虚拟环境下进行;且确保之前的pip已经安装完成了
(py3) [root@jumpserver jumpserver]# cd /server/app/jumpserver/utils

(py3) [root@jumpserver utils]#  bash make_migrations.sh
⑧. 运行jumpserver
(py3) [root@jumpserver utils]# cd /server/app/jumpserver/

(py3) [root@jumpserver jumpserver]# chmod +x jms

(py3) [root@jumpserver jumpserver]# ./jms start all -d   #-d后台运行
jumpserver的使用方法:./jms start|stop|status|restart all
⑨. 访问测试
默认 账号:admin
密码:admin
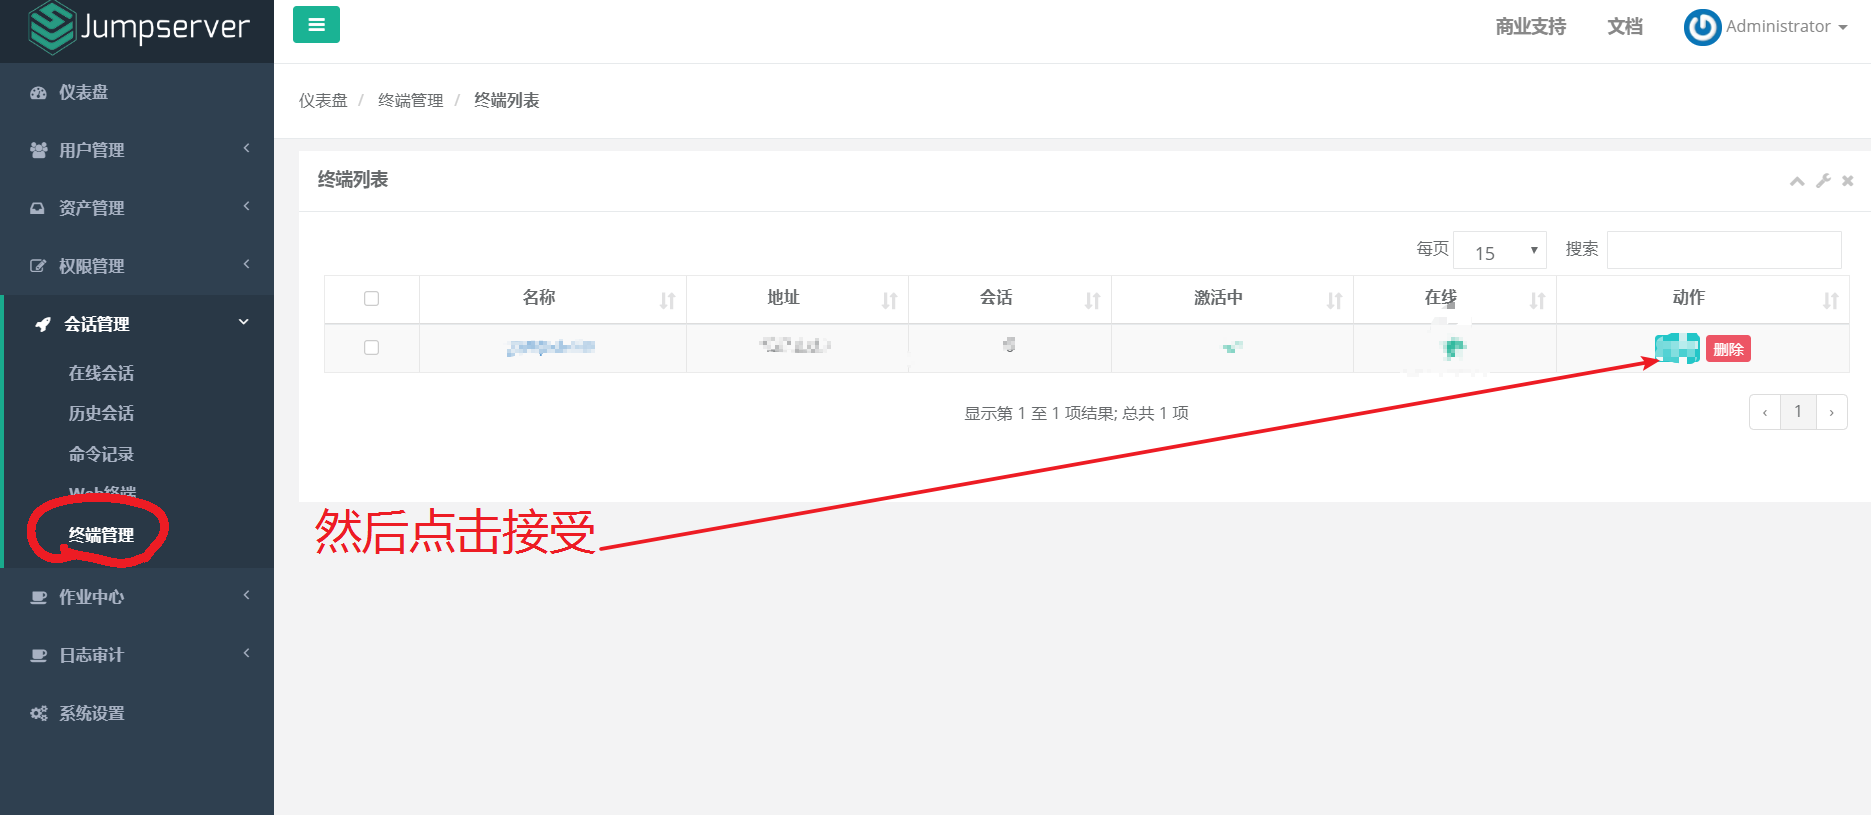
安装 组件
在web页面上点击web终端

会看到:
Luna是单独部署的一个程序,你需要部署luna,coco,配置nginx做url分发, 如果你看到了这个页面,证明你访问的不是nginx监听的端口,祝你好运
所以接下来,我们安装luna和coco
安装coco
**coco实现了
SSH Server 和 Web Terminal Server 的组件,提供 SSH 和 WebSocket 接口,
使用 Paramiko 和 Flask 开发**
(py3) [root@jumpserver coco]# cd /server/sources/coco/requirements/

(py3) [root@jumpserver requirements]# yum install `cat rpm_requirements.txt`

(py3) [root@jumpserver requirements]# pip install -r requirements.txt -i https://mirrors.aliyun.com/pypi/simple/

(py3) [root@jumpserver requirements]# cp -r /server/sources/coco/ /server/app/

(py3) [root@jumpserver requirements]# cd /server/app/coco/

(py3) [root@jumpserver coco]# cp conf_example.py conf.py

(py3) [root@jumpserver coco]# chmod +x cocod

(py3) [root@jumpserver coco]# ./cocod start -d

Start coco process
使用方法:./cocod start|stop|status|restart
安装Web-Terminal前端-Luna组件
Luna概述:Luna现在是 Web Terminal 前端,计划前端页面都由该项目提供,Jumpserver 只提供 API,不再负责后台渲染html等
(py3) [root@jumpserver coco]# cd /server/sources/

(py3) [root@jumpserver sources]# tar xf luna.tar.gz

(py3) [root@jumpserver sources]# cp -r luna /server/app/
配置Nginx整合各组件
(py3) [root@jumpserver sources]#  yum -y install nginx

(py3) [root@jumpserver sources]# vim /etc/nginx/^Cinx.conf

将原先的server{} 段全部替换掉
** 最终的结果如下:**
(py3) [root@jumpserver nginx]# grep -Ev "#|^$" /etc/nginx/nginx.conf

user nginx;

worker_processes auto;

error_log /var/log/nginx/error.log;

pid /run/nginx.pid;

include /usr/share/nginx/modules/*.conf;

events {

    worker_connections 1024;

}

http {

    log_format  main  '$remote_addr - $remote_user [$time_local] "$request" '

                      '$status $body_bytes_sent "$http_referer" '

                      '"$http_user_agent" "$http_x_forwarded_for"';

    access_log  /var/log/nginx/access.log  main;

    sendfile            on;

    tcp_nopush          on;

    tcp_nodelay         on;

    keepalive_timeout   65;

    types_hash_max_size 2048;

    include             /etc/nginx/mime.types;

    default_type        application/octet-stream;

    include /etc/nginx/conf.d/*.conf;

server {

    listen 80;

    proxy_set_header X-Real-IP $remote_addr;

    proxy_set_header Host $host;

    proxy_set_header X-Forwarded-For $proxy_add_x_forwarded_for;

    location /luna/ {

        try_files $uri / /index.html;

        alias /server/app/luna/;

    }

    location /media/ {

        add_header Content-Encoding gzip;

        root /server/app/jumpserver/data/;

    }

    location /static/ {

        root /server/app/jumpserver/data/;

    }

    location /socket.io/ {

        proxy_buffering off;

        proxy_http_version 1.1;

        proxy_set_header Upgrade $http_upgrade;

        proxy_set_header Connection "upgrade";

    }

    location / {

    }

}

}
语法检查
(py3) [root@jumpserver sources]# nginx -t

nginx: the configuration file /etc/nginx/nginx.conf syntax is ok

nginx: configuration file /etc/nginx/nginx.conf test is successful
运行 Nginx
(py3) [root@jumpserver nginx]# systemctl start nginx

(py3) [root@jumpserver nginx]# systemctl enable nginx

Created symlink from /etc/systemd/system/multi-user.target.wants/nginx.service to /usr/lib/systemd/system/nginx.service.
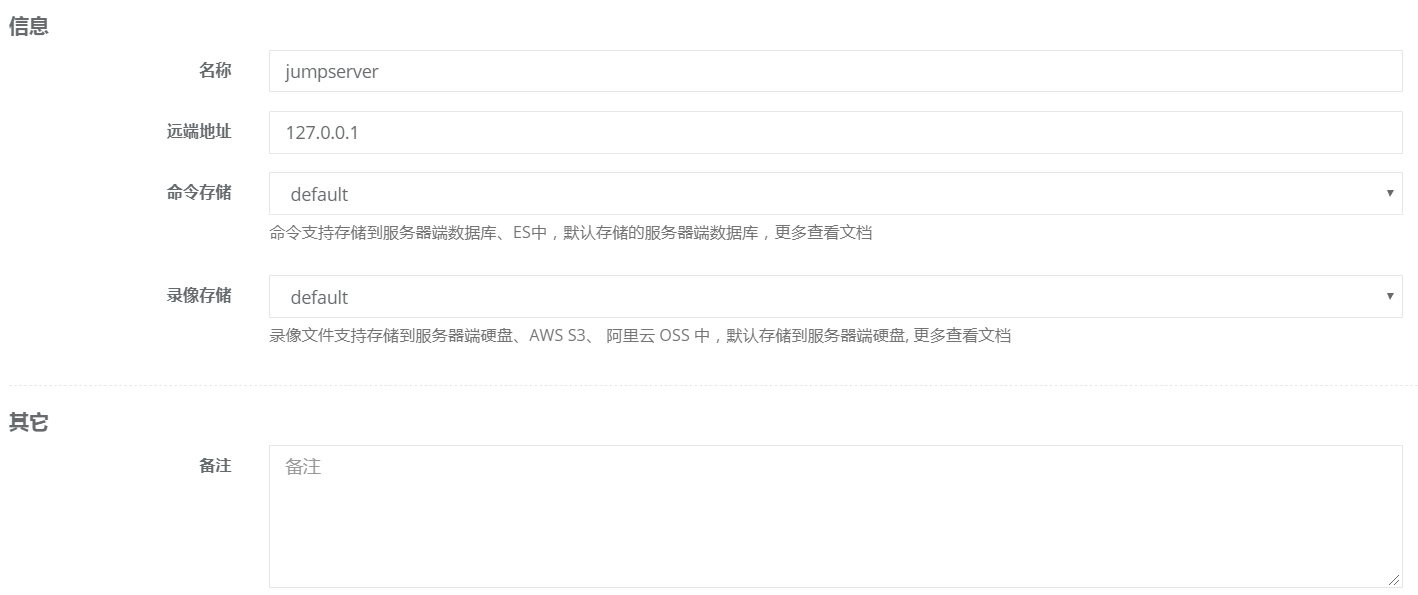
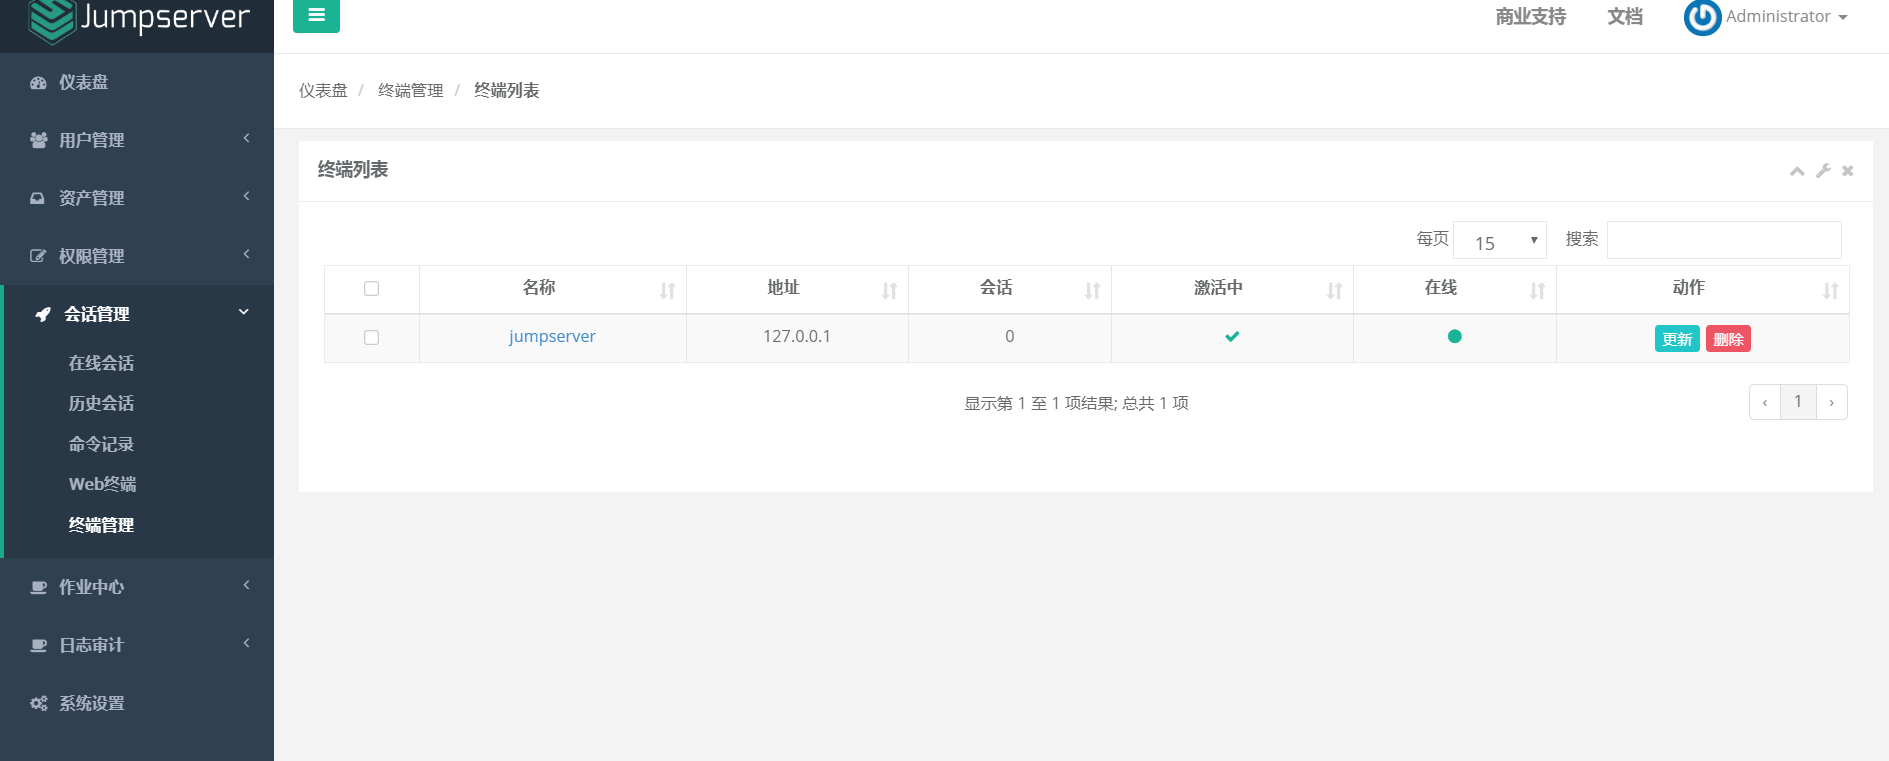
在web页面上点击
默认信息,确认即可
服务器命令行终端测试:
(py3) [root@jumpserver nginx]# ssh -p2222 admin@10.0.0.161

The authenticity of host '[10.0.0.161]:2222 ([10.0.0.161]:2222)' can't be established.

RSA key fingerprint is SHA256:8MCnHK0t1yfaxyf6fFq1e93fE9JDBc4hG00OlnWelXY.

RSA key fingerprint is MD5:b5:6d:74:d6:00:90:f4:93:8f:b8:de:33:14:ea:6b:ee.

Are you sure you want to continue connecting (yes/no)? yes

Warning: Permanently added '[10.0.0.161]:2222' (RSA) to the list of known hosts.

admin@10.0.0.161's password: #填写admin的密码admin

    Administrator, 欢迎使用Jumpserver开源跳板机系统

    1) 输入 ID 直接登录 或 输入部分 IP,主机名,备注 进行搜索登录(如果唯一).

    2) 输入 / + IP, 主机名 or 备注 搜索. 如: /ip

    3) 输入 P/p 显示您有权限的主机.

    4) 输入 G/g 显示您有权限的主机组.

    5) 输入 G/g + 组ID 显示该组下主机. 如: g1

    6) 输入 H/h 帮助.

    0) 输入 Q/q 退出.
用10.0.0.161就可以直接访问了,不需要再加8080
到此安装成功
堡垒机-jumpserver的更多相关文章
- CentOS7 开源跳板机(堡垒机) Jumpserver
开源跳板机(堡垒机)Jumpserver 环境 CentOS 7 x64 关闭 selinux firewalld jumpserver: 172.24.0.14 testserve ...
- Centos下堡垒机Jumpserver V3.0环境部署完整记录(2)-配置篇
前面已经介绍了Jumpserver V3.0的安装,基于这篇安装文档,下面说下Jumpserver安装后的的功能使用: 一.jumpserver的启动 Jumpserver的启动和重启 [root@t ...
- 开源堡垒机jumpserver
开源堡垒机jumpserver 开源堡垒机jumpserver的安装 开源堡垒机jumpserver的配置和使用
- 项目实战15.2—企业级堡垒机 jumpserver快速入门
必备条件 硬件条件 ① 一台安装好 Jumpserver 系统的可用主机(堡垒机) ② 一台或多台可用的 Linux.Windows资产设备(被管理的资产) 服务条件 (1)coco服务 ① 鉴于心态 ...
- 堡垒机jumpserver测试记录--使用
快速入门 截图就不放了,官网都有,这里只是就遇到的一些问题做下记录 必备条件 一台安装好 Jumpserver 系统的可用主机(堡垒机) 一台或多台可用的 Linux.Windows资产设备(被管理的 ...
- Centos下堡垒机Jumpserver V3.0环境部署完整记录(1)-安装篇
由于来源身份不明.越权操作.密码泄露.数据被窃.违规操作等因素都可能会使运营的业务系统面临严重威胁,一旦发生事故,如果不能快速定位事故原因,运维人员往往就会背黑锅.几种常见的运维人员背黑锅场景:1)由 ...
- 开源堡垒机jumpserver的安装
开源跳板机jumpserver安装 简介 Jumpserver 是全球首款完全开源的堡垒机, 使用GNU GPL v2.0 开源协议, 是符合4A 的专业运维审计系统 Jumpserver 使用Pyt ...
- 分享一款开源堡垒机-jumpserver
本文主文章地址为:https://blog.csdn.net/KH_FC JumpServer是由FIT2CLOUD(飞致远)公司旗下一款开源的堡垒机,这款也是全球首款开源的堡垒机,使用 GNU GP ...
- 开源堡垒机jumpserver的配置和使用
开源跳板机jumpserver配置和使用 http://docs.jumpserver.org/zh/docs/quick_start.html#id9 系统设置 基本设置 # 修改url 的&quo ...
- 项目实战15—企业级堡垒机 jumpserver
本文收录在Linux运维企业架构实战系列 环境准备 系统:CentOS 7 IP:192.168.10.101 关闭selinux 和防火墙 # CentOS $ setenforce # 可以设置配 ...
随机推荐
- 深入理解Amazon Alexa Skill(四)
本节利用三星Smartthings Classic物联网平台的web service smartapp,实现了一个Alexa智能家居skill的例子,由此来了解Alexa是如何控制其他云的智能家居设备 ...
- sqlserver检查sql执行时间
set statistics profile onset statistics io onset statistics time onGO select * from mytable; goset s ...
- 图像滤镜艺术---(Lightleaks Filter)漏光滤镜
原文:图像滤镜艺术---(Lightleaks Filter)漏光滤镜 (Lightleaks Filter)漏光滤镜 漏光拍摄其实就是一种摄影手法,最初是因为强烈光照导致相片交卷的过分曝光,最终在成 ...
- Win8 Metro(C#)数字图像处理--3.3图像直方图计算
原文:Win8 Metro(C#)数字图像处理--3.3图像直方图计算 /// <summary> /// Get the array of histrgram. /// </sum ...
- Android零基础入门第5节:善用ADT Bundle,轻松邂逅女神
原文:Android零基础入门第5节:善用ADT Bundle,轻松邂逅女神 在前几期中总结分享了Android的前世今生.Android 系统架构和应用组件那些事.带你一起来聊一聊Android开发 ...
- shell中select、case的使用
case和select结构在技术上说并不是循环, 因为它们并不对可执行代码块进行迭代. 但是和循环相似的是, 它们也依靠在代码块顶部或底部的条件判断来决定程序的分支. select select结 ...
- 使用QPainter的drawPixmap()绘制多幅图片 good
众所周知,使用QLabel的setPixmap()就可以将图片显示出来,做视屏解码后显示也可以如此.但是为何我今天还要费力使用基函数drawPixmap()来做绘图?理由有这么些吧: 1.使用QLab ...
- BI-学习之 新概念介绍
什么是统一维度模型 层次结构.级别.成员和度量值 什么是MDX MDX与SQL的区别 什么是数据仓库 什么是OLAP数据分析引擎 BI企业级解决方案 什么是统一维度模型 维度(dimension)是描 ...
- delphi xe5 中TMemo控件的应用——for android
TMemo中的两个方法: TMemo.Lines.Add(stringxxx);意思是向TMemo中增加字符串stringxxx: TMemo.Lines.Text :=stringxxx,意思是清空 ...
- Delphi Berlin 10.1.2 FMX用TMessageManager处理自定义消息
看FMX代码,发现有两种消息处理的实现方式,一种是用TMessageManager来实现自定义的消息,另外一种象TEdit中的实现,直接声明消息方法. 早前,看过文章说TMessageManage ...