python接口自动化11-pytest入门
前言
pytest是一个非常成熟的全功能的Python测试框架,适合从简单的单元到复杂的功能测试,主要特点有以下几点:
- 简单灵活,容易上手;
- 支持参数化;
- 能够支持简单的单元测试;
- 标记测试功能与属性
- 复杂的功能测试,比如可以做selenium等自动化测试、接口自动化测试(pytest+requests);
- pytest具有很多第三方插件,并且可以自定义扩展,比较好用的如pytest-selenium(集成selenium)、pytest-html(完美html测试报告生成)等;
- Skip和xfail:处理不成功的测试用例;
- 可以很好的和jenkins集成;
- 通过xdist插件分发测试到多个CPU
一、简介
1、环境搭建推荐版本匹配:pip install pytest==3.6.3
- Python3.6.x + pytest 3.6.3
- Python3.7.x + pytest 4.0.2
2、查看版本:pytest --version
C:\Users\Administrator>pytest --version

This is pytest version 3、6、3, imported from d:\path_python\lib\site-packages\pytest、py
3、pytest 命名规则:
- 文件名以test_*、py 或 *_test、py
- 类已 Test* 开头
- 函数/方法以 test_* 开头
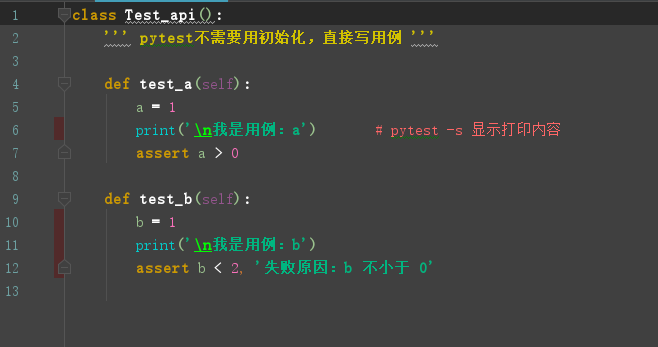
4、pytest 直接写用例,写完 cmd 运行,不需要导入其他模块。
G:\python_study\study\pytest_demo\study>pytest -s test_demo1.py

================================================= test session starts =================================================

platform win32 -- Python 3.6.5, pytest-3.6.3, py-1.8.0, pluggy-0.6.0

rootdir: G:\python_study\study\pytest_demo\study, inifile:

collected 2 items

test_demo1.py

我是用例:a

.

我是用例:b

.

============================================== 2 passed in 0.02 seconds ===============================================

二、pytest 命令行参数介绍
1、运行规则:pytest py文件路径
C:\Users\Administrator>pytest G:\python_study\study\pytest_demo\study\test_demo.py

============================= test session starts =============================

platform win32 -- Python 3.6.5, pytest-3.6.3, py-1.8.0, pluggy-0.6.0

rootdir: C:\Users\Administrator, inifile:

collected 4 items

test_demo.py ....                                                        [100%]

========================== 4 passed in 0.03 seconds ===========================
2、显示打印信息(不然不会看到打印内容):pytest -s xxx
G:\python_study\study\pytest_demo\study>pytest -s test_demo1.py

================================================= test session starts =================================================

platform win32 -- Python 3.6.5, pytest-3.6.3, py-1.8.0, pluggy-0.6.0

rootdir: G:\python_study\study\pytest_demo\study, inifile:

collected 2 items

test_demo1.py

我是用例:a

.

我是用例:b

.

============================================== 2 passed in 0.02 seconds ===============================================
3、显示详细信息:pytest -v xxx
G:\python_study\study\pytest_demo\study>pytest test_demo1.py -v

============================= test session starts =============================

platform win32 -- Python 3.6.5, pytest-3.6.3, py-1.8.0, pluggy-0.6.0 -- d:\path_python\python.exe

cachedir: .pytest_cache

rootdir: G:\python_study\study\pytest_demo\study, inifile:

collected 2 items

test_demo1.py::Test_api::test_a PASSED                                   [ 50%]

test_demo1.py::Test_api::test_b PASSED                                   [100%]

========================== 2 passed in 0.02 seconds ===========================
4、简洁显示信息:pytest -q xxx
G:\python_study\study\pytest_demo\study>pytest test_demo1.py -q

..                                                                       [100%]

2 passed in 0.02 seconds
5、运行指定用例:pytest -k case_name (case_name可类可函数,模糊匹配关键字),如下匹配 demo
G:\python_study\study\pytest_demo\study>pytest -k demo -v

============================= test session starts =============================

platform win32 -- Python 3.6.5, pytest-3.6.3, py-1.8.0, pluggy-0.6.0 -- d:\path_python\python.exe

cachedir: .pytest_cache

rootdir: G:\python_study\study\pytest_demo\study, inifile:

collected 11 items / 5 deselected

test_demo.py::test_ab PASSED                                             [ 16%]

test_demo.py::test_aba PASSED                                            [ 33%]

test_demo.py::Test_api::test_aa PASSED                                   [ 50%]

test_demo.py::Test_api::test_b PASSED                                    [ 66%]

test_demo1.py::Test_api::test_a PASSED                                   [ 83%]

test_demo1.py::Test_api::test_b PASSED                                   [100%]

=================== 6 passed, 5 deselected in 0.06 seconds ====================
6、命令行参数不分顺序,还有其他命令行参数,不一一细说:
- 运行类用例且不运行类某个用例:pytest -v -k "Test_api1 and not test_a"
- 失败停止测试:pytest -x
- 指定个数失败后停止测试:pytest --maxfail=2
- 运行上一次失败用例(或没失败的):pytest --last-failed
- 等等
7、pycharm 设置 pytest 运行用例:

更多请查看 pytest -h 或者找度娘,我们一般用以上的参数够日常使用了。欢迎来QQ交流群:482713805
python接口自动化11-pytest入门的更多相关文章
- python接口自动化之pytest环境准备与入门(五)
安装的pytest版本应该与安装的python版本对应,不然会有问题 (我的环境是python3.6与pytest4.5.0) 1.安装pytest pip install pytest==4.5.0 ...
- 2020年第二期《python接口自动化+测试开发》课程,已开学!
2020年第二期<python接口自动化+python测试开发>课程,12月15号开学! 主讲老师:上海-悠悠 上课方式:QQ群视频在线教学,方便交流 本期上课时间:12月15号-3月29 ...
- Python接口自动化——soap协议传参的类型是ns0类型的要创建工厂方法纪要
1:在Python接口自动化中,对于soap协议的xml的请求我们可以使用Suds Client来实现,其soap协议传参的类型基本上是有2种: 第一种是传参,不需要再创建啥, 第二种就是ns0类型的 ...
- python接口自动化(十)--post请求四种传送正文方式(详解)
简介 post请求我在python接口自动化(八)--发送post请求的接口(详解)已经讲过一部分了,主要是发送一些较长的数据,还有就是数据比较安全等.我们要知道post请求四种传送正文方式首先需要先 ...
- python接口自动化-Cookie_绕过验证码登录
前言 有些登录的接口会有验证码,例如:短信验证码,图形验证码等,这种登录的验证码参数可以从后台获取(或者最直接的可查数据库) 获取不到也没关系,可以通过添加Cookie的方式绕过验证码 前面在“pyt ...
- python接口自动化28-requests-html爬虫框架
前言 requests库的好,只有用过的人才知道,最近这个库的作者又出了一个好用的爬虫框架requests-html.之前解析html页面用过了lxml和bs4, requests-html集成了一些 ...
- python接口自动化-参数化
原文地址https://www.cnblogs.com/yoyoketang/p/6891710.html python接口自动化 -参数关联(一)https://www.cnblogs.com/11 ...
- python接口自动化 -参数关联(一)
原文地址https://www.cnblogs.com/yoyoketang/p/6886610.html 原文地址https://www.cnblogs.com/yoyoketang/ 原文地址ht ...
- python接口自动化20-requests获取响应时间(elapsed)与超时(timeout)
前言 requests发请求时,接口的响应时间,也是我们需要关注的一个点,如果响应时间太长,也是不合理的. 如果服务端没及时响应,也不能一直等着,可以设置一个timeout超时的时间 关于reques ...
- python接口自动化24-有token的接口项目使用unittest框架设计
获取token 在做接口自动化的时候,经常会遇到多个用例需要用同一个参数token,并且这些测试用例跨.py脚本了. 一般token只需要获取一次就行了,然后其它使用unittest框架的测试用例全部 ...
随机推荐
- 教你如何在5分钟轻松部署squid正向代理
正向代理是一个位于客户端和原始服务器(origin server)之间的服务器,为了从原始服务器取得内容,客户端向代理发送一个请求并指定目标(原始服务器),然后代理向原始服务器转交请求并将获得的内容返 ...
- mybatis基础 笔记
Mybatis依赖<!--测试--> <dependency> <groupId>junit</groupId> <artif ...
- 【Golang基础】defer执行顺序
defer 执行顺序类似栈的先入后出原则(FILO) 一个defer引发的小坑:打开文件,读取内容,删除文件 // 原始问题代码 func testFun(){ // 打开文件 file, ...
- 《推送开发全面盘点当前Android后台保活方案的真实运行效果》
登录 立即注册 TCP/IP详解 资讯 动态 社区 技术精选 首页 即时通讯网›专项技术区›推送开发全面盘点当前Android后台保活方案的真实运行效果(截止2 ... 帖子 打赏 分 ...
- MongoDB数据库常用SQL命令 — MongoDB可视化工具Robo 3T
1.db.collection.updateMany() 修改集合中的多个文档. db.getCollection('user').find({"pId":"3332a5 ...
- InnoSetup 根据选择的安装语言显示不同语言的(协议)License和更新说明
需求 在安装时,选择中文安装,显示中文版协议(License)文件. 在安装时,选择英文安装,显示英文版协议(License)文件. 解决 [Languages] 段中有LicenseFile属性和I ...
- jmap 导出 tomcat 内存快照分析
登录系统(注意这里启动 tomcat 的用户) # 获取 tomcat 的 pid 号 ps -ef|grep tomcat # 例如这里 pid 号为 13133 jmap -dump:live,f ...
- .netcore控制台->定时任务Quartz
之前做数据同步时,用过timer.window服务,现在不用那么费事了,可以使用Quartz,并且配置灵活,使用cron表达式配置XML就可以.我用的是3.0.7版本支持.netcore. 首先创建一 ...
- SAP MM 供应商无英文名称,ME21N里却带出了英文名字?
SAP MM 供应商无英文名称,ME21N里却带出了英文名字? 近日收到客户业务用户上报的一个问题说ME21N的时候,供应商101071的名字怎么是英文名字,实际上供应商主数据里是没有这个英文名字, ...
- Thymeleaf常用语法:模板注释
Thymeleaf模板注释分为标准HTML/XML注释.解析层注释.原型注释三种. 一.注释说明 1.标准HTML/XML注释 直接通过浏览器打开,不显示,Thymeleaf模板引擎解析也不处理,但查 ...
