『TensorFlow』读书笔记_ResNet_V2
『PyTorch × TensorFlow』第十七弹_ResNet快速实现
要点
- 神经网络逐层加深有Degradiation问题,准确率先上升到饱和,再加深会下降,这不是过拟合,是测试集和训练集同时下降的
- 提出了残差结构,这个结构解决了深层网络训练误差反而提升的情况,使得网络理论上可以无限深
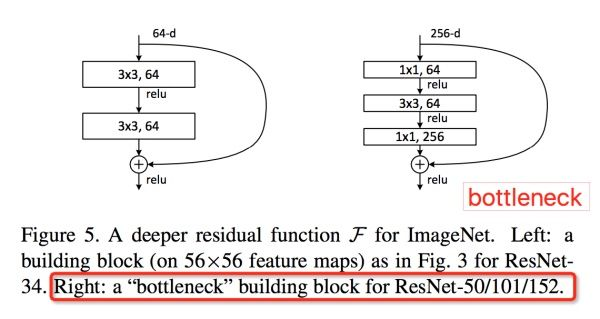
- bottleneck网络结构,注意Channel维度变化:
,宛如一个中间细两端粗的瓶颈,所以称为“bottleneck”。这种结构相比VGG,早已经被证明是非常效的,能够更好的提取图像特征。
残差结构
截取代码如下,
@slim.add_arg_scope

def bottleneck(inputs,depth,depth_bottleneck,stride,

               outputs_collections=None,scope=None):

    """

    核心残差学习单元

    输入tensor给出一个直连部分和残差部分加和的输出tensor

    :param inputs: 输入tensor

    :param depth: Block类参数,输出tensor通道

    :param depth_bottleneck: Block类参数,中间卷积层通道数

    :param stride: Block类参数,降采样步长

                   3个卷积只有中间层采用非1步长去降采样。

    :param outputs_collections: 节点容器collection

    :return: 输出tensor

    """

    with tf.variable_scope(scope,'bottleneck_v2',[inputs]) as sc:

        # 获取输入tensor的最后一个维度(通道)

        depth_in = slim.utils.last_dimension(inputs.get_shape(),min_rank=4)

        # 对输入正则化处理,并激活

        preact = slim.batch_norm(inputs,activation_fn=tf.nn.relu,scope='preact')

        'shortcut直连部分'

        if depth == depth_in:

            # 如果输入tensor通道数等于输出tensor通道数

            # 降采样输入tensor使之宽高等于输出tensor

            shortcut = subsample(inputs,stride,'shortcut')

        else:

            # 否则,使用尺寸为1*1的卷积核改变其通道数,

            # 同时调整宽高匹配输出tensor

            shortcut = slim.conv2d(preact,depth,[1,1],stride,

                                   normalizer_fn=None,activation_fn=None,

                                   scope='shortcut')

        'residual残差部分'

        residual = slim.conv2d(preact,depth_bottleneck,[1,1],stride=1,scope='conv1')

        residual = slim.conv2d(residual,depth_bottleneck,3,stride=stride,scope='conv2')

        residual = slim.conv2d(residual,depth,[1,1],stride=1,scope='conv3')

        output = shortcut + residual

        return slim.utils.collect_named_outputs(outputs_collections,sc.name,output)
逻辑流程如下,
批正则化数据
shortcut分量处理:调整输入tensor使之和输出tensor深度一致,宽高一致
residual分量处理:1*1/1卷积->3*3/自定步长(所以上面需要调整shortcut宽高)卷积->1*1/1卷积
shortcut + residual 作为最终输出,注意是加,不是concat。
代码
之前一直对变量作用域的实际功效比较不解(虽然介绍文章看了很多)特别是reuse属性搭配上后,这节网络结构较为复杂,图结构生成方式很混乱,也和自己粗心有关,运行时出了一些变量重复的错,修改过程中对变量作用域的理解深入了。所谓的reuse或者重名什么的和变量生成函数没有关系,只要同一个生成函数不同生成次数时指定不同的name就完全没问题,重点是在计算图的位置要不一样。如果是同一个计算图位置重复生成(初始化)的话要注明reuse=True。
实际例子中作者采用了一些写起来显得麻烦但是提高了效率的架构方式,比如conv2d_same的实现,和网络结束部分的全局平均池化,都为了效率放弃了最简单的写法。
网络结构如下,
# Author : Hellcat

# Time   : 2017/12/14

import math

import time

from datetime import datetime

import collections

import tensorflow as tf

slim = tf.contrib.slim

class Block(collections.namedtuple('Block',['scope','unit_fn','args'])):

    """

    使用collections.namedtuple设计ResNet基本模块组的name tuple,并用它创建Block的类

    只包含数据结构,不包含具体方法。

    定义一个典型的Block,需要输入三个参数:

    scope:Block的名称

    unit_fn:ResNet V2中的残差学习单元生成函数

    args:Block的args(输出深度,瓶颈深度,瓶颈步长)

    """

def subsample(inputs,factor,scope=None):

    """

    如果factor为1,则不做修改直接返回inputs;如果不为1,则使用

    slim.max_pool2d最大池化来实现,通过1*1的池化尺寸,factor作步长,实

    现降采样。

    :param inputs: A 4-D tensor of size [batch, height_in, width_in, channels]

    :param factor: 采样因子

    :param scope: 域名

    :return: 采样结果

    """

    if factor == 1:

        return inputs

    else:

        return slim.max_pool2d(inputs,[1,1],stride=factor,scope=scope)

def conv2d_same(inputs,num_outputs,kernel_size,stride,scope=None):

    """

    卷积层实现,有更简单的写法,这样做其实是为了提高效率

    :param inputs: 输入tensor

    :param num_outputs: 输出通道

    :param kernel_size: 卷积核尺寸

    :param stride: 卷积步长

    :param scope: 节点名称

    :return: 输出tensor

    """

    if stride == 1:

        return slim.conv2d(inputs,num_outputs,kernel_size,stride=1,padding='SAME',scope=scope)

    else:

        pad_total = kernel_size - 1

        pad_beg = pad_total // 2

        pad_end = pad_total - pad_beg

        inputs = tf.pad(inputs,[[0,0],[pad_beg,pad_end],

                                [pad_beg,pad_end],[0,0]])

        return slim.conv2d(inputs,num_outputs,kernel_size,stride=stride,

                           padding='VALID',scope=scope)

@slim.add_arg_scope

def stack_block_dense(net,blocks,outputs_collections=None):

    """

    示例,Block('block1',bottleneck,[(256,64,1)]*2 + [(256,64,2)])

    :param net:  A `Tensor` of size [batch, height, width, channels].

    :param blocks: 是之前定义的Block的class的列表

    :param outputs_collections: 收集各个end_points的collections

    :return: Output tensor

    """

    for block in blocks:

        with tf.variable_scope(block.scope,'block',[net]) as sc:

            for i,unit in enumerate(block.args):

                with tf.variable_scope('unit_%d' % (i+1), values=[net]):

                    # 示例:(256,64,1)

                    unit_depth,unit_depth_bottleneck,unit_stride = unit

                    net = block.unit_fn(net,

                                        depth=unit_depth,

                                        depth_bottleneck=unit_depth_bottleneck,

                                        stride=unit_stride)

            net = slim.utils.collect_named_outputs(outputs_collections,sc.name,net)

            '''

            这个方法会返回本次添加的tensor对象,

            意义是为tensor添加一个别名,并收集进collections中

            实现如下

            if collections:

                append_tensor_alias(outputs,alias)

                ops.add_to_collections(collections,outputs)

            return outputs

            据说本方法位置已经被转移到这里了,

            from tensorflow.contrib.layers.python.layers import utils

            utils.collect_named_outputs()

            '''

    return net

@slim.add_arg_scope

def bottleneck(inputs,depth,depth_bottleneck,stride,

               outputs_collections=None,scope=None):

    """

    核心残差学习单元

    输入tensor给出一个直连部分和残差部分加和的输出tensor

    :param inputs: 输入tensor

    :param depth: Block类参数,输出tensor通道

    :param depth_bottleneck: Block类参数,中间卷积层通道数

    :param stride: Block类参数,降采样步长

                   3个卷积只有中间层采用非1步长去降采样。

    :param outputs_collections: 节点容器collection

    :return: 输出tensor

    """

    with tf.variable_scope(scope,'bottleneck_v2',[inputs]) as sc:

        # 获取输入tensor的最后一个维度(通道)

        depth_in = slim.utils.last_dimension(inputs.get_shape(),min_rank=4)

        # 对输入正则化处理,并激活

        preact = slim.batch_norm(inputs,activation_fn=tf.nn.relu,scope='preact')

        'shortcut直连部分'

        if depth == depth_in:

            # 如果输入tensor通道数等于输出tensor通道数

            # 降采样输入tensor使之宽高等于输出tensor

            shortcut = subsample(inputs,stride,'shortcut')

        else:

            # 否则,使用尺寸为1*1的卷积核改变其通道数,

            # 同时调整宽高匹配输出tensor

            shortcut = slim.conv2d(preact,depth,[1,1],stride,

                                   normalizer_fn=None,activation_fn=None,

                                   scope='shortcut')

        'residual残差部分'

        residual = slim.conv2d(preact,depth_bottleneck,[1,1],stride=1,scope='conv1')

        residual = slim.conv2d(residual,depth_bottleneck,3,stride=stride,scope='conv2')

        residual = slim.conv2d(residual,depth,[1,1],stride=1,scope='conv3')

        output = shortcut + residual

        return slim.utils.collect_named_outputs(outputs_collections,sc.name,output)

def resnet_arg_scope(is_training=True,

                     weight_decay=0.0001,      # L2权重衰减速率

                     batch_norm_decay=0.997,   # BN的衰减速率

                     batch_norm_epsilon=1e-5,  # BN的epsilon默认1e-5

                     batch_norm_scale=True):   # BN的scale默认值

    batch_norm_params = {  # 定义batch normalization(标准化)的参数字典

        'is_training': is_training,

        # 是否是在训练模式,如果是在训练阶段,将会使用指数衰减函数(衰减系数为指定的decay),

        # 对moving_mean和moving_variance进行统计特性的动量更新,也就是进行使用指数衰减函数对均值和方

        # 差进行更新,而如果是在测试阶段,均值和方差就是固定不变的,是在训练阶段就求好的,在训练阶段,

        # 每个批的均值和方差的更新是加上了一个指数衰减函数,而最后求得的整个训练样本的均值和方差就是所

        # 有批的均值的均值,和所有批的方差的无偏估计

        'zero_debias_moving_mean': True,

        # 如果为True,将会创建一个新的变量对 'moving_mean/biased' and 'moving_mean/local_step',

        # 默认设置为False,将其设为True可以增加稳定性

        'decay': batch_norm_decay,             # Decay for the moving averages.

        # 该参数能够衡量使用指数衰减函数更新均值方差时,更新的速度,取值通常在0.999-0.99-0.9之间,值

        # 越小,代表更新速度越快,而值太大的话,有可能会导致均值方差更新太慢,而最后变成一个常量1,而

        # 这个值会导致模型性能较低很多.另外,如果出现过拟合时,也可以考虑增加均值和方差的更新速度,也

        # 就是减小decay

        'epsilon': batch_norm_epsilon,         # 就是在归一化时,除以方差时,防止方差为0而加上的一个数

        'scale': batch_norm_scale,

        'updates_collections': tf.GraphKeys.UPDATE_OPS,

        # force in-place updates of mean and variance estimates

        # 该参数有一个默认值,ops.GraphKeys.UPDATE_OPS,当取默认值时,slim会在当前批训练完成后再更新均

        # 值和方差,这样会存在一个问题,就是当前批数据使用的均值和方差总是慢一拍,最后导致训练出来的模

        # 型性能较差。所以,一般需要将该值设为None,这样slim进行批处理时,会对均值和方差进行即时更新,

        # 批处理使用的就是最新的均值和方差。

        #

        # 另外,不论是即使更新还是一步训练后再对所有均值方差一起更新,对测试数据是没有影响的,即测试数

        # 据使用的都是保存的模型中的均值方差数据,但是如果你在训练中需要测试,而忘了将is_training这个值

        # 改成false,那么这批测试数据将会综合当前批数据的均值方差和训练数据的均值方差。而这样做应该是不

        # 正确的。

    }

    with slim.arg_scope(

            [slim.conv2d],

            weights_regularizer=slim.l2_regularizer(weight_decay),       # 权重正则器设置为L2正则

            weights_initializer=slim.variance_scaling_initializer(),

            activation_fn=tf.nn.relu,

            normalizer_fn=slim.batch_norm,                               # 标准化器设置为BN

            normalizer_params=batch_norm_params):

        with slim.arg_scope([slim.batch_norm],**batch_norm_params):

            with slim.arg_scope([slim.max_pool2d],padding='SAME') as arg_sc:

                return arg_sc

def resnet_v2(inputs,

              blocks,

              num_classes=None,

              global_pool=True,

              include_root_block=True,

              reuse=None,

              scope=None):

    """

    网络结构主函数

    :param inputs: 输入tensor

    :param blocks: Block类列表

    :param num_classes: 输出类别数

    :param global_pool: 是否最后一层全局平均池化

    :param include_root_block: 是否最前方添加7*7卷积和最大池化

    :param reuse: 是否重用

    :param scope: 整个网络名称

    :return:

    """

    with tf.variable_scope(scope,'resnet_v2',[inputs],reuse=reuse) as sc:

        # 字符串,用于命名collection名字

        end_points_collecion = sc.original_name_scope + 'end_points'

        print(end_points_collecion)

        with slim.arg_scope([slim.conv2d,bottleneck,stack_block_dense],

                            # 为新的收集器取名

                            outputs_collections=end_points_collecion):

            net = inputs

            if include_root_block:

                with slim.arg_scope([slim.conv2d],

                                    activation_fn=None,

                                    normalizer_fn=None):

                    # 卷积:2步长,7*7核,64通道

                    net = conv2d_same(net,64,7,stride=2,scope='conv1')

                # 池化:2步长,3*3核

                net = slim.max_pool2d(net,[3,3],stride=2,scope='pool1')

            # 至此图片缩小为1/4

            # 读取blocks数据结构,生成残差结构

            net = stack_block_dense(net,blocks)

            net = slim.batch_norm(net,

                                  activation_fn=tf.nn.relu,

                                  scope='postnorm')

            if global_pool:

                # 全局平均池化,效率比avg_pool更高

                # 即对每个feature做出平均池化,使每个feature输出一个值

                net = tf.reduce_mean(net,[1,2],name='pool5',keep_dims=True)

            if num_classes is not None:

                net = slim.conv2d(net,num_classes,[1,1],

                                  activation_fn=None,

                                  normalizer_fn=None,

                                  scope='logits')

            # 将collection转化为dict

            end_points = slim.utils.convert_collection_to_dict(end_points_collecion)

            if num_classes is not None:

                # 为dict添加节点

                end_points['predictions'] = slim.softmax(net,scope='predictions')

            return net, end_points

def resnet_v2_152(inputs,

                    num_classes=None,

                    global_pool=True,

                    reuse=None,

                    scope='resnet_v2_152'):

    blocks = [

        # 输出深度,瓶颈深度,瓶颈步长

        Block('block1',bottleneck,[(256,64,1)]*2 + [(256,64,2)]),

        Block('block2',bottleneck,[(512,128,1)]*7 + [(512,128,2)]),

        Block('block3',bottleneck,[(1024,256,1)]*35 + [(1024,256,2)]),

        Block('block4',bottleneck,[(2048,512,1)]*3)

    ]

    return resnet_v2(inputs,blocks,num_classes,global_pool,

                     include_root_block=True,reuse=reuse,scope=scope)

#-------------------评测函数---------------------------------

# 测试152层深的ResNet的forward性能

def time_tensorflow_run(session, target, info_string):

    num_steps_burn_in = 10

    total_duration = 0.0

    total_duration_squared = 0.0

    for i in range(num_batches + num_steps_burn_in):

        start_time = time.time()

        _ = session.run(target)

        duration = time.time() - start_time

        if i >= num_steps_burn_in:

            if not i % 10:

                print ('%s: step %d, duration = %.3f' %

                       (datetime.now(), i - num_steps_burn_in, duration))

            total_duration += duration

            total_duration_squared += duration * duration

    mn = total_duration / num_batches

    vr = total_duration_squared / num_batches - mn * mn

    sd = math.sqrt(vr)

    print('%s: %s across %d steps, %.3f +/- %.3f sec / batch' %

          (datetime.now(), info_string, num_batches, mn, sd))

batch_size = 32

height,width = 224,224

inputs = tf.random_uniform([batch_size,height,width,3])

with slim.arg_scope(resnet_arg_scope(is_training=False)):

    # 1000分类

    net,end_points = resnet_v2_152(inputs,1000)

init = tf.global_variables_initializer()

sess = tf.Session()

sess.run(init)

num_batches = 100

time_tensorflow_run(sess,net,'Forward')

# forward计算耗时相比VGGNet和Inception V3大概只增加了50%,是一个实用的卷积神经网络。
和上节同理,不贴时耗。
『TensorFlow』读书笔记_ResNet_V2的更多相关文章
- 『TensorFlow』读书笔记_降噪自编码器
『TensorFlow』降噪自编码器设计 之前学习过的代码,又敲了一遍,新的收获也还是有的,因为这次注释写的比较详尽,所以再次记录一下,具体的相关知识查阅之前写的文章即可(见上面链接). # Aut ...
- 『TensorFlow』读书笔记_VGGNet
VGGNet网络介绍 VGG系列结构图, 『cs231n』卷积神经网络工程实践技巧_下 1,全部使用3*3的卷积核和2*2的池化核,通过不断加深网络结构来提升性能. 所有卷积层都是同样大小的filte ...
- 『TensorFlow』读书笔记_SoftMax分类器
开坑之前 今年3.4月份的时候就买了这本书,同时还买了另外一本更为浅显的书,当时读不懂这本,所以一度以为这本书很一般,前些日子看见知乎有人推荐它,也就拿出来翻翻看,发现写的的确蛮好,只是稍微深一点,当 ...
- 『TensorFlow』读书笔记_多层感知机
多层感知机 输入->线性变换->Relu激活->线性变换->Softmax分类 多层感知机将mnist的结果提升到了98%左右的水平 知识点 过拟合:采用dropout解决,本 ...
- 『TensorFlow』读书笔记_简单卷积神经网络
如果你可视化CNN的各层级结构,你会发现里面的每一层神经元的激活态都对应了一种特定的信息,越是底层的,就越接近画面的纹理信息,如同物品的材质. 越是上层的,就越接近实际内容(能说出来是个什么东西的那些 ...
- 『TensorFlow』读书笔记_进阶卷积神经网络_分类cifar10_上
完整项目见:Github 完整项目中最终使用了ResNet进行分类,而卷积版本较本篇中结构为了提升训练效果也略有改动 本节主要介绍进阶的卷积神经网络设计相关,数据读入以及增强在下一节再与介绍 网络相关 ...
- 『TensorFlow』读书笔记_进阶卷积神经网络_分类cifar10_下
数据读取部分实现 文中采用了tensorflow的从文件直接读取数据的方式,逻辑流程如下, 实现如下, # Author : Hellcat # Time : 2017/12/9 import os ...
- 『TensorFlow』读书笔记_AlexNet
网络结构 创新点 Relu激活函数:效果好于sigmoid,且解决了梯度弥散问题 Dropout层:Alexnet验证了dropout层的效果 重叠的最大池化:此前以平均池化为主,最大池化避免了平均池 ...
- 『TensorFlow』读书笔记_Inception_V3_下
极为庞大的网络结构,不过下一节的ResNet也不小 线性的组成,结构大体如下: 常规卷积部分->Inception模块组1->Inception模块组2->Inception模块组3 ...
随机推荐
- 列表 & 元组& join & range
一:列表(增删改查,列表的嵌套,列表的循环) 1)增加 append (在列表的尾部增加) insert (插入) insert(插入的位置,插入的内容) extend ...
- webpack项目搭建
1.新建一个文件目录,命令行进入当前目录,输入npm init 创建package.json文件 2.安装项目依赖webpack模块: npm install webpack --save-dev 3 ...
- DAX/PowerBI系列 - 库存总价值(Inventory Value)
DAX/PowerBI系列 - 库存总价值(Inventory Value) 欢迎交流与骚扰 难度: ★★☆☆☆(2星) 适用: ★★☆☆☆(2星) 概况: 有多少货(库存)当然重要(对于运营人员), ...
- AdPlus
adplus是windbg下面附带的一个小工具: https://docs.microsoft.com/en-us/windows-hardware/drivers/debugger/adplus A ...
- Mybatis(二)总结
1. 输入映射(就是映射文件中可以传入哪些参数类型) 1)基本类型 2)pojo类型 3)Vo类型2. 输出映射(返回的结果集可以有哪些类型) 1)基本类型 2)pojo类型 3)List类型3. 动 ...
- iscroll4升级到iscroll5全攻略笔记
前段时间在搞移动终端(移动web)的项目,其中需要用到滚动的功能(html的滚动效果不好,且在低版本上不支持).后面上网找了下资料,发现大部分人都在用iscroll4(下面简称v4),下载下来试了下确 ...
- 笔记-ASP.NET WebApi
本文是针对ASP.NET WepApi 2 的笔记. Web API 可返回的结果: 1.void 2.HttpResponseMessage 3.IHttpActionResult 4.其他类型 返 ...
- python多线程学习三
本文希望达到的目标: 1.服务器端与线程池 (实例demo) 2.并发插入db与线程池(实例demo) 3.线程池使用说明 4.线程池源码解析 一.基于socket的服务器与线程池连接. 1.在i7 ...
- php中获取中文首字母程序代码
年会抽奖,要求一等奖的中奖概率是0.12%,二等奖中奖概率是3%,三等奖中奖概率是12%,其他中奖概率是都是谢谢惠顾. <?php /** * 抽奖 * @param int $total */ ...
- zw·10倍速大数据与全内存计算
zw·10倍速大数据与全内存计算 zw全内存10倍速计算blog,早就在博客园机器视觉栏目发过,大数据版的一直挂着,今天抽空补上. 在<零起点,python大数据与量化交易>目录中 htt ...