Vue系列教程(三)之vue-cli脚手架的使用
一、Vue-cli的环境准备
目的:(1)快速管理依赖 (2)确定项目结构
1.安装node.js
Node.js是一个可以让前端运行在服务器上的一个工。
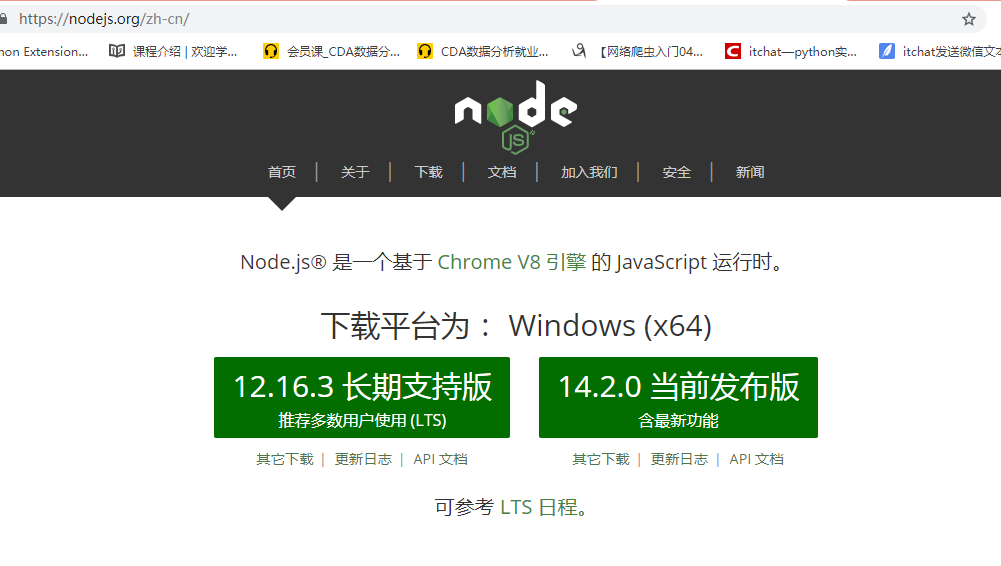
测试node.js是否安装成功:cmd下输入node -v

npm config set prefix F:\node\node_global

npm config set cache F:\node\node_cache
2. 使用npm安装vue-cli
npm install -g  @vue/cli  3.x

npm install –g vue-cli  2.x

npm: node.js包管理工具

install: 安装

vue-cli:要安装的工具

-g:全局安装
3. 配置使用国内源
npm配置国内镜像
npm config set registry https://registry.npm.taobao.org

npm config set disturl https://npm.taobao.org/dist

npm config set electron_mirror https://npm.taobao.org/mirrors/electron/
npm查看当前镜像
npm config get registry
yarn配置国内镜像
yarn config set registry https://registry.npm.taobao.org

yarn config set disturl https://npm.taobao.org/dist

yarn config set electron_mirror https://npm.taobao.org/mirrors/electron/
yarn查看当前镜像
yarn get registry
二、使用vue-cli下载项目骨架搭建项目
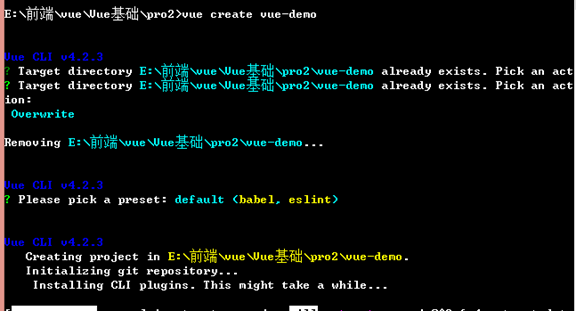
- vue create 项目名称
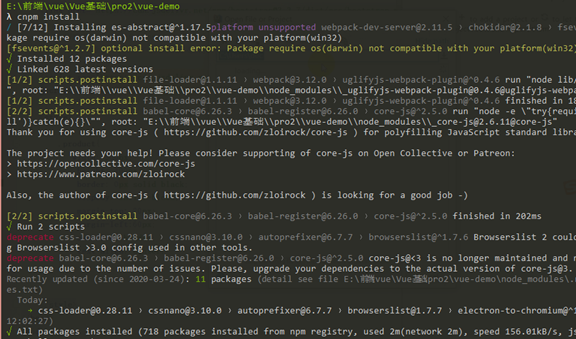
- 安装项目依赖 npm install
注:3.x版本之后创建项目时就会自动安装
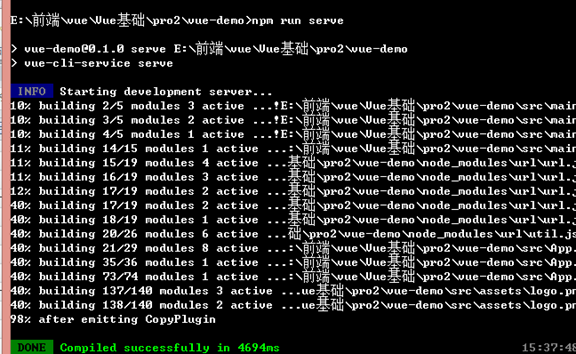
使用开发模式运行项目
npm run dev 2.x
npm run serve 3.x
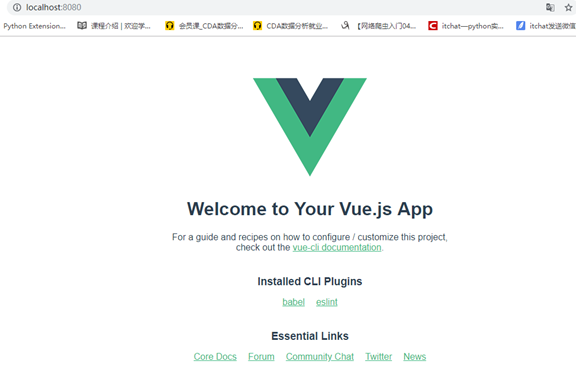
此时可以在浏览器中:http://localhost:8080 访问首页
三、Vue组件的组成部分
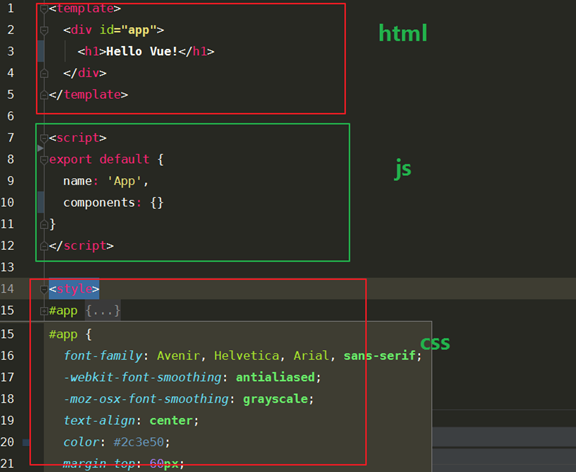
.1. vue文件的组成部分
2.在vue组件中使用多个vue组件搭建一个页面
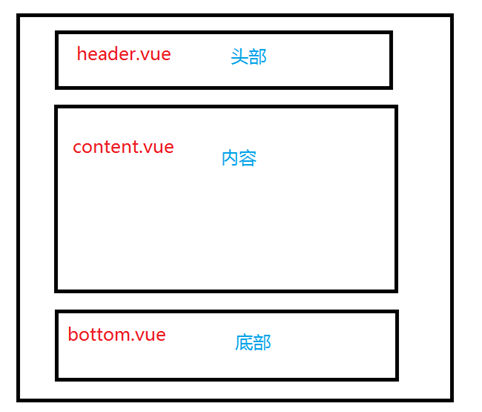
- 全局注册
import Vue from 'vue'

import App from './App.vue'

import Header from "./components/Header";

import Content from "./components/Content";

import Footer from "./components/Footer";

Vue.component('MyHeader', Header);

Vue.component('MyContent', Content);

Vue.component('MyFooter', Footer);

Vue.config.productionTip = false;

new Vue({

  render: h => h(App),

}).$mount('#app');
- 本地注册
在组件的内部注册另外一个组件,成为一个标签,这个标签只在该组件内部使用,而不能在其他组件内部使用。
<template>

  <div id="app">

  <MyHeader></MyHeader>

    <MyContent></MyContent>

  <MyFooter></MyFooter>

  </div>

</template>

<script>

import Header from "./components/Header";

import Content from "./components/Content";

import Footer from "./components/Footer";

  export default {

  name: 'App',

  components: {

    'MyHeader': Header,

    'MyContent': Content,

    'MyFooter': Footer,

  }

}

</script>
四、Vue组件之间的参数传递
- 父传子
App.vue
<template>

  <div id="app">

  <MyHeader></MyHeader>

    <MyContent :Mytitle="title"></MyContent>

  <MyFooter></MyFooter>

  </div>

</template>

  export default {

    name: 'App',

    components: {

      'MyHeader': Header,

      'MyContent': Content,

      'MyFooter': Footer,

    },

    data(){

      return {

        title: "Hello Vue!"

      }

    }

}
content.vue
<template>

    <div>

        <h2>{{Mytitle}}</h2>

        商品列表...

    </div>

</template>

<script>

    export default {

        name: "Content",

        props: ['Mytitle',]

    }

</script>
通过子组件的props属性,来指明可以接收的参数,父组件通过在标签中写明参数的键值对来传递参数。
props表示一个组件的参数部分,有两种写法:
(1)props:[参数列表]
比如:props:[‘MyProp1’,’MyProp2’]
(2)props:[参数名1:{type:String,required:true,default:”xx”},参数名2:{}]
- 子传父
App.vue
<template>

  <div id="app">

  <MyHeader></MyHeader>

    <MyContent :Mytitle="msg" :btnfn="change_msg"></MyContent>

  <MyFooter></MyFooter>

  </div>

</template>

<script>

import Header from "./components/Header";

import Content from "./components/Content";

import Footer from "./components/Footer";

  export default {

    name: 'App',

    components: {

      'MyHeader': Header,

      'MyContent': Content,

      'MyFooter': Footer,

    },

    data(){

      return {

        msg: "Hello Vue!"

      }

    },

    methods:{

      change_msg(v){

        this.msg = v;

      }

    }

}

</script>
content.vue
<template>

    <div>

        <h2>{{Mytitle}}</h2>

        商品列表...

        <button type="button" @click="btnfn('hello python')">点我</button>

    </div>

</template>

<script>

    export default {

        name: "Content",

        // props: ['Mytitle',]

        props:{

            'Mytitle':{

                type:String,

                required: true,

                default: "xx",

            },

            'btnfn': {

                type: Function,

            }

        }

    }

</script>
- 以事件发射的方式子传父
子组件中,使用this.$emit(‘键', ‘值’)
父组件中,在子组件标签中使用@键=”msg=$event”
Content.vue
 doClick(){

     this.$emit("newName", "hello js");

     }

 }
App.vue
<MyContent :Mytitle="msg" @newName="msg=$event"></MyContent>
五、Vue使用Axios
- 安装axios
npm install --save axios vue-axios
- 在main.js使用axios
import Vue from 'vue'

import axios from 'axios'

import VueAxios from 'vue-axios'

Vue.use(VueAxios, axios)

或

import Vue from 'vue'

import axios from 'axios'

Vue.prototype.axios = axios
1. get请求
方式一

 this.axios({

        method:'get',

        url:'http://127.0.0.1:8000/register',

        params:{

            "mail": this.mail,

            "password": this.password,

        },

    }).then(function (response) {

            console.log(response.data);

        });

方式二

 const { data: res, status: status } = await this.axios.get('users/getUserList', {

                params: this.queryInfo

            });

            if (status !== 200) {

                return this.$message.error('获取用户列表失败!')

            }

            this.userlist = res.data.users;

            this.total = res.data.total
2. post请求
发送post请求: 解决axios无法传递data中的参数问题
默认情况下发送axios时请求头中的内容类型为:
Content-Type:application/json;charset=UTF-8
而如果服务端需要的是:
Content-Type:application/x-www-form-urlencoded
因此,使用axios的qs内置库中的方法进行内容类型的转换。
import Qs from 'qs'

this.axios({

method:'post',

url:'http://localhost:8081/regist',

transformRequest: [function (data) {

return Qs.stringify(data)

}],

data:{

email:this.email

}

}).then(function (response) {

alert(response.data.message)

})

方式二

const { data: res, status: status } = await this.axios.post('users/addOneUser', user_form);

                    if (status !== 200) {

                        this.$message.error('添加用户失败!')

                    }

                    this.$message.success('添加用户成功!')

                    this.UserDialogVisible = false;

                    this.getUserList()
3.pu
const { data: res, status: status } = await this.axios.put('users/updateUser', user_form);

                    if (status !== 200) {

                        this.$message.error('更新用户信息失败!')

                    }

                    // 隐藏添加用户对话框

                    this.UserDialogVisible = false;

                    this.$message.success('更新用户信息成功!')

                    this.getUserList()
4.delete
const { data: res, status: status } = await this.axios.delete('users/deleteUser', {

                params:{"id": id},

            });

            if (status !== 200) return this.$message.error('删除用户失败!')

            this.$message.success('删除用户成功!');

            this.getUserList()
5. axios拦截器
axios.interceptors.request.use(config => {

  NProgress.start()

  config.headers.Authorization = Storage.sessionGet("token");

  return config

})

axios.interceptors.response.use( response => {

  NProgress.done()

  if (response.status >= 250  && response.status <= 260) {

      Storage.sessionRemove('token') // 删除已经失效或过期的token(不删除也可以,因为登录后覆盖)

      router.replace({path: '/Login'}).catch(err => {err})

  } else if (response.data.token) {

      Storage.sessionSet('token', response.data.token)

  }

  return response

})
六、解决跨域请求问题
1) 什么是跨域?
跨域,指的是浏览器不能执行其他网站的脚本。它是由浏览器的同源策略造成的,是浏览器施加的安全限制。
所谓同源是指,域名,协议,端口均相同,只要有一个不同,就是跨域。不明白没关系,举个栗子:
http://www.123.com/index.html 调用 http://www.123.com/server.php (非跨域)

http://www.123.com/index.html 调用 http://www.456.com/server.php (主域名不同:123/456,跨域)

http://abc.123.com/index.html 调用 http://def.123.com/server.php (子域名不同:abc/def,跨域)

http://www.123.com:8080/index.html 调用 http://www.123.com:8081/server.php (端口不同:8080/8081,跨域)

http://www.123.com/index.html 调用 https://www.123.com/server.php (协议不同:http/https,跨域)

请注意:localhost和127.0.0.1虽然都指向本机,但也属于跨域。
浏览器执行javascript脚本时,会检查这个脚本属于哪个页面,如果不是同源页面,就不会被执行。
2)为何要研究跨域问题?
因为浏览器的同源策略规定某域下的客户端在没明确授权的情况下,不能读写另一个域的资源。而在实际开发中,前后端常常是相互分离的,并且前后端的项目部署也常常不在一个服务器内或者在一个服务器的不同端口下。前端想要获取后端的数据,就必须发起请求,如果不做一些处理,就会受到浏览器同源策略的约束。后端可以收到请求并返回数据,但是前端无法收到数据。
3)为何浏览器会制定同源策略
之所以有同源策略,其中一个重要原因就是对cookie的保护。cookie 中存着sessionID 。黑客一旦获取了sessionID,并且在有效期内,就可以登录。当我们访问了一个恶意网站 如果没有同源策略 那么这个网站就能通过js 访问document.cookie 得到用户关于的各个网站的sessionID 其中可能有银行网站 等等。通过已经建立好的session连接进行攻击,比如CSRF攻击。这里需要服务端配合再举个例子,现在我扮演坏人 我通过一个iframe 加载某宝的登录页面 等傻傻的用户登录我的网站的时候 我就把这个页面弹出 用户一看 阿里唉大公司 肯定安全 就屁颠屁颠的输入了密码 注意 如果没有同源策略 我这个恶意网站就能通过dom操作获取到用户输入的值 从而控制该账户所以同源策略是绝对必要的.还有需要注意的是同源策略无法完全防御CSRF。
4)跨域会阻止什么操作?
浏览器是从两个方面去做这个同源策略的,一是针对接口的请求,二是针对Dom的查询
5)多种跨域方法
跨域可以大概分为两种目的
前后端分离时,前端为了获取后端数据而跨域
为不同域下的前端页面通信而跨域
为前后端分离而跨域
ü Cross Origin Resource Share (CORS)
CORS是一个跨域资源共享方案,为了解决跨域问题,通过增加一系列请求头和响应头,规范安全地进行跨站数据传输。CORS背后的基本思想是使用自定义的HTTP头部允许浏览器和服务器相互了解对方,从而决定请求或响应成功与否.通过过滤器在response中返回头部,使服务器和浏览器可互通。
Access-Control-Allow-Origin:指定授权访问的域
Access-Control-Allow-Methods:授权请求的方法(GET, POST, PUT, DELETE,OPTIONS等)
适合设置单一的(或全部)授权访问域,所有配置都是固定的,特简单。也没根据请求的类型做不同的处理


func Cors() gin.HandlerFunc {

    return func(c *gin.Context) {

        method := c.Request.Method

        c.Header("Access-Control-Allow-Origin", "*")

        c.Header("Access-Control-Allow-Headers", "Content-Type,AccessToken,X-CSRF-Token, Authorization, Token")

        c.Header("Access-Control-Allow-Methods", "POST, GET, OPTIONS, PUT, DELETE,UPDATE")      //服务器支持的所有跨域请求的方

        c.Header("Access-Control-Expose-Headers", "Content-Length, Access-Control-Allow-Origin, Access-Control-Allow-Headers, Content-Type")

        c.Header("Access-Control-Allow-Credentials", "true")

        //放行所有OPTIONS方法

        if method == "OPTIONS" {

            c.AbortWithStatus(http.StatusNoContent)

        }

        // 处理请求

        c.Next()

    }

}

func main() {

    r := gin.Default()

    r.Use(Cors(),)

    r.GET("/register", RegisterHandler)

    _ = r.Run(":8000")

}
gin跨域中间件
- JSONP 跨域
JSONP是前端解决跨域最实用的方法
原理就是html中 的link,href,src属性都是不受跨域影响的,link可以调用远程的css文件,href可以链接到随便的url上,图片的src可以随意引用图片,script的src属性可以随意引入不同源的js文件。JSONP既是利用了<srcipt>,那么就只能支持GET请求。其他请求无法实现
- nginx 反向代理实现跨域
七、Vue路由
路由器的功能:在数据通信时选择通信的路线。
在vue中的路由,能够在一个vue组件中实现其他组件的相互切换。也就是说,可以通过路由模块,创建路由表,将制定的组件显示在路由视图中。
1.安装路由模块
npm install vue-router –s
2.设计路由界面
3. 创建静态路由表
router.js
import Home from "./components/Home";

import Products from "./components/Products";

export const routes = [

    {

        path: "/Home",

        component: Home,

    },

    {

        path: "/Products",

        component: Products,

    }

];
4.在mian.js中使用路由模块以及注册路由表
import Vue from 'vue'

import App from './App.vue'

import VueRouter from 'vue-router'

import {routes} from "./router";

Vue.config.productionTip = false;

Vue.use(VueRouter); // 使用路由模块

// 创建一个VueRouter模块实例

const router = new VueRouter({

  routes: routes

});

new Vue({

  router,

  render: h => h(App),

}).$mount('#app');
5.创建路由链接和路由视图4.在mian.js中使用路由模块以及注册路由表
App.vue
<template>

    <div id="app">

        <div>

            <span>

                <router-link to="/Home">首页</router-link>

            </span>

            <span>

                <router-link to="/Products">商品列表</router-link>

            </span>

        </div>

        <router-view></router-view>

    </div>

</template>
6.路由之间的参数传递
1. 设参

 {

        path: "/Products/:id",

        component: Products,

    }

2. 传参

<router-link to="/Products/1">最新商品</router-link>

3.接参

this.$route.params.id

data(){

        return {

           id: this.$route.params.id

         }

    },
7.路由之间跳转的方式
1)通过html中的路由<router-link to=”/Home”>首页</router-link>
2)通过js实现路由的跳转 this.$router.push("/Home").catch(err => {err});;
补充:组件样式表的作用范围
如果vue组件中的style标签没有带上scoped标签,那么这个style的样式将会作用在整个页面中,如果加上scoped标签,则样式只会作用在当前组件中。
8.嵌套路由(子路由)
路由显示的组件内部,又嵌套者路由,成为子路由。
1,嵌套路由表
export default new Router({

    routes: [

        {

            path: "/Login",

            name: "Login",

            component: Login,

        },

        {

            path: "/Backend",

            name: "Backend",

            component: Backend,

            children: [

                {

                    path: "/ProductList",

                    name: "ProductList",

                    component: ProductList,

                },

                {

                    path: "/ProductInfo",

                    name: "ProductInfo",

                    component: ProductInfo,

                },

            ]

        }

    ]

});
backend.vue
<template>

    <el-container style="height: 500px; border: 1px solid #eee">

        <el-aside width="200px" style="background-color: rgb(238, 241, 246)">

            <el-menu :default-openeds="['1', '3']">

                <el-submenu index="1">

                    <template slot="title"><i class="el-icon-message"></i>商品管理</template>

                    <el-menu-item-group>

                        <el-menu-item index="1-1"><router-link to="/ProductList">商品列表</router-link></el-menu-item>

                        <el-menu-item index="1-2"><router-link to="/ProductInfo">商品信息</router-link></el-menu-item>

                    </el-menu-item-group>

                </el-submenu>

            </el-menu>

        </el-aside>

        <el-container>

            <el-header style="text-align: right; font-size: 12px">

                <el-dropdown>

                    <i class="el-icon-setting" style="margin-right: 15px"></i>

                    <el-dropdown-menu slot="dropdown">

                        <el-dropdown-item><a href="#">查看</a></el-dropdown-item>

                        <el-dropdown-item><a href="#">新增</a></el-dropdown-item>

                        <el-dropdown-item><a href="/#/Login">退出</a></el-dropdown-item>

                    </el-dropdown-menu>

                </el-dropdown>

                <span>王小虎</span>

            </el-header>

            <el-main>

                <router-view></router-view>

            </el-main>

        </el-container>

    </el-container>

</template>
说明:
(1)在<el-main>元素中配置了<router-view>用于展示嵌套路由
(2)主要使用 <router-link to=”路由”>展示嵌套路由内容
9.路由重定向
export default new Router({

    routes: [

    {

            path: "/Login",

            name: "Login",

            component: Login,

        },

        {

            path: "/Logout",

            redirect: "/Login",

        },

]

})
10 参数传递
1.使用路径匹配的方式

1)修改路由配置

{path: '/user/profile/:id', name:'UserProfile', component: UserProfile}

2)传递参数

(1)router-link

<router-link :to="{name: 'UserProfile', params: {id: 1}}">个人信息</router-link>

说明:此时我们将 to 改为了 :to ,是为了将这一属性当成对象使用,注意 router-link 中的 name 属性名称

一定要和 路由中的 name 属性名称 匹配,因为这样 Vue 才能找到对应的路由路径;

(2)js代码方式

this.$router.push({ name: 'UserProfile', params: {id: 1}});

3)接收参数

{{ $route.params.id }}   2.使用props方式

1)修改路由配置

{path: '/user/profile/:id', name:'UserProfile', component: UserProfile, props: true}

说明:主要增加了 props: true 属性

2)传递参数

同上

3)接收参数

export default {

props: ['id'],

name: "UserProfile"

}

模板中

{{id}}
11.路由钩子
路由钩子函数
beforeRouteEnter :在进入路由前执行
beforeRouteLeave :在离开路由前执行
export default {

props: ['id'],

name: "UserProfile",

beforeRouteEnter: (to, from, next) => {

console.log("准备进入个人信息页");

next();

},

beforeRouteLeave: (to, from, next) => {

console.log("准备离开个人信息页");

next();

}

}
参数说明:
to :路由将要跳转的路径信息
from :路径跳转前的路径信息
next :路由的控制参数
next() 跳入下一个页面
next('/path') 改变路由的跳转方向,使其跳到另一个路由
next(false) 返回原来的页面
next((vm)=>{}) 仅在 beforeRouteEnter 中可用,vm 是组件实例
生命周期执行顺序
准备进入个人信息页
ProductInfo.vue?ca1b:17 beforeCreate
ProductInfo.vue?ca1b:21 created
ProductInfo.vue?ca1b:24 beforeMount
ProductInfo.vue?ca1b:30 mounted
ProductInfo.vue?ca1b:13 准备离开个人信息页
ProductInfo.vue?ca1b:39 beforeDestory
ProductInfo.vue?ca1b:42 destory
路由文件示例


import Vue from "vue";

import Router from "vue-router"

import store from "../store"

// 路由懒加载

const Login = () => import(/* webpackChunkName: "Login_Home_Welcome_ResetPwd" */ '../view/Login.vue')

const Home = () => import(/* webpackChunkName: "Login_Home_Welcome_ResetPwd" */ '../view/Home.vue')

const Welcome = () => import(/* webpackChunkName: "Login_Home_Welcome_ResetPwd" */ '../view/personal/Welcome.vue')

const ResetPwd = () => import(/* webpackChunkName: "Login_Home_Welcome_ResetOwd" */ '../view/personal/ResetPwd.vue')

const Users = () => import(/* webpackChunkName: "Users" */ '../view/users/User.vue')

const Roles = () => import(/* webpackChunkName: "Auth" */ '../view/authority/Roles.vue')

const Menus = () => import(/* webpackChunkName: "Auth" */ '../view/authority/Menus.vue')

const API = () => import(/* webpackChunkName: "Auth" */ '../view/authority/API.vue')

const BaseList = () => import(/* webpackChunkName: "System" */ '../view/system/Base.vue')

const ClassList = () => import(/* webpackChunkName: "System" */ '../view/system/Class.vue')

const Course = () => import(/* webpackChunkName: "System" */ '../view/system/Course.vue')

const StudentList = () => import(/* webpackChunkName: "Students" */ '../view/student/StudentList.vue')

const StudentInfo = () => import(/* webpackChunkName: "Students" */ '../view/student/StudentInfo.vue')

const StuActivity = () => import(/* webpackChunkName: "Students" */ '../view/student/StuActivity.vue')

const Research = () => import(/* webpackChunkName: "Students" */ '../view/student/Research.vue')

const Grants = () => import(/* webpackChunkName: "Students" */ '../view/student/Grants.vue')

const Rewards = () => import(/* webpackChunkName: "Students" */ '../view/student/Rewards.vue')

const Jobs = () => import(/* webpackChunkName: "Students" */ '../view/student/Jobs.vue')

// const ScoreImport = () => import(/* webpackChunkName: "Scores" */ '../view/score/ScoreImport.vue')

const UploadExcel = () => import(/* webpackChunkName: "Scores" */ '../view/score/upload-excel.vue')

const ScoreList = () => import(/* webpackChunkName: "Scores" */ '../view/score/ScoreList.vue')

const ScoreSummary = () => import(/* webpackChunkName: "Scores" */ '../view/score/ScoreSummary.vue')

const ScoreFilter = () => import(/* webpackChunkName: "Scores" */ '../view/score/ScoreFilter.vue')

const Archives = () => import(/* webpackChunkName: "Party" */ '../view/party/Archives.vue')

const PartyFilter = () => import(/* webpackChunkName: "Party" */ '../view/party/partyFilter.vue')

const Messages = () => import(/* webpackChunkName: "Message" */ '../view/message/Messages.vue')

const Notices = () => import(/* webpackChunkName: "Message" */ '../view/message/Notices.vue')

const Tasks = () => import(/* webpackChunkName: "Message" */ '../view/message/Tasks.vue')

const Error = () => import(/* webpackChunkName: "Error" */ '../view/404.vue')

// 注册路由

Vue.use(Router);

// 配置路由

const router = new Router({

    // mode: "history",

    routes: [

        { path: "/", redirect: "/home"},

        { path: "/Login", component: Login},

        {

            path: "/home",

            component: Home,

            redirect: "/welcome",

            children: [

                {path: "/welcome", component: Welcome},

                {path: "/reset_pwd", component: ResetPwd},

                {path: "/users", component: Users, meta: {requireAuth: true, title: "用户列表"}},

                {path: "/roles", component: Roles, meta: {requireAuth: true, title: "角色列表"}},

                {path: "/menus", component: Menus, meta: {requireAuth: true, title: "菜单列表"}},

                {path: "/api", component: API, meta: {requireAuth: true, title: "API列表"}},

                {path: "/base", component: BaseList, meta: {requireAuth: true, title: "基础配置"}},

                {path: "/class", component: ClassList, meta: {requireAuth: true, title: "班级列表"}},

                {path: "/course", component: Course, meta: {requireAuth: true, title: "课程管理"}},

                {path: "/students", component: StudentList, meta: {requireAuth: true, title: "学生列表"}},

                {path: "/studentInfo/:id",name: "studentInfo", component: StudentInfo, meta: {requireAuth: true, title: "学生信息"}},

                {path: "/stuActivity", component: StuActivity, meta: {requireAuth: true, title: "学生活动"}},

                {path: "/stuResearch", component: Research, meta: {requireAuth: true, title: "科研管理"}},

                {path: "/rewards", component: Rewards, meta: {requireAuth: true, title: "获奖经历"}},

                {path: "/grants", component: Grants, meta: {requireAuth: true, title: "助学金"}},

                {path: "/jobs", component: Jobs, meta: {requireAuth: true, title: "学生就业"}},

                // {path: "/scoreImport", component: ScoreImport, meta: {requireAuth: true, title: "成绩导入"}},

                {path: "/scoreImport", component: UploadExcel, meta: {requireAuth: true, title: "成绩导入"}},

                {path: "/scoreList", component: ScoreList, meta: {requireAuth: true, title: "成绩列表"}},

                {path: "/scoreSummary", component: ScoreSummary, meta: {requireAuth: true, title: "成绩汇总"}},

                {path: "/scoreFilter", component: ScoreFilter, meta: {requireAuth: true, title: "成绩筛选"}},

                {path: "/archives", component: Archives, meta: {requireAuth: true, title: "政治档案"}},

                {path: "/partyFilter", component: PartyFilter, meta: {requireAuth: true, title: "党员筛选"}},

                {path: "/messages", component: Messages, meta: {requireAuth: true, title: "消息列表"}},

                {path: "/notices", component: Notices, meta: {requireAuth: true, title: "通知列表"}},

                {path: "/tasks", component: Tasks, meta: {requireAuth: true, title: "任务列表"}},

                {path: "/404", component: Error}

            ]

        },

        { path: "*", redirect: "/404"},

    ]

});

router.beforeEach((to, from, next) => {

    if (to.path === "/Login") return next()

    if (to.meta.requireAuth){

        if (!store.getters.menu_path_map.hasOwnProperty(to.path) ) {

            if (!store.getters.menu_path_map.hasOwnProperty("/" + to.name)) {

                return next('/404')

            }

        }

    }

    const tokenStr = window.sessionStorage.getItem("token");

    if (!tokenStr) return next("/Login")

    next()

})

export default router
router,js


import Vue from 'vue'

import App from './App.vue'

import router from "./router";

import store from "./store";

import axios from "axios"

import VueAxios from "vue-axios"

import Storage from "./plugins/storage"

import "./assets/fonts/iconfont.css"

import "element-ui/lib/theme-chalk/index.css"

import "./assets/css/global.css"

import ElementUI from "element-ui"

// 添加进度条效果

import NProgress from 'nprogress'

import 'nprogress/nprogress.css'

// 简单配置

NProgress.inc(0.2)

NProgress.configure({ easing: 'ease', speed: 500, showSpinner: false, trickle: false })

// 配置请求根路径

axios.defaults.baseURL = "http://127.0.0.1:8000/api/v1"

axios.defaults.headers.post['Content-Type'] = 'application/x-www-form-urlencoded'

axios.interceptors.request.use(config => {

  NProgress.start()

  config.headers.Authorization = Storage.sessionGet("token");

  return config

})

axios.interceptors.response.use( response => {

  NProgress.done()

  if (response.status >= 250  && response.status <= 260) {

      Storage.sessionRemove('token') // 删除已经失效或过期的token(不删除也可以,因为登录后覆盖)

      router.replace({path: '/Login'}).catch(err => {err})

  } else if (response.data.token) {

      Storage.sessionSet('token', response.data.token)

  }

  return response

})

Vue.filter("datetimeFormat", function(time){

    let oldDate = new Date(time)

    let year   = oldDate.getFullYear();

    let month  = oldDate.getMonth()+1;

    let day    = oldDate.getDate();

    let hour   = oldDate.getHours();

    let minute = oldDate.getMinutes();

    let second = oldDate.getSeconds();

    return year+"-"+month+"-"+day+" "+hour+":"+minute+":"+second;

})

Vue.filter("dateFormat", function(time){

    if (time == '0001-01-01T00:00:00Z') return ''

    let oldDate = new Date(time)

    let year   = oldDate.getFullYear();

    let month  = oldDate.getMonth()+1;

    let day    = oldDate.getDate();

    let hour   = oldDate.getHours();

    let minute = oldDate.getMinutes();

    let second = oldDate.getSeconds();

    return year+"-"+month+"-"+day

})

Vue.config.productionTip = false

Vue.prototype.domain = "http://127.0.0.1:8000"

Vue.prototype.storage = Storage

Vue.use(VueAxios, axios)

Vue.use(ElementUI)

new Vue({

  router,

  store,

  render: h => h(App),

}).$mount('#app')
main.js
Vue系列教程(三)之vue-cli脚手架的使用的更多相关文章
- [js高手之路] vue系列教程 - 事件专题(4)
本文主要讲解事件冒泡,事件绑定的简写,事件默认行为,按键码等一系列与事件相关的知识. 一.事件绑定的简写,@事件类型. 之前我的[js高手之路] vue系列教程 - vue的事件绑定与方法(2) 用 ...
- Vue基础系列(三)——Vue模板中的数据绑定语法
写在前面的话: 文章是个人学习过程中的总结,为方便以后回头在学习. 文章中会参考官方文档和其他的一些文章,示例均为亲自编写和实践,若有写的不对的地方欢迎大家和我一起交流. VUE基础系列目录 < ...
- CRL快速开发框架系列教程三(更新数据)
本系列目录 CRL快速开发框架系列教程一(Code First数据表不需再关心) CRL快速开发框架系列教程二(基于Lambda表达式查询) CRL快速开发框架系列教程三(更新数据) CRL快速开发框 ...
- Android Studio系列教程三--快捷键
Android Studio系列教程三--快捷键 2014 年 12 月 09 日 DevTools 本文为个人原创,欢迎转载,但请务必在明显位置注明出处!http://stormzhang.com/ ...
- NGUI系列教程三
接下来我们再来看Progress Bar和Slider,对比参数我们可以发现,Progress Bar和slider的明显区别在于slider多一个Thumb选项,这里的Thumb就是我们拖动的时候点 ...
- 黄聪:Microsoft Enterprise Library 5.0 系列教程(三) Validation Application Block (高级)
原文:黄聪:Microsoft Enterprise Library 5.0 系列教程(三) Validation Application Block (高级) 企业库验证应用程序模块之配置文件模式: ...
- 黄聪:Microsoft Enterprise Library 5.0 系列教程(三) Validation Application Block (初级)
原文:黄聪:Microsoft Enterprise Library 5.0 系列教程(三) Validation Application Block (初级) 企业库提供了一个很强大的验证应用程序模 ...
- Fastify 系列教程三 (验证、序列化和生命周期)
Fastify 系列教程: Fastify 系列教程一 (路由和日志) Fastify 系列教程二 (中间件.钩子函数和装饰器) Fastify 系列教程三 (验证.序列化和生命周期) 验证 Fast ...
- webpack4 系列教程(三): 多页面解决方案--提取公共代码
这节课讲解webpack4打包多页面应用过程中的提取公共代码部分.相比于webpack3,4.0版本用optimization.splitChunks配置替换了3.0版本的CommonsChunkPl ...
- WPF系列教程——(三)使用Win10 Edge浏览器内核 - 简书
原文:WPF系列教程--(三)使用Win10 Edge浏览器内核 - 简书 在需要显示一些 H5网站的时候自带的WebBrowser总是显示不了,WebBrowser使用的是IE内核,许多H5新特性都 ...
随机推荐
- 【阿菜做实践】利用go语言写一个简单的Pow样例
本篇博客的主要内容是用go写一个简单的Proof-of-Work共识机制,不涉及到网络通信环节,只是一个本地的简单demo.开发IDE用的是JB Golang. 整个项目的文件结构如下: PoWdem ...
- centos k3s部署
目录 一.k3s介绍 二.在线安装 三.离线安装 四.高可用安装 五.配置k3s镜像仓库 六.Kubernetes 仪表盘 七.常用命令 八.参考 一.k3s介绍 1.k3s是一个轻量级的 Kuber ...
- IM即时通讯设计 高并发聊天服务:服务器 + qt客户端(附源码)
来源:微信公众号「编程学习基地」 目录 IM即时通信程序设计 IM即时通讯 设计一款高并发聊天服务需要注意什么 如何设计可靠的消息处理服务 什么是粘包 什么是半包 解决粘包和半包 IM通信协议 应用层 ...
- 攻击科普:DDos
目录 一.DDoS 攻击究竟是什么? 二.DDoS 攻击多少G是什么意思? 二.DDoS攻击种类 ICMP Flood UDP Flood NTP Flood SYN Flood CC攻击 DNS Q ...
- Java(运算符)
运算符 Java语言支持的运算符: 算术运算符:+,-,*,/,%(取余.求余)[模运算],++(自增),--(自减) 赋值运算符:= 关系运算符:>,<,>=(大于等于),< ...
- 由一次 UPDATE 过慢 SQL 优化而总结出的经验
最近,线上的 ETL 数据归档 SQL 发生了点问题,有一个 UPDATE SQL 跑了两天还没跑出来: update t_order_record set archive_id = '420a7fe ...
- CF469A I Wanna Be the Guy 题解
Content 小 A 和小 B 正在玩一个游戏,游戏一共有 \(n\) 关,而两个人各只能通过 \(p_A,p_B\) 个关卡.问他们能否通过合作通关这个游戏. 数据范围:\(1\leqslant ...
- CF78B Easter Eggs 题解
Content 有一个有 \(n\) 个点的环,你可以将其染成一种颜色.一共有 \(7\) 种颜色(R,O,Y,G,B,I,V)可以选择.你的染色方案应该满足下面的要求: 每一个点都要被染色,且 \( ...
- libevent源码学习(2):内存管理
目录 内存管理函数 函数声明 event-config.h 函数定义 event_mm_malloc_ event_mm_calloc_ event_mm_strdup_ event_mm_reall ...
- Mybatis-Plus一键生成代码
Mybatis-Plus一键生成代码 一.闲言碎语 闲来无事看了看了MP的官网看到一键生成的代码更新了! 整个Ui风格都变了,遂决定瞅一眼新的代码生成器 官网地址~~ 二.引入依赖 新的代码生成只有在 ...
