高可用Kubernetes集群-15. 部署Kubernetes集群统一日志管理
参考文档:
Kubernetes推荐采用Fluentd+Elasticsearch+Kibana对系统与容器日志进行采集,查询并展现。
一.环境
1. 基础环境
|
组件 |
版本 |
Remark |
|
kubernetes |
v1.9.2 |
|
|
fluentd-elasticsearch |
v2.0.4 |
|
|
elasticsearch |
v5.6.4 |
|
|
kibana |
5.6.4 |
2. 原理

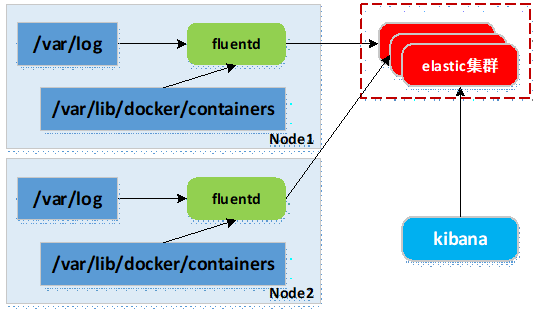
- 容器运行输出到控制台的日志,以*-json.log的命名方式存放到/var/lib/docker/containers目录;
- 在各Node上运行fluentd服务(同logstash),采集所在节点/var/log与/var/lib/docker/containers两个目录下的日志;
- fluentd采集的日志数据汇总到elasticsearch集群;
- kibana展示与交互。
二.部署Kubernetes集群性能监控
1. 准备images
kubernetes部署服务时,为避免部署时发生pull镜像超时的问题,建议提前将相关镜像pull到相关所有节点(以下以kubenode1为例),或搭建本地镜像系统。
- 基础环境已做了镜像加速,可参考:http://www.cnblogs.com/netonline/p/7420188.html
- 需要从gcr.io pull的镜像,已利用Docker Hub的"Create Auto-Build GitHub"功能(Docker Hub利用GitHub上的Dockerfile文件build镜像),在个人的Docker Hub build成功,可直接pull到本地使用。
[root@kubenode1 ~]# docker pull netonline/fluentd-elasticsearch:v2.0.4

[root@kubenode1 ~]# docker pull netonline/elasticsearch:v5.6.4

[root@kubenode1 ~]# docker pull netonline/kibana:5.6.4

# elastic需要vm.max_map_count不低于262144,利于轻量级的alpine linux初始化1个基础容器保证需求

[root@kubenode1 ~]# docker pull alpine:3.6
2. 下载yaml范本
# release下载页:https://github.com/kubernetes/kubernetes/tree/master/cluster/addons/fluentd-elasticsearch

[root@kubenode1 ~]# mkdir -p /usr/local/src/yaml/efk

[root@kubenode1 ~]# cd /usr/local/src/yaml/efk

# fluentd-es-configmap.

[root@kubenode1 efk]# wget https://raw.githubusercontent.com/kubernetes/kubernetes/master/cluster/addons/fluentd-elasticsearch/fluentd-es-configmap.yaml

# fluentd-es-ds

[root@kubenode1 efk]# wget https://raw.githubusercontent.com/kubernetes/kubernetes/master/cluster/addons/fluentd-elasticsearch/fluentd-es-ds.yaml

# es-statefulset

[root@kubenode1 efk]# wget https://raw.githubusercontent.com/kubernetes/kubernetes/master/cluster/addons/fluentd-elasticsearch/es-statefulset.yaml

# es-service.

[root@kubenode1 efk]# wget https://raw.githubusercontent.com/kubernetes/kubernetes/master/cluster/addons/fluentd-elasticsearch/es-service.yaml

# kibana-deployment

[root@kubenode1 efk]# wget https://raw.githubusercontent.com/kubernetes/kubernetes/master/cluster/addons/fluentd-elasticsearch/kibana-deployment.yaml

# kibana-service

[root@kubenode1 efk]# wget https://raw.githubusercontent.com/kubernetes/kubernetes/master/cluster/addons/fluentd-elasticsearch/kibana-service.yaml

本实验使用yaml文件(修改版):https://github.com/Netonline2016/kubernetes/tree/master/addons/efk
3. es-statefulset.yaml
es-statefulset.yaml由4个模块组成:ServiceAccout,ClusterRole,ClusterRoleBinding,StatefulSet。
其中ServiceAccout,ClusterRole,ClusterRoleBinding等3个模块定义了1个新的ClusterRole权限,并完成ClusterRoleBinding,授权到ServiceAccout。这3个模块默认不修改。
1)StatefulSet
默认不需要修改ServiceAccount部分,设置ServiceAccount资源,获取rbac中定义的权限。
StatefulSet是Deployment/RC的一个特殊变种,主要面向有状态的服务,特性如下:
- StatefulSet中每个Pod都有稳定的,唯一的网络标识,可以用来发现集群内的其他成员;如StatefulSet的名字为elasticsearch,则第一个Pod为elasticsearch-0,第二个Pod为elasticsearch-1,依次类推;
- StatefulSet控制的Pod副本的启停顺序是受控的,操作第n个Pod时,前n-1个Pod已运行且状态ready;
- StatefulSet里的Pod采用稳定的持久化的存储卷,通过PV/PVC实现,删除Pod时默认不会删除与StatefulSet相关的存储卷,保证了数据安全。
# 修改处:第76行,变更镜像名;

# 设定为StatefulSet资源,副本数为2,采用持久化存储;

# 使用init Container在应用启动之前做初始化操作

[root@kubenode1 ~]# cd /usr/local/src/yaml/efk/

[root@kubenode1 efk]# sed -i 's|k8s.gcr.io/elasticsearch:v5.6.4|netonline/elasticsearch:v5.6.4|g' es-statefulset.yaml

[root@kubenode1 efk]# cat es-statefulset.yaml

# Elasticsearch deployment itself

apiVersion: apps/v1

kind: StatefulSet

metadata:

  name: elasticsearch-logging

  namespace: kube-system

  labels:

    k8s-app: elasticsearch-logging

    version: v5.6.4

    kubernetes.io/cluster-service: "true"

    addonmanager.kubernetes.io/mode: Reconcile

spec:

  serviceName: elasticsearch-logging

  replicas:

  selector:

    matchLabels:

      k8s-app: elasticsearch-logging

      version: v5.6.4

  template:

    metadata:

      labels:

        k8s-app: elasticsearch-logging

        version: v5.6.4

        kubernetes.io/cluster-service: "true"

    spec:

      serviceAccountName: elasticsearch-logging

      containers:

      - image: netonline/elasticsearch:v5.6.4

        name: elasticsearch-logging

        resources:

          # need more cpu upon initialization, therefore burstable class

          limits:

            cpu: 1000m

          requests:

            cpu: 100m

        ports:

        - containerPort: 9200

          name: db

          protocol: TCP

        - containerPort: 9300

          name: transport

          protocol: TCP

        volumeMounts:

        - name: elasticsearch-logging

          mountPath: /data

        env:

        - name: "NAMESPACE"

          valueFrom:

            fieldRef:

              fieldPath: metadata.namespace

      volumes:

      - name: elasticsearch-logging

        emptyDir: {}

      # Elasticsearch requires vm.max_map_count to be at least 262144.

      # If your OS already sets up this number to a higher value, feel free

      # to remove this init container.

      initContainers:

      - image: alpine:3.6

        command: ["/sbin/sysctl", "-w", "vm.max_map_count=262144"]

        name: elasticsearch-logging-init

        securityContext:

          privileged: true
4. es-service.yaml
es-service.yaml默认不需要修改。
5. fluentd-es-configmap.yaml
fluentd-es-configmap.yaml设定一个ConfigMap资源,以volume的形式挂载为fluentd服务内部的文件,默认不需要修改。
6. fluentd-es-ds.yaml
fluentd-es-ds.yaml由4个模块组成:ServiceAccout,ClusterRole,ClusterRoleBinding,StatefulSet。
其中ServiceAccout,ClusterRole,ClusterRoleBinding等3个模块定义了1个新的ClusterRole: fluentd-es权限,并完成ClusterRoleBinding: fluentd-es,授权到ServiceAccout: fluentd-es。这3个模块默认不修改。
1)DaemonSet
fluentd需要在每个Node上运行,有以下3种方式实现:
- 直接在Node上部署fluentd服务;
- 通过kubelet的--config参数,为每个Node加载fluentd Pod;
- 通过DaemonSet资源设定fluentd Pod在每个Node运行(官方推荐)。
# 修改处:第16行,变更镜像名;

# nodeSelector:标签设置为”true”,设定DaemonSet调度Pod只能调度到含有标签”beta.kubernetes.io/fluentd-ds-ready”的节点,需要在相应节点设置标签

[root@kubenode1 efk]# sed -i 's|k8s.gcr.io/fluentd-elasticsearch:v2.0.4|netonline/fluentd-elasticsearch:v2.0.4|g' fluentd-es-ds.yaml

[root@kubenode1 efk]# cat fluentd-es-ds.yaml

……

apiVersion: apps/v1

kind: DaemonSet

metadata:

  name: fluentd-es-v2.0.4

  namespace: kube-system

  labels:

    k8s-app: fluentd-es

    version: v2.0.4

    kubernetes.io/cluster-service: "true"

    addonmanager.kubernetes.io/mode: Reconcile

spec:

  selector:

    matchLabels:

      k8s-app: fluentd-es

      version: v2.0.4

  template:

    metadata:

      labels:

        k8s-app: fluentd-es

        kubernetes.io/cluster-service: "true"

        version: v2.0.4

      # This annotation ensures that fluentd does not get evicted if the node

      # supports critical pod annotation based priority scheme.

      # Note that this does not guarantee admission on the nodes (#40573).

      annotations:

        scheduler.alpha.kubernetes.io/critical-pod: ''

    spec:

      priorityClassName: system-node-critical

      serviceAccountName: fluentd-es

      containers:

      - name: fluentd-es

        image: netonline/fluentd-elasticsearch:v2.0.4

        env:

        - name: FLUENTD_ARGS

          value: --no-supervisor -q

        resources:

          limits:

            memory: 500Mi

          requests:

            cpu: 100m

            memory: 200Mi

        volumeMounts:

        - name: varlog

          mountPath: /var/log

        - name: varlibdockercontainers

          mountPath: /var/lib/docker/containers

          readOnly: true

        - name: libsystemddir

          mountPath: /host/lib

          readOnly: true

        - name: config-volume

          mountPath: /etc/fluent/config.d

      nodeSelector:

        beta.kubernetes.io/fluentd-ds-ready: "true"

      terminationGracePeriodSeconds: 30

      volumes:

      - name: varlog

        hostPath:

          path: /var/log

      - name: varlibdockercontainers

        hostPath:

          path: /var/lib/docker/containers

      # It is needed to copy systemd library to decompress journals

      - name: libsystemddir

        hostPath:

          path: /usr/lib64

      - name: config-volume

        configMap:

          name: fluentd-es-config-v0.1.4
2)设置标签
# 所有期望运行fluentd Pod的节点都需要设置标签

[root@kubenode1 ~]# kubectl get nodes

[root@kubenode1 ~]# kubectl label nodes 172.30.200.21 beta.kubernetes.io/fluentd-ds-ready=true

[root@kubenode1 ~]# kubectl label nodes 172.30.200.22 beta.kubernetes.io/fluentd-ds-ready=true

[root@kubenode1 ~]# kubectl label nodes 172.30.200.23 beta.kubernetes.io/fluentd-ds-ready=true

7. kibana-deployment.yaml
# 修改处:第22行,变更镜像名;

[root@kubenode1 efk]# sed -i 's|docker.elastic.co/kibana/kibana:5.6.4|netonline/kibana:5.6.4|g' kibana-deployment.yaml
8. kibana-service.yaml
默认不需要修改Service部分。
三.验证
1. 启动服务
[root@kubenode1 ~]# cd /usr/local/src/yaml/efk/

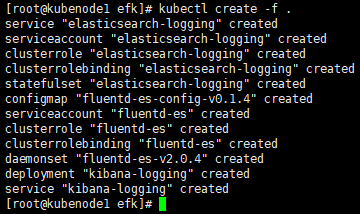
[root@kubenode1 efk]# kubectl create -f .

2. 查看服务
# 查看statefulset,daemonset与deployment

[root@kubenode1 ~]# kubectl get statefulset -n kube-system

[root@kubenode1 ~]# kubectl get daemonset -n kube-system

[root@kubenode1 ~]# kubectl get deployment -n kube-system | grep kibana

# 查看elasticsearch与kibana的Pod运行状态;

# 有状态的Pod命名是有规律的

[root@kubenode1 ~]# kubectl get pods -n kube-system | grep -E 'elasticsearch|kibana'

# 查看fluentd的Pod运行状态,”-o wide”参数可显示Pod运行节点;

# 期望运行的节点都运行了fluentd Pod服务

[root@kubenode1 ~]# kubectl get pods -n kube-system -o wide | grep fluentd

# 查看service运行状态

[root@kubenode1 ~]# kubectl get svc -n kube-system | grep -E 'elasticsearch|kibana'

# kibana Pod第一次启动时有一定的初始化操作来优化并cache状态页面,时间一般在10~20分钟内;

# 通过日志查看,”-f”参数类似于“tailf”;

[root@kubenode1 ~]# kubectl log kibana-logging-5d4b6ddfc7-szx6d -n kube-system -f

3. 访问elasticsearch
# 访问elasticsearch,采用kube-apiserver方式,也可以使用kubecet proxy代理的方式(同dashboard方式)

[root@kubenode1 ~]# kubectl cluster-info

浏览器访问访问elasticsearch,返回json文档:https://172.30.200.10:6443/api/v1/namespaces/kube-system/services/elasticsearch-logging/proxy/

4. 访问kibana
访问kibana,同样采用kube-apiserver方式,也可以使用kubecet proxy代理的方式(同dashboard方式)
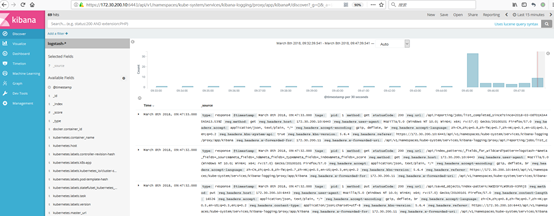
浏览器访问访问kibana:https://172.30.200.10:6443/api/v1/namespaces/kube-system/services/kibana-logging/proxy
同ELK,第一次进入kibana,需要进行初始化配置,默认"Create"即可;


高可用Kubernetes集群-15. 部署Kubernetes集群统一日志管理的更多相关文章
- 高可用Kubernetes集群-14. 部署Kubernetes集群性能监控平台
参考文档: Github介绍:https://github.com/kubernetes/heapster Github yaml文件: https://github.com/kubernetes/h ...
- centos7.4安装高可用(haproxy+keepalived实现)kubernetes1.6.0集群(开启TLS认证)
目录 目录 前言 集群详情 环境说明 安装前准备 提醒 一.创建TLS证书和秘钥 安装CFSSL 创建 CA (Certificate Authority) 创建 CA 配置文件 创建 CA 证书签名 ...
- 【Linux运维-集群技术进阶】Nginx+Keepalived+Tomcat搭建高可用/负载均衡/动静分离的Webserver集群
额.博客名字有点长.. . 前言 最终到这篇文章了,心情是有点激动的. 由于这篇文章会集中曾经博客讲到的全部Nginx功能点.包含主要的负载均衡,还有动静分离技术再加上这篇文章的重点.通过Keepal ...
- docker compose搭建redis7.0.4高可用一主二从三哨兵集群并整合SpringBoot【图文完整版】
一.前言 redis在我们企业级开发中是很常见的,但是单个redis不能保证我们的稳定使用,所以我们要建立一个集群. redis有两种高可用的方案: High availability with Re ...
- centos7下kubernetes(3。部署kubernetes)
环境:三个centos7 K8s2是Master;K8s1是node1:K8s3是node2 官方文档:https://kubernetes.io/docs/setup/independent/ins ...
- centos7下kubernetes(5。部署kubernetes dashboard)
基于WEB的dashboard,用户可以用kubernetes dashboard部署容器话的应用,监控应用的状态,执行故障排查任务以及管理kubernetes各种资源. 在kubernetes da ...
- MySQL高可用方案-PXC环境部署记录
之前梳理了Mysql+Keepalived双主热备高可用操作记录,对于mysql高可用方案,经常用到的的主要有下面三种: 一.基于主从复制的高可用方案:双节点主从 + keepalived 一般来说, ...
- redis sentinel 高可用(HA)方案部署,及python应用示例
redis sentinel(哨兵)高可用集群的部署方法,并通过 python 程序实例讲解如何使用 redis sentinel 简介 介绍 redis sentinel(哨兵)集群的部署,配置一主 ...
- 大数据学习笔记——Hadoop高可用完全分布式模式完整部署教程(包含zookeeper)
高可用模式下的Hadoop集群搭建 本篇博客将会在之前写过的Linux的完整部署的基础上进行,暂时不会涉及到伪分布式或者完全分布式模式搭建,由于HA模式涉及到的配置文件较多,维护起来也较为复杂,相信学 ...
随机推荐
- Linux学习---linux下的彩蛋和各种有趣的命令
[原文]https://www.toutiao.com/i6596596897392099844/ screenfetch 一个显示系统信息和主题信息的命令 使用方法 输入screenfetch 效果 ...
- 【转】Java学习---Java中volatile关键字实现原理
[原文]https://www.toutiao.com/i6592879392400081412/ 前言 我们知道volatile关键字的作用是保证变量在多线程之间的可见性,它是java.util.c ...
- Ubuntu集群 配置ntp服务
1.概述 NTP(Network Time Protocol)是用来使计算机时间同步化的一种协议,它可以使计算机对其服务器或时钟源(如石英钟,GPS等等)做同步化,它可以提供高精准度的时间校正(LAN ...
- 【转】android Toast大全(五种情形)建立属于你自己的Toast
Toast用于向用户显示一些帮助/提示.下面我做了5中效果,来说明Toast的强大,定义一个属于你自己的Toast. 1.默认效果 代码 Toast.makeText(getApplicationCo ...
- Linux命令——用户和用户组管理
Linux命令--用户和用户组管理 命令groupadd 作用:新增组 格式:groupadd [-g GID] groupname 参数:-g,指定GID,一般从500开始 说明:一般不必加-g参数 ...
- mysql数据库创建和权限分配
查询安装路径: whereis mysql连接mysql: mysql -u root -p第一步:创建用户CREATE USER 'claim_prod'@'%' IDENTIFIED BY 'Pa ...
- DQN(Deep Reiforcement Learning) 发展历程(三)
目录 不基于模型(Model-free)的预测 蒙特卡罗方法 时序差分方法 多步的时序差分方法 参考 DQN发展历程(一) DQN发展历程(二) DQN发展历程(三) DQN发展历程(四) DQN发展 ...
- 简单直白的去理解AOP,了解Spring AOP,使用 @AspectJ - 读书笔记
AOP = Aspect Oriental Programing 面向切面编程 文章里不讲AOP术语,什么连接点.切点.切面什么的,这玩意太绕,记不住也罢.旨在以简单.直白的方式理解AOP,理解Sp ...
- WPF Style
<Application x:Class="WzlyTool.App" xmlns="http://schemas.microsoft.com/winfx/20 ...
- 20155216 Exp2 后门原理与实践
后门原理与实践 实验内容: 常用后门工具 NC 或 netcat netcat是一个底层工具,进行基本的TCP UDP数据收发.常被与其他工具结合使用,起到后门的作用. Linux: 一般自带netc ...
