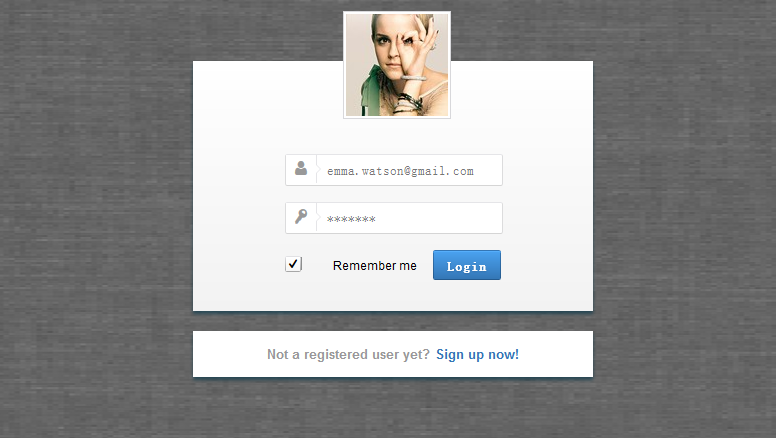
到网上收集了一个“高大上”的CSS3登入表单和大家分享一下
要求
必备知识
基本了解CSS语法,初步了解CSS3语法知识。
开发环境
Adobe Dreamweaver CS6
演示地址
预览截图(抬抬你的鼠标就可以看到演示地址哦):

制作步骤:
一, 引入prefixfree.js脚本
下面代码中使用了CSS3无前缀脚本prefixfree.js,可以省去CSS3中前缀“-moz”、“-webkit”、“-o”、“-ms”,如对该脚本不了解的可以点击下面链接哦:CSS3无前缀脚本prefixfree.js与Animatable使用介绍,不过使用上还是略有出入,自己认真看看哦。
<script type="text/javascript" charset="UTF-8" src="prefixfree.min.js"></script>
二, <body>标签结构
<body>

       <div class="content">

           <form action="" method="post" class="login-form">

               <div class="username">

                   <input type="text" name="username" placeholder="emma.watson@gmail.com" autocomplete="on" />

                   <span class="user-icon icon">u</span>

               </div>

               <div class="password">

                   <input type="password" name="password" placeholder="*******" />

                   <span class="password-icon icon">p</span>

               </div>

               <div class="account-control">

                   <input type="checkbox" name="Remember me" id="Remember me" value="Remember me" checked="checked" />

                   <label for="Remember me" data-on="c" class="check"></label>

                   <label for="Remember me" class="info">Remember me</label>

                   <button type="submit">Login</button>

               </div>

               <p class="not-registered">Not a registered user yet?<a>Sign up now!</a></p>

           </form>

       </div>

</body>
三,CSS代码
body {

   background: url(bg.png);

   background-size: 100% 100%;

   margin:;

   padding:;}

.content {

    width:600px;

    height:420px;

    margin:50px auto;

}

.login-form {

    width:400px;

    height:177px;

    margin:70px auto 0;

    padding-top:73px;

    position:relative;

    background-image:-*-linear-gradient(top,rgb(255,255,255),rgb(242,242,242));

    box-shadow:0 3px 3px rgba(21,62,78,0.8);

}

.login-form:before {

    content:"";

    position:absolute;

    top:-50px;

    left:150px;

    width:102px;

    height:102px;

    padding:2px;

    border:1px solid rgb(216,216,219);

    background:#fff url("profilepicture.jpg") no-repeat 2px 2px;

}

.not-registered {

    position:absolute;

    color:rgb(153,153,153);

    font-weight:bold;

    font-size:13px;

    top:calc(100% + 20px);

    background-color:rgb(255,255,255);

    width:400px;

    height:46px;

    margin:0 auto;

    line-height:46px;

    text-align: center;

    box-shadow:0 3px 3px rgba(21,62,78,0.8);

}

.not-registered a {

    margin-left:5px;

    text-decoration: none;

    color:rgb(52,119,182);

    cursor: pointer;

}

.login-form div {

    width:216px;

    height:28px;

    margin:20px auto;

    position:relative;

    line-height:28px;

    border:none;

}

.login-form .user-icon,

.login-form .password-icon {

    display:inline-block;

    font-family: 'loginform-icon';

    font-size:15px;

    text-align:center;

    line-height:28px;

    color:rgb(153,153,153);

    position:absolute;

    left:1px;

    top:1px;

    background-color:rgb(255,255,255);

    border:none;

    border-right:1px solid rgb(229,229,232);

    width:30px;

    height:28px;

    transition: all 300ms linear;

}

.login-form .username input, .login-form .password input {

    height:100%;

    width:calc(100% - 40px);

    padding-left:40px;

    border-radius:2px;

    border:1px solid;

    border-color:rgb(229,229,232) rgb(220,220,221) rgb(213,213,213) rgb(220,220,221);

    display:block;

    transition: all 300ms linear;

}

.login-form .icon:before, .login-form .icon:after {

    content:"";

    position:absolute;

    top:10px;

    left:30px;

    width:;

    height:;

    border:4px solid transparent;

    border-left-color:rgb(255,255,255);

}

.login-form .icon:before {

    top:9px;

    border:5px solid transparent;

    border-left-color:rgb(229,229,232);

}

.login-form .username input:focus, .login-form .password input:focus {

    border-color:rgb(69,153,228);

    box-shadow:0 0 2px 1px rgb(200,223,244);

}

.login-form .username input:focus + span, .login-form .password input:focus + span {

    background:-*-linear-gradient(top,rgb(255,255,255),rgb(245,245,245));

    color:rgb(51,51,51);

}

.login-form .username input:focus + span:after, .login-form .password input:focus + span:after {

    border-left-color:rgb(250,250,250);

}

.login-form .account-control label {

    margin-left:24px;

    font-size:12px;

    font-family: Arial, Helvetica, sans-serif;

    cursor:pointer;

}

.login-form button[type="submit"] {

    color:#fff;

    font-weight:bold;

    float:right;

    width:68px;

    height:30px;

    position:relative;

    background:-*-linear-gradient(top,rgb(74,162,241),rgb(52,119,182)) 1px 0 no-repeat,

               -*-linear-gradient(top,rgb(52,118,181),rgb(36,90,141)) left top no-repeat;

    background-size:66px 28px,68px 29px;

    border:none;

    border-top:1px solid rgb(52,118,181);

    border-radius:2px;

    box-shadow:inset 0 1px 0 rgb(86,174,251);

    text-shadow:0 1px 1px rgb(51,113,173);

    transition: all 200ms linear;

}

.login-form button[type="submit"]:hover {

    text-shadow:0 0 2px rgb(255,255,255);

    box-shadow:inset 0 1px 0 rgb(86,174,251),0 0 10px 3px rgba(74,162,241,0.5);

}

.login-form button[type="submit"]:active {

    background:-*-linear-gradient(top,rgb(52,119,182),rgb(74,162,241)) 1px 0 no-repeat,

               -*-linear-gradient(top,rgb(52,118,181),rgb(36,90,141)) left top no-repeat;

}

.login-form .account-control input {

    width:0px;

    height:0px;

}

.login-form label.check {

    position:absolute;

    left:;

    top:50%;

    margin:-8px 0;

    display:inline-block;

    width:16px;

    height:16px;

    line-height: 16px;

    text-align:center;

    border-radius:2px;

    background:-*-linear-gradient(top,rgb(255,255,255),rgb(246,246,246)) 1px 1px no-repeat,

               -*-linear-gradient(top,rgb(227,227,230),rgb(165,165,165)) left top no-repeat;

    background-size:14px 14px,16px 16px;

}

.login-form .account-control input:checked + label.check:before {

    content:attr(data-on);

    font-family:loginform-icon;

}

@font-face {

  font-family: 'loginform-icon';

  src: url("font/loginform-icon.eot");

  src: url("font/loginform-icon.eot?#iefix") format('embedded-opentype'),

       url("font/loginform-icon.woff") format('woff'),

       url("font/loginform-icon.ttf") format('truetype'),

       url("font/loginform-icon.svg#loginform-icon") format('svg');

  font-weight: normal;

  font-style: normal;

}
OK,制作完成!自己动手试试吧。以上代码来源与互联网,本人只稍做修改了,案例仅供学习参考使用哦。
如以上文章或链接对你有帮助的话,别忘了在文章结尾处轻轻点击一下 “还不错”按钮或到页面右下角点击 “赞一个” 按钮哦。你也可以点击页面右边“分享”悬浮按钮哦,让更多的人阅读这篇文章。
到网上收集了一个“高大上”的CSS3登入表单和大家分享一下的更多相关文章
- 自制“低奢内”CSS3登入表单,包含JS验证,请别嫌弃哦。
要求 必备知识 基本了解CSS语法,初步了解CSS3语法知识.和JS/JQuery基本语法. 开发环境 Adobe Dreamweaver CS6 演示地址 演示地址 预览截图(抬抬你的鼠标就可以看到 ...
- 9款大气实用的HTML5/CSS3注册登录表单
1.HTML5/CSS3仿Facebook登录表单 利用CSS3制作的登录表单的确很漂亮,我们在html5tricks网站上也分享过几款了,比如CSS3密码强度验证表单可以显示密码的强度,这款纯CSS ...
- jQuery和CSS3超酷表单美化插件
这是一款效果很精美炫酷的jQuery和CSS3联系方式表单美化插件.大多数站点上都有让用户填写的联系方式表单,一个设计良好的表单可以大大的提升用户的体验度.该表单美化插件在原生HTML表单的基础上进 ...
- JavaWeb网上图书商城完整项目--day02-4.regist页面提交表单时对所有输入框进行校验
1.现在我们要将table表中的输入的参数全部提交到后台进行校验,我们提交我们是按照表单的形式提交,所以我们首先需要在table表外面添加一个表单 <%@ page language=" ...
- 用angular实时获取本地localStorage数据,实现一个模拟后台数据登入的效果
研究了一上午,终于做出了,实时获取本地localStorage来模拟注册登入~~~ <!DOCTYPE html><html><head lang="en&qu ...
- DHTMLX 前端框架 建立你的一个应用程序 教程(八)-- 添加表单Form
添加表单Form 我们下一步是在页面中添加一个表单,表格中的选中字段将会显示在表单中.提供一个提交按钮 可以对显示的数据进行修改提交. 添加表单到布局单元格中 1.在右侧布局中使用attachForm ...
- CSS3实战开发 表单发光特效实战开发
首先,我们先准备好html代码: <!doctype html> <html> <head> <meta charset="utf-8"& ...
- 我和小美的撸码日记(3)之中的一个句话搞定MVC表单页数据绑定与提交
另外献上在<线体验Demo地址>希望大家也能从中得到一些启示. 地址:http://121.40.148.178:8080/ . username:guest,password:12345 ...
- 一个web应用的诞生--数据表单
下面把角色分为两种,普通用户和管理员用户,至少对于普通用户来说,直接修改DB是不可取的,要有用户注册的功能,下面就开始进行用户注册的开发. 用户表 首先要想好用户注册的时候需要提供什么信息:用户名.密 ...
随机推荐
- bind研究(一)转载
## 阅读数:6537 最近自学JavaScript,学到bind方法这块儿有些地方不太明白,自己就查了些资料,结合自己的理解写了这篇文章以备后面回顾用...其实应该还是搬砖为主吧. 什么是this对 ...
- weat!!团队
摘要: 团队名称:weat!! 团队成员:刘波 崔和杰 简介: 刘波:性别男,爱好:动漫,徒步旅行.在组内负责程序编写这一部分. 优点:认真负责,不懂就会去问. 崔和杰:性别男,爱好:篮球.在组内负责 ...
- C++指针二(易错模型)
规则一:Main(主调函数)分配的内存(在堆区,栈区.全局区)都可以在被调用函数里使用.如果在被调用函数里面的临时区(栈)分配内存,主调用函数是不能使用的. #include "stdio. ...
- (01背包 第k优解) Bone Collector II(hdu 2639)
http://acm.hdu.edu.cn/showproblem.php?pid=2639 Problem Description The title of this problem i ...
- [转]Windows中使用命令行方式编译打包Android项目
http://my.oschina.net/liux/blog/37875 网上很多用Ant来编译打包Android应用的文章,毕竟Ant是纯Java语言编写的,具有很好的跨平台性.今天想写个纯win ...
- 调用azkaban接口,upload 本地zip文件
使用azkaban部署任务,可以将job文件打成zip包,通过web页面上传. 如图 但是当我们实践CI持续化部署的时候,要实现自动的部署上线. 这时就要调用azkaban提供的api. 地址如下:h ...
- day01_雷神_Python入门
day01 1.编程语言 主流的像C.java.python.php.C#.等,可以从不同维度分类如下: 机器码和字节码 机器码: C 字节码: 其他 note: 机器码是电脑的CPU可直接解读的数据 ...
- 企业项目开发--cookie(2)
此文已由作者赵计刚授权网易云社区发布. 欢迎访问网易云社区,了解更多网易技术产品运营经验. 2.1.3.CookieUtil:(cookie的基本操作:增删查,注意没有改) 1 package co ...
- 【友情链接】各位dalao的博客
同省神犇 HA队长 __stdcall HA chty_syq为文文讲过字符串 HA cdcq为文文讲过后缀数组① ② Bluesky007超强的 外省神犇 知名OIer黄学长 一个可爱的蓝孩子qwq ...
- mysql添加外键的4种方式
今天开始复习,在过后的几天里开始在博客上记录一下平时疏忽的知识点,温故而知新 屁话不多--直接上货 创建主表: 班级 CREATE TABLE class(cid INT PRIMARY KEY AU ...
