springboot-30-security(三)使用注解实现权限控制
上个博客: http://www.cnblogs.com/wenbronk/p/7381252.html中, 实现了经典5表对用户进行权限的控制, 但太过于繁琐了, 官方推荐的方式是将用户和角色存储数据库, 权限直接在要访问的接口上进行控制
(我感觉更麻烦...每个接口都需要指定)
本篇基于第一个, security: http://www.cnblogs.com/wenbronk/p/7379865.html
一, 数据库: (更多可见 security(1) )
1, 数据表:
SET FOREIGN_KEY_CHECKS=;

-- ----------------------------

-- Table structure for `sys_user`

-- ----------------------------

DROP TABLE IF EXISTS `sys_user`;

CREATE TABLE `sys_user` (

  `id` INT () NOT NULL AUTO_INCREMENT COMMENT '主键id',

  `username` varchar() DEFAULT NULL COMMENT '用户名',

  `password` varchar() DEFAULT NULL COMMENT '密码',

  PRIMARY KEY (`id`)

) ENGINE=InnoDB AUTO_INCREMENT= DEFAULT CHARSET=utf8;

-- ----------------------------

-- Table structure for `sys_role`

-- ----------------------------

DROP TABLE IF EXISTS `sys_role`;

CREATE TABLE `sys_role` (

  `id` INT () NOT NULL AUTO_INCREMENT COMMENT '主键id',

  `name` varchar() DEFAULT NULL COMMENT '用户名',

  PRIMARY KEY (`id`)

) ENGINE=InnoDB AUTO_INCREMENT= DEFAULT CHARSET=utf8;

-- ----------------------------

-- Table structure for `sys_role_user`

-- ----------------------------

DROP TABLE IF EXISTS `sys_role_user`;

CREATE TABLE `sys_role_user` (

  `id` int() NOT NULL AUTO_INCREMENT COMMENT '主键id',

  `sys_user_id` INT() NOT NULL COMMENT 'user_id',

  `sys_role_id` INT() NOT NULL COMMENT 'role_id',

  PRIMARY KEY (`id`)

) ENGINE=InnoDB AUTO_INCREMENT= DEFAULT CHARSET=utf8;

ALTER TABLE sys_role_user ADD CONSTRAINT sys_FK1 FOREIGN KEY(sys_user_id) REFERENCES sys_user(id);

ALTER TABLE sys_role_user ADD CONSTRAINT role_FK2 FOREIGN KEY(sys_role_id) REFERENCES sys_role(id);
2, 插入数据
insert into SYS_USER (id,username, password) values (,'vini', '$2a$10$n7sdY5rR1X3XOfZR6o2R.OdW0vvz3uidz0UEzVKV0CEyu0hGwIch.');

insert into SYS_USER (id,username, password) values (,'bronk', '$2a$10$n7sdY5rR1X3XOfZR6o2R.OdW0vvz3uidz0UEzVKV0CEyu0hGwIch.');

insert into SYS_ROLE(id,name) values(,'ROLE_ADMIN');

insert into SYS_ROLE(id,name) values(,'ROLE_USER');

insert into SYS_ROLE_USER(SYS_USER_ID,sys_role_id) values(,);

insert into SYS_ROLE_USER(SYS_USER_ID,sys_role_id) values(,);
这儿使用了 Bcrpy强hash加密, 我设置的密码为 123,
更多可见: http://blog.csdn.net/u012373815/article/details/60465776
3, 映射实体
SysUser.groovy
package com.wenbronk.security.entity

import com.fasterxml.jackson.annotation.JsonIgnore

import org.springframework.security.core.GrantedAuthority

import org.springframework.security.core.userdetails.UserDetails

/**

 * Created by wenbronk on 2017/8/14.

 */

class SysUser implements UserDetails {

    int id

    String username

    @JsonIgnore

    String password

    String rawPass

    @JsonIgnore

    List<SysRole> roles

    List<? extends GrantedAuthority> authorities

    @Override

    @JsonIgnore

    Collection<? extends GrantedAuthority> getAuthorities() {

        return authorities

    }

    @Override

    @JsonIgnore

    boolean isAccountNonExpired() {

        return true

    }

    @Override

    @JsonIgnore

    boolean isAccountNonLocked() {

        return true

    }

    @Override

    @JsonIgnore

    boolean isCredentialsNonExpired() {

        return true

    }

    @Override

    @JsonIgnore

    boolean isEnabled() {

        return true

    }

    @Override

    public String toString() {

        return "SysUser{" +

                "id=" + id +

                ", username='" + username + '\'' +

                ", password='" + password + '\'' +

                ", rawPass='" + rawPass + '\'' +

                ", roles=" + roles +

                ", authorities=" + authorities +

                '}';

    }

}
SysRole.groovy
package com.wenbronk.security.entity

/**

 * Created by wenbronk on 2017/8/14.

 */

class SysRole {

    int id

    String name

    @Override

    public String toString() {

        return "SysRole{" +

                "id=" + id +

                ", name=" + name +

                '}';

    }

}
4, mapper
SysUserMapper.groovy
package com.wenbronk.security.mapper

import com.wenbronk.security.entity.SysUser

/**

 * Created by wenbronk on 2017/8/14.

 */

interface SysUserMapper {

    SysUser findByUserName(String username)

}
SysUserMapper.xml
<?xml version="1.0" encoding="UTF-8" ?>

        <!DOCTYPE mapper PUBLIC "-//mybatis.org//DTD Mapper 3.0//EN" "http://mybatis.org/dtd/mybatis-3-mapper.dtd" >

<mapper namespace="com.wenbronk.security.mapper.SysUserMapper">

<resultMap id="sys_user_map" type="SysUser">

    <id property="id" column="id" />

    <result property="username" column="username" />

    <result property="password" column="password" />

    <collection property="roles" ofType="SysRole">

        <result column="name" property="name" />

    </collection>

</resultMap>

<select id="findByUserName" parameterType="string" resultMap="sys_user_map">

    select u.id, u.username, u.password, r.name

    from sys_user u

    LEFT JOIN sys_role_user s on u.id = s.sys_user_id

    LEFT JOIN sys_role r on r.id = s.sys_role_id

    WHERE username = #{username}

</select>

</mapper>
二, security
1, WebSecurityConfig.groovy
package com.wenbronk.security.security.config

import com.wenbronk.security.security.interceptor.MyFilterSecurityInterceptor

import com.wenbronk.security.security.service.CustomUserService

import org.springframework.beans.factory.annotation.Autowired

import org.springframework.context.annotation.Configuration

import org.springframework.http.HttpMethod

import org.springframework.security.config.annotation.authentication.builders.AuthenticationManagerBuilder

import org.springframework.security.config.annotation.method.configuration.EnableGlobalMethodSecurity

import org.springframework.security.config.annotation.web.builders.HttpSecurity

import org.springframework.security.config.annotation.web.configuration.EnableWebSecurity

import org.springframework.security.config.annotation.web.configuration.WebSecurityConfigurerAdapter

import org.springframework.security.crypto.bcrypt.BCryptPasswordEncoder

import javax.inject.Inject

/**

 * Created by wenbronk on 2017/8/15.

 */

@Configuration

@EnableWebSecurity

@EnableGlobalMethodSecurity(securedEnabled = true) // 控制权限注解

class WebSecurityConfig extends WebSecurityConfigurerAdapter {

    @Inject

    CustomUserService customUserService;

    @Autowired

    MyFilterSecurityInterceptor myFilterSecurityInterceptor

    /**

     * 设置加密方式为 BCrypt强hash

     */

    @Override

    protected void configure(AuthenticationManagerBuilder auth) throws Exception {

        auth.userDetailsService(customUserService).passwordEncoder(new BCryptPasswordEncoder());

    }

    @Override

    protected void configure(HttpSecurity http) throws Exception {

        // 关闭 csrf()

        http.csrf().disable()

                .authorizeRequests()

                .antMatchers("/users**").authenticated()

                .antMatchers(HttpMethod.POST).authenticated()

                .antMatchers(HttpMethod.PUT).authenticated()

                .antMatchers(HttpMethod.DELETE).authenticated()

                .antMatchers("/**")

                .permitAll()

                .and()

                .sessionManagement()

                // 使用basic认证登陆

                .and().httpBasic()

    }

}
这儿需要关闭 csrf 和使用 basic 认证, 相信可见:
http://blog.csdn.net/u012373815/article/details/55047285

http://blog.csdn.net/u012373815/article/details/56832167
CustomerUserService.groovy
package com.wenbronk.security.security.service

import com.wenbronk.security.entity.SysUser

import com.wenbronk.security.mapper.SysUserMapper

import org.springframework.security.core.GrantedAuthority

import org.springframework.security.core.authority.SimpleGrantedAuthority

import org.springframework.security.core.userdetails.UserDetails

import org.springframework.security.core.userdetails.UserDetailsService

import org.springframework.security.core.userdetails.UsernameNotFoundException

import org.springframework.stereotype.Service

import javax.inject.Inject

/**

 * Created by wenbronk on 2017/8/15.

 */

@Service

class CustomUserService implements UserDetailsService {

    @Inject

    SysUserMapper sysUserMapper

//    @Inject

//    SysPermissionMapper sysPermissionMapper

    @Override

    UserDetails loadUserByUsername(String s) throws UsernameNotFoundException {

        def sysUser = sysUserMapper.findByUserName(s) as SysUser

        assert sysUser != null

        List<GrantedAuthority> authorities = new ArrayList<>()

        sysUser.getRoles().each { role ->

            // 将用户的权限添加到 authrities中就可以了

            authorities.add(new SimpleGrantedAuthority(role.getName()))

        }

        sysUser.setAuthorities(authorities)

        return sysUser

    }

}
三, 接口控制:
登陆使用的
    @RequestMapping(value = "/login")

    public Object login(@AuthenticationPrincipal SysUser loginUser, @RequestParam(name = "logout", required = false) String logout) {

        if (logout != null) {

            return null

        }

        if (loginUser != null) {

            return loginUser

        }

        return null

    }
权限接口控制:
package com.wenbronk.security.controller

import com.wenbronk.security.entity.SysUser

import org.springframework.security.access.annotation.Secured

import org.springframework.web.bind.annotation.RequestBody

import org.springframework.web.bind.annotation.RequestMapping

import org.springframework.web.bind.annotation.RequestMethod

import org.springframework.web.bind.annotation.RestController

/**

 * Created by wenbronk on 2017/8/17.

 */

@RestController

@RequestMapping("/users")

class HomeController {

    /**

     * 所有可访问

     */

    @RequestMapping(method = RequestMethod.GET)

    String getusers() {

        'getUsers'

    }

    @Secured(value = ['ROLE_ADMIN', 'ROLE_USER'])

    @RequestMapping(method = RequestMethod.POST)

    String save(@RequestBody SysUser user) {

        user.toString()

    }

    /**

     * 只有admin可访问

     */

    @Secured(value = ['ROLE_ADMIN'])

    @RequestMapping(method = RequestMethod.PUT)

    String update() {

        'updateUser'

    }

    @Secured(value = ['ROLE_ADMIN'])

    @RequestMapping(method = RequestMethod.DELETE)

    String delete() {

        'deleteUser'

    }

}
四, 访问:
1, get访问
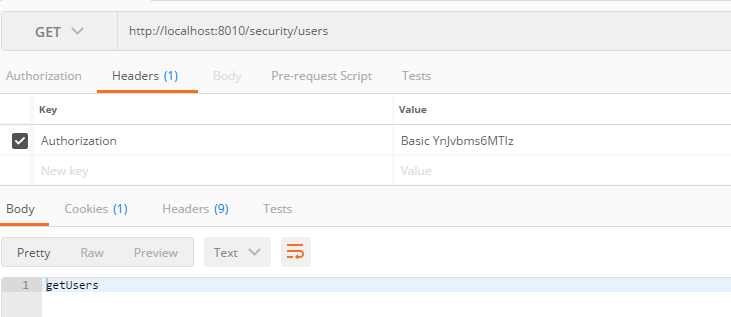
2, post访问, 请求体为:
{

    "id": ,

    "username": "vini",

    "password": "",

    "rawPass": ""

}

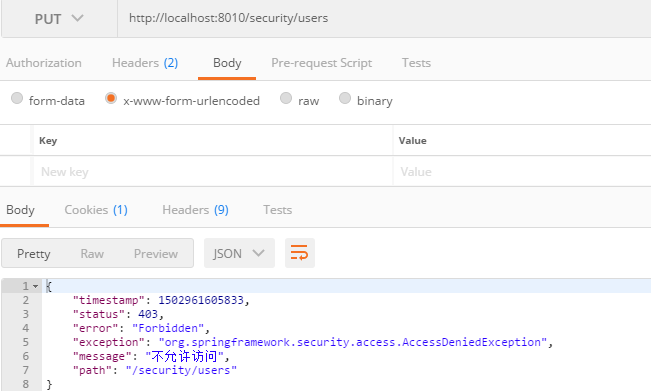
3, put请求, 此处使用的用户没有权限
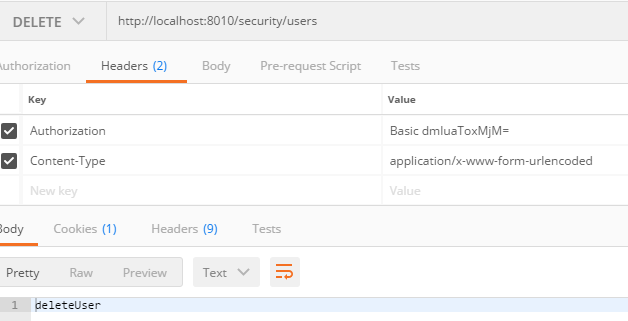
4, delete请求, 换有权限的用户
这样, 就可以实现具体方法的访问权限控制, 包括rest请求
ps: basic64登陆, 需要密码, 可以使用工具生成, 也可以抓包
原博客地址:
http://blog.csdn.net/u012373815/article/details/59749385
springboot-30-security(三)使用注解实现权限控制的更多相关文章
- springboot整合security实现基于url的权限控制
权限控制基本上是任何一个web项目都要有的,为此spring为我们提供security模块来实现权限控制,网上找了很多资料,但是提供的demo代码都不能完全满足我的需求,因此自己整理了一版. 在上代码 ...
- SpringBoot系列——Security + Layui实现一套权限管理后台模板
前言 Spring Security官网:https://spring.io/projects/spring-security Spring Security是一个功能强大且高度可定制的身份验证和访问 ...
- struts2拦截器加自定义注解实现权限控制
https://blog.csdn.net/paul342/article/details/51436565 今天结合Java的Annotation和Struts2进行注解拦截器权限控制. 功能需求: ...
- Spring Security实现统一登录与权限控制
1 项目介绍 最开始是一个单体应用,所有功能模块都写在一个项目里,后来觉得项目越来越大,于是决定把一些功能拆分出去,形成一个一个独立的微服务,于是就有个问题了,登录.退出.权限控制这些东西怎么办呢? ...
- SpringBoot Spring Security 核心组件 认证流程 用户权限信息获取详细讲解
前言 Spring Security 是一个安全框架, 可以简单地认为 Spring Security 是放在用户和 Spring 应用之间的一个安全屏障, 每一个 web 请求都先要经过 Sprin ...
- springboot通过AOP和自定义注解实现权限校验
自定义注解 PermissionCheck: package com.mgdd.sys.annotation; import java.lang.annotation.*; /** * @author ...
- Spring Boot+Spring Security+JWT 实现 RESTful Api 权限控制
摘要:用spring-boot开发RESTful API非常的方便,在生产环境中,对发布的API增加授权保护是非常必要的.现在我们来看如何利用JWT技术为API增加授权保护,保证只有获得授权的用户才能 ...
- spring boot系列03--spring security (基于数据库)登录和权限控制(下)
(接上篇) 后台 先说一下AuthConfig.java Spring Security的主要配置文件之一 AuthConfig 1 @Configuration 2 @EnableWebSecuri ...
- spring boot系列--spring security (基于数据库)登录和权限控制
先说一下AuthConfig.java Spring Security的主要配置文件之一 AuthConfig 1 @Configuration 2 @EnableWebSecurity 3 publ ...
随机推荐
- (转)类(class)和结构(struct)的区别是什么?它们对性能有影响吗?.NET BCL里有哪些是类(结构),为什么它们不是结构(类)?在自定义类型时,您如何选择是类还是结构?
转自:http://blog.csdn.net/lingxyd_0/article/details/8695747 类(class)和结构(struct)的区别是什么?它们对性能有影响吗?.NET B ...
- (转) HighCharts 非规律日期 多条曲线的 绘画
转自:http://blog.csdn.net/z69183787/article/details/8651296 项目中需要为A,B 2个元素 绘出统计值的曲线,但A与B 的 时间点 并不一致,查找 ...
- bzoj5109(图论好题)
我的参考题解:https://www.cnblogs.com/ccz181078/p/7907022.html: 不过我感觉题解的压位有问题,(1<<x)还不炸上天.不过这题数据水,好像怎 ...
- (广搜)Fire Game -- FZU -- 2150
http://acm.hust.edu.cn/vjudge/contest/view.action?cid=82828#problem/I Fire Game Time Limit:1000MS ...
- POJ3181--Dollar Dayz(动态规划)
Farmer John goes to Dollar Days at The Cow Store and discovers an unlimited number of tools on sale. ...
- Android内容提供者(Content provider)
使用ContentProvider共享数据 当应用继承ContentProvider类,并重写该类用于提供数据和存储数据的方法,就可以向其他应用共享其数据.虽然使用其他方法也可以对外共享数据,但数据访 ...
- hdu 4911 求逆序对数+树状数组
http://acm.hdu.edu.cn/showproblem.php?pid=4911 给定一个序列,有k次机会交换相邻两个位置的数,问说最后序列的逆序对数最少为多少. 实际上每交换一次能且只能 ...
- JBoss 系列四十九:JBoss 7/WildFly 中端口使用列表
JBoss 7中端口使用列表 JBoss 7中所有配置都在一个文件中(standaone*.xml, domain.xml),和之前的JBoss相比JBoss 7用到的端口变少,我们将以表格的形式列出 ...
- AlexNet详解
在imagenet上的图像分类challenge上Alex提出的alexnet网络结构模型赢得了2012届的冠军.要研究CNN类型DL网络模型在图像分类上的应用,就逃不开研究alexnet,这是CNN ...
- sql server rdl report 如何用动态sql
我做rdl report 一般用存储过程,可是今天遇到个问题,需要用动态sql,rdl report数据集不能绑定字段 查了一下谷歌,解决如下: declare @CarrierList table ...