两个Vue Demo
1 实现 person list
<!DOCTYPE html>

<html>

    <head>

        <meta charset="UTF-8">

        <title></title>

        <link rel="stylesheet" href="css/vueDemo413.css" />

    </head>

    <body>

        <div id="app">

            <fieldset>

                <legend>

                    Person List

                </legend>

                <div class="form-group">

                    <label>Name:</label>

                    <input type="text" v-model="newPerson.name"/>

                </div>

                <div class="form-group">

                    <label>Age:</label>

                    <input type="text" v-model="newPerson.age"/>

                </div>

                <div class="form-group">

                    <label>Sex:</label>

                    <select v-model="newPerson.sex">

                    <option value="Male">Male</option>

                    <option value="Female">Female</option>

                </select>

                </div>

                <div class="form-group">

                    <label></label>

                    <button @click="createPerson">Create</button>

                </div>

        </fieldset>

        <table>

            <thead>

                <tr>

                    <th>Name</th>

                    <th>Age</th>

                    <th>Sex</th>

                    <th>Delete</th>

                </tr>

            </thead>

            <tbody>

                <tr v-for="person in people">

                    <td>{{ person.name }}</td>

                    <td>{{ person.age }}</td>

                    <td>{{ person.sex }}</td>

                    <td :class="'text-center'"><button @click="deletePerson($index)">Delete</button></td>

                </tr>

            </tbody>

        </table>

        </div>

    </body>

    <!-- <script src="js\node_modules\vue\dist\vue.js"></script> -->

    <script src="js/vue.js"></script>

    <script>

        var vm = new Vue({

            el: '#app',

            data: {

                newPerson: {

                    name: '',

                    age: 0,

                    sex: 'Male'

                },

            people: [{

                    name: 'Richard',

                    age: 30,

                    sex: 'Male'

                }, {

                    name: 'Roy',

                    age: 26,

                    sex: 'Male'

                }, {

                    name: 'Sansa',

                    age: 22,

                    sex: 'Female'

                }, {

                    name: 'Micheal',

                    age: 36,

                    sex: 'Male'

                }]

            },

            methods:{

                createPerson: function(){

                    this.people.push(this.newPerson);

                    // 添加完newPerson对象后,重置newPerson对象

                    this.newPerson = {name: '', age: 0, sex: 'Male'}

                },

                deletePerson: function(index){

                    // 删一个数组元素

                    this.people.splice(index,1);

                }

            }

        })

    </script>

</html>
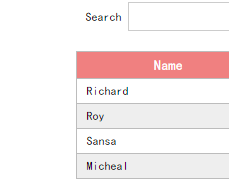
2 搜索person
<!DOCTYPE html>

<html>

    <head>

        <meta charset="UTF-8">

        <title></title>

        <link rel="stylesheet" href="css/myTest417.css" />

    </head>

    <body>

        <div id="app">

            <div id="searchBar">

                Search <input type="text" v-model="searchQuery" />

            </div>

            <simple-grid :data="gridData" :columns="gridColumns" :filter-key="searchQuery">//:v-bind,@v-on

            </simple-grid>

        </div>

        <template id="grid-template">

            <table>

                <thead>

                    <tr>

                        <th v-for="col in columns">

                            {{ col | capitalize}}

                        </th>

                    </tr>

                </thead>

                <tbody>

                    <tr v-for="entry in data | filterBy filterKey">

                        <td v-for="col in columns">

                            {{entry[col]}}

                        </td>

                    </tr>

                </tbody>

            </table>

        </template>

    </body>

    <script src="js/vue.js"></script>

    <script>

        Vue.component('simple-grid', {

            template: '#grid-template',

            props: {

                data: Array,

                columns: Array,

                filterKey: String

            }

        })

        var demo = new Vue({

            el: '#app',

            data: {

                searchQuery: '',

                gridColumns: ['name', 'age', 'sex'],

                gridData: [{

                    name: 'Richard',

                    age: 30,

                    sex: 'Male'

                }, {

                    name: 'Roy',

                    age: 26,

                    sex: 'Male'

                }, {

                    name: 'Sansa',

                    age: 22,

                    sex: 'Female'

                }, {

                    name: 'Micheal',

                    age: 36,

                    sex: 'Male'

                }]

            }

        })

    </script>

</html>
CSS:
1:
* {

    margin:;

    padding:;

    box-sizing: border-box

}

html {

    font-size: 12px;

    font-family: Ubuntu, simHei, sans-serif;

    font-weight: 400

}

body {

    font-size: 1rem

}

table,

td,

th {

    border-collapse: collapse;

    border-spacing: 0

}

table {

    width: 100%

}

td,

th {

    border: 1px solid #bcbcbc;

    padding: 5px 10px

}

th {

    background: lightcoral;

    font-size: 1.2rem;

    font-weight:;

    color: #fff;

    cursor: pointer

}

tr:nth-of-type(odd) {

    background: #fff

}

tr:nth-of-type(even) {

    background: #eee

}

fieldset {

    border: 1px solid #BCBCBC;

    padding: 15px;

}

input {

    outline: none

}

input[type=text] {

    border: 1px solid #ccc;

    padding: .5rem .3rem;

}

input[type=text]:focus {

    border-color: #42b983;

}

button {

    outline: none;

    padding: 5px 8px;

    color: #fff;

    border: 1px solid #BCBCBC;

    border-radius: 3px;

    background-color: lightcoral;

    cursor: pointer;

}

button:hover{

    opacity: 0.8;

}

#app {

    margin: 0 auto;

    max-width: 640px

}

.form-group {

    margin: 10px;

}

.form-group > label {

    display: inline-block;

    width: 10rem;

    text-align: right;

}

.form-group > input,

.form-group > select {

    display: inline-block;

    height: 2.5rem;

    line-height: 2.5rem;

}

.text-center{

    text-align: center;

}

.pagination {

    display: inline-block;

    padding-left:;

    margin: 21px 0;

    border-radius: 3px;

}

.pagination > li {

    display: inline;

}

.pagination > li > a {

    position: relative;

    float: left;

    padding: 6px 12px;

    line-height: 1.5;

    text-decoration: none;

    color: #009a61;

    background-color: #fff;

    border: 1px solid #ddd;

    margin-left: -1px;

    list-style: none;

}

.pagination > li > a:hover {

    background-color: #eee;

}

.pagination .active {

    color: #fff;

    background-color: #009a61;

    border-left: none;

    border-right: none;

}

.pagination .active:hover {

    background: #009a61;

    cursor: default;

}

.pagination > li:first-child > a .p {

    border-bottom-left-radius: 3px;

    border-top-left-radius: 3px;

}

.pagination > li:last-child > a {

    border-bottom-right-radius: 3px;

    border-top-right-radius: 3px;

}
2:
* {

    margin:;

    padding:;

    box-sizing: border-box

}

html {

    font-size: 12px;

    font-family: Ubuntu, simHei, sans-serif;

    font-weight: 400

}

body {

    font-size: 1rem

}

table,

td,

th {

    border-collapse: collapse;

    border-spacing: 0

}

table {

    width: 100%;

    margin: 20px;

}

td,

th {

    border: 1px solid #bcbcbc;

    padding: 5px 10px

}

th {

    background: lightcoral;

    font-size: 1.2rem;

    font-weight:;

    color: #fff;

    cursor: pointer

}

tr:nth-of-type(odd) {

    background: #fff

}

tr:nth-of-type(even) {

    background: #eee

}

fieldset {

    border: 1px solid #BCBCBC;

    padding: 15px;

}

input {

    outline: none

}

input[type=text] {

    border: 1px solid #ccc;

    padding: .5rem .3rem;

}

input[type=text]:focus {

    border-color: #42b983;

}

button {

    outline: none;

    padding: 5px 8px;

    color: #fff;

    border: 1px solid #BCBCBC;

    border-radius: 3px;

    background-color: #009A61;

    cursor: pointer;

}

button:hover{

    opacity: 0.8;

}

#app {

    margin: 0 auto;

    max-width: 480px;

}

#searchBar{

    margin: 10px;

    padding-left: 20px;

}

#searchBar input[type=text]{

    width: 80%;

}

.arrow {

    display: inline-block;

    vertical-align: middle;

    width:;

    height:;

    margin-left: 5px;

    opacity: 0.66;

}

.arrow.asc {

    border-left: 4px solid transparent;

    border-right: 4px solid transparent;

    border-bottom: 4px solid #fff;

}

.arrow.dsc {

    border-left: 4px solid transparent;

    border-right: 4px solid transparent;

    border-top: 4px solid #fff;

}
1:

2:

两个Vue Demo的更多相关文章
- vue demo todo-list
html <input type='text' v-model="todoItem" v-on:keyup.enter='addItem'> <ul> &l ...
- 个人推荐的两款vue导出EXCEL插件
个人认为前端VUE项目中导出EXCEL比较好的两种方法,均不是我个人原创,我只是收录简单说明,原创地址在下面. 下面推荐两种方法,个人推荐第一种,第二种不做详细讲解,因为作者已经写过博客了,你们可以点 ...
- 两万字Vue.js基础学习笔记
Vue.js学习笔记 目录 Vue.js学习笔记 ES6语法 1.不一样的变量声明:const和let 2.模板字符串 3.箭头函数(Arrow Functions) 4. 函数的参数默认值 5.Sp ...
- 两万字Vue.js基础学习笔记(二)
Vue.js学习笔记(二) 4.模块化开发 ES6模块化的导入和导出 我们使用export指令导出了模块对外提供的接口,下面我们就可以通过import命令来加载对应的这个模块了 首先,我们需要在HTM ...
- 一文解析Pinia和Vuex,带你全面理解这两个Vue状态管理模式
Pinia和Vuex一样都是是vue的全局状态管理器.其实Pinia就是Vuex5,只不过为了尊重原作者的贡献就沿用了这个看起来很甜的名字Pinia. 本文将通过Vue3的形式对两者的不同实现方式进行 ...
- Framework7+vue demo
最近看了下f7+vue做了几个测试页面,商品图片来自淘宝,代码等有时间了再传,
- 一个基于ES6+webpack的vue小demo
上一篇文章<一个基于ES5的vue小demo>我们讲了如何用ES5,vue-router做一个小demo,接下来我们来把它变成基于ES6+webpack的demo. 一.环境搭建及代码转换 ...
- vue环境的搭建与第一个demo
参考两个博客 1 2 git.npm和淘宝镜像的安装过程过程省略了,直接开始webpack + vue-cli + 创建demo 首先,在磁盘创建一个文件夹,命名为vue-projects,里面再建一 ...
- Vue.js之组件嵌套小demo
Vue.js之组件嵌套的小demo项目 第一步:初始化一个wabpack项目,这里不在复述.第二步:在components文件夹下新建Header.vue Footer.vue和Users.vue三个 ...
随机推荐
- 学习sqlserver的函数方法
http://www.w3school.com.cn/sql/func_datediff.asp SQL Server DATEDIFF() 函数 SELECT DATEDIFF(day,'2008- ...
- LOJ#6342. 跳一跳(期望)
题意 $n \leqslant 10^5$ Sol 随便推一推就好了吧.. $f[i] = \frac{f[i] + f[i +1] + \dots f[n]}{n - i + 1} + 1$ 移一下 ...
- 转:对比python 链接 neo4j 驱动,py2neo 和 neo4j-driver 和 neo4jrestclient
Comparing Neo4j driver, py2neo and neo4jrestclient with some basic commands using the Panama Papers ...
- GPIO实现I2C协议模拟(1)
最近需要用GPIO模拟I2C协议,如果是在Linux下面比较简单,但在Windows下面,是否有没Linux那么简单了. 索性自己对I2C协议还有一些了解,翻了SPEC并结合示波器量出的实际信号分析, ...
- vue layui
关于 vue中使用layui插件,个人一些小小的心得. 我是全局的引入,在static文件夹里存放layui的完整代码 在index页面中标签引入 <link rel="stylesh ...
- html5定位获取当前位置并在百度地图上显示
用html5的地理定位功能通过手机定位获取当前位置并在地图上居中显示出来,下面是百度地图API的使用过程,有需要的朋友可以参考下 在开发移动端 web 或者webapp时,使用百度地图 API 的过程 ...
- 【PHP】根据两地经纬度计算距离
最近做一个H5活动的项目,有个要求是必须现场玩家才能参与,所以就需要计算玩家位置和活动地点的距离来判断是否在活动现场. 以下是写的一个根据经纬度计算两地距离的方法 1 function getDist ...
- 前段ztree 树状插件
效果展示
- 二叉树(dfs)
样例输入: 5 //下面n行每行有两个数 2 3 //第i行的两个数,代表编号为i的节点所连接的两个左右儿子的编号. 4 5 0 0 // 0 表示无 0 0 0 0 样 ...
- 动态规划:HDU3496-Watch The Movie(二维费用的背包问题)
Watch The Movie Time Limit: 3000/1000 MS (Java/Others) Memory Limit: 65535/65535 K (Java/Others) ...
