Rigging a Versatile Weapon Bone for 3ds Max
说明:先添加weapon到点的约束,位置,方向约束都调整好了后再建立点到手,hip的父子关系,注意这个顺序
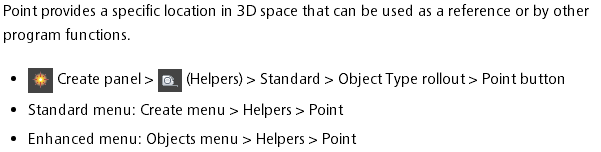
加点的方法
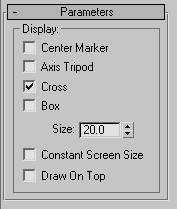
点设置成box的方法:
http://hewiki.heroengine.com/wiki/Rigging_a_Versatile_Weapon_Bone_for_3ds_Max
This is an advanced-level tutorial for artists, which explains how to configure a character-held item such as a weapon or some other prop. This item could be attached to a character at multiple locations (not just one hand), and then animated to change
positions from one location to the next.
Goal
The goal of this tutorial is to build a weapon rig that allows the character to hold and manipulate the weapon with different grips, and even different hands. We also want to be able to sheath the weapon either on the hip or the back. We will achieve this by
skinning the weapon to a weapon bone, and then use a series of point helpers, position, and orient constraints to achieve fluid motion.
Although this tutorial was done in 3ds Max, the concepts translate directly to Maya.
See Rigging a Versatile
Weapon Bone for Maya page for Maya tutorial.
Tutorial
In 3ds Max, start off with the character in a relaxed root pose. 
Create a small bone and name it Weapon Bone, color it if you like. There are 2 ways to parent this bone, either is ok, what matters is that you pick one and stay consistent.
Orient the bone so that it is laying flat at (0,0,0) degrees.
- The first way is to just parent the weapon bone to the hand that the weapon will be in most often, in this case, the right.
- The other is to parent it to the Bip01 node. You may want to do this especially if your character has long limbs. Longer limbs means there will be more floating point errors in all the bones of the limb, resulting in jittery
motions. If you parent directly to the bip01, that's less to go through resulting in more accurate motion.
You will never animate this bone directly, it will be driven by other things. This relationship is strictly for the engine to read the hierarchy, and for granny to figure out the baked down curves.
Also, build a stand-in weapon, and parent it to the weapon bone, make sure your axis alignment is the same. 
Next, create 4 point helpers. Sometimes it's easier to select them if you change there shape to box. Roughly place one in each hand, these will be used for holding weapons. Place one on his hip so the weapon can be sheathed. The other one will remain free.
This is handy in case you want to animate the weapon free of the character rig. Place it on the ground temporarily, or what ever you may come up with. Some times it's good to have more than 1 free point helper for some extra freedom.
- For best results, name your point helpers appropriately

Now we want to add a position constraint to the weapon bone so that we can control its motion with the point helpers. Select the Weapon Bone, go: Animation/Constraints/Position Constraint. Select the Right_weapon_control with
the tool. The weapon bone should snap to the controller location.


- Ensure the weapon bone is still selected.
- From the main menu, go: Animation/Constraints/Orientation Constraint. Select the Right_weapon_control with the tool. The
weapon bone should orient to the controllers orientation. Select the right_weapon_controller and rotate it so that it's an appropriate rotation for the weapon itself.


Next, select the weapon bone again, on your control panel, open the Motion tab. Under PRS parameters, make sure you haveRotation selected, then under Orientation Constraint select Add Orientation Target. Select the other weapon controls. The
result should be an oddly rotated weapon bone, that's okay, we'll get to that later.

Do the same procedure, except this time, add positional targets. The weapon should now be in between all the controls.

Now adjust the weight on the position and orientation targets so that only the left_weapon_control is 100% and the other are all 0%. The weapon should now be on the left hand. Adjust the left_weapon_control to have the correct orientation with the rotate tool


Repeat the last step and adjust each positional and orientation constraint so that it is 100% for 1 control at a time, adjust the controllers rotation.


- parent the right_weapon_control to the right hand
- parent the left_weapon_control to the left hand
- parent the hip_control to the pelvis bone
- keep the free_control unparented.
Now to finesse this a little bit, select the hip control and do an orientation constraint on it. select the Right thigh bone. Select Keep initial offset on the orientation panel. Now the sheathed weapon maintains its position to the pelvis, but rotates
with the leg as it walks.

The last thing to do is to create a selection set for the controls.
The controls should not be a part of the exported skeleton or animation files. That way you don't have to manually select them each time to hide and unhide them.
- Now you can effectively transition the weapon between the hands and various other parts of the rig just by animating the controls and the constraint weighting on the weapon bone
Rigging a Versatile Weapon Bone for 3ds Max的更多相关文章
- 3dmax实例教程-使用3ds Max 创建一个完整的场景
本篇教程讲述了利用3ds max创建一个完整的场景. 灵感来源:当我在遇到一些事情睡不着觉的时候我便在努力想象一些别的事情,于是我便想到了这个场景,其实对于我的这个角色我即没有参考图也没有草稿图,有的 ...
- 3ds max 渲染清晰面片的边缘
3ds max的菜单栏 -> 渲染 -> 材质编辑器->精简材质编辑器,将面状打勾,如下图,就能渲染出面片清晰的图形.
- 学习3ds max插件开发过程中的一些小结
1. 3ds max是以树状结构来管理整个场景的,每个树节点类型为INode 2. Interface类很关键,可以通过其中的GetRootNode.NumberOfChildren和GetChild ...
- 3ds max的动画输出
转自:http://zhidao.baidu.com/link?url=qc3vV2A9-ydb-YiVKoF7z_bIIRlmLSkyl8DcuWNYn8FaBxa2BDVLwuGPX_jYWxbw ...
- 3DS MAX调慢摄像机动画
在3ds max的右下角找到时间配置,然后出现该对话框,然后调整结束时间,将原来的时间翻倍,就能够是摄像机动画变慢. 下图的旋转速度比上图慢一半.
- Cityengine, 3ds MAX, FME
Cityengine 和 3ds MAX 一次只可以导入 (import) 一个模型. FME可以一次导入多个模型,因此可以用它来进行数据整合,然后放到cityengine里头去现实.FZViewer ...
- 。【自学总结 1】------3ds Max 界面
3ds Max 界面包含4部分(7区域) 4部分:菜单.控制工具.命令面板.窗口区 7区域: 1.标题栏:主要用于显示当前工作文件的名称,可以看到文件存储路径. 2.菜单栏:菜单中的命令如果带有省略号 ...
- 3ds Max光照纹理导入Unity的教程.
原地址:http://www.cocoachina.com/gamedev/gameengine/2010/0531/1581.html 相信这个3ds Max光照纹理导入Unity的教程对游戏设计师 ...
- 3ds max 2016 新功能
3ds max 2016 新功能_MCG节点编辑器 这是介绍视频下载: http://pan.baidu.com/s/1gds4wqJ
随机推荐
- 《AndroidStudio有用指南》反馈问题和建议
<AndroidStudio有用指南>反馈问题和建议 IntelliJ IDEA在持续更新, Android Studio也在持续更新, 本书也将会持续更新. Android Studio ...
- 2016/08/18 select
1.//得到select项的个数 2.jQuery.fn.size = function(){ 3. return jQuery(this).get(0).options.length; 4.} 5. ...
- Struts2基本概念
一.Struts2体系结构 : 1.Web浏览器请求一个资源. 2.过滤器Dispatcher查找方法,确定适当的Action. 3.拦截器自动对请求应用通用功能,如验证和文件上传操作. 4.Acti ...
- javaweb开发之EL表达式
一.EL简介 EL全名为Expression Language,它主要用于替换JSP页面中的脚本表达式<%= %>,从各种类型的Web域中检索Java对象.获取数据.它可以很方便地访问Ja ...
- Mixtures of Gaussians and the EM algorithm
http://cs229.stanford.edu/ http://cs229.stanford.edu/notes/cs229-notes7b.pdf
- thinkphp权限管理Rbac实例
首先,先建立Rbac那五张表(用户表,角色表,节点表,权限表,角色-用户表),后面四张可以在thinkphp中Rbac类里直接复制. 第二步,根据需求往那五张表里插入数据,注意:节点表里的节点名称一定 ...
- linux apache服务器
apache服务器 服务端功能是侦听和响应客户端的http请求.http协议的默认端口是80. 1996年以来,apache成为最流行的web服务器. IIS web服务器只能安装在windows上. ...
- git项目.gitignore文件不生效解决办法
配置好.gitignore文件如下: HELP.md /target/ !.mvn/wrapper/maven-wrapper.jar ### STS ### .apt_generated .clas ...
- Codeforces Round #363 (Div. 2) C. Vacations —— DP
题目链接:http://codeforces.com/contest/699/problem/C 题解: 1.可知每天有三个状态:1.contest ,2.gym,3.rest. 2.所以设dp[i] ...
- iOS 使用.xcworkspace文件管理代码和工程依赖(实现项目模块化)
一.创建xcworkspace文件. 在cocoapods安装后,项目文件里都会多一个后缀为.xcworkspace的文件.打开这个文件就相当打开最初创建的项目了.那么这个文件也就是用来管理项目的,它 ...