Linux MySql5.6.38安装过程
1.下载mysql安装包mysql-5.6.38-linux-glibc2.12-x86_64.tar.gz
2.用xftp工具将其上传到Linux服务器上的soft文件夹,没有的话先创建
[root@master ~]# cd /

[root@master /]# ls

bin dev home lib64 media opt root selinux sys usr

boot etc lib lost+found mnt proc sbin srv tmp var

[root@master /]# mkdir soft
3.解压mysql-5.6.38-linux-glibc2.12-x86_64.tar.gz
[root@master soft]# tar ‐zxvf mysql‐5.6.‐linux‐glibc2.‐x86_64.tar.gz
4.删除mysql-5.6.38-linux-glibc2.12-x86_64.tar.gz并将解压的文件夹重命名为mysql
[root@master soft]# ls

mysql‐5.6.‐linux‐glibc2.‐x86_64 mysql‐5.6.‐linux‐glibc2.‐x86_64.tar.gz

[root@master soft]# rm ‐rf mysql‐5.6.‐linux‐glibc2.‐x86_64.tar.gz

[root@master soft]# mv mysql‐5.6.‐linux‐glibc2.‐x86_64/ mysql
5.查看之前系统是否安装过mysql
[root@master soft]# rpm ‐qa|grep mysql

mysql‐libs‐5.1.‐.el6_6.x86_64
6.卸载之前安装过的mysql
[root@master soft]# rpm ‐e ‐‐nodeps mysql‐libs‐5.1.‐.el6_6.x86_64

[root@master soft]# rpm ‐qa|grep mysql

[root@master soft]#
7.查看系统之前是否有mysql用户
[root@master soft]# groups mysql

groups: mysql:无此用户
8.创建mysql用户组及用户
[root@master soft]# groupadd mysql

[root@master soft]# useradd ‐r ‐g mysql mysql
9.将解压的mysql文件夹移动到/usr/local目录下
[root@master soft]# mv mysql/ /usr/local/
10.进入/usr/local/文件夹并修改mysql文件夹用户组及用户为mysql
[root@master soft]# cd /usr/local/

[root@master local]# chown ‐R mysql:mysql mysql

[root@master local]# ll

总用量

drwxr‐xr‐x.  root root  9月   bin

drwxr‐xr‐x.  root root  9月   etc

drwxr‐xr‐x.  root root  9月   games

drwxr‐xr‐x.  root root  9月   include

drwxr‐xr‐x.  root root  9月   lib

drwxr‐xr‐x.  root root  9月   lib64

drwxr‐xr‐x.  root root  9月   libexec

drwxr‐xr‐x.  mysql mysql  1月  : mysql

drwxr‐xr‐x.  root root  9月   sbin

drwxr‐xr‐x.  root root  1月  : share

drwxr‐xr‐x.  root root  9月   src

[root@master local]#
11.修改/etc/hosts文件夹将IP和主机名添加进去
[root@master scripts]# vi /etc/hosts
192.168.1.110 master

127.0.0.1 localhost localhost.localdomain localhost4 localhost4.localdomain4

:: localhost localhost.localdomain localhost6 localhost6.localdomain6
12.进入mysql/scripts/文件夹,进行安装
[root@master scripts]# ./mysql_install_db ‐‐basedir=/usr/local/mysql ‐‐

datadir=/usr/local/mysql/data ‐‐user=mysql ‐‐explicit_defaults_for_timestamp
 Installing MySQL system tables...‐‐ ::  [Note] Ignoring ‐‐secure‐file‐priv value

 as server is running with ‐‐bootstrap.

 ‐‐ ::  [Note] /usr/local/mysql/bin/mysqld (mysqld 5.6.) starting as process

  ...

 ‐‐ ::  [Note] InnoDB: Using atomics to ref count buffer pool pages

 ‐‐ ::  [Note] InnoDB: The InnoDB memory heap is disabled

 ‐‐ ::  [Note] InnoDB: Mutexes and rw_locks use GCC atomic builtins

 ‐‐ ::  [Note] InnoDB: Memory barrier is not used

 ‐‐ ::  [Note] InnoDB: Compressed tables use zlib 1.2.

 ‐‐ ::  [Note] InnoDB: Using Linux native AIO

 ‐‐ ::  [Note] InnoDB: Using CPU crc32 instructions

 ‐‐ ::  [Note] InnoDB: Initializing buffer pool, size = 128.0M

 ‐‐ ::  [Note] InnoDB: Completed initialization of buffer pool

 ‐‐ ::  [Note] InnoDB: The first specified data file ./ibdata1 did not exist: a

 new database to be created!

 ‐‐ ::  [Note] InnoDB: Setting file ./ibdata1 size to  MB

 ‐‐ ::  [Note] InnoDB: Database physically writes the file full: wait...

 ‐‐ ::  [Note] InnoDB: Setting log file ./ib_logfile101 size to  MB

 ‐‐ ::  [Note] InnoDB: Setting log file ./ib_logfile1 size to  MB

 ‐‐ ::  [Note] InnoDB: Renaming log file ./ib_logfile101 to ./ib_logfile0

 ‐‐ ::  [Warning] InnoDB: New log files created, LSN=

 ‐‐ ::  [Note] InnoDB: Doublewrite buffer not found: creating new

 ‐‐ ::  [Note] InnoDB: Doublewrite buffer created

 ‐‐ ::  [Note] InnoDB:  rollback segment(s) are active.

 ‐‐ ::  [Warning] InnoDB: Creating foreign key constraint system tables.

 ‐‐ ::  [Note] InnoDB: Foreign key constraint system tables created

 ‐‐ ::  [Note] InnoDB: Creating tablespace and datafile system tables.

 ‐‐ ::  [Note] InnoDB: Tablespace and datafile system tables created.

 ‐‐ ::  [Note] InnoDB: Waiting for purge to start

 ‐‐ ::  [Note] InnoDB: 5.6. started; log sequence number

 ‐‐ ::  [Note] Binlog end

 ‐‐ ::  [Note] InnoDB: FTS optimize thread exiting.

 ‐‐ ::  [Note] InnoDB: Starting shutdown...

 ‐‐ ::  [Note] InnoDB: Shutdown completed; log sequence number

 OK

 Filling help tables...‐‐ ::  [Note] Ignoring ‐‐secure‐file‐priv value as server

 is running with ‐‐bootstrap.

 ‐‐ ::  [Note] /usr/local/mysql/bin/mysqld (mysqld 5.6.) starting as process

  ...

 ‐‐ ::  [Note] InnoDB: Using atomics to ref count buffer pool pages

 ‐‐ ::  [Note] InnoDB: The InnoDB memory heap is disabled

 ‐‐ ::  [Note] InnoDB: Mutexes and rw_locks use GCC atomic builtins

 ‐‐ ::  [Note] InnoDB: Memory barrier is not used

 ‐‐ ::  [Note] InnoDB: Compressed tables use zlib 1.2.

 ‐‐ ::  [Note] InnoDB: Using Linux native AIO

 ‐‐ ::  [Note] InnoDB: Using CPU crc32 instructions

 ‐‐ ::  [Note] InnoDB: Initializing buffer pool, size = 128.0M

 ‐‐ ::  [Note] InnoDB: Completed initialization of buffer pool

 ‐‐ ::  [Note] InnoDB: Highest supported file format is Barracuda.

 ‐‐ ::  [Note] InnoDB:  rollback segment(s) are active.

 ‐‐ ::  [Note] InnoDB: Waiting for purge to start

 ‐‐ ::  [Note] InnoDB: 5.6. started; log sequence number

 ‐‐ ::  [Note] Binlog end

 ‐‐ ::  [Note] InnoDB: FTS optimize thread exiting.

 ‐‐ ::  [Note] InnoDB: Starting shutdown...

 ‐‐ ::  [Note] InnoDB: Shutdown completed; log sequence number

 OK

 To start mysqld at boot time you have to copy

 support‐files/mysql.server to the right place for your system

 PLEASE REMEMBER TO SET A PASSWORD FOR THE MySQL root USER !

 To do so, start the server, then issue the following commands:

 /usr/local/mysql/bin/mysqladmin ‐u root password 'new‐password'

 /usr/local/mysql/bin/mysqladmin ‐u root ‐h master password 'new‐password'

 Alternatively you can run:

 /usr/local/mysql/bin/mysql_secure_installation

 which will also give you the option of removing the test

 databases and anonymous user created by default. This is

 strongly recommended for production servers.

 See the manual for more instructions.

 You can start the MySQL daemon with:

 cd . ; /usr/local/mysql/bin/mysqld_safe &

 You can test the MySQL daemon with mysql‐test‐run.pl

 cd mysql‐test ; perl mysql‐test‐run.pl

 Please report any problems at http://bugs.mysql.com/

 The latest information about MySQL is available on the web at

 http://www.mysql.com

 Support MySQL by buying support/licenses at http://shop.mysql.com

 New default config file was created as /usr/local/mysql/my.cnf and

 will be used by default by the server when you start it.

 You may edit this file to change server settings
可能出现的错误
、数据初始化‐主机名解析错误

系统‐Red Hat Enterprise Linux Server release 6.6

软件‐源码安装mysql‐5.6..tar.gz

环境‐Linux rhel6.myexample.com 2.6.‐.el6.x86_64 # SMP Tue Sep  :: EDT  x86_64

x86_64 x86_64 GNU/Linux

报错:WARNING

[root@rhel6 mysql]# scripts/mysql_install_db ‐‐user=mysql

WARNING: The host 'rhel6.myexample.com' could not be looked up with ./bin/resolveip.

This probably means that your libc libraries are not  % compatible

with this binary MySQL version. The MySQL daemon, mysqld, should work

normally with the exception that host name resolving will not work.

This means that you should use IP addresses instead of hostnames

when specifying MySQL privileges !

原因:主机名解析错误。

解决:hosts文件中添加如下内容,ok!

[root@rhel6 mysql]# vi /etc/hosts

192.168.56.20 rhel6.myexample.com

总结:

因为lib库不是很兼容当前MySQL版本。在主机名解析不起作用的情况下,会引起MySQL守护进程、mysqld工作异常,因

此在MySQL中授权时需要使用IP地址,而不能使用主机名。

(不解决该问题,依然可以正确执行scripts/mysql_install_db数据库初始化脚本。)

、数据初始化‐时间戳问题

系统‐Red Hat Enterprise Linux Server release 6.6

软件‐源码安装mysql‐5.6..tar.gz

环境‐Linux rhel6.myexample.com 2.6.‐.el6.x86_64 # SMP Tue Sep  :: EDT  x86_64

x86_64 x86_64 GNU/Linux

报错:Warning

[root@rhel6 mysql]# scripts/mysql_install_db ‐‐user=mysql

Installing MySQL system tables...‐‐ ::  [Warning] TIMESTAMP with implicit DEFAULT

value is deprecated. Please use ‐‐explicit_defaults_for_timestamp server option (see

documentation for more details).

‐‐ ::  [Note] ./bin/mysqld (mysqld 5.6.) starting as process  ...

原因:机器的系统时间与TIMESTAMP时间戳不匹配。

解决:执行mysql_install_db数据初始化脚本时添加explicit_defaults_for_timestamp选项。

[root@rhel6 mysql]# scripts/mysql_install_db ‐‐user=mysql ‐‐explicit_defaults_for_timestamp

、数据初始化‐重复安装引起多个配置文件,默认配置文件

系统‐Red Hat Enterprise Linux Server release 6.6

软件‐源码安装mysql‐5.6..tar.gz

环境‐Linux rhel6.myexample.com 2.6.‐.el6.x86_64 # SMP Tue Sep  :: EDT  x86_64

x86_64 x86_64 GNU/Linux

报错:Warning

WARNING: Found existing config file ./my.cnf on the system.

Because this file might be in use, it was not replaced,

but was used in bootstrap (unless you used ‐‐defaults‐file)

and when you later start the server.

The new default config file was created as ./my‐new.cnf,

please compare it with your file and take the changes you need.

WARNING: Default config file /etc/my.cnf exists on the system

This file will be read by default by the MySQL server

If you do not want to use this, either remove it, or use the

‐‐defaults‐file argument to mysqld_safe when starting the server

原因:

Warning1是因为重复安装,导致在安装目录下已经存在my.cnf文件。

Warning2是指默认的my.cnf配置文件在/etc/目录下。

启动Mysql server时,可指定‐‐default‐file=/path/my.cnf参数来启动mysql服务。
13.返回上一级mysql目录,修改data文件及用户组及用户为mysql
[root@master scripts]# cd ..

[root@master mysql]# chown ‐R mysql:mysql data
14.修改mysql密码,之前安装时已经提示如何修改
/usr/local/mysql/bin/mysqladmin ‐u root password 'new‐password'

/usr/local/mysql/bin/mysqladmin ‐u root ‐h master password 'new‐password'
[root@master bin]# ./mysqladmin ‐u root password 'root'
有可能会出现以下错误
[root@master bin]# ./mysqladmin ‐u root password 'root'

./mysqladmin: connect to server at 'localhost' failed

error: 'Can't connect to local MySQL server through socket '/tmp/mysql.sock' ()'

Check that mysqld is running and that the socket: '/tmp/mysql.sock' exists!

[root@master bin]#
因为这时还没有启动mysql,这算是一个坑。
15.启动mysql,进入mysql/support-files文件夹执行命令
[root@master mysql]# cd support‐files/

[root@master support‐files]# ls

binary‐configure magic my‐default.cnf mysqld_multi.server mysql‐log‐rotate mysql.server

[root@master support‐files]# ./mysql.server start

Starting MySQL.Logging to '/usr/local/mysql/data/master.err'.

SUCCESS!

[root@master support‐files]#
16.在重新执行命令修改密码
[root@master bin]# ./mysqladmin ‐u root password 'root'

Warning: Using a password on the command line interface can be insecure.

[root@master bin]#
17.登录mysql
[root@master bin]# ./mysql ‐uroot ‐p

Enter password:

Welcome to the MySQL monitor. Commands end with ; or \g.

Your MySQL connection id is

Server version: 5.6. MySQL Community Server (GPL)

Copyright (c) , , Oracle and/or its affiliates. All rights reserved.

Oracle is a registered trademark of Oracle Corporation and/or its

affiliates. Other names may be trademarks of their respective

owners.

Type 'help;' or '\h' for help. Type '\c' to clear the current input statement.

mysql>
18.将其他用户的密码也修改为root
update mysql.user set password=password('root') where user='root'; flush privileges;
mysql> update mysql.user set password=password('root') where user='root'; flush privileges;

Query OK,  rows affected (0.00 sec)

Rows matched:  Changed:  Warnings:

Query OK,  rows affected (0.00 sec)

mysql>
19.在Windows上远程连接mysql,此时端口不同,关闭Linux上的防火墙
[root@master bin]# service iptables stop

iptables:将链设置为政策 ACCEPT:filter [确定]

iptables:清除防火墙规则: [确定]

iptables:正在卸载模块: [确定]

[root@master bin]#
此时在Windows上用cmd窗口Telnet Linux服务器3306端口报错
D•Host '192.168.1.1' is not allowed to connect to

遗失对主机的连接。

C:\Users\Administrator>telnet 192.168.1.110
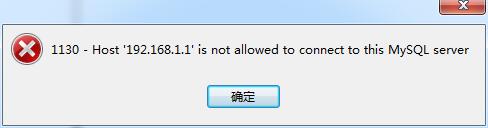
为解决这一问题,需要本地登陆MySQL后执行如下命令
mysql> grant all privileges on *.* to root@'%' identified by 'root';

Query OK,  rows affected (0.00 sec)

mysql> flush privileges;

Query OK,  rows affected (0.00 sec)

mysql>
执行之后即可连接成功

20.将mysql加入services服务
[root@master mysql]# cp support‐files/mysql.server /etc/init.d/mysqld

[root@master mysql]# chkconfig ‐‐add mysqld

[root@master mysql]# chkconfig mysqld on

[root@master mysql]# service mysqld restart

Shutting down MySQL.... SUCCESS!

Starting MySQL. SUCCESS!

[root@master mysql]#
查看状态
[root@master mysql]# service mysqld status

SUCCESS! MySQL running ()

[root@master mysql]#
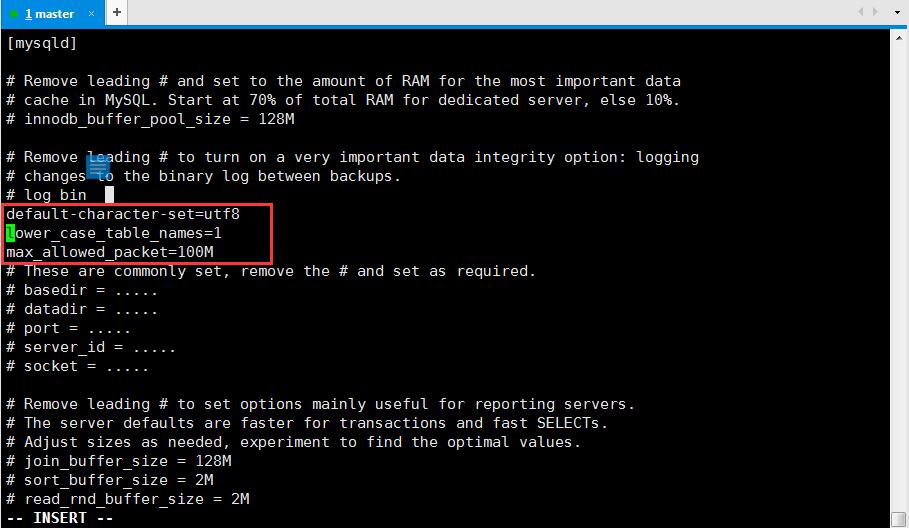
21.配置my.cnf
[root@master mysql]# vi my.cnf
[mysqld]

# Remove leading # and set to the amount of RAM for the most important data

# cache in MySQL. Start at % of total RAM for dedicated server, else %.

# innodb_buffer_pool_size = 128M

# Remove leading # to turn on a very important data integrity option: logging

# changes to the binary log between backups.

# log_bin

default‐character‐set=utf8

lower_case_table_names=

max_allowed_packet=100M

# These are commonly set, remove the # and set as required.

# basedir = .....

# datadir = .....

# port = .....

# server_id = .....

# socket = .....

# Remove leading # to set options mainly useful for reporting servers.

# The server defaults are faster for transactions and fast SELECTs.

# Adjust sizes as needed, experiment to find the optimal values.

# join_buffer_size = 128M

# sort_buffer_size = 2M

# read_rnd_buffer_size = 2M
配置好之后充气mysql服务
[root@master data]# service mysqld restart

ERROR! MySQL server PID file could not be found!

Starting MySQL... ERROR! The server quit without updating PID file

(/usr/local/mysql/data/master.pid).
此时报错,查看/usr/local/mysql/data/master.err文件发现报错内容
‐‐ ::  [ERROR] /usr/local/mysql/bin/mysqld: unknown variable 'defaultcharacter‐

set=utf8'

‐‐ ::  [ERROR] Aborting
my.cnf字符集设置问题,重新设置为character_set_server=utf8
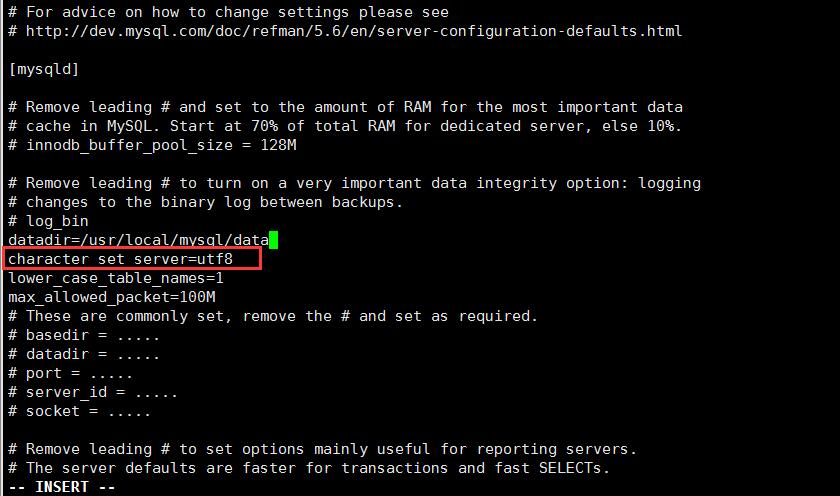
重新启动解决
[root@master mysql]# service mysqld restart

Shutting down MySQL.. SUCCESS!

Starting MySQL. SUCCESS!

[root@master mysql]#
Linux MySql5.6.38安装过程的更多相关文章
- JProfiler远程监控Linux上Tomcat的安装过程细讲(步骤非常详细!!!)
JProfiler远程监控Linux上Tomcat的安装过程细讲(步骤非常详细!!!) 1.文件准备: 服务器:CentOS Linux release 7.3.1611 (Core) Apa ...
- mysql5.5编译安装过程(自己总结)
一,安装过程 //创建mysql安装目录,创建数据存放目录,创建用户和用户组与赋予数据存放目录权限 mkdir -p /usr/local/mysql/ mkdir -p /data/mysql/ g ...
- (转)linux下mysql的安装过程
最近在linux安装了mysql,根据网上收集的资料和个人的操作过程,大概做了个整理,以便以后进行参考回顾. 1.下载mysql-5.1.36.tar.gz,并且解压. tar -xzvf mysql ...
- linux mysql-5.6.26 安装
下载地址 ftp://mirror.switch.ch/mirror/mysql/Downloads/MySQL-5.6/mysql-5.6.26-linux-glibc2.5-x86_64.tar. ...
- Linux系统源码安装过程中的prefix选项
在linux和unix环境中,源码安装是最常用的软件安装方式,一些软件除了提供源码外,也提供各种发行版的二进制安装包(如基于redhat包管理工具的rpm包),但强烈建议使用源码安装方式.原因是:(1 ...
- linux环境中,nginx安装过程
需求描述: 记录在linux平台,nginx安装的过程. 环境描述: 操作系统:Red Hat Enterprise Linux Server release 6.6 (Santiago) 操作内核版 ...
- 1、linux下mysql5.5.20安装过程报错汇总
1.Access denied for user 'root'@'localhost' (using password: YES) 这个提示是因为root帐户默认不开放远程访问权限,所以需要修改一下相 ...
- linux系统下nodejs安装过程随记
首先下载适合的版本.这里我使用的是node v.10.36 先介绍编译安装的详细过程. 下载该版本: wget http://nodejs.org/dist/v0.10.36/node-v0.10.3 ...
- Linux源码包安装过程及注意事项
众做周知RedHat Linux使用RPM包管理器安装rpm包,但是RPM包是由红帽编译打包的,通常相对于最新版落后了很多,甚至可能缺少我们所要使用的功能.如果你需要定制想要的软件功能.自定义安装路径 ...
随机推荐
- 【转】HttpServletRequestWrapper 实现xss注入
这里说下最近项目中我们的解决方案,主要用到commons-lang3-3.1.jar这个包的org.apache.commons.lang3.StringEscapeUtils.escapeHtml4 ...
- 【原】通过Spring-Session实现不同系统之间的单点登录
单点登录(Single Sign On),简称为 SSO,是目前比较流行的企业业务整合的解决方案之一.SSO的定义是在多个应用系统中,用户只需要登录一次就可以访问所有相互信任的应用系统.目前市面上有很 ...
- Linux学习8-Linux常用命令(4)
链接命令 命令名称:ln 命令英文原意:link 命令所在路径:/bin/ln 执行权限:所有用户 功能描述:生成链接文件 语法:ln 选项[-s][原文件] [目标文件] 选项: -s 创建 ...
- SQL0286N 找不到页大小至少为 "8192"、许可使用授权标识 "db2inst" 的缺省表空间。
在 SQL 处理期间,它返回: SQL0286N 找不到页大小至少为 "8192".许可使用授权标识 "db2inst" 的缺省表空间. 顾名思义,DB2默认 ...
- CSS相对定位|绝对定位(五)之z-index篇——张鑫旭
by zhangxinxu from http://www.zhangxinxu.com本文地址:http://www.zhangxinxu.com/wordpress/?p=1855 补充于2016 ...
- 朴素贝叶斯文本分类实现 python cherry分类器
贝叶斯模型在机器学习以及人工智能中都有出现,cherry分类器使用了朴素贝叶斯模型算法,经过简单的优化,使用1000个训练数据就能得到97.5%的准确率.虽然现在主流的框架都带有朴素贝叶斯模型算法,大 ...
- Android Dialog的整个生命周期
Activities提供了一种方便管理的创建.保存.回复的对话框机制,例如 onCreateDialog(int), onPrepareDialog(int, Dialog), showDialog( ...
- hidden field implements session
隐藏域实现会话管理概述 如果你正在制作一个网络问卷,由于问卷内容很长,因此必须分几个页面,上一页面作答完后,必须请求服务器显示下一个页面. 但是在HTTP协议中,服务器并不会记得上一次请求的状态.既然 ...
- CSS 小结笔记之清除浮动
浮动是一个非常好用的属性,但是有时会出现一些问题,需要进行清除浮动.例如 <!DOCTYPE html> <html lang="en"> <head ...
- 探索ORM之iBati(一)
ibatis iBATIS一词来源于“internet”和“abatis”的组合,是一个由Clinton Begin在2001年发起的开放源代码项目.最初侧重于密码软件的开发,现在是一个基于Jav ...