自动化测试--封装getDriver的方法
在自动化测试的时候,通常都会把最常用的功能封装起来,实现通用性。
该篇博客是实现了getDriver方法的封装。
第一次封装的时候,是使用的传参。
@Parameters(value = {"driverType","dirvePath","fireFoxInstallPath","fireFoxVersion"})

    public void getDriver(String driverType, String dirvePath, String fireFoxInstallPath, String fireFoxVersion) {

        if (driverType.equals("ie")) {

            driver = getIEDriver(dirvePath);

        } else if (driverType.equals("chrome")) {

            driver = getChromeDriver(dirvePath);

        } else if (driverType.equals("fireFox")) {

            driver = getFireFoxDriver(dirvePath, fireFoxInstallPath, fireFoxVersion);

        }

    }

    private WebDriver getFireFoxDriver(String dirvePath, String fireFoxInstallPath, String fireFoxVersion) {

        System.setProperty(SystemProperty.BROWSER_BINARY, fireFoxInstallPath);

        if ("3.X".equals(fireFoxVersion)) {

            System.setProperty(GeckoDriverService.GECKO_DRIVER_EXE_PROPERTY, dirvePath);

        }

        return new FirefoxDriver();

    }

    private WebDriver getChromeDriver(String dirvePath) {

        System.setProperty(ChromeDriverService.CHROME_DRIVER_EXE_PROPERTY, dirvePath);

        return new ChromeDriver();

    }

    private WebDriver getIEDriver(String dirvePath) {

        DesiredCapabilities capabilities = new DesiredCapabilities();

        capabilities.setCapability(InternetExplorerDriver.IGNORE_ZOOM_SETTING, true);

        capabilities.setCapability(InternetExplorerDriver.INTRODUCE_FLAKINESS_BY_IGNORING_SECURITY_DOMAINS, true);

        System.setProperty(InternetExplorerDriverService.IE_DRIVER_EXE_PROPERTY, dirvePath);

        return new InternetExplorerDriver(capabilities);

    }
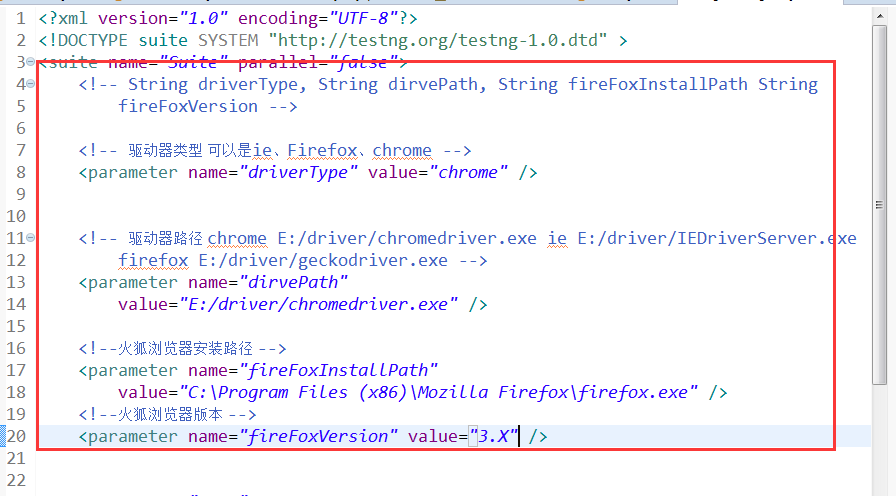
下面是testNG 的配置文件:

可以看到,这种实现方式,会使我们的配置文件变得比较庞大,不够清晰。每次切换 启动的浏览器类型的时候,要一项项修改配置文件,比较麻烦。
考虑到上述缺点,笔者重新换了实现方式。使用读取配置文件、反射的方法来切换浏览器的启动。
下面是实现方法:
1.准备配置文件:
<?xml version="1.0" encoding="UTF-8"?>

<!--  只需要修改下面的driverIndex 就可以去创建对应index的驱动-->

<driver driverIndex="3">

    <!-- 谷歌浏览器配置文件 -->

    <name value="org.openqa.selenium.chrome.ChromeDriver" index="0">

        <properties>

            <property

                name="ChromeDriverService.CHROME_DRIVER_EXE_PROPERTY"

                value="E:/driver/chromedriver.exe" />

        </properties>

    </name>

    <!-- 火狐浏览器 对应的selenium3.x版本 的配置文件 -->

    <name value="org.openqa.selenium.firefox.FirefoxDriver"

        seleniumVersion="3.x" index="1">

        <properties>

            <property name="SystemProperty.BROWSER_BINARY"

                value="C:\Program

        Files (x86)\Mozilla Firefox\firefox.exe" />

            <property

                name="GeckoDriverService.GECKO_DRIVER_EXE_PROPERTY"

                value="E:/driver/geckodriver.exe" />

        </properties>

    </name>

    <!-- 火狐浏览器 对应的selenium2.x版本 的配置文件 -->

    <name value="org.openqa.selenium.firefox.FirefoxDriver"

        seleniumVersion="2.x" index="2">

        <properties>

            <property name="SystemProperty.BROWSER_BINARY"

                value="C:\Program

        Files (x86)\Mozilla Firefox\firefox.exe" />

        </properties>

    </name>

    <!--IE浏览器配置文件 -->

    <name value="org.openqa.selenium.ie.InternetExplorerDriver"

        index="3">

        <properties>

            <property

                name="InternetExplorerDriverService.IE_DRIVER_EXE_PROPERTY"

                value="E:/driver/IEDriverServer.exe" />

        </properties>

        <capabilities>

            <capability

                name="InternetExplorerDriver.IGNORE_ZOOM_SETTING" />

            <capability

                name="InternetExplorerDriver.INTRODUCE_FLAKINESS_BY_IGNORING_SECURITY_DOMAINS" />

        </capabilities>

    </name>

</driver>
下面是实现浏览器切换的代码:
package com.claire.jing.utils;

import java.util.List;

import org.dom4j.Document;

import org.dom4j.DocumentException;

import org.dom4j.Element;

import org.dom4j.io.SAXReader;

import org.openqa.selenium.WebDriver;

import org.openqa.selenium.remote.DesiredCapabilities;

public class GetDriverUtil {

    private static Class clazz;

    private static Object obj ;

    public static void main(String[] args) throws InterruptedException {

        WebDriver driver = getDriver();

        driver.get("http://www.baidu.com");

        Thread.sleep(10000);

        driver.quit();

    }

    public static WebDriver getDriver() {

        Document document = null;

        Element driverNameElement= null;

        String driverName =null;

        SAXReader reader = new SAXReader();

        try {

            document = reader.read(GetDriverUtil.class.getResourceAsStream("/driverProperties.xml"));

        } catch (DocumentException e) {

            e.printStackTrace();

        }

        /**

         * 下面是通过解析XML,获取到驱动的类全名

         */

        Element rootElement = document.getRootElement(); //获取到根节点

        int index = Integer.parseInt(rootElement.attributeValue("driverIndex"));//获取到根节点上的driverIndex并转成int类型

        //获取到所有"name"子节点,遍历,找出与根节点中的driverIndex相同的,将其value属性值获取出来,作为类全名用于反射

        List<Element> driverNameElements = rootElement.elements("name");

        for (Element driverNameElement1 : driverNameElements) {

            int i = Integer.parseInt(driverNameElement1.attributeValue("index"));

            if (i == index) {

                driverName = driverNameElement1.attributeValue("value");//获取到name子节点的“value”属性值

                driverNameElement = driverNameElement1;//将该节点赋值给driverElement,后续根据它来获得子节点

            }

        }

        /**

         * 通过类全名,反射出驱动类来

         */

        try {

            clazz = Class.forName(driverName);

        } catch (ClassNotFoundException e) {

            e.printStackTrace();

        }

        /**

         * 下面是解析XML中的系统参数以及能力参数

         */

        Element propertiesElement = driverNameElement.element("properties");

        List<Element> propertyElements = propertiesElement.elements("property");

        //设置系统参数

        for (Element property : propertyElements) {

            System.setProperty(property.attributeValue("name"), property.attributeValue("value"));

        }

        //设置能力(ie的话,需要设置忽略域设置等级 以及忽略页面百分比的能力)

        Element capabilitiesElement = driverNameElement.element("capabilities");

        if (capabilitiesElement != null) {

            //创建能力对象

            DesiredCapabilities realCapabilities = new DesiredCapabilities();

            //获得能力列表

            List<Element> capabilitiesElements = capabilitiesElement.elements("capability");

            for (Element capability : capabilitiesElements) {

                //遍历能力列表,并给能力赋值

                realCapabilities.setCapability(capability.attributeValue("name"), true);

            }

        }

        /*

         * 通过反射,创建驱动对象

         */

        try {

            obj = clazz.newInstance();

        } catch (InstantiationException e) {

            e.printStackTrace();

        } catch (IllegalAccessException e) {

            e.printStackTrace();

        }

        WebDriver driver = (WebDriver) obj;

        return driver;

    }

}
实现了只要修改配置文件中的driverIndex的值,就能去启动对应的浏览器。
自动化测试--封装getDriver的方法的更多相关文章
- Python+Appium自动化测试(6)-元素等待方法与重新封装元素定位方法
在appium自动化测试脚本运行的过程中,因为网络不稳定.测试机或模拟器卡顿等原因,有时候会出现页面元素加载超时元素定位失败的情况,但实际这又不是bug,只是元素加载较慢,这个时候我们就会使用元素等待 ...
- 自动化测试--封装JDBCUnit
在进行测试的时候,经常需要对数据库进行操作.我们知道,通过代码与数据库交互,需要以下几步: 1.加载驱动 之前有盆友问我,为什么Selenium操作浏览器的时候,非要下载浏览器驱动?为啥对数据库进行操 ...
- 总结Allegro元件封装(焊盘)制作方法[修整]
总结Allegro元件封装(焊盘)制作方法 在Allegro系统中,建立一个零件(Symbol)之前,必须先建立零件的管脚(Pin).元件封装大体上分两种,表贴和直插.针对不同的封装,需要制作不同的P ...
- JS如何封装一些列方法为一个对象的操作,然后集中管理这些操作,方便修改和调用
var Api = { ajax:{ // 添加项目 旧! add_project : function(pro_name, html, css, js,callback) { $.post(&quo ...
- PHP封装Excel表方法使用流程
今天总结了一下Excel表的封装和导出使用,原理 经常使用与一些日常报表, 数据报表, 实现方法比较简单, 一次封装, 简单的方法调用,简单~ 废话不多说,直接入正题, 先说下重要的参数要记住的东西 ...
- javascript封装自定义滚动条方法,可自定义四个边框滚动条
还是根据我的个人习惯封装了一个方法 setScroll({ box :父盒子DOM对象, content : 内容盒子DOM对象, scrollall : 滚动条大盒子DOM对象, scroll : ...
- 在jsp提交表单的参数封装到一个方法里
建议去看一下孤傲苍狼写的Servlet+JSP+JavaBean开发模式(http://www.cnblogs.com/xdp-gacl/p/3902537.html), 最好把他JavaWeb学习总 ...
- 几种封装javaBean的方法
开发框架时,经常需要使用java对象(javaBean)的属性来封装程序的数据,封装javaBean的方法有很多,比如反射,内省,以及使用工具类.下面从反射开始介绍. 1.javaBean介绍: 简介 ...
- Python类总结-封装(私有属性,方法)
封装基础 广义上面向对象的封装:代码的保护,面向对象的思想本身就是一种封装 只让自己的对象能调用自己类中的方法 狭义上的封装-面向对象三大特性之一(私有变量,用公有的方法封装私有属性,方法叫封装) 把 ...
随机推荐
- 逻辑回归(分类问题)(Logistic Regression、罗杰斯特回归)
逻辑回归:问题只有两项,即{0, 1}.一般而言,回归问题是连续模型,不用在分类问题上,且噪声较大,但如果非要引入,那么采用逻辑回归模型. 对于一般训练集: 参数系统为: 逻辑回归模型为: ...
- python+requests实现接口测试 - get与post请求使用
简介:Requests 是用Python语言编写,基于 urllib,采用 Apache2 Licensed 开源协议的 HTTP 库.它比 urllib 更加方便,可以节约我们大量的工作,完全满足 ...
- git上传过滤忽略文件
有些时候我们不想把某些文件纳入版本控制中,比如数据库文件,临时文件,设计文件等 在主目录下建立".gitignore"文件,此文件有如下规则: 忽略文件中的空行或以井号(#)开始的 ...
- linux系统状态查看/管理相关命令
系统状态查看命令: w 查看用户 top 系统进程监控 uptime 查看某台服务器运行了多久 htop 更加先进的交互式监控工具(需要安装) iotop 监控并实时显示磁盘IO输入和输出和程序进程( ...
- onload函数不执行
原因: <jsp:include page="">通过该标签引入jsp时会导致<body>失效 案例: <jsp:include page=" ...
- WebSocket 和socket 的区别
去年光棍节的时候,我写过一篇 quick-cocos2d-x 中的 socket 技术选择:LuaSocket 和 WebSocket .这篇文章介绍了我为何决定在项目中使用 LuaSocket . ...
- Java程序如何生成Jar 执行文件(1)
一.用Eclipse生产Jar文件 注意:此方法只能打包简单程序,不包含含有第三方jar包的项目 首先,看一下我的项目的目录结构: 1,项目名字上面点右键,选择Export,在选择java\JAR f ...
- Vscode配置C++运行环境(2019/1//11更)并加入bits/stdc++.h头文件
因为重装系统,以前配置好的c++环境又没了.所以有要配置一遍. 1 下载mingw64或minw, 配置好环境变量:C://mingw64//bin; 在cmd下用g++ -v验证是否成功. 2. ...
- flex布局设置min-width
在一个flex布局中,对于一个设置了flex属性设置为1的div容器,再对其设置min-width:0,保证内容不超出外层容器
- JS高级. 06 缓存、分析解决递归斐波那契数列、jQuery缓存、沙箱、函数的四种调用方式、call和apply修改函数调用方法
缓存 cache 作用就是将一些常用的数据存储起来 提升性能 cdn //-----------------分析解决递归斐波那契数列<script> //定义一个缓存数组,存储已经计算出来 ...
