Hive速览
一、概述
Hive由Facebook开源,是一个构建在Hadoop之上的数据仓库工具
将结构化的数据映射成表
支持类SQL查询,Hive中称为HQL
1.读模式
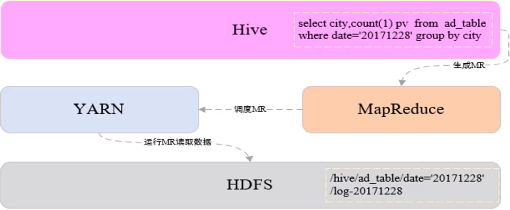
2.Hive架构
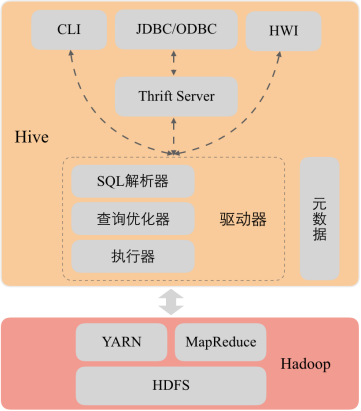 3.使用Hive的原因
Hadoop数据分析的问题:
MapReduce实现复杂查询逻辑开发难度大,周期长
开发速度无法快速满足业务发展
使用Hive原因
类似SQL语法,使用灵活方便,开发速度快
统一的元数据管理
易扩展
人员培养容易、学习成本低
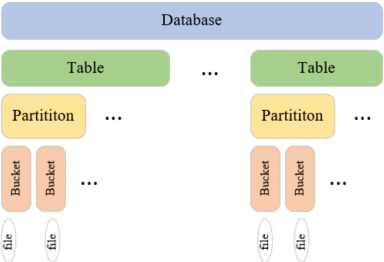
4.数据模型
二、Hive配置安装
1.创建HDFS数据仓库目录
hadoop fs -mkdir -p /user/hive/warehouse
2.为所有用户添加数据仓库目录的写权限
hadoop fs -chmod a+w /user/hive/warehouse
3.开放HDFS 中tmp临时目录的权限
hadoop fs -chmod -R 777 /tmp
5.将Hive安装包解压到/bigdata/安装目录
tar -zxvf apache-hive-1.2.2-bin.tar.gz -C /bigdata
6.创建软链接
ln -s /bigdata/apache-hive-1.2.2-bin /usr/local/hive

7.设置环境变量
vim /etc/profile
添加如下内容:
export HIVE_HOME=/usr/local/hive
export PATH=$PATH:${HIVE_HOME}/bin

8.重新编译使环境变量生效
source /etc/profile
9.hive-site.xml配置文件上传到hive/conf目录中,添加用于存储元数据的MySQL数据库配置信息
<?xml version="1.0" encoding="UTF-8" standalone="no"?>
<?xml-stylesheet type="text/xsl" href="configuration.xsl"?>
<!--
Licensed to the Apache Software Foundation (ASF) under one or more
contributor license agreements. See the NOTICE file distributed with
this work for additional information regarding copyright ownership.
The ASF licenses this file to You under the Apache License, Version 2.0
(the "License"); you may not use this file except in compliance with
the License. You may obtain a copy of the License at http://www.apache.org/licenses/LICENSE-2.0 Unless required by applicable law or agreed to in writing, software
distributed under the License is distributed on an "AS IS" BASIS,
WITHOUT WARRANTIES OR CONDITIONS OF ANY KIND, either express or implied.
See the License for the specific language governing permissions and
limitations under the License.
-->
<configuration>
<property>
<name>javax.jdo.option.ConnectionURL</name>
<value>jdbc:mysql://node01:3306/hive?createDatabaseIfNotExist=true&useSSL=false</value>
</property>
<property>
<name>javax.jdo.option.ConnectionDriverName</name>
<value>com.mysql.jdbc.Driver</value>
</property>
<property>
<name>javax.jdo.option.ConnectionUserName</name>
<value>hive</value>
</property>
<property>
<name>javax.jdo.option.ConnectionPassword</name>
<value>hive1234</value>
</property>
</configuration>

10.将mysql驱动jar文件拷贝到${HIVE_HOME}/lib目录下


11.登录MySQL创建用户hive
登录MySQL:mysql -u root -p
创建用户:create user 'hive'@'%' identified by 'hive1234';
查询用户表确定用户创建成功:select user,host from mysql.user;
为用户授权:grant all privileges on *.* to 'hive'@'%';
刷新权限:flush privileges;

12.启动hive
/usr/local/hive/bin/hive

三、数据类型和文件格式
hive常用文件格式
1.TEXTFILE
默认文件格式,建表时用户需要显示指定分隔符
存储方式:行存储
优点:最简单的数据格式,便于和其他工具(Pig, grep, sed, awk)共享数据,便于查看和编辑;加载较快。
缺点:耗费存储空间,I/O性能较低;Hive不进行数据切分合并,不能进行并行操作,查询效率低。
适用场景:适用于小型查询,查看具体数据内容的测试操作。
2.SequenceFile
二进制键值对序列化文件格式
存储方式:行存储
优点:可压缩、可分割,优化磁盘利用率和I/O;可并行操作数据,查询效率高。
缺点:存储空间消耗最大;对于Hadoop生态系统之外的工具不适用,需要通过text文件转化加载。
适用场景:适用于数据量较小、大部分列的查询。
3.RCFILE
RCFile是Hive推出的一种专门面向列的数据格式,它遵循“先按列划分,再垂直划分”的设计理念。
存储方式:行列式存储
优点:可压缩,高效的列存取;查询效率较高。
缺点:加载时性能消耗较大,需要通过text文件转化加载;读取全量数据性能低。
4.ORCFILE
优化后的rcfile
存储方式:行列式存储。
优缺点:优缺点与rcfile类似,查询效率最高。
适用场景:适用于Hive中大型的存储、查询。

hive基本数据类型
1.整数类型
TINYINT、SMALLINT、INT、BIGINT
空间占用分别是1字节、2字节、4字节、8字节
2.浮点类型
FLOAT、DOUBLE
空间占用分别是32位和64位浮点数
3.布尔类型
BOOLEAN
用于存储true和false
4.字符串文本类型
STRING
存储变长字符串,对类型长度没有限制
5.时间戳类型
TIMESTAMP
存储精度为纳秒的时间戳

hive复杂数据类型
1.ARRAY
存储相同类型的数据,可以通过下标获取数据
定义:ARRAY<STRING>
查询:array[index]
2.MAP
存储键值对数据,键或者值的类型必须相同,通过键获取值
定义:MAP<STRING,INT>
查询:map[‘key’]
3.STRUCT
可以存储多种不同的数据类型,一旦声明好结构,各字段的位置不能改变
定义:STRUCT<city:STRING,address :STRING,door_num:STRING>
查询:struct.fieldname

四、Hive演示
1.查看数据库

show databases;

默认只有default库

2.创建用户表:user_info

字段信息:用户id,地域id,年龄,职业

create table user_info(

user_id string,

area_id string,

age int,

occupation string

)

 row format delimited fields terminated by '\t'

 lines terminated by '\n'

 stored as textfile;

2.1 查看default库中的表,发现新建的user_info表在default库中

use default;

show tables;

3.删除user_info表,user_info表在hdfs的目录也会被同时删除

drop table user_info;

4.创建数据库rel,用于存储维度表

create database rel;

查看hdfs路径

hadoop fs -ls /user/hive/warehouse/

会增加rel.db目录

***************创建内部管理表*********

1.在数据库rel中创建学生信息表

字段信息:学号、姓名、年龄、地域

切换使用rel数据库:

use rel;

create table student_info(

student_id string comment '学号',

name string comment '姓名',

age int comment '年龄',

origin string comment '地域'

)

comment '学生信息表'

row format delimited

fields terminated by '\t'

lines terminated by '\n'

stored as textfile;

1.1 使用load从本地加载数据到表student_info

load data local inpath '/home/hadoop/apps/hive_test_data/student_info_data.txt' into table student_info;

1.2 查看student_info表在hdfs路径,新增加了student_info_data.txt文件

hadoop fs -ls /user/hive/warehouse/rel.db/student_info

1.3 查询北京(代码11)的学生信息

select * from student_info where origin='11'

1.4 使用load从hdfs加载数据到表student_info

1.4.1 删除student_info表已经存在的hdfs文件

hadoop fs -rm -f /user/hive/warehouse/rel.db/student_info/student_info_data.txt

查询student_info没有数据了

select * from student_info

1.4.2 将本地文件上传到hdfs根目录下

hadoop fs -put /home/hadoop/apps/hive_test_data/student_info_data.txt /

1.4.3 使用load将hdfs文件加载到student_info表中

load data inpath '/student_info_data.txt' into table student_info;

load data inpath '/student_info_data.txt' overwrite into table student_info;

1.4.4查询student_info,新加载的数据已经生效

select * from student_info

原hdfs根目录下的student_info_data.txt已经被剪切到student_info表的hdfs路径下/user/hive/warehouse/rel.db/student_info

***************数据类型*********

2.创建员工表:employee

字段信息:用户id,工资,工作过的城市,社保缴费情况(养老,医保),福利(吃饭补助(float),是否转正(boolean),商业保险(float))

create table rel.employee(

user_id string,

salary int,

worked_citys array<string>,

social_security map<string,float>,

welfare struct<meal_allowance:float,if_regular:boolean,commercial_insurance:float>

)

row format delimited fields terminated by '\t'

collection items terminated by ','

map keys terminated by ':'

lines terminated by '\n'

stored as textfile;

2.1 从本地加载数据到表employee

load data local inpath '/home/hadoop/apps/hive_test_data/employee_data.txt' into table employee;

查询employee表

select * from employee;

2.2 修改employees_data.txt文件中的某些值,第二次向表中加载数据,会在原表数据后追加,不会覆盖

load data local inpath '/home/hadoop/apps/hive_test_data/employee_data.txt' into table employee;

查看HDFS路径

hadoop fs -ls /user/hive/warehouse/rel.db/employee

会出现employees_data_copy_1.txt文件

查询employee表

select * from employee;

2.3 使用overwrite方式加载,覆盖原表数据

load data local inpath '/home/hadoop/apps/hive_test_data/employee_data.txt' overwrite into table employee;

查看HDFS路径

hadoop fs -ls /user/hive/warehouse/rel.db/employee

只有employee_data.txt文件

查询employee表

select * from employee;

2.4 查询已转正的员工编号,工资,工作过的第一个城市,社保养老缴费情况,福利餐补金额

select user_id,

salary,

worked_citys[0],

social_security['养老'],

welfare.meal_allowance

from rel.employee

where welfare.if_regular=true;

***************创建外部表*************

可以提前创建好hdfs路径

hadoop fs -mkdir -p /user/hive/warehouse/data/student_school_info

如果没有提前创建好,在创建外部表的时候会根据指定路径自动创建

创建外部表学生入学信息

字段信息:

学号、姓名、学院id、专业id、入学年份

HDFS数据路径:/user/hive/warehouse/data/student_school_info

create external table rel.student_school_info(

student_id string,

name string,

institute_id string,

major_id string,

school_year string

)

row format delimited

fields terminated by '\t'

lines terminated by '\n'

stored as textfile

location '/user/hive/warehouse/data/student_school_info';

上传本地数据文件到hdfs

hadoop fs -put /home/hadoop/apps/hive_test_data/student_school_info_external_data.txt /user/hive/warehouse/data/student_school_info/

查询

select * from student_school_info

***************创建内部分区表*************

1.创建学生入学信息表

字段信息:学号、姓名、学院id、专业id

分区字段:入学年份

create table student_school_info_partition(

student_id string,

name string,

institute_id string,

major_id string

)

partitioned by(school_year string)

row format delimited

fields terminated by '\t'

lines terminated by '\n'

stored as textfile;

1.1 使用insert into从student_school_info表将2017年入学的学籍信息导入到student_school_info_partition分区表中

insert into table student_school_info_partition partition(school_year='2017')

select t1.student_id,t1.name,t1.institute_id,t1.major_id

from student_school_info t1

where t1.school_year=2017;

1.2 查看分区

show partitions student_school_info_partition;

1.3 查看hdfs路径

hadoop fs -ls /user/hive/warehouse/rel.db/student_school_info_partition/

会增加school_year='2017'目录

1.4 查询student_school_info_partition

select * from student_school_info_partition where school_year='2017';

1.5 删除分区

alter table student_school_info_partition drop partition (school_year='2017');

查看hadoop fs -ls /user/hive/warehouse/rel.db/student_school_info_partition/路径,

school_year='2017'目录已经被删除

1.6 使用动态分区添加数据

set hive.exec.dynamic.partition=true;

set hive.exec.dynamic.partition.mode=nonstrict;

insert overwrite table student_school_info_partition partition(school_year)

select t1.student_id,t1.name,t1.institute_id,t1.major_id,t1.school_year

from student_school_info t1

1.7 查看分区

show partitions student_school_info_partition;

1.8 查看hdfs路径

hadoop fs -ls /user/hive/warehouse/rel.db/student_school_info_partition/

会增加school_year='2017'目录

1.9 查询

select * from student_school_info_partition where school_year='2017';

***************创建外部分区表*************

1.创建学生入学信息表

字段信息:学号、姓名、学院id、专业id

分区字段:入学年份

create external table rel.student_school_info_external_partition(

student_id string,

name string,

institute_id string,

major_id string

)

partitioned by(school_year string)

row format delimited

fields terminated by '\t'

lines terminated by '\n'

stored as textfile

location '/user/hive/warehouse/data/student_school_info_external_partition';

1.2 在分区表的hdfs路径中添加school_year=2017目录

hadoop fs -mkdir /user/hive/warehouse/data/student_school_info_external_partition/school_year=2017

1.3 将student_school_external_partition_data.txt文件上传到school_year=2017文件夹下

hadoop fs -put student_school_external_partition_data.txt /user/hive/warehouse/data/student_school_info_external_partition/school_year=2017

1.4 查询student_school_info_external_partition表,虽然数据已经添加到了分区对应的hdfs路径,

但是表还没有添加分区,所以查询的时候没有数据

select * from student_school_info_external_partition;

查询分区,也没有分区信息

show partitions student_school_info_external_partition;

1.5 手动添加分区

alter table student_school_info_external_partition add partition(school_year='2017');

再次查询分区和数据已经添加上了

1.6 删除分区

alter table student_school_info_external_partition drop partition(school_year='2017');

查看分区,分区已经被删除

show partitions student_school_info_external_partition;

查看hdfs分区数据,分区数据还在

hadoop fs -ls /user/hive/warehouse/data/student_school_info_external_partition/school_year=2017

***************使用LIKE、AS创建表,表重命名,添加、修改、删除列*************

1. 根据已存在的表结构,使用like关键字,复制一个表结构一模一样的新表

create table student_info2 like student_info;

2. 根据已经存在的表,使用as关键字,创建一个与查询结果字段一致的表,同时将查询结果数据插入到新表

create table student_info3 as select * from student_info;

只有student_id,name两个字段的表

create table student_info4 as select student_id,name from student_info;

3.student_info4表重命名为student_id_name

alter table student_info4 rename to student_id_name;

4.给student_info3表添加性别列,新添加的字段会在所有列最后,分区列之前,在添加新列之前已经存在的数据文件中

如果没有新添加列对应的数据,在查询的时候显示为空。添加多个列用逗号隔开。

alter table student_info3 add columns (gender string comment '性别');

5.删除列或修改列

5.1 修改列,将继续存在的列再定义一遍,需要替换的列重新定义

alter table student_info3 replace columns(student_id string,name string,age int,origin string,gender2 int);

5.2 删除列,将继续存在的列再定义一遍,需要删除的列不再定义

alter table student_info3 replace columns(student_id string,name string,age int,origin string);

***************创建分桶表*************

1. 按照指定字段取它的hash散列值分桶

创建学生入学信息分桶表

字段信息:学号、姓名、学院ID、专业ID

分桶字段:学号,4个桶,桶内按照学号升序排列

create table rel.student_info_bucket(

student_id string,

name string,

age int,

origin string

)

clustered by (student_id) sorted by (student_id asc) into 4 buckets

row format delimited

fields terminated by '\t'

lines terminated by '\n'

stored as textfile;

2. 向student_info_bucket分桶表插入数据

set hive.enforce.bucketing = true;

set mapreduce.job.reduces=4;

insert overwrite table student_info_bucket

select student_id,name,age,origin

from student_info

cluster by(student_id);

查看hdfs分桶文件

hadoop fs -ls /user/hive/warehouse/rel.db/student_info_bucket

分桶表一般不使用load向分桶表中导入数据,因为load导入数据只是将数据复制到表的数据存储目录下,hive并不会

在load的时候对数据进行分析然后按照分桶字段分桶,load只会将一个文件全部导入到分桶表中,并没有分桶。一般

采用insert从其他表向分桶表插入数据。

分桶表在创建表的时候只是定义表的模型,插入的时候需要做如下操作:

在每次执行分桶插入的时候在当前执行的session会话中要设置hive.enforce.bucketing = true;声明本次执行的是一次分桶操作。

需要指定reduce个数与分桶的数量相同set mapreduce.job.reduces=4,这样才能保证有多少桶就生成多少个文件。

如果定义了按照分桶字段排序,需要在从其他表查询数据过程中将数据按照分区字段排序之后插入各个桶中,分桶表并不会将各分桶中的数据排序。

排序和分桶的字段相同的时候使用Cluster by(字段),cluster by 默认按照分桶字段在桶内升序排列,如果需要在桶内降序排列,

使用distribute by (col) sort by (col desc)组合实现。

作业练习:

set hive.enforce.bucketing = true;

set mapreduce.job.reduces=4;

insert overwrite table student_info_bucket

select student_id,name,age,origin

from student_info

distribute by (student_id) sort by (student_id desc);

********************导出数据**************

使用insert将student_info表数据导出到本地指定路径

insert overwrite local directory '/home/hadoop/apps/hive_test_data/export_data'

row format delimited  fields terminated by '\t' select * from student_info;

导出数据到本地的常用方法

hive -e "select * from rel.student_info" > ./student_info_data.txt

默认结果分隔符:'\t'

***************各种join关联**************

create table rel.a(

id int,

name string

)

row format delimited

fields terminated by '\t'

lines terminated by '\n'

stored as textfile;

create table rel.b(

id int,

name string

)

row format delimited

fields terminated by '\t'

lines terminated by '\n'

stored as textfile;

load data local inpath '/home/hadoop/apps/hive_test_data/a_join_data' into table a;

load data local inpath '/home/hadoop/apps/hive_test_data/b_join_data' into table b;

****join或inner join

两个表通过id关联,只把id值相等的数据查询出来。join的查询结果与inner join的查询结果相同。

select * from a join b on a.id=b.id;

等同于

select * from a inner join b on a.id=b.id;

****full outer join或full join

两个表通过id关联,把两个表的数据全部查询出来

select * from a full join b on a.id=b.id;

****left join

左连接时,左表中出现的join字段都保留,右表没有连接上的都为空

select * from a left join b on a.id=b.id;

****right join

右连接时,右表中出现的join字段都保留,左表没有连接上的都是空

select * from a right join b on a.id=b.id;

****left semi join

左半连接实现了类似IN/EXISTS的查询语义,输出符合条件的左表内容。

hive不支持in …exists这种关系型数据库中的子查询结构,hive暂时不支持右半连接。

例如:

select a.id, a.name from a where a.id in (select b.id from b);

使用Hive对应于如下语句:

select a.id,a.name from a left semi join b on a.id = b.id;

****map side join

使用分布式缓存将小表数据加载都各个map任务中,在map端完成join,map任务输出后,不需要将数据拷贝到reducer阶段再进行join,

降低的数据在网络节点之间传输的开销。多表关联数据倾斜优化的一种手段。多表连接,如果只有一个表比较大,其他表都很小,

则join操作会转换成一个只包含map的Job。运行日志中会出现Number of reduce tasks is set to 0 since there's no reduce operator

没有reduce的提示。

例如:

select /*+ mapjoin(b) */ a.id, a.name from a join b on a.id = b.id

***************hive内置函数**************

创建用户评分表

create table rel.user_core_info(

user_id string,

age int,

gender string,

core int

)

row format delimited fields terminated by '\t'

lines terminated by '\n'

stored as textfile;

load data local inpath '/home/hadoop/apps/hive_test_data/user_core.txt' into table rel.user_core_info;

1. 条件函数 case when

语法1:CASE a WHEN b THEN c [WHEN d THEN e]* [ELSE f] END

说明:如果a等于b,那么返回c;如果a等于d,那么返回e;否则返回f

例如:

hive> select case 1 when 2 then 'two' when 1 then 'one' else 'zero' end;

one

语法2:CASE WHEN a THEN b [WHEN c THEN d]* [ELSE e] END

说明:如果a为TRUE,则返回b;如果c为TRUE,则返回d;否则返回e

例如:

hive> select case when 1=2 then 'two' when 1=1 then 'one' else 'zero' end;

one

查询用户评分表,每个年龄段的最大评分值

select gender,

case when age<=20 then 'p0' when age>20 and age<=50 then 'p1' when age>=50 then 'p3' else 'p0' end,

max(core) max_core

from rel.user_core_info

group by gender,

case when age<=20 then 'p0' when age>20 and age<=50 then 'p1' when age>=50 then 'p3' else 'p0' end;

2. 自定义UDF函数

当Hive提供的内置函数无法满足你的业务处理需要时,此时就可以考虑使用用户自定义函数(UDF:user-defined function)。

UDF 作用于单个数据行,产生一个数据行作为输出。

步骤:

1. 先开发一个java类,继承UDF,并重载evaluate方法

2. 打成jar包上传到服务器

3. 在使用的时候将jar包添加到hive的classpath

hive>add jar /home/hadoop/apps/hive_test_data/HiveUdfPro-1.0-SNAPSHOT.jar;

4. 创建临时函数与开发好的java class关联

hive>create temporary function age_partition as 'cn.chinahadoop.udf.AgePartitionFunction';

5. 即可在hql中使用自定义的函数

select gender,

age_partition(age),

max(core) max_core

from rel.user_core_info

group by gender,

age_partition(age);
五、数据仓库项目
1.数据仓库
数据仓库之父”Bill Inmon在Building the Data Warehouse一书中给出了数据仓库的定义,数据仓库是一个面向主题的、集成的、非易失的且随时间变化的数据集合,用来支持管理人员的决策。
特点:
- 面向主题的
- 集成的
- 相对稳定的
- 反映历史变化
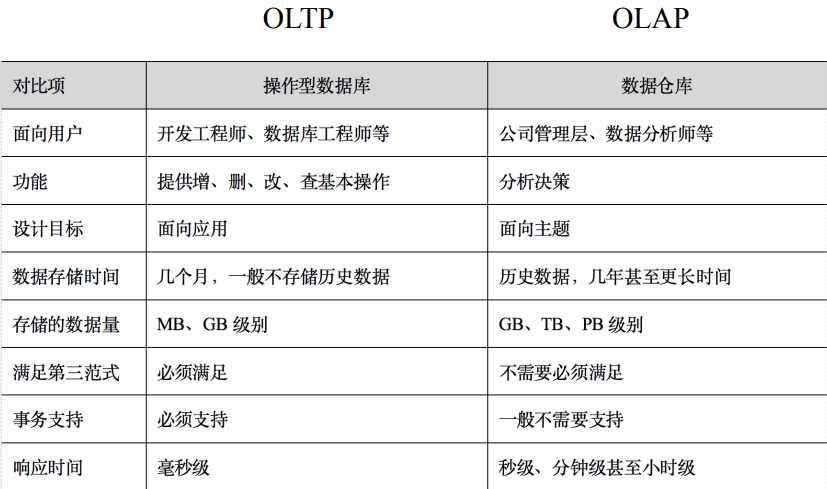
操作型数据库与数据仓库对比
分层架构
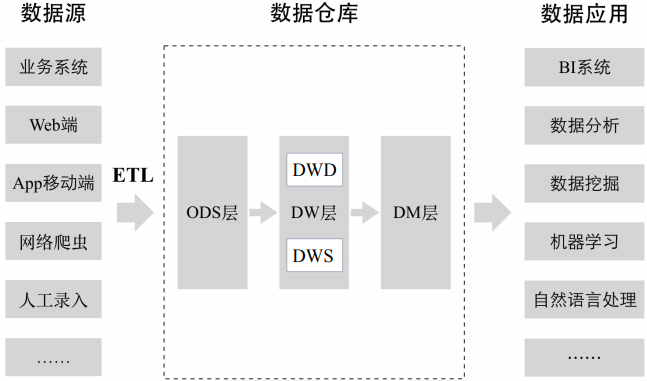
ODS层是临时存储层,是原始的数据或进行了比较简单加工的数据
DW ODS层经过数据仓库里的ETL加工后的数据(上图没有标注)导入DW层,DW层的数据一定是经过清洗过的,并且是干净的、一致的、准确的、规范的。 DW层进一步划分:
DWD 数据仓库明细层
DWS 数据仓库汇总层,在明细层基础之上构建一个数据汇总层,根据明细数据中的不同维度,一般按最细的粒度,把所有相关的维度做一个聚合,把一些关键指标提前聚合出来。
DM层 数据集市层,也可以称为应用层,DM层可以有多个数据集市,每一个数据集市对应不同的部门或业务团队。是数据仓库里的数据二次加工得到的,和具体业务部门关联起来了。
为什么要对数据仓库进行分层?
1.用空间换时间。每一层进行大量预处理,提升用户应用体验。数据可能会有大量冗余。
2.
3.简化数据清洗过程,将复杂工作拆分,每一层就比较简单、容易理解。
维度建模法
由“商业智能之父”Ralph Kimball提出,采用自上而下的建模方法,先构建数据集市,适用于项目早期和互联网领域
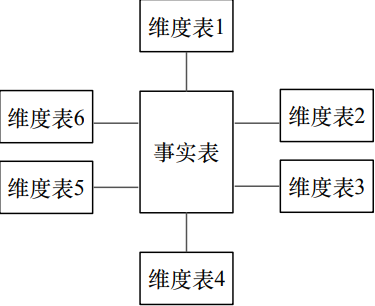
星型模型
由事实表和维度表组成:
- 事实表:记录细粒度的事实数据,通常以数值形式存储
- 维度表:对事实表数据属性的描述
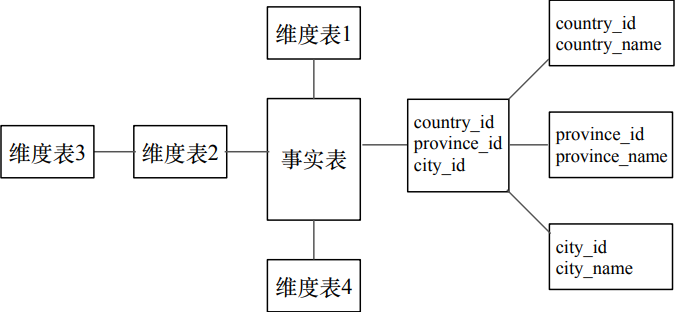
雪花模型
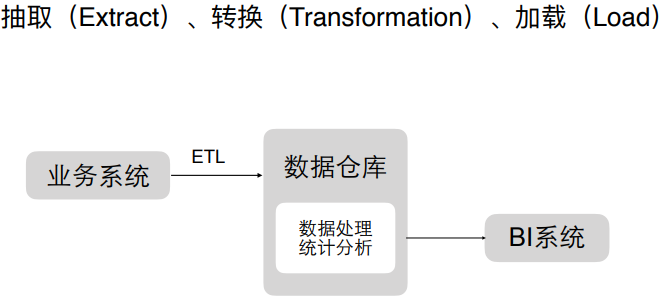
ETL过程
2.sqoop
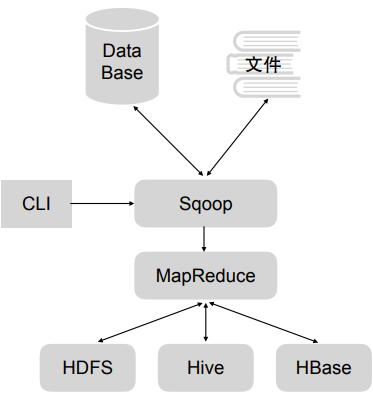
用于关系数据库,转化到HDFS、Hive、HBase里等存储或导出到关系型数据库和文件里,只有map阶段,没有reduce阶段
安装
Sqoop 的安装方法非常简单, 可以使用官方提供的已经编译好的安装包进行安装, 也可以从 github 下载 Sqoop 源码(源码地址: https://github.com/apache/sqoop) 自行编译安装包进行安装。
1)下载 Sqoop 安装包
Sqoop 下载地址:
http://www.apache.org/dyn/closer.lua/sqoop/1.4.7


Sqoop 官方文档:
http://sqoop.apache.org/docs/1.4.7/SqoopUserGuide.html
2)解压和配置 Sqoop
2.1 下载完安装包后, 将压缩文件加压到安装目录下, 本例将 Sqoop 安装到/bigdata 下
tar -zxvf sqoop-1.4..bin__hadoop-2.6..tar.gz
2.2 创建Sqoop的软连接,并将Sqoop添加到/etc/profile环境变量中
[root@node01 /]# ln -s /bigdata/sqoop-1.4..bin__hadoop-2.6. /usr/local/sqoop

[root@node01 /]# vim /etc/profile

[root@node01 /]# source /etc/profile
2.3 Sqoop 在运行过程中,会涉及到 Hive、Hadoop、MySQL 等工具的使用,所以在运行 Sqoop之前需要对 Sqoop 进行配置
进入到${SQOOP_HOME}/conf 目录中, 拷贝 sqoop-env-template.sh 脚本文件并且重命名为 sqoop-env.sh。 Sqoop 在运行过程中会自动加载 sqoop-env.sh 文件, 读取配置文件中的配置项。
cp sqoop-env-template.sh sqoop-env.sh
2.4 在 sqoop-env.sh 中设置三个配置项
export HADOOP_COMMON_HOME=/usr/local/hadoop #Hadoop 安装路径

export HADOOP_MAPRED_HOME=/usr/local/hadoop #MapReduce 安装路径

export HIVE_HOME=/usr/local/hive
2.5 使用 Sqoop 的过程中, 会涉及到操作关系型数据库, 要将相关数据库的驱动包拷贝到${SQOOP_HOME}/lib 目录中
例如: 使用 Sqoop 操作 MySQL 数据库时, Sqoop 通过 JDBC 连接到 MySQL, 需要将JDBC 连接 MySQL 的驱动包 mysql-connector-java-5.1.45-bin.jar 拷贝到${SQOOP_HOME}/lib目录中。
cp ${HIVE_HOME}/lib/mysql-connector-java-5.1.45-bin.jar ${SQOOP_HOME}/lib
2.6 将 Hive 的 配 置 文 件 路 径 HIVE_CONF_DIR 和 Hive 运 行 时 依 赖 的 工 具 包 路 径HIVE_CLASSPATH 添加到环境变量/etc/profile 中
export HIVE_CONF_DIR=${HIVE_HOME}/conf

export HIVE_CLASSPATH=${HIVE_HOME}/lib
否则使用 Sqoop 从 MySQL 向 Hive 表中导入数据时会报:
“ERROR hive.HiveConfig:Could not load org.apache.hadoop.hive.conf.HiveConf”

2.7 将 Hive 的配置文件 hive-site.xml 拷贝到${SQOOP_HOME}/conf 文件夹中。
否则使用Sqoop 从 MySQL 向 Hive 指定的数据库中导入数据时, 会报“Database does not exists”数据库不存在的错误。

3) 验证 Sqoop 是否安装成功
通过${SQOOP_HOME}/bin/sqoop version 命令查看 Sqoop 版本号,版本号显示正常表示安装配置成功。
[root@node01 ~]# sqoop version

19/03/01 16:27:09 INFO sqoop.Sqoop: Running Sqoop version: 1.4.7

Sqoop 1.4.7

git commit id 2328971411f57f0cb683dfb79d19d4d19d185dd8

Compiled by maugli on Thu Dec 21 15:59:58 STD 2017
4)查看 Sqoop 命令使用方法
执行${SQOOP_HOME}/bin/sqoop 命令时传入 help 参数可以查看 sqoop 命令的详细使用方法。 Sqoop 命令的使用方法和相关参数解释如下图所示:

3.数据仓库项目
确定主题:广告曝光主题
对接的部门:销售、运营
1)在mysql中创建relation数据库
创建三张表
**************************mysql********************

# 创建地域关系表

CREATE TABLE IF NOT EXISTS rel_area_detail(

   id INT UNSIGNED AUTO_INCREMENT,

   area_id VARCHAR(100) NOT NULL,

   area_name VARCHAR(40) NOT NULL,

   PRIMARY KEY (id)

)ENGINE=InnoDB DEFAULT CHARSET=utf8;

load data infile "/var/lib/mysql-files/area_info.txt" into table rel_area_detail fields terminated by '\t' lines terminated by '\n';

# 创建终端信息关系表

CREATE TABLE IF NOT EXISTS rel_terminal_detail(

   id INT UNSIGNED AUTO_INCREMENT,

   terminal_id VARCHAR(100) NOT NULL,

   terminal_name VARCHAR(100) NOT NULL,

   terminal_type VARCHAR(100) NOT NULL,

   PRIMARY KEY (id)

)ENGINE=InnoDB DEFAULT CHARSET=utf8;

load data infile "/var/lib/mysql-files/terminal_info.txt" into table rel_terminal_detail fields terminated by '\t' lines terminated by '\n';

# 创建广告主信息关系表

CREATE TABLE IF NOT EXISTS rel_advertiser_detail(

   id INT UNSIGNED AUTO_INCREMENT,

   advertiser_id VARCHAR(100) NOT NULL,

   advertiser_name VARCHAR(100) NOT NULL,

   PRIMARY KEY (id)

)ENGINE=InnoDB DEFAULT CHARSET=utf8;

load data infile "/var/lib/mysql-files/advertiser_info.txt" into table rel_advertiser_detail fields terminated by '\t' lines terminated by '\n';

**************************hive********************

## ods层

#创建地域关系表(天粒度)

create table ods.ods_rel_area_detail_d(

area_id string,

area_name string

)

row format delimited

fields terminated by '\t'

lines terminated by '\n'

stored as textfile;

#创建终端信息关系表(天粒度)

create table ods.ods_rel_terminal_detail_d(

terminal_id string,

terminal_name string,

terminal_type string

)

row format delimited

fields terminated by '\t'

lines terminated by '\n'

stored as textfile;

#创建广告主信息关系表(天粒度)

create table ods.ods_rel_advertiser_detail_d(

advertiser_id string,

advertiser_name string

)

row format delimited

fields terminated by '\t'

lines terminated by '\n'

stored as textfile;

#创建原始广告曝光日志表(天粒度)

create external table ods.ods_ad_log_d(

id bigint,

advertiser_id string,

duration int,

position int,

area_id string,

terminal_id string,

view_type int,

device_id string

)

partitioned by(dt string)

row format delimited

fields terminated by '\t'

lines terminated by '\n'

stored as textfile

location '/user/hive/warehouse/data/ods/ods_ad_log_d';

## dwd明细层

#创建数据仓库明细层的广告曝光日志表,表存储的文件类型为RCFILE(天粒度)

#dwd_ad_log_rc_d表比ods_ad_log_d表增加了terminal_type终端类型字段

create external table dwd.dwd_ad_log_rc_d(

id bigint,

advertiser_id string,

duration int,

position int,

area_id string,

terminal_id string,

terminal_type string,

view_type int,

device_id string

)

partitioned by(dt string)

row format delimited

fields terminated by '\t'

lines terminated by '\n'

stored as RCFILE

location '/user/hive/warehouse/data/dwd/dwd_ad_log_rc_d';

## dws汇总层

#dws_ad_summary_rc_d没有统计device_id维度,设备id通常用于计算新增用户数、累计用户数等指标,可以归属到用户主题

create external table dws.dws_ad_summary_rc_d(

advertiser_id string,

duration int,

position int,

area_id string,

terminal_id string,

terminal_type string,

pv bigint,

click bigint

)

partitioned by(dt string)

row format delimited

fields terminated by '\t'

lines terminated by '\n'

stored as RCFILE

location '/user/hive/warehouse/data/dws/dws_ad_summary_rc_d';

##dm数据集市(针对销售部门)

#各广告主每天在不同地域投放的广告的曝光量、点击量

create external table dm.dm_sls_ad_advertiser_report_rc_d(

advertiser_id string,

advertiser_name string,

area_id string,

area_name string,

pv bigint,

click bigint

)

partitioned by(dt string)

row format delimited

fields terminated by '\t'

lines terminated by '\n'

stored as RCFILE

location '/user/hive/warehouse/data/dm/dm_sls_ad_advertiser_report_rc_d';

#每天在不同地域,不同终端上投放的广告的曝光量、点击量

create external table dm.dm_opt_ad_terminal_report_rc_d(

area_id string,

area_name string,

terminal_id string,

terminal_name string,

terminal_type string,

pv bigint,

click bigint

)

partitioned by(dt string)

row format delimited

fields terminated by '\t'

lines terminated by '\n'

stored as RCFILE

location '/user/hive/warehouse/data/dm/dm_opt_ad_terminal_report_rc_d';
执行load data infile "/var/lib/mysql-files/area_info.txt" into table rel_area_detail fields terminated by '\t' lines terminated by '\n';
必须是/var/lib/mysql-files/目录,否则会报错
MySQL 5.7向表导入数据时报错:
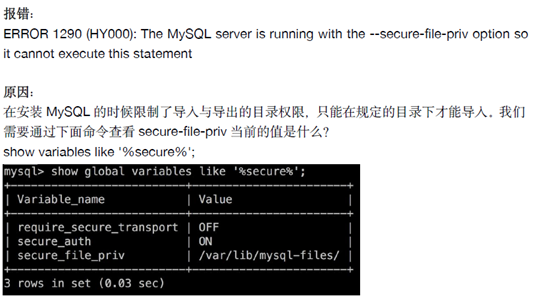
MySQL 5.7向表导入数据时报错:
mysql> load data infile '/var/lib/mysql-files/ADDSubscribers_MSISDN.txt' into table tmp_Subscribers_01 fields enclosed by '"';

ERROR 13 (HY000): Can't get stat of '/var/lib/mysql-files/ADDSubscribers_MSISDN.txt' (Errcode: 13 - Permission denied)
解决方法:
在load语句中加上local参数
mysql> load data local infile '/tmp/ADDSubscribers_MSISDN.txt' into table tmp_Subscribers_01 fields enclosed by '"';

Query OK, 0 rows affected, 10 warnings (0.00 sec)

Records: 10  Deleted: 0  Skipped: 10  Warnings: 10
2)hive中创建ods、dwd、dm、ods等数据库
创建下面的表
**************************hive********************

## ods层

#创建地域关系表(天粒度)

create table ods.ods_rel_area_detail_d(

area_id string,

area_name string

)

row format delimited

fields terminated by '\t'

lines terminated by '\n'

stored as textfile;

#创建终端信息关系表(天粒度)

create table ods.ods_rel_terminal_detail_d(

terminal_id string,

terminal_name string,

terminal_type string

)

row format delimited

fields terminated by '\t'

lines terminated by '\n'

stored as textfile;

#创建广告主信息关系表(天粒度)

create table ods.ods_rel_advertiser_detail_d(

advertiser_id string,

advertiser_name string

)

row format delimited

fields terminated by '\t'

lines terminated by '\n'

stored as textfile;

#创建原始广告曝光日志表(天粒度)

create external table ods.ods_ad_log_d(

id bigint,

advertiser_id string,

duration int,

position int,

area_id string,

terminal_id string,

view_type int,

device_id string

)

partitioned by(dt string)

row format delimited

fields terminated by '\t'

lines terminated by '\n'

stored as textfile

location '/user/hive/warehouse/data/ods/ods_ad_log_d';

## dwd明细层

#创建数据仓库明细层的广告曝光日志表,表存储的文件类型为RCFILE(天粒度)

#dwd_ad_log_rc_d表比ods_ad_log_d表增加了terminal_type终端类型字段

create external table dwd.dwd_ad_log_rc_d(

id bigint,

advertiser_id string,

duration int,

position int,

area_id string,

terminal_id string,

terminal_type string,

view_type int,

device_id string

)

partitioned by(dt string)

row format delimited

fields terminated by '\t'

lines terminated by '\n'

stored as RCFILE

location '/user/hive/warehouse/data/dwd/dwd_ad_log_rc_d';

## dws汇总层

#dws_ad_summary_rc_d没有统计device_id维度,设备id通常用于计算新增用户数、累计用户数等指标,可以归属到用户主题

create external table dws.dws_ad_summary_rc_d(

advertiser_id string,

duration int,

position int,

area_id string,

terminal_id string,

terminal_type string,

pv bigint,

click bigint

)

partitioned by(dt string)

row format delimited

fields terminated by '\t'

lines terminated by '\n'

stored as RCFILE

location '/user/hive/warehouse/data/dws/dws_ad_summary_rc_d';

##dm数据集市(针对销售部门)

#各广告主每天在不同地域投放的广告的曝光量、点击量

create external table dm.dm_sls_ad_advertiser_report_rc_d(

advertiser_id string,

advertiser_name string,

area_id string,

area_name string,

pv bigint,

click bigint

)

partitioned by(dt string)

row format delimited

fields terminated by '\t'

lines terminated by '\n'

stored as RCFILE

location '/user/hive/warehouse/data/dm/dm_sls_ad_advertiser_report_rc_d';

#每天在不同地域,不同终端上投放的广告的曝光量、点击量

create external table dm.dm_opt_ad_terminal_report_rc_d(

area_id string,

area_name string,

terminal_id string,

terminal_name string,

terminal_type string,

pv bigint,

click bigint

)

partitioned by(dt string)

row format delimited

fields terminated by '\t'

lines terminated by '\n'

stored as RCFILE

location '/user/hive/warehouse/data/dm/dm_opt_ad_terminal_report_rc_d';
3)数据从mysql中导入到hive中
#######################################################################################

#同步mysq relation库的rel_advertiser_detail表数据到hive ods库ods_rel_advertiser_detail_d表

#######################################################################################

MYSQL_HOSTNAME="192.168.196.130"

MYSQL_PORT="3306"

MYSQL_USERNAME="sqoop"

MYSQL_PASSWORD="sqoop1234"

DBNAME="relation"

/usr/local/sqoop/bin/sqoop import \

-Dorg.apache.sqoop.splitter.allow_text_splitter=true \

--connect jdbc:mysql://${MYSQL_HOSTNAME}:${MYSQL_PORT}/${DBNAME} --username ${MYSQL_USERNAME} --password ${MYSQL_PASSWORD} \

--query "select advertiser_id,advertiser_name from rel_advertiser_detail where \$CONDITIONS" \

--target-dir '/tmp/sqoop/rel_advertiser_detail' \

--hive-import \

--hive-overwrite \

--hive-database ods \

--hive-table ods_rel_advertiser_detail_d \

--delete-target-dir \

--split-by advertiser_id \

--fields-terminated-by '\t'

#######################################################################################

#同步mysq relation库的rel_area_detail表数据到hive ods库ods_rel_area_detail_d表

#######################################################################################

MYSQL_HOSTNAME="192.168.196.130"

MYSQL_PORT="3306"

MYSQL_USERNAME="sqoop"

MYSQL_PASSWORD="sqoop1234"

DBNAME="relation"

/usr/local/sqoop/bin/sqoop import \

-Dorg.apache.sqoop.splitter.allow_text_splitter=true \

--connect jdbc:mysql://${MYSQL_HOSTNAME}:${MYSQL_PORT}/${DBNAME} --username ${MYSQL_USERNAME} --password ${MYSQL_PASSWORD} \

--query "select area_id,area_name from rel_area_detail where \$CONDITIONS" \

--target-dir '/tmp/sqoop/rel_area_detail' \

--hive-import \

--hive-overwrite \

--hive-database ods \

--hive-table ods_rel_area_detail_d \

--delete-target-dir \

--split-by area_id \

--fields-terminated-by '\t'
#######################################################################################

#同步mysq relation库的rel_terminal_detail表数据到hive ods库ods_rel_terminal_detail_d表

#######################################################################################

MYSQL_HOSTNAME="192.168.196.130"

MYSQL_PORT="3306"

MYSQL_USERNAME="sqoop"

MYSQL_PASSWORD="sqoop1234"

DBNAME="relation"

/usr/local/sqoop/bin/sqoop import \

-Dorg.apache.sqoop.splitter.allow_text_splitter=true \

--connect jdbc:mysql://${MYSQL_HOSTNAME}:${MYSQL_PORT}/${DBNAME} --username ${MYSQL_USERNAME} --password ${MYSQL_PASSWORD} \

--query "select terminal_id,terminal_name,terminal_type from rel_terminal_detail where \$CONDITIONS" \

--target-dir '/tmp/sqoop/rel_terminal_detail' \

--hive-import \

--hive-overwrite \

--hive-database ods \

--hive-table ods_rel_terminal_detail_d \

--delete-target-dir \

--split-by terminal_id \

--fields-terminated-by '\t'
--query "select terminal_id,terminal_name,terminal_type from rel_terminal_detail where \$CONDITIONS" \
不管有没有where条件都要加 \$CONDITIONS" \
--target-dir '/tmp/sqoop/rel_terminal_detail'
会现在hadoop上创建一个临时目录,数据先放在该临时路径再加载到目标路径
--delete-target-dir 上面定义了临时路径,下面可删除临时路径
--hive-overwrite 覆盖表里的数据
--hive-database ods \
--hive-table ods_rel_terminal_detail_d \
导入的hive数据库和表
--split-by terminal_id 指定id字段,map任务通过指定的id进行划分的
--fields-terminated-by '\t' 不同字段间的分隔符
-Dorg.apache.sqoop.splitter.allow_text_splitter=true 如果上面指定的id是字符串类型,必须有该参数,否则会报错
sqoop是mysql中新创建的只有查询权限的用户
否则会报错
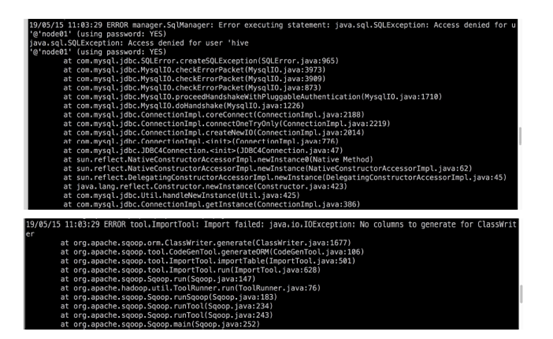
解决方法1:mysql用户权限问题
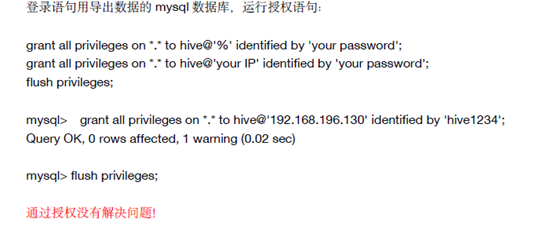

grant select on *.* to username@'yourSqooplp' identified by 'yourPassword';

flush privileges;

grant select on *.* to sqoop@'node01' identified by 'sqoop1234';

grant select on *.* to sqoop@'192.168.99.151' identified by 'sqoop1234';

grant select on *.* to sqoop@'localhost' identified by 'sqoop1234';

grant select on *.* to sqoop@'node02' identified by 'sqoop1234';

grant select on *.* to sqoop@'192.168.99.152' identified by 'sqoop1234';

grant select on *.* to sqoop@'node03' identified by 'sqoop1234';

grant select on *.* to sqoop@'192.168.99.153' identified by 'sqoop1234';

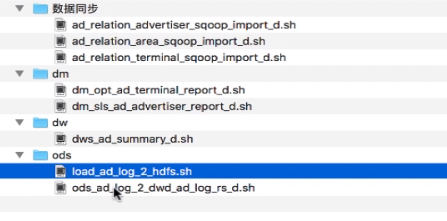
4)ods层脚本
#!/bin/bash

######################################################################

# 每天将广告日志服务器本地的日志数据上传到HDFS

######################################################################

#日志存放的位置,最后一级目录不用加

ad_log_local="/bigdata/work/hive_dw/ad_log"

#时间间隔

interval=$1

dt=`date --date "$interval days ago" '+%Y%m%d'`

filename="ad_log_${dt}.txt"

#hive表hdfs数据路径

ad_log_hive_hdfs_path="/user/hive/warehouse/data/ods/ods_ad_log_d/dt=${dt}"

echo "开始将本地广告日志文件${filename}上传到${ad_log_hive_hdfs_path}..."

#首先检测文件是否存在,存在返回0

hdfs dfs -test -e ad_log_hive_hdfs_path

if [ $? != 0 ];then

    #创建hdfs文件路径

    hdfs dfs -mkdir -p $ad_log_hive_hdfs_path

fi

#开始上传日志

echo -e "hdfs dfs -put ${ad_log_local}/${filename} ${ad_log_hive_hdfs_path}"

hdfs dfs -put ${ad_log_local}/${filename} ${ad_log_hive_hdfs_path}

echo "上传结束!"

#!/bin/bash

#####################################################################

#每天凌晨将ods库ods_ad_log_d表前一天的数据同步到dwd库的dwd_ad_log_rc_d表

#author:xiaoguanyu

#####################################################################

#获取计算所需的日期

dt=`date --date "$1 days ago" '+%Y%m%d'`

echo "开始将ods库ods_ad_log_d表$dt的数据同步到dwd库的dwd_ad_log_rc_d表中..."

#刷新hive分区表的分区元数据信息,使手动添加的hdfs分区生效

hive -e "msck repair table ods.ods_ad_log_d"

hive -e"

set hive.exec.dynamic.partition=true;

set hive.exec.dynamic.partition.mode=nonstrict;

insert overwrite table dwd.dwd_ad_log_rc_d partition(dt='$dt')

select a1.id,

a1.advertiser_id,

a1.duration,

a1.position,

a1.area_id,

a1.terminal_id,

a2.terminal_type,

a1.view_type,

a1.device_id

from ods.ods_ad_log_d a1 left join ods.ods_rel_terminal_detail_d a2 on a1.terminal_id=a2.terminal_id

where a1.dt='$dt'

"

if [ $? -ne 0 ]; then

    exit 1

    echo "将ods库ods_ad_log_d表$dt的数据同步到dwd库的dwd_ad_log_rc_d表失败!"

fi

echo "已成功将ods库ods_ad_log_d表$dt的数据同步到dwd库的dwd_ad_log_rc_d表!"
5)dw层脚本
#!/bin/sh

##########################################################################

#按照最细粒度进行预聚合计算,提高数据集市的查询性能

##########################################################################

#author:xiaoguanyu

dt=`date --date "$1 days ago" '+%Y%m%d'`

hive -e"

set hive.exec.dynamic.partition=true;

set hive.exec.dynamic.partition.mode=nonstrict;

insert overwrite table dws.dws_ad_summary_rc_d partition(dt='$dt')

select advertiser_id,

duration,

position,

area_id,

terminal_id,

terminal_type,

sum(case when view_type=1 then 1 else 0 end) pv,

sum(case when view_type=2 then 1 else 0 end) click

from dwd.dwd_ad_log_rc_d

where dt='$dt'

group by advertiser_id,

duration,

position,

area_id,

terminal_id,

terminal_type,

device_id

"

if [ $? -ne 0 ]; then

  echo "dws_ad_summary_rc_d计算失败!"

  exit 1

fi
6)dm层脚本
#!/bin/sh

##########################################################################

#需求方:运营部

#根据dws层广告曝光聚合数据,每天计算不同地域各终端的广告投放情况

##########################################################################

#author:xiaoguanyu

dt=`date --date "$1 days ago" '+%Y%m%d'`

hive -e"

set hive.exec.dynamic.partition=true;

set hive.exec.dynamic.partition.mode=nonstrict;

insert overwrite table dm.dm_opt_ad_terminal_report_rc_d partition(dt='$dt')

select a1.area_id,

rel1.area_name,

a1.terminal_id,

rel2.terminal_name,

a1.terminal_type,

sum(a1.pv) pv,

sum(a1.click) click

from dws.dws_ad_summary_rc_d a1

left join ods.ods_rel_area_detail_d rel1 on a1.area_id=rel1.area_id

left join ods.ods_rel_terminal_detail_d rel2 on a1.terminal_id=rel2.terminal_id

where dt='$dt'

group by a1.area_id,

rel1.area_name,

a1.terminal_id,

rel2.terminal_name,

a1.terminal_type

"

if [ $? -ne 0 ]; then

  echo "dm_opt_ad_terminal_report_rc_d 计算失败!"

  exit 1

fi

#!/bin/sh

##########################################################################

#需求方:销售部

#根据dws层广告曝光聚合数据,每天计算各广告主在不同地域的投放情况

##########################################################################

#author:xiaoguanyu

source /etc/profile

dt=`date --date "$1 days ago" '+%Y%m%d'`

echo "date=${dt}"

echo "start......"

/usr/local/hive/bin/hive -e"

set hive.exec.dynamic.partition=true;

set hive.exec.dynamic.partition.mode=nonstrict;

insert overwrite table dm.dm_sls_ad_advertiser_report_rc_d partition(dt='$dt')

select a1.advertiser_id,

rel1.advertiser_name,

a1.area_id,

rel2.area_name,

sum(a1.pv) pv,

sum(a1.click) click

from dws.dws_ad_summary_rc_d a1

left join ods.ods_rel_advertiser_detail_d rel1 on a1.advertiser_id=rel1.advertiser_id

left join ods.ods_rel_area_detail_d rel2 on a1.area_id=rel2.area_id

where dt='$dt'

group by a1.advertiser_id,

rel1.advertiser_name,

a1.area_id,

rel2.area_name

"

if [ $? -ne 0 ]; then

  echo "dm_sls_ad_advertiser_report_rc_d 计算失败!"

  exit 1

fi

echo "finished!"
Hive速览的更多相关文章
- .NET平台开源项目速览(17)FluentConsole让你的控制台酷起来
从该系列的第一篇文章 .NET平台开源项目速览(1)SharpConfig配置文件读写组件 开始,不知不觉已经到第17篇了.每一次我们都是介绍一个小巧甚至微不足道的.NET平台的开源软件,或者学习,或 ...
- .NET平台开源项目速览(15)文档数据库RavenDB-介绍与初体验
不知不觉,“.NET平台开源项目速览“系列文章已经15篇了,每一篇都非常受欢迎,可能技术水平不高,但足够入门了.虽然工作很忙,但还是会抽空把自己知道的,已经平时遇到的好的开源项目分享出来.今天就给大家 ...
- .NET平台开源项目速览(13)机器学习组件Accord.NET框架功能介绍
Accord.NET Framework是在AForge.NET项目的基础上封装和进一步开发而来.因为AForge.NET更注重与一些底层和广度,而Accord.NET Framework更注重与机器 ...
- .NET平台开源项目速览(1)SharpConfig配置文件读写组件
在.NET平台日常开发中,读取配置文件是一个很常见的需求.以前都是使用System.Configuration.ConfigurationSettings来操作,这个说实话,搞起来比较费劲.不知道大家 ...
- .NET平台开源项目速览(12)哈希算法集合类库HashLib
.NET的System.Security.Cryptography命名空间本身是提供加密服务,散列函数,对称与非对称加密算法等功能.实际上,大部分情况下已经满足了需求,而且.NET实现的都是目前国际上 ...
- .NET平台开源项目速览(11)KwCombinatorics排列组合使用案例(1)
今年上半年,我在KwCombinatorics系列文章中,重点介绍了KwCombinatorics组件的使用情况,其实这个组件我5年前就开始用了,非常方便,麻雀虽小五脏俱全.所以一直非常喜欢,才写了几 ...
- .NET平台开源项目速览(10)FluentValidation验证组件深入使用(二)
在上一篇文章:.NET平台开源项目速览(6)FluentValidation验证组件介绍与入门(一) 中,给大家初步介绍了一下FluentValidation验证组件的使用情况.文章从构建间的验证器开 ...
- .NET平台开源项目速览(9)软件序列号生成组件SoftwareProtector介绍与使用
在文章:这些.NET开源项目你知道吗?让.NET开源来得更加猛烈些吧!(第二辑)中,给大家初步介绍了一下Software Protector序列号生成组件.今天就通过一篇简单的文章来预览一下其强大的功 ...
- .NET平台开源项目速览(8)Expression Evaluator表达式计算组件使用
在文章:这些.NET开源项目你知道吗?让.NET开源来得更加猛烈些吧!(第二辑)中,给大家初步介绍了一下Expression Evaluator验证组件.那里只是概述了一下,并没有对其使用和强大功能做 ...
随机推荐
- centos 升级python
1.下载python3.6.1的包 wget https://www.python.org/ftp/python/3.6.1/Python-3.6.1.tgz 2.解压 tar -zxvf Pytho ...
- 1.初步了解IOC容器
学习地址:腾讯课堂 https://ke.qq.com/course/28986?_bid=167&_wv=3&from=iosapp 1.什么是IOC容器 定义: 1.是一个可以 ...
- Java中JDBC连接池&JDBCTemplate
数据库连接池 概念:其实就是一个容器(集合),存放数据库连接的容器. 当系统初始化好后,容器被创建,容器中会申请一些连接对象,当用户来访问数据库时,从容器中获取连接对象,用户访问完之后,会将连接对象归 ...
- python字符转化
int(x [,base ]) 将x转换为一个整数 long(x [,base ]) 将x转换为一个长整数 float(x) 将x转换到一个浮点数 complex(real [,imag ]) 创建一 ...
- 「NOI2017」整数 解题报告
「NOI2017」整数 有一些比较简单的\(\log^2n\)做法 比如暴力在动态开点线段树上维护每个位置为\(0\)还是\(1\),我们发现涉及到某一位加上\(1\)或者减去\(1\)实际上对其他位 ...
- LUOGU P4587 [FJOI2016]神秘数(主席树)
传送门 解题思路 如果区间内没有\(1\),那么答案就为\(1\),从这一点继续归纳.如果区间内有\(x\)个\(1\),设区间内\([2,x+1]\)的和为\(sum\),如果\(sum=0\),那 ...
- 51NOD 1005
1005 大数加法 基准时间限制:1 秒 空间限制:131072 KB 分值: 0 难度:基础题 收藏 关注 给出2个大整数A,B,计算A+B的结果. Input 第1行:大数A 第2行:大 ...
- HTML5 开发技能图谱skill-map
# HTML5 开发技能图谱