update_engine-整体结构(二)
在update_engine-整体结构(一)中分析UpdateEngineDaemon::OnInit()的整体情况。下面先分析在该方法中涉及的DaemonStateAndroid和BinderUpdateEngineAndroidService。
DaemonStateAndroid
它的继承关系为
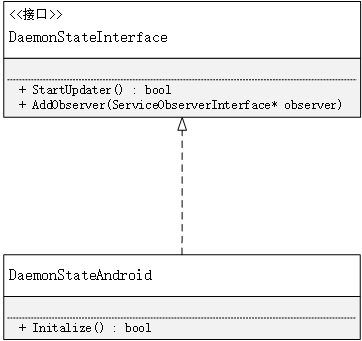
aemonStateInterface中的成员函数都是纯虚函数,在这种情况中可以认为和java中的接口一样,所以在这里使用的是实现的关系,同时也只列出了较为重要的方法。UpdateEngineDaemon的OnInit()方法中调用了DaemonStateAndroid的Initialize()方法,那么这个方法都干了些什么呢?
src/system/update_engine/daemon_state_android.cc
 bool DaemonStateAndroid::Initialize() {

   boot_control_ = boot_control::CreateBootControl();                     //创建BootControl

   if (!boot_control_) {

     LOG(WARNING) << "Unable to create BootControl instance, using stub "

                  << "instead. All update attempts will fail.";

     boot_control_.reset(new BootControlStub());

   }

   hardware_ = hardware::CreateHardware();                               //创建hardware

   if (!hardware_) {

     LOG(ERROR) << "Error intializing the HardwareInterface.";

     return false;

   }

   LOG_IF(INFO, !hardware_->IsNormalBootMode()) << "Booted in dev mode.";

   LOG_IF(INFO, !hardware_->IsOfficialBuild()) << "Booted non-official build.";

   // Initialize prefs.

   base::FilePath non_volatile_path;

   // TODO(deymo): Fall back to in-memory prefs if there's no physical directory

   // available.

   if (!hardware_->GetNonVolatileDirectory(&non_volatile_path)) {

     LOG(ERROR) << "Failed to get a non-volatile directory.";

     return false;

   }

   Prefs* prefs = new Prefs();                                       //创建Prefs

   prefs_.reset(prefs);

   if (!prefs->Init(non_volatile_path.Append(kPrefsSubDirectory))) {

     LOG(ERROR) << "Failed to initialize preferences.";

     return false;

   }

   // The CertificateChecker singleton is used by the update attempter.

   certificate_checker_.reset(

       new CertificateChecker(prefs_.get(), &openssl_wrapper_));     //设置certificateChecker

   certificate_checker_->Init();

   // Initialize the UpdateAttempter before the UpdateManager.

   update_attempter_.reset(new UpdateAttempterAndroid(              //设置UpdateAttempterAndroid

       this, prefs_.get(), boot_control_.get(), hardware_.get()));

   return true;

 }
可以看到初始化了boot_control_,hardware_,ceritficate_checker_,update_attempter_。boot_control_,hardware_,主要实现对slot等底层的操作(在A/B升级中,会存在双系统A和B,可以将A和B称为slot)而update_attempter_其实是A/B升级的核心操作。在UpdateEngineDaemon的OnInit()中的daemon_state->StartUpdater(),最终调用的其实是update_attempter_->Init()
 bool DaemonStateAndroid::StartUpdater() {

   // The DaemonState in Android is a passive daemon. It will only start applying

   // an update when instructed to do so from the exposed binder API.

   update_attempter_->Init();

   return true;

 }
其实DaemonStateAndroid只进行了一个初始化的工作后,就把其他的工作交给了UpdateAttempterAndroid。DaemonStateAndroid到此就算分析完成了。下面认识UpdateAttempterAndroid。
UpdateAttempterAndroid
它的继承关系为
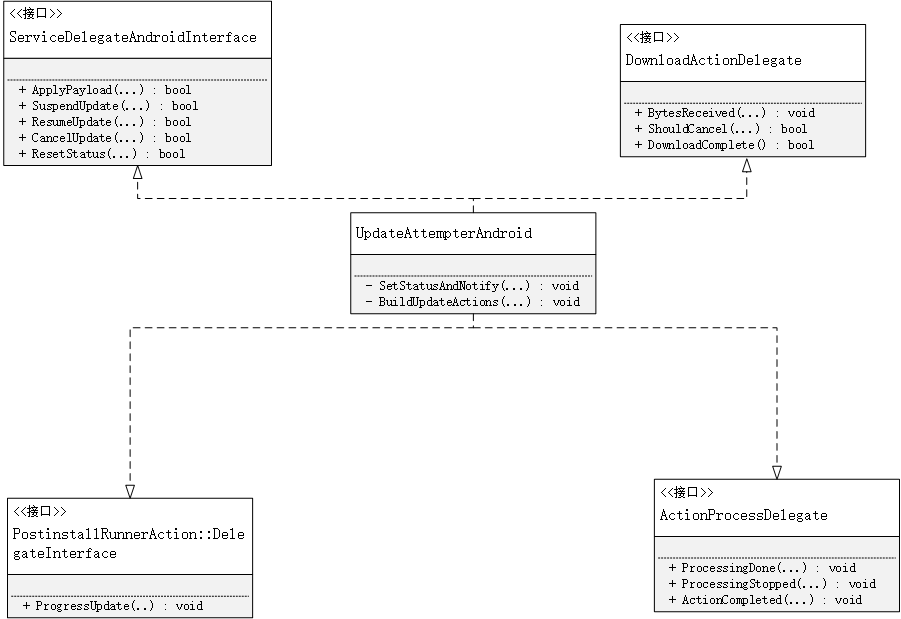
从它的结构就可以看出这个类的重要性了,在画类图的时候省略了函数的参数,已经成员函数只是部分出现。这个类图只是为了帮助理清类的结构。其实这几个接口都是回调接口,他们的函数都是在程序的运行过程中充当回调的角色。UpdateAttempterAndroid通过Init()来开始接管升级的主要流程,内容为:
src/system/update_engine/update_attempter_android.cc
 void UpdateAttempterAndroid::Init() {

   // In case of update_engine restart without a reboot we need to restore the

   // reboot needed state.

   if (UpdateCompletedOnThisBoot())

     SetStatusAndNotify(UpdateStatus::UPDATED_NEED_REBOOT);

   else

     SetStatusAndNotify(UpdateStatus::IDLE);

 }
在这个方法中首先判断是否已经升级完成了但是没有重启,如果是那么就会发出重启的消息,否则就会发出空闲的请求。在来看SetStatusAndNotify这个方法
SetStatusAndNotify
  void UpdateAttempterAndroid::SetStatusAndNotify(UpdateStatus status) {

    status_ = status;

    size_t payload_size =

        install_plan_.payloads.empty() ?  : install_plan_.payloads[].size;

    for (auto observer : daemon_state_->service_observers()) {

      observer->SendStatusUpdate(

          , download_progress_, status_, "", payload_size);

    }

    last_notify_time_ = TimeTicks::Now();

 }
在这个方法中首先会获取payload(升级包中的payload.bin文件)的大小,之后遍历binder观察者的集合,将更新的情况发送出去,从而通知客户端(使用update_engine服务的)。最后更新通知时间。关于install_plan是一个比较重要的结构体,在后面的叙述中会对其进行描述,现在只需知道它是代表升级包的一个数据结构便可。再看来BinderUpdateEngineAndroidService。
BinderUpdateEngineAndroidService
它的继承结构为
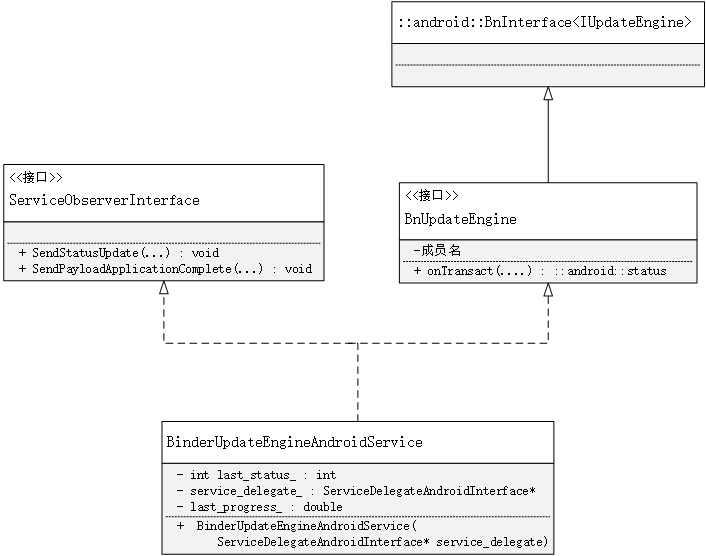
BinderUpdateEngineAndroidService代表了服务端的binder(BnBinder)可以和客户端的(BpBinder)进行通信。关于Binder的通信原理就不多做说明了。下面是BinderUpdateEngineAndroidService中部分方法的说明。
src/system/update_engine/binder_service_brillo.cc
  Status BinderUpdateEngineAndroidService::bind(

      const android::sp<IUpdateEngineCallback>& callback, bool* return_value) {

    callbacks_.emplace_back(callback);

    const android::sp<IBinder>& callback_binder =

        IUpdateEngineCallback::asBinder(callback);

    auto binder_wrapper = android::BinderWrapper::Get();

    binder_wrapper->RegisterForDeathNotifications(

        callback_binder,

       base::Bind(

           base::IgnoreResult(&BinderUpdateEngineAndroidService::UnbindCallback),

           base::Unretained(this),

           base::Unretained(callback_binder.get())));

   // Send an status update on connection (except when no update sent so far),

   // since the status update is oneway and we don't need to wait for the

   // response.

   if (last_status_ != -)

     callback->onStatusUpdate(last_status_, last_progress_);

   *return_value = true;

   return Status::ok();

 }

 void BinderUpdateEngineAndroidService::SendStatusUpdate(

     int64_t /* last_checked_time */,

     double progress,

     update_engine::UpdateStatus status,

     const std::string& /* new_version  */,

     int64_t /* new_size */) {

   last_status_ = static_cast<int>(status);

   last_progress_ = progress;

   for (auto& callback : callbacks_) {

     callback->onStatusUpdate(last_status_, last_progress_);

   }

 }

 Status BinderUpdateEngineAndroidService::unbind(

     const android::sp<IUpdateEngineCallback>& callback, bool* return_value) {

   const android::sp<IBinder>& callback_binder =

       IUpdateEngineCallback::asBinder(callback);

   auto binder_wrapper = android::BinderWrapper::Get();

   binder_wrapper->UnregisterForDeathNotifications(callback_binder);

   *return_value = UnbindCallback(callback_binder.get());

   return Status::ok();

 }

 Status BinderUpdateEngineAndroidService::applyPayload(

     const android::String16& url,

     int64_t payload_offset,

     int64_t payload_size,

     const std::vector<android::String16>& header_kv_pairs) {

   const std::string payload_url{android::String8{url}.string()};

   std::vector<std::string> str_headers;

   str_headers.reserve(header_kv_pairs.size());

   for (const auto& header : header_kv_pairs) {

     str_headers.emplace_back(android::String8{header}.string());

   }

   brillo::ErrorPtr error;

   if (!service_delegate_->ApplyPayload(

           payload_url, payload_offset, payload_size, str_headers, &error)) {

     return ErrorPtrToStatus(error);

   }

   return Status::ok();

 }
当某一个客户端要使用update_engine提供的服务时,首先会通过bind(...)来获取到客户端传过来的IUpdateEngineCallback回调接口,之后获取代表客户端的callback_binder_。之后就可以根据IUpdateEngineCallback,来通知客户端更新的状态和更新是否完成。applyPayload(..)是A/B更新的入口,在这个方法中最终会调用service_delegate_->ApplyPayload(...),service_delegate_其实就是DaemonAttempterAndroid,在这个时候就把更新的工作移交给了DaemonStateAndroid。在上面的分析中涉及到了IUpdateEngine和IUpdateEngineCallback,下面是他们的源码
out/target/product/xxx/obj/STATIC_LIBRARIES/libupdate_engine_android_intermediates/aidl-generated/include/android/os/IUpdateEngine.h
  namespace android {

  namespace os {

  class IUpdateEngine : public ::android::IInterface {

  public:

  DECLARE_META_INTERFACE(UpdateEngine)

  virtual ::android::binder::Status applyPayload(const ::android::String16& url, int64_t payload_offset, int64_t payload_size, const ::std::vector<::android::String16>& headerKeyValuePairs) = ;

  virtual ::android::binder::Status bind(const ::android::sp<::android::os::IUpdateEngineCallback>& callback, bool* _aidl_return) = ;

 virtual ::android::binder::Status unbind(const ::android::sp<::android::os::IUpdateEngineCallback>& callback, bool* _aidl_return) = ;

 virtual ::android::binder::Status suspend() = ;

 virtual ::android::binder::Status resume() = ;

 virtual ::android::binder::Status cancel() = ;

 virtual ::android::binder::Status resetStatus() = ;

 enum Call {

   APPLYPAYLOAD = ::android::IBinder::FIRST_CALL_TRANSACTION + ,

   BIND = ::android::IBinder::FIRST_CALL_TRANSACTION + ,

   UNBIND = ::android::IBinder::FIRST_CALL_TRANSACTION + ,

   SUSPEND = ::android::IBinder::FIRST_CALL_TRANSACTION + ,

   RESUME = ::android::IBinder::FIRST_CALL_TRANSACTION + ,

   CANCEL = ::android::IBinder::FIRST_CALL_TRANSACTION + ,

   RESETSTATUS = ::android::IBinder::FIRST_CALL_TRANSACTION + ,

 };

 };  // class IUpdateEngine

 }  // namespace os

 }  // namespace android

 #endif  // AIDL_GENERATED_ANDROID_OS_I_UPDATE_ENGINE_H_
out/target/product/qcs605/obj/STATIC_LIBRARIES/libupdate_engine_android_intermediates/aidl-generated/include/android/os/IUpdateEngineCallback.h
  namespace android {

  namespace os {

  class IUpdateEngineCallback : public ::android::IInterface {

  public:

  DECLARE_META_INTERFACE(UpdateEngineCallback)

  virtual ::android::binder::Status onStatusUpdate(int32_t status_code, float percentage) = ;

  virtual ::android::binder::Status onPayloadApplicationComplete(int32_t error_code) = ;

 enum Call {

   ONSTATUSUPDATE = ::android::IBinder::FIRST_CALL_TRANSACTION + ,

   ONPAYLOADAPPLICATIONCOMPLETE = ::android::IBinder::FIRST_CALL_TRANSACTION + ,

 };

 };  // class IUpdateEngineCallback

 }  // namespace os

 }
接下来接着看service_delegate_->ApplyPayload(...)
src/update_engine/update_attempter_android.cc
   bool UpdateAttempterAndroid::ApplyPayload(

       const string& payload_url,

       int64_t payload_offset,

       int64_t payload_size,

       const vector<string>& key_value_pair_headers,

       brillo::ErrorPtr* error) {

     if (status_ == UpdateStatus::UPDATED_NEED_REBOOT) {          //检查是否已经更新完成,需要重新启动

       return LogAndSetError(

           error, FROM_HERE, "An update already applied, waiting for reboot");

    }

    if (ongoing_update_) {                                       //检查是否正在更新

      return LogAndSetError(

          error, FROM_HERE, "Already processing an update, cancel it first.");

    }

    DCHECK(status_ == UpdateStatus::IDLE);                       //检查当前是否为空闲状态

    std::map<string, string> headers;

    for (const string& key_value_pair : key_value_pair_headers) {

      string key;

      string value;

      if (!brillo::string_utils::SplitAtFirst(

              key_value_pair, "=", &key, &value, false)) {

        return LogAndSetError(

            error, FROM_HERE, "Passed invalid header: " + key_value_pair);

      }

      if (!headers.emplace(key, value).second)

        return LogAndSetError(error, FROM_HERE, "Passed repeated key: " + key);      //将传递进来的key-value保存到headers中

    }

    // Unique identifier for the payload. An empty string means that the payload

    // can't be resumed.

    string payload_id = (headers[kPayloadPropertyFileHash] +

                         headers[kPayloadPropertyMetadataHash]);                     //根据Payload的hash和元数据的hash计算一个payload_id

    // Setup the InstallPlan based on the request.

    install_plan_ = InstallPlan();                                                   //创建一个InstallPlan

    install_plan_.download_url = payload_url;

    install_plan_.version = "";

    base_offset_ = payload_offset;

    InstallPlan::Payload payload;

    payload.size = payload_size;

    if (!payload.size) {

      if (!base::StringToUint64(headers[kPayloadPropertyFileSize],

                                &payload.size)) {

        payload.size = ;

      }

    }

    if (!brillo::data_encoding::Base64Decode(headers[kPayloadPropertyFileHash],

                                             &payload.hash)) {

      LOG(WARNING) << "Unable to decode base64 file hash: "

                   << headers[kPayloadPropertyFileHash];

    }

    if (!base::StringToUint64(headers[kPayloadPropertyMetadataSize],

                              &payload.metadata_size)) {

      payload.metadata_size = ;

    }

    // The |payload.type| is not used anymore since minor_version 3.

    payload.type = InstallPayloadType::kUnknown;

    install_plan_.payloads.push_back(payload);                          //为payload赋值完成后,将其放入到集合中,因为ApplyPayload可能被多次调用,会有多个payload

    // The |public_key_rsa| key would override the public key stored on disk.

    install_plan_.public_key_rsa = "";

    install_plan_.hash_checks_mandatory = hardware_->IsOfficialBuild();  //是否进行强制性的hash验证,如果为user版则为true,如果为userdebug则为false

    install_plan_.is_resume = !payload_id.empty() &&

                              DeltaPerformer::CanResumeUpdate(prefs_, payload_id);  //是否接着上次未更新完的继续更新

    if (!install_plan_.is_resume) {                                                 //如果从头开始更新

      if (!DeltaPerformer::ResetUpdateProgress(prefs_, false)) {                    //重置更新进度

        LOG(WARNING) << "Unable to reset the update progress.";

      }

      if (!prefs_->SetString(kPrefsUpdateCheckResponseHash, payload_id)) {           //保存payload_id

        LOG(WARNING) << "Unable to save the update check response hash.";

      }

    }

    install_plan_.source_slot = boot_control_->GetCurrentSlot();                //当前正在运行的slot

    install_plan_.target_slot = install_plan_.source_slot ==  ?  : ;         //备用的也就是将要升级的slot

    int data_wipe = ;                                                          //是否进行数据擦除,也就是恢复出厂设置,在做升级包时可以指定该值 -w

    install_plan_.powerwash_required =

        base::StringToInt(headers[kPayloadPropertyPowerwash], &data_wipe) &&

        data_wipe != ;

    NetworkId network_id = kDefaultNetworkId;                                     //NetworkId没有使用过,估计和流式更新相关。

    if (!headers[kPayloadPropertyNetworkId].empty()) {

      if (!base::StringToUint64(headers[kPayloadPropertyNetworkId],

                                &network_id)) {

        return LogAndSetError(

            error,

            FROM_HERE,

            "Invalid network_id: " + headers[kPayloadPropertyNetworkId]);

      }

      if (!network_selector_->SetProcessNetwork(network_id)) {

        return LogAndSetError(

            error,

            FROM_HERE,

            "Unable to set network_id: " + headers[kPayloadPropertyNetworkId]);

      }

    }

   LOG(INFO) << "Using this install plan:";

   install_plan_.Dump();

   BuildUpdateActions(payload_url);        //创建Action,这一架构可以说是更新的主要架构

   // Setup extra headers.

   HttpFetcher* fetcher = download_action_->http_fetcher();

   if (!headers[kPayloadPropertyAuthorization].empty())

     fetcher->SetHeader("Authorization", headers[kPayloadPropertyAuthorization]);

   if (!headers[kPayloadPropertyUserAgent].empty())

     fetcher->SetHeader("User-Agent", headers[kPayloadPropertyUserAgent]);

   SetStatusAndNotify(UpdateStatus::UPDATE_AVAILABLE);

   ongoing_update_ = true;                 //表式正在更新

   // Just in case we didn't update boot flags yet, make sure they're updated

   // before any update processing starts. This will start the update process.

   UpdateBootFlags();                      //修改bootFlags并且开始执行Action

   return true;

 }
从整体上看ApplyPayload主要进行了两个工作首先是初始化payload,之后将具体的升级流程交给了一系列的Action。先看第一部分,要想了解初始化的一些细节,首先应该知道,一个升级包中都包含了些什么。下面以差分包为例,将一个差分包解压后会得到下面的几个文件。
升级包的基本结构
├── care_map.txt #基本上用不到
├── compatibility.zip #基本上用不到
├── META-INF
│ └── com
│ └── android
│ ├── metadata #基本上用不到
│ └── otacert #基本上用不到
├── payload.bin #主要的升级文件
└── payload_properties.txt #升级文件附带的属性
payload_properties.txt文件的内容大致为:
 FILE_HASH=4kYpprUJyMwW8NNV25v0ovMWV11PPijNANQwHy0oZwc=

 FILE_SIZE=

 METADATA_HASH=l2ih2Xam7jqAQYhr9SRdVddG9NPeenaWzTEd+DHct+o=

 METADATA_SIZE=
接下来再看一下InstallPlan这个数据结构
InstallPlan数据结构
   namespace chromeos_update_engine {

   enum class InstallPayloadType {    //升级包的类型

     kUnknown,                         //未知

     kFull,                             //全包

     kDelta,                            //差分包

   };

   std::string InstallPayloadTypeToString(InstallPayloadType type);

  struct InstallPlan {

    InstallPlan() = default;

    bool operator==(const InstallPlan& that) const;

    bool operator!=(const InstallPlan& that) const;

    void Dump() const;

    // Load the |source_path| and |target_path| of all |partitions| based on the

    // |source_slot| and |target_slot| if available. Returns whether it succeeded

    // to load all the partitions for the valid slots.

    bool LoadPartitionsFromSlots(BootControlInterface* boot_control);      //获取source_slot和target_slot中的分区path

    bool is_resume{false};                                                 // 是否未更新完成需要恢复更新

    std::string download_url;  // url to download from                      升级文件的url

    std::string version;       // version we are installing.                版本号

    struct Payload {

      uint64_t size = ;               // size of the payload              payload.bin的大小

      uint64_t metadata_size = ;      // size of the metadata             元数据的大小

      std::string metadata_signature;  // signature of the metadata in base64   元数据的签名

      brillo::Blob hash;               // SHA256 hash of the payload        payload.bin的hash

      InstallPayloadType type{InstallPayloadType::kUnknown};                //升级包的类型

      // Only download manifest and fill in partitions in install plan without

      // apply the payload if true. Will be set by DownloadAction when resuming

      // multi-payload.

      bool already_applied = false;                                        //升级包是否已经被应用

      bool operator==(const Payload& that) const {

        return size == that.size && metadata_size == that.metadata_size &&

               metadata_signature == that.metadata_signature &&

               hash == that.hash && type == that.type &&

               already_applied == that.already_applied;

      }

    };

    std::vector<Payload> payloads;

    // The partition slots used for the update.

    BootControlInterface::Slot source_slot{BootControlInterface::kInvalidSlot};  //定义source_slot

    BootControlInterface::Slot target_slot{BootControlInterface::kInvalidSlot};  //定义target_slot

    // The vector below is used for partition verification. The flow is:

    //

    // 1. DownloadAction fills in the expected source and target partition sizes

    // and hashes based on the manifest.

    //

    // 2. FilesystemVerifierAction computes and verifies the partition sizes and

    // hashes against the expected values.

    struct Partition {                                              //一个分区在source_slot和target_slot都存在

      bool operator==(const Partition& that) const;

      // The name of the partition.

      std::string name;

      std::string source_path;                                 //在source_slot中的位置

      uint64_t source_size{};                                 //大小

      brillo::Blob source_hash;                                //hash

      std::string target_path;                                  //在target_slot中的位置

      uint64_t target_size{};

      brillo::Blob target_hash;

      // Whether we should run the postinstall script from this partition and the

      // postinstall parameters.

      bool run_postinstall{false};

      std::string postinstall_path;

      std::string filesystem_type;                               //文件系统的类型

      bool postinstall_optional{false};

    };

    std::vector<Partition> partitions;

    // True if payload hash checks are mandatory based on the system state and

    // the Omaha response.

    bool hash_checks_mandatory{false};                        //是否强制进行hash检查

    // True if Powerwash is required on reboot after applying the payload.

    // False otherwise.

    bool powerwash_required{false};                           //是否在升级时进行数据的擦除

    // If not blank, a base-64 encoded representation of the PEM-encoded

    // public key in the response.

    std::string public_key_rsa;                             //public_key 一般为null,这个秘钥常常是已经被内置到了系统中了

  };

  }
把这个数据结构弄明白后,也就对ApplyPayload(..)中对InstallPlan的赋值有一个大体的意思了。在这里出现了source和target的概念,source代表的是现在正在运行的系统,target代表此时此刻备用的系统。也可以把source系统做为一个旧的系统,因为在升级检测新版本的时候,会根据source系统检测新的版本,而在升级的时候,先会把source系统拷贝到target中,之后再利用升级包对target进行差分升级。回到ApplyPayload(),对InstallPlan初始化完成后,就会建立Action。这个时候我们就需要明白Action是什么,又是如何运行的。
update_engine-整体结构(二)的更多相关文章
- Spring MVC整体处理流程
一.spring整体结构 首先俯视一下spring mvc的整体结构 二.处理流程 1.请求处理的第一站就是DispatcherServlet.它是整个spring mvc的控制核心.与大多数的jav ...
- 【wepy实战】wepy搭建完整项目
使用小程序框架wepy,搭建完整实战项目.文章将从项目结构.配置.模块等进行逐步分析和学习. 文章适合小程序开发新手以及有经验的小程序developer,不喜勿喷,不吝赐教! 本文为作者原创,转发请标 ...
- 读CSS DIV网页样式与布局心得体会
一.首先根据网页设计图拆分网页的整体结构 二.在html页面用DIV划分出结构块 三.再根据设计图在各个大<DIV>块中加入对应的小<DIV>块或者段落<P>,表单 ...
- Class文件结构-属性表
一.属性表整体结构 二.属性表具体结构
- JAVA字节码文件之结构
开发工具:IEDA.JDK1.8.WinHex 一.字节码文件结构 源代码 package com.jalja.java.bytecode; /** * @Auther: XL * @Date: 20 ...
- python代理池的构建1——代理IP类的构建,以及配置文件、日志文件、requests请求头
一.整体结构 二.代理IP类的构建(domain.py文件) ''' 实现_ init_ 方法, 负责初始化,包含如下字段: ip: 代理的IP地址 port:代理IP的端口号 protocol: 代 ...
- HTML(二)HTML元素(整体结构,块级元素,内联元素,结构元素,交互元素,元素嵌套规则)
HTML整体结构解释 <!DOCTYPE html> // 文件应以"<!DOCTYPE ......>"首行顶格开始,推荐使用"<!DOC ...
- 带你手写基于 Spring 的可插拔式 RPC 框架(二)整体结构
前言 上一篇文章中我们已经知道了什么是 RPC 框架和为什么要做一个 RPC 框架了,这一章我们来从宏观上分析,怎么来实现一个 RPC 框架,这个框架都有那些模块以及这些模块的作用. 总体设计 在我们 ...
- Device Tree(二):基本概念
转自:http://www.wowotech.net/linux_kenrel/dt_basic_concept.html 一.前言 一些背景知识(例如:为何要引入Device Tree,这个机制是用 ...
- Linux课程实践二:编译模块实现内核数据操控
一.内核模块原理 1. Linux内核增加功能 Linux内核整体结构很庞大,包含了很多的组件,现在有两种方法将需要的功能包含进内核当中: - 静态加载:将所有的功能都编译进Linux内核. - 动态 ...
随机推荐
- Number and String in JS
Number 整数 小数(浮点数) 小数参与运算 NaN 其他数据类型转换成数字 String 其他数据类型转换成字符串 Number.Boolean.String的相同点 Number 虽然 ...
- 十四、使用framebuffer填充纯色
简单描述一下framebuffer的使用,它其实就相当于将屏幕上的像素映射到内存中,改变内存中的内容后屏幕自动就变颜色了. 首先要调用open("/dev/fb0", O_RDWR ...
- Displaylink安卓驱动
Displaylink安卓驱动 2019年最新版V2.3.1
- C#获取常用的路径
常用的这两个足够了,其他需要的自行百度 //获取新的 Process 组件并将其与当前活动的进程关联的主模块的完整路径,包含文件名(进程名). string str = System.Diagnost ...
- Javascript 数组相关操作
数组排序问题: sort() arr.sort() 可以直接进行排序,但是排序的方式是按unicode 顺序而来,比如1,1000,200,这个顺序不是我们想要的结果: 所以有了另一种方法,针对num ...
- Java技术 第一次作业
(一)学习总结 1.在java中通过Scanner类完成控制台的输入,查阅JDK帮助文档,Scanner类实现基本数据输入的方法是什么? 代码开头加一句 Import java.util; 构建Sca ...
- Linux-1-用户管理
目录: 用户账号的添加.删除与修改 用户口令的管理 用户组的管理 总结用户与用户组常用命令 ***用户账号的添加.删除与修改*** 添加用户:useradd 选项 用户名 选项: -c comme ...
- 路径R
定义文件路径时前面加个r 例如 firstfolder = r"C:\Users\1261\Desktop\" 不对其中的符号进行转义
- WEB学习笔记2-结构组织和文件命名
常用的前端文件的组织结构: .js(放置javascript代码) .lib(放置框架javascript文件) .custom.js .css(放置CSS样式代码) .lib(放置框架CSS文件) ...
- OpenSSL生成RSA公私钥(java)
生成私钥:genrsa -out rsa_private_key.pem 1024 生成公钥:rsa -in rsa_private_key.pem -out rsa_public_key.pem - ...