第二章 设计高质量的React组件
第二章 设计高质量的React组件
高质量React组件的原则和方法:
划分组件边界的原则;
React组件的数据种类;
React组件的生命周期。
2.1 易于维护组件的设计要素
1、高内聚:指的是把逻辑紧密相关的内容放在一个组件中。用户界面包括:内容、交互行为、样式。
2、低耦合:指的是不同组件之间的依赖关系要尽量弱化,也就是第个组件要尽量独立。
2.2 React组件的数据
React组件的数据分两种,prop和state,作何一个改变,都可能引发组件的重新渲染。
选prop or state,这是一个问题,哈哈,皮一下,很开心嘛!!!
prop是组件的对外接口,state是组件的内部状态。
接下来让我们实现一个父组件包含子组件
2.2.1 React的prop
1.如何传递prop给子组件
import React, {Component} from 'react'

import Counter from './Counter'

class ControlPanel extends Component {

    render() {

        return (

            <div>

                <Counter caption='first' initValue={0}></Counter>

                <Counter caption='second' initValue={10}></Counter>

                <Counter caption='third' initValue={20}></Counter>

            </div>

        )

    }

}

export default ControlPanel
caption、initValue就是要传递的prop值
2.读取prop值
import React, {Component} from 'react'

const buttonStyle = {

    margin: '10px'

}

export default class Counter extends Component {

    constructor(props) {

        super(props)

        console.log(props,'props')
     //给两个函数绑定当前this的执行环境,ES6方法创造的React组件类并不自动给我们绑定this到当前实例对象

        this.onClickIncrementButton = this.onClickIncrementButton.bind(this)

        this.onClickDecrementButton = this.onClickDecrementButton.bind(this)

        this.state = {

            count: props.initValue || 0

        }

    }

    onClickIncrementButton() {

        this.setState({count: this.state.count + 1})

    }

    onClickDecrementButton() {

        this.setState({count: this.state.count - 1})

    }

    render(){
        return(

            <div>

                <button style={buttonStyle} onClick={this.onClickIncrementButton}>+</button>

                <button style={buttonStyle} onClick={this.onClickDecrementButton}>-</button>

                <span>count: {this.state.count}</span>

            </div>

        )

    }

}
首先要定义自己的构造函数,一定要通过super调用父类也就是React.Component的构造函数。如果没有调用super(props),那么组件实例被构造后,类实例的所有成员函数无法通过this.props访问到父组件传递过来的props值。给this.props赋值是React.Component构造函数的工作之一。
3.propTypes检查
对接口的规范:
每个组件支持哪些prop;
每个prop应该是什么样的格式。
从 React v15.5 开始 ,React.PropTypes 助手函数已被弃用,我们建议使用 prop-types 库 来定义contextTypes。只是辅助开发,不会改变组件行为,prop Types 检查
也是要消耗CPU 计算资源的。
Counter.propTypes = {

    //caption必须是string

    //initValue必须是number

    //带上isRequired,表示组件必须要指定caption

    caption: PropTypes.string.isRequired,

    initValue: PropTypes.number

}
//给props的initValue一个初始值,这样可以不用把逻辑判断都放到组件的构造函数中,毕竟这样不美观
//让代码更容易读懂

Counter.defaultProps = {

    initValue: 0

}
2.2.2 React的state
state是记录自身数据变化的
1、初始化state
通常在组件类的构造函数尾部初始化state,本例通过this.state完成state的初始化。
注意以下几点:
state必须是一个javascript对象,不能是string或number这样简单的数据类型。
state的历史:在React 创建之初,使用的是React.createClass -7J 法创建纽件类,这种方式下,通过定义组件类的一个getlnitialState 方法来获取初始state 值,但是这种做法已经被废弃了,我们现在都用ES6 的语法定义组件类,所以不再考虑定义getlnitia!State 方法。
2、读取和更新state
this.setState({name:value}),不能用this.state.name = value
直接修改this.state 的值,虽然事实上改变了组件的内部状态,但只是野蛮地修改了state ,却没有驱动组件进行重新渲染,既然组件没有重新渲染,当然不会反应this.state值的变化;而this.setState ()函数所做的事情,首先是改变this.state 的值,然后驱动组件经历更新过程,这样才有机会让this.state 里新的值出现在界面上。
3、prop和state对比
区别:
prop用于定义外部接口,state用来记录内部状态;
prop的赋值在外部使用组件时,state的赋值在组件内部;
组件不应该改变prop的值,而state存在的目的就是让组件来改变的。
2.3 组件的生命周期
装载过程(Mount),也就是把组件第一次在DOM树中渲染的过程。
更新过程(Update),当组件被重新渲染的过程。
卸载过程(Unmount),组件从DOM中删除的过程。
2.3.1 装载过程
constructor
getInitialState
getDefaultProps
componentWillMount
render
componentDidmount
1、constructor
ES6每个类的构造函数,要创造一个组件类的实例,调用对应的构造函数。
无状态的组件不需要定义构造函数。
一个React组件调用构造函数的目的:
初始化state;
绑定成员函数的this环境。在ES6语法中,类的每个成员函数在执行时的this并不是类实例自动绑定的。
2、getInitialState 和 getDefaultProps
getlnitialState 这个函数的返回值会用来初始化组件的this.state ,getDefaultProps 函数的返回值可以作为props 的初始值,但是,这两个方法只有用React. createClass 方法创造的组件类才会发生作用,本书中我们一直使用的ES6 语法,所以这个函数根本不会产生作用。
3、render
render函数是React组件中最得要的函数,一个React组件可以忽略其它所有函数都不实现,但是一定要实现render函数,因为所有React组件的父类React.Component类对除render外的生命周期函数都有默认实现。
render函数不做实际的渲染动作,只是返回一个JSX描述的结构,最终由React来操作渲染过程。
如果不渲染,那就让render返回一个null或者false,告诉React这个组件不需要渲染任何DOM元素。
4、componentWillMount和componentDidmount
在装载过程中,componentWillMount会在render函数之前调用,”将要装载“没有任何渲染出来的结果,即使调用this.setState修改状态也不会发生重新绘制,在componentWillMount中做的事情,都可以提前到constructor中去做,componentWillMount的存在就是为了和componentDidMount对称。
componentDidMount会在render函数之后调用,这个兄弟的作用比较大,render函数被调用之后,componentDidMount不会立刻被调用,componentDidMount函数被调用的时候,render函数返回的东西已经引发了渲染,组件已经被装载到了DMO树上。
class Counter extends Component{

    constructor(props){

        super(props)

        console.log('enter constructor',props.caption)

        this.add = this.add.bind(this)

        this.math = this.math.bind(this)

        this.state={

            count: props.initValue || 0

        }

    }

    componentWillMount(){

        console.log('enter componentWillMount', this.props.caption)

    }

    componentDidMount(){

        console.log('enter componentDidMount', this.props.caption)

    }

    add(){

        this.setState({count: this.state.count + 1})

    }

    math() {

        this.setState({ count: this.state.count - 1 })

    }

    render(){

        console.log('enter render', this.props.caption)

        return(

            <div>

                <button style={buttonStyle} onClick={this.add}>+</button>

                <button style={buttonStyle} onClick={this.math}>-</button>

                <span>count:{this.state.count}</span>

                {/* <span>props:{this.props}</span> */}

            </div>

        )

    }

}
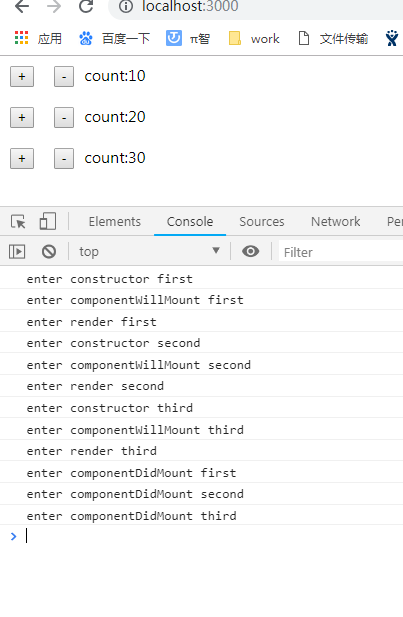
之所以会出现所有组件的render函数被调用后,组件的componentDidMount才连在一起被调用,是因为render函数本身并不往DOM树上渲染或者装载内容,它只是返回一个JSX表示的对象,然后由React库来根据返回的对象决定如何渲染。而React库肯定要把所有组件返回的结果综合起来,才能知道如何产生对应的DOM修改。
componentWilIMount 和componentDidMount 这对兄弟函数还有一个区别,就是componentWillMount可以在服务器端被调用,也可以在浏览器端被调用;而component-DidMount
只能在浏览器端被调用,在服务器端使用React 的时候不会被调用。
2.2.3 更新过程
当组件被挂载到DOM树上之后,为了更好的交互体验,当props和state被修改的时候,就会引发组件的更新过程。
componentWillReceiveProps
shoudComponentUpdate
cpmponentWillUpdate
render和装载过程一样
componentDidUpdate
并不是所有的更新过都会执行全部函数。
1、componentWillReceiveProps(nextProps)
当父组件的render函数被调用,在render函数里面渲染的子组件就会经历更新过程,不管父组件传给子组件的props有没有改变,都会触发子组件的componentWillReceiveProps函数。通过this.setState方法触发的更新过程不会调用这个函数。
class ControlPanel extends Component{

    render() {

        console.log('enter controlPanel render')

        return (

            <div>

                {/* this.forceUpdate() 强制引发一次重绘 */}

                <button onClick={()=>this.forceUpdate()}>Click me to repaint!</button>

                <Counter caption='first' initValue={10} />

                <Counter caption='second' initValue={20} />

                <Counter caption='third' initValue={30} />

            </div>

        )

    }

}
子组件添加这个函数
    componentWillReceiveProps(){

        console.log('enter counter componentWillReceiveProps')

    }

引发forceUpdate之后,首先调用父组件的render函数,接着调用第一个子组件的componentWillReceiveProps函数,然后再调用子组件的render函数,第二个第三个依次进行。
在此例中,渲染三个子组件的时候,props的值一直没有变化,可见componentWillReceiveProps并不是当props值变化的时候才去调用,nextProps代表的是第一次渲染传入的props值,this.props代表的是上一次渲染时props的值,只有两者有变化的时候才有必要调用this.setState更新内部状态。this.setState不会引发componentWillReceiveProps函数。
2、nextProps)(nextProps, nextState)
除了render函数,nextProps)可能是React组件生命周期中最重要的一个函数了。
render函数重要,是因为它决定了该渲染什么,nextProps)函数重要,是因为它决定了一个组件什么时候不需要渲染。
render和nextProps)函数,也是React生命周期中唯二两个要求有返回结果的函数。render函数返回的结果用于构造DOM对象,而nextProps)函数返回一个布尔值,告诉React库这个组件在这次更新过程中是否要继续。
在更新过程中,React首先调用nextProps)函数,如果这个函数返回true,那就会继续更新过程,接下来调用render函数;反之得到一个false,那就会停止更新,也就不会引发后续的渲染了。只要使用恰当,shouldComponentUpdate能大大提高React组件的性能,没必要重新渲染的就不要渲染了,速度会更快。
    shouldComponentUpdate(nextProps, nextState){

        //nextProps、nextstate、this.props、this.state之间做对比,没有变化就没有必要重新渲染

        return (nextProps.caption !== this.props.caption || nextState.count !== this.state.count)

    }

只有第一次调用了子组件的render函数,刷新之后并不有改变caption或initvalue的值,没有引发组件内部状态改变,所以完全没有必要重绘。
3、componentWillUpdate和componentDidUpdate
如果组件的shoudComponentShouldUpdate函数返回true,React接下来依次调用的函数有componentWillUpdate、render、componentDidUpdate。
componentWillMount和componentDidMount,componentWillUpdate和componentDidUpdate这两对函数,一前一后把render函数夹在中间。
2.3.3 卸载过程
React卸载过程只涉及到一个函数componentWillUnMount,当React组件要DOM树上删除掉之前,就会调用componentWillUnMount函数,此函数适合做一些清理性的工作。
componentWillU nmount 中的工作往往和componentDidMount 有关,比如,在componentDidMount 中用非React 的方法创造了一些DOM 元素,如果撒手不管可能会造成内存泄露,那就需要在componentWillUnmount 中把这些创造的DOM 元素清理掉。
2.4 组件向外传递数据
子组件如何把数据传递给父组件。
通过函数传递,啥也不说,上代码:
class ControlPanel extends Component{

    constructor(props){

        super(props)

        this.initValues = [10, 20, 30]

        const initSum = this.initValues.reduce((a,b)=>a+b,0)

        this.onCounterUpdate = this.onCounterUpdate.bind(this)

        this.state = {

            initSum

        }

    }

    onCounterUpdate(newValue,previousValue){

        const valueChange = newValue - previousValue

        this.setState({initSum:this.state.initSum+valueChange})

    }

    render() {

        // console.log('enter controlPanel render')

        return (

            <div>

                {/* this.forceUpdate() 强制引发一次重绘 */}

                <button onClick={()=>this.forceUpdate()}>Click me to repaint!</button>

                <Counter onUpdate={this.onCounterUpdate} caption='first' initValue={this.initValues[0]} />

                <Counter onUpdate={this.onCounterUpdate} caption='second' initValue={this.initValues[1]} />

                <Counter onUpdate={this.onCounterUpdate} caption='third' initValue={this.initValues[2]} />

                <span>sum:{this.state.initSum}</span>

            </div>

        )

    }

}
子组件
    add(){

        this.updateCount(true)

    }

    math() {

        this.updateCount(false)

    }

    updateCount(state){

        const previousValue = this.state.count

        const newValue = state ? previousValue + 1 : previousValue -1

        this.setState({count: newValue})

        this.props.onUpdate(newValue, previousValue)

    }
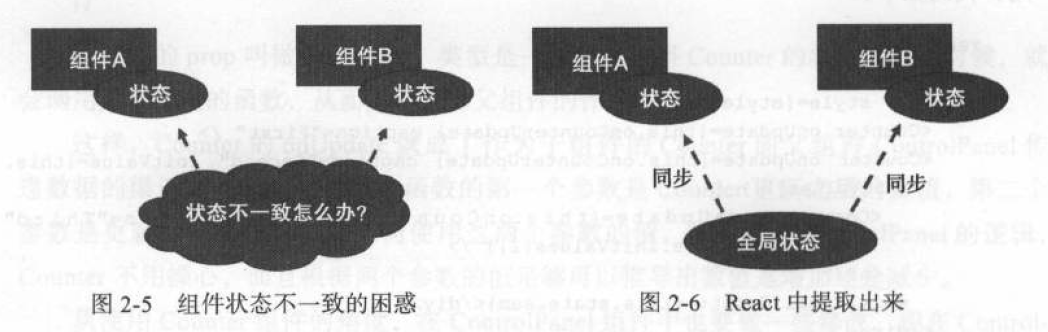
2.5 React组件state和prop的局限
第二章 设计高质量的React组件的更多相关文章
- .net架构设计读书笔记--第二章 设计体系结构
第五节 探索领域架构 一.领域驱动设计的价值与意义 最初在java中使用,.net要晚些才引入.领域驱动设计出现之初的争议.一个向导,少走弯路 1. 我们真的需要DDD吗? DDD并不适用于每个软 ...
- 笔记《Java程序性能优化 让你的Java程序更快、更稳定》 第二章 设计调优
2.1 善用设计模式 23 (1) 1. 设计模式好处: 2.1.1 单例模式 23 (6) 1. 单例模式是一种对象创建模式,用于产生一个对象的具体实例,它可以确保系统中一个类只产生一个实例: 2. ...
- 一起来学Spring Cloud | 第二章:服务注册和发现组件 (Eureka)
本篇文章,很浅显的一步步讲解如何搭建一个能运行的springcloud项目(带所有操作截图).相信!看完本篇之后,你会觉得springcloud搭建如此简单~~~~ 一. Eureka简介: 1.1 ...
- [Learn AF3]第二章 App Framework 3.0的组件View——AF3的驱动引擎
View:af3中的驱动引擎 组件名称:View 使用说明:按照官方的说法,view组件是af3的“驱动引擎(driving force)”,view是af3应用的基础,一个app中可以包 ...
- 高质量API网关组件实现
PI网关组件的作用? 1.网关直接代替MVC当中的Controller层,减少编码量提高开发效率 2.统一API接口的出入参格式,提高API的友好性 3.自动检测API接口规范,提高接口的质量 4.统 ...
- 第二章 SpringCloud之Eureka-Server服务发现组件
1.Eureka简介 文档:https://cloud.spring.io/spring-cloud-netflix/spring-cloud-netflix.html ############### ...
- 编写高质量代码:Web前端开发修炼之道(一)
最近老大给我们买来一些技术方面的书籍,其实很少搬着一本书好好的完整的看完过,每每看电子档的,也是打游击式的看看这章,瞅瞅那章,在那5本书中挑了一本比较单薄的<编写高质量代码web前端开发修炼之道 ...
- 《Offer一箩筐》一份高质量「简历」撰写指南,望打扰!!
「MoreThanJava」 宣扬的是 「学习,不止 CODE」. 如果觉得 「不错」 的朋友,欢迎 「关注 + 留言 + 分享」,文末有完整的获取链接,您的支持是我前进的最大的动力! Hi~ 这里是 ...
- 编写高质量代码:改善Java程序的151个建议(第二章:基本类型)
编写高质量代码:改善Java程序的151个建议(第二章:基本类型) 目录 建议21:用偶判断,不用奇判断 建议22:用整数类型处理货币 建议23:不要让类型默默转换 建议24:边界还是边界 建议25: ...
随机推荐
- HNOI模拟 Day3.22
第一题: 盾盾的打字机 (drdrd) [题目描述] 盾盾有一个非常有意思的打字机,现在盾哥要用这台打字机来打出一段文章. 由于有了上次的经验,盾盾预先准备好了一段模板 A 存在了内存中,并以此为基础 ...
- Massive Data Mining学习记录
第一周: 学习PageRank, 知识点:每个节点的权值由其他节点的投票决定,所有节点的权值和为1 当节点很多时候必须转换成矩阵运算来计算节点的最终值,由马尔可夫链可以证明,这个值可以迭代得到 问题: ...
- bzoj3550: [ONTAK2010]Vacation&&bzoj3112: [Zjoi2013]防守战线
学了下单纯形法解线性规划 看起来好像并不是特别难,第二个code有注释.我还有...*=-....这个不是特别懂 第一个是正常的,第二个是解对偶问题的 #include<cstdio> # ...
- MAMP/xampp安装redis
nmp/amp/xampp安装redis 一.安装redis服务 1.通过homebrew安装redis sudo brew install redis 2.启动redis服务,且接受客户端连接 su ...
- python-----列表生成式和列表生成器表达
列表表达式: 程序一: 常规写法: L = [] for x in range(1, 11): L.append(x * x) print(L) #[1, 4, 9, 16, 25, 36, 49, ...
- AT2004 Anticube
https://www.zybuluo.com/ysner/note/1304774 题面 给定\(n\)个数\(s_i\),要求从中选出最多的数,满足任意两个数之积都不是完全立方数. \(n\leq ...
- 利用Oracle内置分析函数进行高效统计汇总
分析函数是Oracle从8.1.6开始引入的一个新的概念,为我们分析数据提供了一种简单高效的处理方式.在分析函数出现以前,我们必须使用自联查询,子查询或者内联视图,甚至复杂的存储过程实现的语句,现 ...
- openStack Aio 环境的neutron agent-list和cluster 环境 CLI结果对比
- 查看mysql数据库的所有配置信息和服务器的各种状态
查看MySQL服务器配置信息 mysql> show variables; 2, 查看MySQL服务器运行的各种状态值 mysql> show global status;
- PHP面向对象技术(全面讲解)
作者:高洛峰 来源:<PHPer>杂志 1.面向对象的概念 面向对象编程(Object Oriented Programming, OOP, 面向对象程序设计)是一种计算机 ...