Qt qml的软件架构设计
google: qt qml application architecture 有很多资源。
1 https://www.ics.com/blog/multilayered-architecture-qt-quick
这是一个大牛写的一种架构:A Multilayered Architecture for Qt Quick。 记录在下面:源代码在baidu网盘learning-qt-codes里面。
The topic of application architecture rarely comes up in the context of Qt, because as Qt developers we tend to be more interested in the classes and objects (trees) than the application as a whole (forest). However, the architecture of a Qt Quick application is the difference between pain and joy. A good architecture makes C++ and QML integration seem natural, while a poor and muddled architecture makes it an exercise in frustration.
Multilayered Architecture
A multilayered software architecture is one that organizes different responsibilities into layers. Each layer has a broad role within the application, and communicates with other layers through well-defined interfaces. The architecture promotes high cohesion and low coupling, both hallmarks of good software design.
A layer could be a module within an executable, a separate process in a system, or even a physically separate system. The classic layers in a multilayered architecture are:
- Presentation Layer: The visible user interface
- Service Layer: Interprocess communication, frontend/backend bridge, etc.
- Business Logic Layer: Domain knowledge, business rules, etc.
- Data Access Layer: Databases, networks, files, etc.
A slight modification of this provides a good architecture for GUI applications. The Presentation Layer is the actual user interface, what the user can directly see and interact with. The Business Logic Layer is what we sometimes call the "backend". It's where all of our application logic resides. The Adapter Layer sits between the two and acts as a bridge, and might be either a thin interface or a thick service layer.
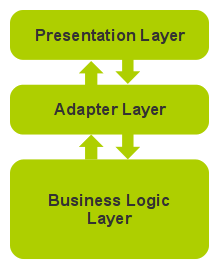
One benefit of this architecture is that the UI can be easily swapped out. A few years ago I worked on a project that shipped with three different UI frontends (in-process Qt, remote process Qt, remote HTML), with the same business logic backend. The same architecture also allows the backend to be swapped out for a testing harness.
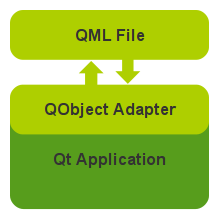
This matches up closely to the classic Qt application model. The Presentation Layer is the UI form class created by Qt Designer, the Adapter Layer is the host QWidget that has ownership of the form class, and the Business Logic Layer is the rest of the application. The host widget controls all communication between the UI frontend and the application backend.
Integrating C++ and QML
Qt Quick provides four main ways to integrate C++ and QML. Each has its own place and purpose.
- Subclassing QQuickItem: QQuickItem allows you to write your own visual and non-visual QML items using C++.
- Registering C++ types with QML: C++ classes can be registered with the QML type system, allowing them to be instantiated as QML types.
- Registering Context Properties: QObjects can be registered with the QML context, allowing their properties to be directly accessed.
- Accessing QML objects through the QML object tree: All QML objects reside in a tree hierarchy and can be accessed via the root of the tree.
The last two methods are best suited for multilayered architectures. Registering a context property is best if the QML is pulling data from C++, and accessing the QML objects is best if the C++ is pushing data to QML. Both methods can be used together. For our architecture, we are going to stick with the last method, with the added restriction that C++ objects may only access the QML root object. This is the advice given in the Qt documentation, as the restriction avoids the danger of high coupling when C++ objects refer to QML objects inside the QML object tree. This method also turns out to be surprisingly simple to use.
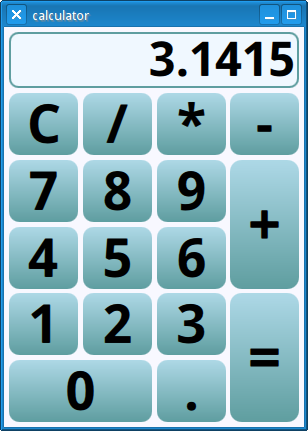
The architecture will be examined in more detail using an example application. This is a simple desktop calculator application originally written for widgets, but ported to Qt Quick. It may be downloaded from here.
The Main QML File
There will be one main QML file that the C++ side will interact with. It will include the root of the QML object tree, which will provide a sufficient interface for the application to utilize. This includes properties and their implicit signals, other explicit signals and any helper functions. Anything below the root level of the QML tree should be treated as strictly private.
The QML communicates with the C++ by emitting signals. This is anonymous communication, as the QML has no way of knowing who has connected to its signals. It cannot directly communicate with any C++ object because none have been set as context properties.
import QtQuick 2.1
import QtQuick.Layouts 1.0
Rectangle {
id: calculator
property alias displayText: display.text
signal keyClicked(int key)
signal cutTriggered()
signal copyTriggered()
signal pasteTriggered()
...
In our example, the calculator item is the root of the QML object tree. The C++ backend only has access to its standard Rectangle properties (height, width, etc.) and to the displayText property, which is an alias for the text property of a child TextInput component. Four signals are also defined, and the backend will connect to these.
focus: true
Keys.onPressed: {
if (event.modifiers & Qt.ControlModifier) {
if (event.key === Qt.Key_X) {
cutTriggered();
event.accepted = true;
}
else if (event.key === Qt.Key_C) {
copyTriggered();
event.accepted = true;
}
else if (event.key === Qt.Key_V) {
pasteTriggered();
event.accepted = true;
}
}
}
The root object has the focus and handles keypresses. Whenever one of the Ctrl+X, Ctrl+C, or Ctrl+V commands is pressed, it will emit the appropriate signals from the root item.
GridLayout {
id: mainLayout
columns: 4
anchors.fill: parent
...
Rectangle {
id: display
color: "aliceblue"
border.color: "cadetblue"
...
Text {
id: displayText
text: "0"
font.pixelSize: parent.height - 4*2
...
}
}
...
For simplicity, we will be using the new QtQuick Layouts to lay out the components in the calculator. Unlike a Grid positioner, a GridLayout will both position and size its child items. Note that text property of displayText was aliased earlier, so that it could be accessed from outside the QML object tree.
Repeater {
Button {
id: key
text: modelData.text
Layout.preferredWidth: 48
Layout.preferredHeight: 40
Layout.fillWidth: true
Layout.fillHeight: true
...
onClicked: calculator.keyClicked(modelData.key)
}
model: [
{ text: "C", key: Qt.Key_Delete },
{ text: "/", key: Qt.Key_Slash },
{ text: "*", key: Qt.Key_Asterisk },
{ text: "-", key: Qt.Key_Minus },
...
]
}
}
}
Buttons are created using a repeater. When clicked they will emit the keyClicked() signal from the root item.
As should be clear by now, the QML is only concerned with the layout and presentation of the user interface. There is no business logic here, the QML does not perform any calculations on user input.
The QObject Adapter Class
The QObject adapter is the bridge that sits between the QML and the rest of the C++ application. It is the only C++ module allowed to directly communicate with the QML frontend. It may directly access any property of the root QML object, make connections to root's signals, and call any exposed functions. JavaScript functions should be limited in scope to functionality within the user interface itself, such as driving an animation or creating dialogs. They should never intrude into the problem domain, as that is the responsibility of the Business Logic Layer.
class Calculator : public QObject
{
Q_OBJECT
Q_PROPERTY(QString display READ display WRITE setDisplay NOTIFY displayChanged)
public:
Calculator(QObject *parent = 0);
~Calculator();
void setRootObject(QObject *root);
QString display() const { return mDisplay; }
public slots:
void setDisplay(const QString &display);
void keyClicked(int key);
void editCut();
void editCopy();
void editPaste();
...
signals:
void displayChanged();
private:
QObject *mRoot;
QString mDisplay;
...
};
In practice, the adapter is very similar to the custom widget classes that were used with Qt Designer UI forms. The connections are typically created in the constructor or initializer, and much of the class is slot implementations that react to signals from the frontend UI.
Note that class defines a display property. If an object of this class were registered with the QML context, then the QML could directly access the display property. We are not using context properties however.
In this application, the adapter and the business logic reside in the same class, due to the simplicity of the program. In many projects it will make sense to keep them separate.
Calculator::Calculator(QObject *parent)
: QObject(parent), mRoot(0), mDisplay()
{
connect(this, SIGNAL(displayChanged()), this, SLOT(onDisplayChanged()));
}
void Calculator::setDisplay(const QString &display)
{
if (mDisplay != display) {
mDisplay = display;
emit displayChanged();
}
}
void Calculator::onDisplayChanged()
{
// push the new display value to QML
if (mRoot) mRoot->setProperty("displayText", mDisplay);
}
The constructor sets up a connection so that any changes to the display property can be forwarded to the QML frontend. The QObject property system allows us to access any property by name. When the display changes, it is pushed to the QML using the setProperty() call.
Note the anonymous nature of the property. The business logic doesn't care if the front is a QML Item or a C++ QWidget. Changing the adapter code slightly, the frontend could even be HTML or other technology. Even sticking to just QML, it makes it easy to change the frontend without touching any backend code.
void Calculator::setRootObject(QObject *root)
{
// disconnect from any previous root
if (mRoot != 0) mRoot->disconnect(this);
mRoot = root;
if (mRoot) {
// make connections
connect(root, SIGNAL(keyClicked(int)), this, SLOT(keyClicked(int)));
connect(root, SIGNAL(cutTriggered()), this, SLOT(editCut()));
connect(root, SIGNAL(copyTriggered()), this, SLOT(editCopy()));
connect(root, SIGNAL(pasteTriggered()), this, SLOT(editPaste()));
// set initial state
clearAll();
}
}
The main application will set the root object of the QML object tree for the adapter, as we will see later. At this point, the connections are made with the root, and a default state is set.
void Calculator::keyClicked(int key)
{
if (!mRoot) return;
double operand = mDisplay.toDouble();
switch (key) {
case Qt::Key_0:
case Qt::Key_1:
case Qt::Key_2:
case Qt::Key_3:
case Qt::Key_4:
case Qt::Key_5:
case Qt::Key_6:
case Qt::Key_7:
case Qt::Key_8:
case Qt::Key_9: // digit pressed
if ((mDisplay == "0") && key == Qt::Key_0) return;
if (mExpectingOperand) {
mDisplay.clear();
mExpectingOperand = false;
}
mDisplay += QString::number(key-Qt::Key_0);
break;
...
emit displayChanged();
}
Clicking a button in the QML frontend will emit a keyClicked(int) signal, conveying key information. The application uses the Qt::Key enumeration as a convenience. Different keys will perform different operations that affect the display string. After the operation is complete the displayChanged() signal is emitted which will in turn set the displayText property of the QML root object.
void Calculator::editCut()
{
// copy and delete
if (mRoot) {
editCopy();
clearAll();
}
}
void Calculator::editCopy()
{
if (mRoot) {
QGuiApplication::clipboard()->setText(mDisplay);
}
}
void Calculator::editPaste()
{
if (mRoot) {
setDisplay(QGuiApplication::clipboard()->text());
}
}
Here are the editCut(), editCopy(), and editPaste() slots. They make use of the system clipboard.
The main() Function
int main(int argc, char *argv[])
{
QGuiApplication app(argc, argv);
// create view window
QQuickView *view = new QQuickView;
view->setSource(QUrl("Calculator.qml"));
view->setResizeMode(QQuickView::SizeRootObjectToView);
view->resize(300, 400);
// create Calculator object
Calculator calculator;
calculator.setRootObject(view->rootObject());
QObject::connect(view->engine(), SIGNAL(quit()), view, SLOT(close()));
view->show();
return app.exec();
}
The main() function of the application is straightforward. It creates a QQuickView for the main Calculator.qml file. It then creates a Calculator adapter and sets the root object.
Conclusion
The multilayered architecture is a perfect fit for Qt Quick applications. This architecture provides clean separation of responsibilities, and promotes good component design. It's also easy to use and makes integration of QML in C++ applications a simple pleasure rather than a complicated task.
About the author
David Johnson
David is a Senior Software Engineer at ICS and certified Qt trainer. David has been actively using Qt since 1998 (with version 1.42). David specializes in desktop applications and data visualization. He has also contributed to the KDE and FreeBSD Open Source projects.
2 论坛讨论: https://news.ycombinator.com/item?id=13491426
3 其他:
https://wiki.qt.io/QML_Application_Structuring_Approaches
https://www.udemy.com/learning-qt-5/
Qt qml的软件架构设计的更多相关文章
- Qt qml 单例模式
Qt qml 单例模式,没什么好说的,看代码吧.单例模式很适合做全局的配置文件. [示例下载] http://download.csdn.net/detail/surfsky/8539313 [以下是 ...
- Qt qml listview 列表视图控件(下拉刷新、上拉分页、滚动轴)
Qt qml listview下拉刷新和上拉分页主要根据contentY来判断.但要加上顶部下拉指示器.滚动条,并封装成可简单调用的组件,着实花了我不少精力:) [先看效果] [功能] 下拉刷新 ...
- qt qml qchart 图表组件
qt qml qchart 图表组件 * Author: Julien Wintz * Created: Thu Feb 13 23:41:59 2014 (+0100) 这玩意是从chart.js迁 ...
- qt qml中PropertyAnimation的几种使用方法
qml文章 qt qml中PropertyAnimation的几种使用方法 动画应用场景有以下几种: 首先如果一个Rectangle.动画是要改变它的x和y值 1,Rectangle一旦被创建,就要移 ...
- SoC嵌入式软件架构设计II:没有MMU的CPU虚拟内存管理的设计和实现方法
大多数的程序代码是必要的时,它可以被加载到内存中运行.手术后,可直接丢弃或覆盖其它代码. 我们PC然在同一时间大量的应用,地址空间差点儿能够整个线性地址空间(除了部分留给操作系统或者预留它用).能够觉 ...
- SoC嵌入式软件架构设计II:否MMU的CPU虚拟内存管理的设计与实现方法
大多数的程序代码是必要的时,它可以被加载到内存中运行.手术后,可直接丢弃或覆盖其他代码.我们PC然在同一时间大量的应用,能够整个线性地址空间(除了部分留给操作系统或者预留它用),能够觉得每一个应用程序 ...
- SoC嵌入式软件架构设计
内存是SoC(System on Chip,片上系统)集成设计的重要模块,是SoC中成本比重较大的部分.内存管理的软硬件设计是SoC软件架构设计的重要一环,架构设计师必须要在成本和效率中取得平衡,做到 ...
- Qt QML referenceexamples attached Demo hacking
/********************************************************************************************* * Qt ...
- SoC嵌入式软件架构设计之六:API设计方法
在嵌入式系统中,驱动都是以API的方式提供给应用进行调用.这里介绍嵌入式系统的API设计和管理方法. 驱动在系统中会按模块进行分类,比如按键驱动.LCD驱动.文件系统.card驱动.I2C驱动等等:每 ...
随机推荐
- std_msgs/String.msg
from std_msgs.msg import String http://docs.ros.org/api/std_msgs/html/msg/String.html
- call 和 apply 方法
1:每个函数都包含两个非继承而来的方法:call(),apply(). 2:call方法和apply方法作用是一样的. 下边是call的使用例子: window.color = 'red'; docu ...
- Software Project Management_JUnit && Maven
Task1: Develop the project “HelloWorld” -A .java program: Just print out “Hello” + your name; -A tes ...
- cmake 手册详解【转】
https://www.cnblogs.com/coderfenghc/tag/cmake/ CMake 手册详解(二十三) SirDigit 2012-12-16 22:03 阅读:11058 ...
- springlcoud中使用consul作为注册中心
好久没写博客了,从今天开始重新杨帆起航............................................ springlcoud中使用consul作为注册中心. 我们先对比下注册 ...
- Eclipse创建的Java Web项目,如何启用外置浏览器访问jsp或者html页面
当我们用Eclipse创建了一个Java Web项目,想访问一个jsp或者html页面时,通常会在目标页面(以jsp为例)上点击鼠标右键,选择[Run As]——>[Run on Server] ...
- Mini学习之mini.DataGrid使用说明
参考:http://miniui.com/docs/api/index.html#ui=datagrid mini.DataGrid表格.实现分页加载.自定义列.单元格渲染.行编辑器.锁定列.过滤行. ...
- MySQL not equal to operator <> && !=
MySQL :: MySQL 5.7 Reference Manual :: 12.3.2 Comparison Functions and Operatorshttps://dev.mysql.co ...
- Nessus更新到8.5.0
Nessus更新到8.5.0 此次更新,主要涉及以下变化: (1)Nessus的用户注册和激活流程进行简化.用户可以在Nessus软件中直接进行注册和激活. (2)Nessus报告生成功能得到加强 ...
- SynchronizedStack -- tomcat8同步栈
同步栈(安全栈): org.apache.tomcat.util.collections.SynchronizedStack通过stack栈锁来控制栈中获取的类T.通过push.pop和clear方法 ...