为树莓派3B添加LCD1602液晶屏
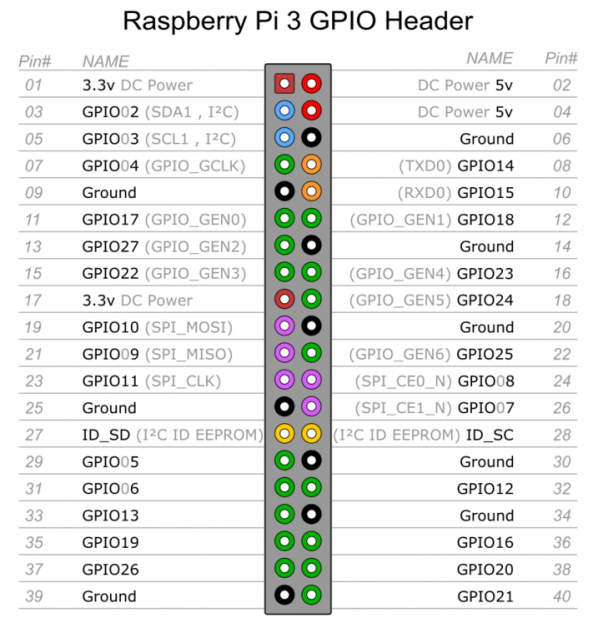
树莓派3B针脚说明
LCD1602接线说明
VSS,接地
VDD,接5V电源
VO,液晶对比度调节,接电位器中间的引脚,电位器两边的引脚分别接5V和接地。
RS,寄存器选择,接GPIO14
RW,读写选择,接地,表示写模式
EN,使能信号,接GPIO15
D0,数据位0,4位工作模式下不用,不接
D1,数据位1,4位工作模式下不用,不接
D2,数据位2,4位工作模式下不用,不接
D3,数据位3,4位工作模式下不用,不接
D4,数据位4,接GPIO17
D5,数据位5,接GPIO18
D6,数据位6,接GPIO27
D7,数据位7,接GPIO22
A,液晶屏背光+,接5V
K,液晶屏背光-,接地
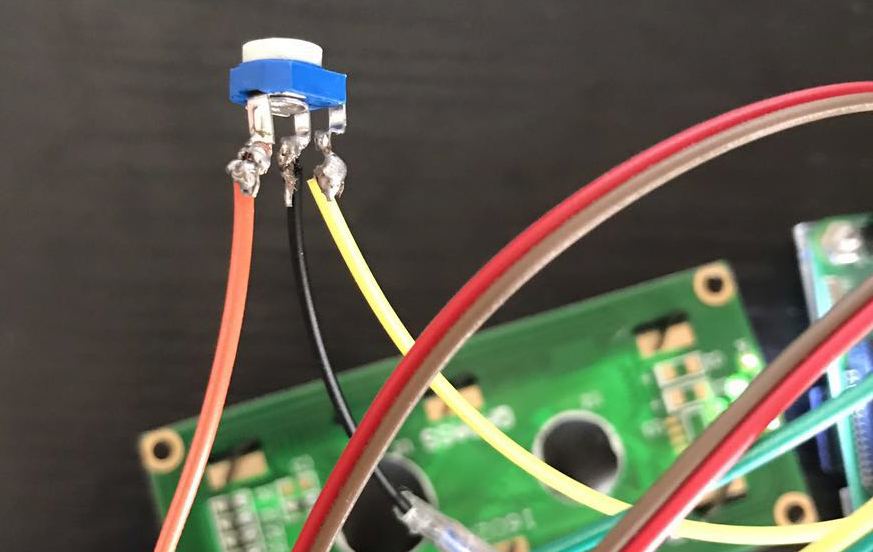
调整电位器
因为缺少1个5V的线,直接破皮拧一根进去就行,电位器调整到屏幕显示正常的对比度即可,第一次玩烙铁,焊的略丑…
lcd1602.py
#!/usr/bin/python |
1602.py
#!/usr/bin/python |
将以上两个文件保存在同一个目录下,运行1602.py即可打印信息到LCD上。
效果图

参考链接
http://www.cnblogs.com/xiaowuyi/p/4051238.html
https://www.6zou.net/tech/raspberry-pi-lcd1602-system-monitor.html
为树莓派3B添加LCD1602液晶屏的更多相关文章
- 树莓派3b添加python时间同步脚本
树莓派没有电池,因此断电后系统时间会停止,直到你开机后又继续计时,所以会造成系统时间和实际时间有很大的误差. 因为项目需要用到本地时间,精度要求不高不想折腾(如果需要高精度,需要安装ntp),所以考虑 ...
- [记录]学习树莓派3B接DHT11和LCD1602和修改树莓派时区
前提 树莓派系统安装好 apache web 服务器,如未安装,可在树莓派内执行sudo apt-get install apache2 进行安装apache 也可以通过命令获取GPIO信息: gpi ...
- 使用Python控制1602液晶屏实时显示时间(附PyCharm远程调试)
前言 原创文章,转载引用务必注明链接.水平有限,如有疏漏,欢迎指正. 本文介绍一下UP板的GPIO资源使用,以及一个使用Python演示一个简单的demo. 本文使用Markdown写成,为获得更好的 ...
- 树莓派3b在rt-thread上移植LittlevGL
树莓派3b在rt-thread上移植LittlevGL 目录 树莓派3b在rt-thread上移植LittlevGL 1.本文概述 2.资源准备 3.上手体验 4.rt-thread与lvgl进行无缝 ...
- s3c2440液晶屏驱动 (内核自带) linux-4.1.24
自带有一部分驱动的配置信息,只要修改这部分就能支援 不同的液晶屏 - /arch/arm/mach-s3c24xx/mach-smdk2440.c 另一部分在 /drivers/video/fbdev ...
- 树莓派3B+(一)
第一步:安装raspbian系统 介绍:Raspbian是为树莓派设计,基于Debian的操作系统,由一个小团队开发.其不隶属于树莓派基金会,但被列为官方支持的操作系统. 下载地址:https://w ...
- ARM40-A5应用——fbset与液晶屏参数的适配【转】
转自:https://blog.csdn.net/vonchn/article/details/80784579 ARM40-A5应用——fbset与液晶屏参数的适配 2018.6.18 版权声明:本 ...
- 树莓派3b安装Nginx和php7和百度语音合成模块
1.安装sox系统mp3音频播放模块(项目需要) sudo apt-get install lame sudo apt-get install sox sudo apt-get install lib ...
- 树莓派3B+首次登陆通过网络
树莓派3B+默认串口不能登录,即使可使用可需要通过连线方式连接,如何才能直接通过网络ssh登录树莓派呢? 串口问题及使用 树莓派3的UART串口的使用问题,该串口问题的官方反馈及回复请参考这两篇官方博 ...
随机推荐
- 1V升压5V和1.5V升压5V的集成电路芯片
1.5V和1V输入,要升压输出5V的集成电路芯片合适? 干电池标准电压是1.5V,放电电压后面在0.9V-1V左右,如果要选用干电池1.5V升压到5V的合适的芯片,需要满足低压1V或者0.9V更好的低 ...
- 数据分析——Numpy/pandas
NumPy NumPy是高性能科学计算和数据分析的基础包.部分功能如下: ndarray, 具有矢量算术运算和复杂广播能力的快速且节省空间的多维数组. 用于对整组数据进行快速运算的标准数学函数(无需编 ...
- OpenCV 和 Dlib 人脸识别基础
00 环境配置 Anaconda 安装 1 下载 https://repo.anaconda.com/archive/ 考虑到兼容性问题,推荐下载Anaconda3-5.2.0版本. 2 安装 3 测 ...
- uni-app开发经验分享十九: uni-app对接微信小程序直播
uni-app对接微信小程序直播 1.登录微信小程序后台-点击>设置->第三方设置->添加直播插件 2.添加直播组件后->点击<详情> 记录这两个参数直播 ...
- STL_map和multimap容器
一.map/multimap的简介 map是标准的关联式容器,一个map是一个键值对序列,即(key,value)对.它提供基于key的快速检索能力. map中key值是唯一的.集合中的元素按一定的顺 ...
- Linux下运行java报错:Error: Could not find or load main class SocketIOPropertites
[root@node01 testfileio]# javac SocketIOPropertites.java && java Soc ketIOPropertitesError: ...
- muduo 网络库的整体架构图和一个简化版本的架构设计
https://blog.csdn.net/adkada1/article/details/54342275 简析 https://blog.csdn.net/amoscykl/article/det ...
- Node.js 安全指南
当项目周期快结束时,开发人员会越来越关注应用的"安全性"问题.一个安全的应用程序并不是一种奢侈,而是必要的.你应该在开发的每个阶段都考虑应用程序的安全性,例如系统架构.设计.编码, ...
- RocketMQ 常用消息类型
文章首发于公众号<程序员果果> 地址 : https://mp.weixin.qq.com/s/dYqGd9zi2mNelsNNLIribg 消息发送示例 导入依赖: <depend ...
- linux查看log
TOMCAT_PATH='/home/jyapp/apache-tomcat-7.0.59/'PID=`ps -ef |grep $TOMCAT_PATH | grep -v grep |awk '{ ...