vgg学习
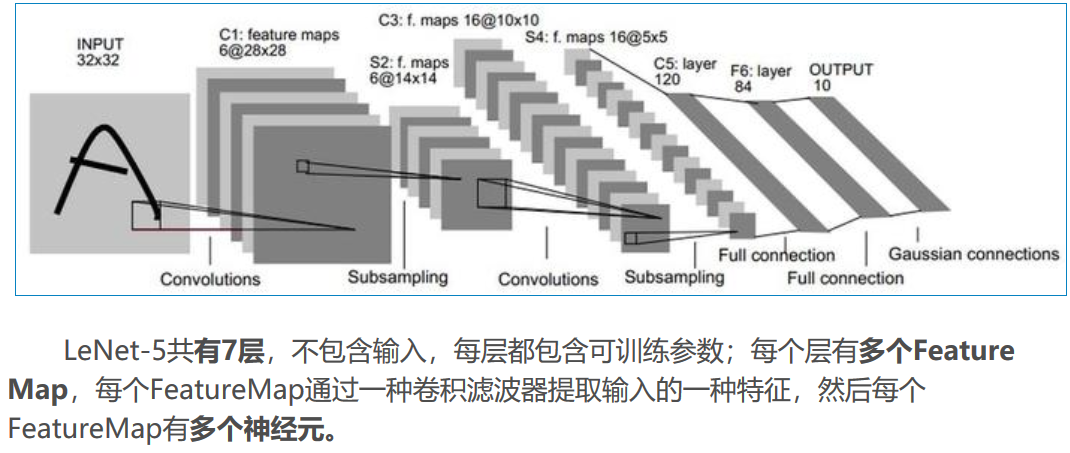
LeNet-5是一个较简单的卷积神经网络。下图显示了其结构:输入的二维图像,先经过两次卷积层到池化层,再经过全连接层,最后使用softmax分类作为输出层。

(6)数据增强,随机地从256*256的原始图像中截取224*224大小的区域(以及水平翻转的镜像),相当于增加了2*(256-224)^2=2048倍的数据量。如果没有数据增强,仅靠原始的数据量,参数众多的CNN会陷入过拟合中,使用了数据增强后可以大大减轻过拟合,提升泛化能力。进行预测时,则是取图片的四个角加中间共5个位置,并进行左右翻转,一共获得10张图片,对他们进行预测并对10次结果求均值。同时,AlexNet论文中提到了会对图像的RGB数据进行PCA处理,并对主成分做一个标准差为0.1的高斯扰动,增加一些噪声,这个Trick可以让错误率再下降1%。
# -*- coding=UTF-8 -*- import tensorflow as tf # 输入数据 import input_data mnist = input_data.read_data_sets("/tmp/data/", one_hot=True) # 定义网络超参数 learning_rate = 0.001 training_iters = 200000 batch_size = 64 display_step = 20 # 定义网络参数 n_input = 784 # 输入的维度 n_classes = 10 # 标签的维度 dropout = 0.8 # Dropout 的概率 # 占位符输入 x = tf.placeholder(tf.types.float32, [None, n_input]) y = tf.placeholder(tf.types.float32, [None, n_classes]) keep_prob = tf.placeholder(tf.types.float32) # 卷积操作 def conv2d(name, l_input, w, b): return tf.nn.relu(tf.nn.bias_add( \ tf.nn.conv2d(l_input, w, strides=[1, 1, 1, 1], padding='SAME'),b) \ , name=name) # 最大下采样操作 def max_pool(name, l_input, k): return tf.nn.max_pool(l_input, ksize=[1, k, k, 1], \ strides=[1, k, k, 1], padding='SAME', name=name) # 归一化操作 def norm(name, l_input, lsize=4): return tf.nn.lrn(l_input, lsize, bias=1.0, alpha=0.001 / 9.0, beta=0.75, name=name) # 定义整个网络 def alex_net(_X, _weights, _biases, _dropout): _X = tf.reshape(_X, shape=[-1, 28, 28, 1]) # 向量转为矩阵 # 卷积层 conv1 = conv2d('conv1', _X, _weights['wc1'], _biases['bc1']) # 下采样层 pool1 = max_pool('pool1', conv1, k=2) # 归一化层 norm1 = norm('norm1', pool1, lsize=4) # Dropout norm1 = tf.nn.dropout(norm1, _dropout) # 卷积 conv2 = conv2d('conv2', norm1, _weights['wc2'], _biases['bc2']) # 下采样 pool2 = max_pool('pool2', conv2, k=2) # 归一化 norm2 = norm('norm2', pool2, lsize=4) # Dropout norm2 = tf.nn.dropout(norm2, _dropout) # 卷积 conv3 = conv2d('conv3', norm2, _weights['wc3'], _biases['bc3']) # 下采样 pool3 = max_pool('pool3', conv3, k=2) # 归一化 norm3 = norm('norm3', pool3, lsize=4) # Dropout norm3 = tf.nn.dropout(norm3, _dropout) # 全连接层,先把特征图转为向量 dense1 = tf.reshape(norm3, [-1, _weights['wd1'].get_shape().as_list()[0]]) dense1 = tf.nn.relu(tf.matmul(dense1, _weights['wd1']) + _biases['bd1'], name='fc1') # 全连接层 dense2 = tf.nn.relu(tf.matmul(dense1, _weights['wd2']) + _biases['bd2'], name='fc2') # Relu activation # 网络输出层 out = tf.matmul(dense2, _weights['out']) + _biases['out'] return out # 存储所有的网络参数 weights = { 'wc1': tf.Variable(tf.random_normal([3, 3, 1, 64])), 'wc2': tf.Variable(tf.random_normal([3, 3, 64, 128])), 'wc3': tf.Variable(tf.random_normal([3, 3, 128, 256])), 'wd1': tf.Variable(tf.random_normal([4*4*256, 1024])), 'wd2': tf.Variable(tf.random_normal([1024, 1024])), 'out': tf.Variable(tf.random_normal([1024, 10])) } biases = { 'bc1': tf.Variable(tf.random_normal([64])), 'bc2': tf.Variable(tf.random_normal([128])), 'bc3': tf.Variable(tf.random_normal([256])), 'bd1': tf.Variable(tf.random_normal([1024])), 'bd2': tf.Variable(tf.random_normal([1024])), 'out': tf.Variable(tf.random_normal([n_classes])) } # 构建模型 pred = alex_net(x, weights, biases, keep_prob) # 定义损失函数和学习步骤 cost = tf.reduce_mean(tf.nn.softmax_cross_entropy_with_logits(pred, y)) optimizer = tf.train.AdamOptimizer(learning_rate=learning_rate).minimize(cost) # 测试网络 correct_pred = tf.equal(tf.argmax(pred,1), tf.argmax(y,1)) accuracy = tf.reduce_mean(tf.cast(correct_pred, tf.float32)) # 初始化所有的共享变量 init = tf.initialize_all_variables() # 开启一个训练 with tf.Session() as sess: sess.run(init) step = 1 # Keep training until reach max iterations while step * batch_size < training_iters: batch_xs, batch_ys = mnist.train.next_batch(batch_size) # 获取批数据 sess.run(optimizer, feed_dict={x: batch_xs, y: batch_ys, keep_prob: dropout}) if step % display_step == 0: # 计算精度 acc = sess.run(accuracy, feed_dict={x: batch_xs, y: batch_ys, keep_prob: 1.}) # 计算损失值 loss = sess.run(cost, feed_dict={x: batch_xs, y: batch_ys, keep_prob: 1.}) print "Iter " + str(step*batch_size) + ", Minibatch Loss= " + "{:.6f}".format(loss) + ", Training Accuracy= " + "{:.5f}".format(acc) step += 1 print "Optimization Finished!" # 计算测试精度 print "Testing Accuracy:", sess.run(accuracy, feed_dict={x: mnist.test.images[:256], y: mnist.test.labels[:256], keep_prob: 1.}) 以上代码忽略了部分卷积层,全连接层使用了特定的权重。VGG
VGG-16和VGG-19取名源自作者所处研究组名(Visual Geometry Group),后面的16 19代表了网络的深度。
VGG-16/VGG-19 138M参数,ILSVRC 2014的亚军网络。
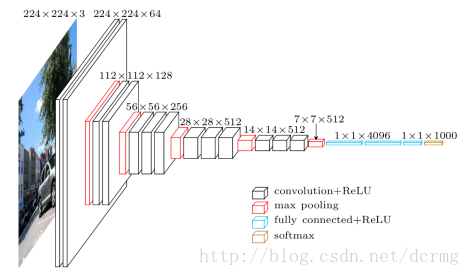
VGG-16结构的基本框架
conv1^2 (64) -> pool1 -> conv2^2 (128) -> pool2 -> conv3^3 (256) -> pool3 -> conv4^3 (512) -> pool4 -> conv5^3 (512) -> pool5 -> fc6 (4096) -> fc7 (4096) -> fc8 (1000) -> softmax。 ^3代表重复3次。
网络输入的224×224的图像。

VGG网络的特点
(1). 结构简单,作者将卷积核全部替换为3×3(极少用了1×1);相比于AlexNet 的池化核,VGG全部使用2×2的池化核。
(2). 参数量大,而且大部分的参数集中在全连接层中。网络名称中有16表示它有16层conv/fc层。
(3). 合适的网络初始化和使用批量归一(batch normalization)层对训练深层网络很重要。
(4). VGG-19结构类似于VGG-16,有略好于VGG-16的性能,但VGG-19需要消耗更大的资源,因此实际中VGG-16使用得更多。由于VGG-16网络结构十分简单,并且很适合迁移学习,因此至今VGG-16仍在广泛使用。
def VGG16(images, _dropout, n_cls):
"""
此处权重初始化方式采用的是:
卷积层使用预训练模型中的参数
全连接层使用xavier类型初始化
"""
conv1_1 = conv(images, 64, 'conv1_1', fineturn=True) #1
conv1_2 = conv(conv1_1, 64, 'conv1_2', fineturn=True) #2
pool1 = maxpool(conv1_2, 'pool1')
conv2_1 = conv(pool1, 128, 'conv2_1', fineturn=True) #3
conv2_2 = conv(conv2_1, 128, 'conv2_2', fineturn=True) #4
pool2 = maxpool(conv2_2, 'pool2')
conv3_1 = conv(pool2, 256, 'conv3_1', fineturn=True) #5
conv3_2 = conv(conv3_1, 256, 'conv3_2', fineturn=True) #6
conv3_3 = conv(conv3_2, 256, 'conv3_3', fineturn=True) #7
pool3 = maxpool(conv3_3, 'pool3')
conv4_1 = conv(pool3, 512, 'conv4_1', fineturn=True) #8
conv4_2 = conv(conv4_1, 512, 'conv4_2', fineturn=True) #9
conv4_3 = conv(conv4_2, 512, 'conv4_3', fineturn=True) #10
pool4 = maxpool(conv4_3, 'pool4')
conv5_1 = conv(pool4, 512, 'conv5_1', fineturn=True) #11
conv5_2 = conv(conv5_1, 512, 'conv5_2', fineturn=True) #12
conv5_3 = conv(conv5_2, 512, 'conv5_3', fineturn=True) #13
pool5 = maxpool(conv5_3, 'pool5')
#因为训练自己的数据,全连接层最好不要使用预训练参数
flatten = tf.reshape(pool5, [-1, 7*7*512])
fc6 = fc(flatten, 4096, 'fc6', xavier=True) #14
dropout1 = tf.nn.dropout(fc6, _dropout)
fc7 = fc(dropout1, 4096, 'fc7', xavier=True) #15
dropout2 = tf.nn.dropout(fc7, _dropout)
fc8 = fc(dropout2, n_cls, 'fc8', xavier=True) #16
return fc8
vgg学习的更多相关文章
- [caffe]深度学习之图像分类模型VGG解读
一.简单介绍 vgg和googlenet是2014年imagenet竞赛的双雄,这两类模型结构有一个共同特点是go deeper.跟googlenet不同的是.vgg继承了lenet以及alexnet ...
- 【深度学习系列】用PaddlePaddle和Tensorflow实现经典CNN网络Vgg
上周我们讲了经典CNN网络AlexNet对图像分类的效果,2014年,在AlexNet出来的两年后,牛津大学提出了Vgg网络,并在ILSVRC 2014中的classification项目的比赛中取得 ...
- 学习TensorFlow,调用预训练好的网络(Alex, VGG, ResNet etc)
视觉问题引入深度神经网络后,针对端对端的训练和预测网络,可以看是特征的表达和任务的决策问题(分类,回归等).当我们自己的训练数据量过小时,往往借助牛人已经预训练好的网络进行特征的提取,然后在后面加上自 ...
- 第二十四节,TensorFlow下slim库函数的使用以及使用VGG网络进行预训练、迁移学习(附代码)
在介绍这一节之前,需要你对slim模型库有一些基本了解,具体可以参考第二十二节,TensorFlow中的图片分类模型库slim的使用.数据集处理,这一节我们会详细介绍slim模型库下面的一些函数的使用 ...
- 『TensorFlow』SSD源码学习_其二:基于VGG的SSD网络前向架构
Fork版本项目地址:SSD 参考自集智专栏 一.SSD基础 在分类器基础之上想要识别物体,实质就是 用分类器扫描整张图像,定位特征位置 .这里的关键就是用什么算法扫描,比如可以将图片分成若干网格,用 ...
- 基于深度学习的人脸识别系统(Caffe+OpenCV+Dlib)【三】VGG网络进行特征提取
前言 基于深度学习的人脸识别系统,一共用到了5个开源库:OpenCV(计算机视觉库).Caffe(深度学习库).Dlib(机器学习库).libfacedetection(人脸检测库).cudnn(gp ...
- 深度学习图像标注工具VGG Image Annotator (VIA)使用教程
VGG Image Annotator (VIA)是一款开源的图像标注工具,由Visual Geometry Group开发. 可以在线和离线使用,可标注矩形.圆.椭圆.多边形.点和线.标注完成后,可 ...
- 卷积神经网络之VGG网络模型学习
VGG:VERY DEEP CONVOLUTIONAL NETWORKS FOR LARGE-SCALE IMAGE RECOGNITION 牛津大学 visual geometry group(VG ...
- OpenCV3与深度学习实例:Dlib+VGG Face实现两张脸部图像相似度比较
原文:https://my.oschina.net/wujux/blog/2221444 实现思路: 1.使用Dlib识别并提取脸部图像 2.使用VGG Face模型提取脸部特征 3.使用余弦相似度算 ...
随机推荐
- ansible-主机清单的配置
1. ansible主机清单的配置 以下是ansible安装完成后的源文件 1 [root@test-1 ~]# cat /etc/ansible/hosts 2 # This is the defa ...
- 6.Android-五大布局
Android 五大布局如下所示: LinearLayout 线性布局 只能指定一个方向(垂直/水平)来布局 RelativeLayout 相对布局 通过某个控件为参照物,来定位其它控件的位置的布局方 ...
- linux系统上用户态pppoe收发包过程
花了几天看了一下ppp/pppoe有关的东西,画了一下用户态pppoe收发包的示意图.
- 多测师讲解python_模块(导入模块和内置模块)_高级讲师肖sir
#自定义模块# from aaa import * #指定导入某个包中具体的类.函数.方法## A.fun1(2,2) #import +模块名 :# # import +模块名+.+.+# # 导入 ...
- 多测师讲解html _无序列表006_高级讲师肖sir
<!DOCTYPE html><html> <head> <meta charset="UTF-8"> <title>无 ...
- 多测师讲解_007 hashlib练习
#Hash,译做"散列",也有直接音译为"哈希"的.把任意长度的输入,通过某种hash算法,变换成固定长度的输出,该输出就是散列值,也称摘要值.该算法就是哈希函 ...
- MacBook连接蓝牙鼠标、蓝牙键盘失败的解决方案
问题: keychron k4连接不上MacBook,但是win10和iPhone都可以成功连接. 解决方法: 1.关闭wifi: 2.连接蓝牙键盘: 3.稍等一会,再连接wifi就可以了. 另外,苹 ...
- 【UR #2】猪猪侠再战括号序列
UOJ小清新题表 题目摘要 UOJ链接 有一个由 \(n\) 个左括号 "(" 和 \(n\) 个右括号 ")" 组成的序列.每次操作时可以选定两个数 \(l, ...
- GA001-181-21
Composite State with History The Composite State with History Pattern describes an entity (e.g. Cl ...
- linux(centos8):使用namespace做资源隔离
一,namespace是什么? namespace 是 Linux 内核用来隔离内核资源的方式. 它是对全局系统资源的封装隔离, 处于不同 namespace 的进程拥有独立的全局系统资源, 改变一个 ...
