步进电机的Arduino库函数
This library allows you to control unipolar or bipolar stepper motors. To use it you will need a stepper motor, and the appropriate hardware to control it. For more on that, see Tom Igoe's notes on steppers.
函数
Stepper(steps, pin1, pin2) 步进电机定义
Stepper(steps, pin1, pin2, pin3, pin4) 步进电机定义
Description 解释
This function creates a new instance of the Stepper class that represents a particular stepper motor attached to your Arduino board. Use it at the top of your sketch, above setup() and loop(). The number of parameters depends on how you've wired your motor - either using two or four pins of the Arduino board.
Parameters 参数
steps: the number of steps in one revolution of your motor. If your motor gives the number of degrees per step, divide that number into 360 to get the number of steps (e.g. 360 / 3.6 gives 100 steps). (int) 一圈对应的步数
pin1, pin2: two pins that are attached to the motor (int)
pin3, pin4: optional the last two pins attached to the motor, if it's connected to four pins (int)
Returns A new instance of the Stepper motor class.
setSpeed(rpm) 速度设定
Description 解释
Sets the motor speed in rotations per minute (RPMs). This function doesn't make the motor turn, just sets the speed at which it will when you call step().
Parameters 参数
rpms: the speed at which the motor should turn in rotations per minute - a positive number (long)
Returns None 无返回值
step(steps) 步数执行
Description
Turns the motor a specific number of steps, at a speed determined by the most recent call to setSpeed(). This function is blocking; that is, it will wait until the motor has finished moving to pass control to the next line in your sketch. For example, if you set the speed to, say, 1 RPM and called step(100) on a 100-step motor, this function would take a full minute to run. For better control, keep the speed high and only go a few steps with each call to step().
Parameters
steps: the number of steps to turn the motor - positive to turn one direction, negative to turn the other (int)
Returns None
举例
例1 Stepper Motor Knob 用电位器控制步进电机步数
Control a highly accurate stepper motor using a potentiometer
Stepper motors, due to their unique design, can be controlled to a high degree of accuracy without any feedback mechanisms. The shaft of a stepper, mounted with a series of magnets, is controlled by a series of electromagnetic coils that are charged positively and negatively in a specific sequence, precisely moving it forward or backward in small "steps".
There are two types of steppers, Unipolars and Bipolars, and it is very important to know which type you are working with. For each of the motors, there is a different circuit. The example code will control both kinds of motors. See the unipolar and bipolar motor schematics for information on how to wire up your motor.
In this example, a potentiometer (or other sensor) on analog input 0 is used to control the movement of a stepper motor using the Arduino Stepper Library. The stepper is controlled by with digital pins 8, 9, 10, and 11 for either unipolar or bipolar motors.
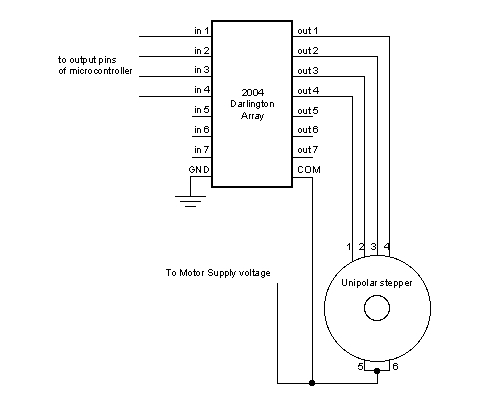
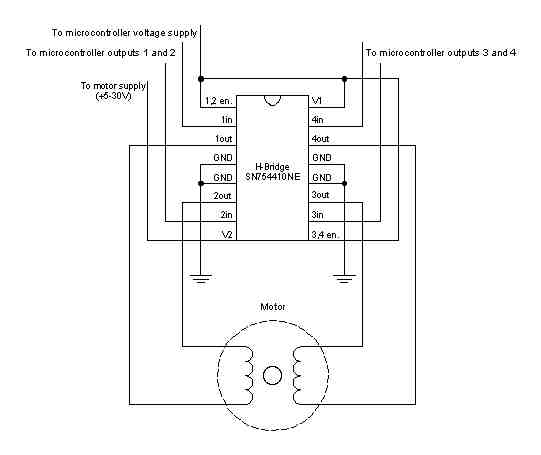
The Arduino or Genuino board will connect to a U2004 Darlington Array if you're using a unipolar stepper or a SN754410NE H-Bridge if you have a bipolar motor.
For more information about the differences of the two types, please take a look at Tom Igoe's page on stepper motors.
Hardware Required 硬件
Arduino or Genuino Board
10k ohm potentiometer
stepper motor
U2004 Darlington Array (if using a unipolar stepper)
SN754410ne H-Bridge (if using a bipolar stepper)
power supply appropriate for your particular stepper
hook-up wires
breadboard
Circuits 电路
Below you'll find circuits for both unipolar and bipolar steppers. In either case, it is best to power your stepper motors from an external supply, as they draw too much to be powered directly from your Arduino board.
In both circuits, connect a 10k pot to power and ground, with it's wiper outputting to analog pin 0.
Note: Both circuits below are four wire configurations. Two wire configurations will not work with the code provided.
Unipolar Stepper Circuit and schematic:
Bipolar Stepper Circuit and schematic:
Code 程序
For both unipolar and bipolar steppers
 1 /*

 2 * MotorKnob

 3 ** A stepper motor follows the turns of a potentiometer (or other sensor) on analog input 0.

 4 ** http://www.arduino.cc/en/Reference/Stepper

 5 * This example code is in the public domain.

 6 */

 7

 8 #include <Stepper.h>

 9 #define STEPS 100     // change this to the number of steps on your motor

10   // create an instance of the stepper class, specifying

11   // the number of steps of the motor and the pins it's attached to

12 Stepper stepper(STEPS, 8, 9, 10, 11);

13 int previous = 0;    // the previous reading from the analog input

14

15 void setup()

16 {

17     stepper.setSpeed(30);   // set the speed of the motor to 30 RPMs

18 }

19

20 void loop()

21 {

22     int val = analogRead(0);   // get the sensor value

23   // move a number of steps equal to the change in the sensor reading

24     stepper.step(val - previous);   // remember the previous value of the sensor

25     previous = val;

26 }
例2 Stepper Speed Control 用电位器控制步进电机速度
Control the stepping speed with a potentiometer
硬件与电路部分,与上例同
Code 程序
For both unipolar and bipolar steppers
 1 /*

 2 Stepper Motor Control - speed control

 3 This program drives a unipolar or bipolar stepper motor.

 4 The motor is attached to digital pins 8 - 11 of the Arduino.

 5 A potentiometer is connected to analog input 0.

 6     The motor will rotate in a clockwise direction. The higher the potentiometer value,the faster the motor speed. Because setSpeed() sets the delay between steps,you may notice the motor is less responsive to changes in the sensor value at low speeds.

 7

 8 Created 30 Nov. 2009,Modified 28 Oct 2010,by Tom Igoe

 9 */

10

11 #include <Stepper.h>

12 const int stepsPerRevolution = 200;

13 // change this to fit the number of steps per revolution

14   // for your motor initialize the stepper library on pins 8 through 11:

15 Stepper myStepper(stepsPerRevolution, 8, 9, 10, 11);

16 int stepCount = 0;   // number of steps the motor has taken

17

18 void setup()

19 {

20     // nothing to do inside the setup

21 }

22

23 void loop()

24  {

25     int sensorReading = analogRead(A0); // read the sensor value:

26     int motorSpeed = map(sensorReading, 0, 1023, 0, 100);

27     // map it to a range from 0 to 100

28     if (motorSpeed > 0) // set the motor speed:

29     {

30         myStepper.setSpeed(motorSpeed);

31         myStepper.step(stepsPerRevolution / 100); // step 1/100 of a revolution:

32     }

33 }
例3 Stepper One Revolution 正转一圈反转一圈
Turn the shaft one revolution clockwise and one counterclockwise.
硬件与电路部分,与上例同
Code 程序
For both unipolar and bipolar steppers
 1 /*

 2 Stepper Motor Control - one revolution

 3 This program drives a unipolar or bipolar stepper motor.

 4 The motor is attached to digital pins 8 - 11 of the Arduino.

 5     The motor should revolve one revolution in one direction, then one revolution in the other direction.

 6

 7 Created 11 Mar. 2007,Modified 30 Nov. 2009,by Tom Igoe

 8 */

 9 #include <Stepper.h>

10 const int stepsPerRevolution = 200;

11 // change this to fit the number of steps per revolution

12  // for your motor initialize the stepper library on pins 8 through 11:

13 Stepper myStepper(stepsPerRevolution, 8, 9, 10, 11);

14

15 void setup()

16 {

17     myStepper.setSpeed(60);   // set the speed at 60 rpm:

18     Serial.begin(9600);   // initialize the serial port:

19 }

20

21 void loop()

22 {

23     Serial.println("clockwise");   // step one revolution in one direction:

24     myStepper.step(stepsPerRevolution);

25     delay(500);

26     Serial.println("counterclockwise");   // step one revolution in the other         direction:

27     myStepper.step(-stepsPerRevolution);

28     delay(500);

29 }
例4 One step at a time 一次只走一步
Turn the shaft step by step to check the proper wiring of the motor.
硬件与电路部分,与上例同
Code 程序
For both unipolar and bipolar steppers
 1 /*

 2 Stepper Motor Control - one step at a time

 3 This program drives a unipolar or bipolar stepper motor.

 4 The motor is attached to digital pins 8 - 11 of the Arduino.

 5     The motor will step one step at a time, very slowly. You can use this to test that you've got the four wires of your stepper wired to the correct pins. If wired correctly, all steps should be in the same direction.

 6     Use this also to count the number of steps per revolution of your motor,if you don't know it. Then plug that number into the one Revolution example to see if you got it right.

 7

 8 Created 30 Nov. 2009,by Tom Igoe

 9 */

10

11 #include <Stepper.h>

12 const int stepsPerRevolution = 200; // change this to fit the number of steps per revolution

13     // for your motor initialize the stepper library on pins 8 through 11:

14 Stepper myStepper(stepsPerRevolution, 8, 9, 10, 11);

15 int stepCount = 0; // number of steps the motor has taken

16

17 void setup()

18 {

19     Serial.begin(9600);   // initialize the serial port:

20 }

21

22 void loop()

23 {

24     myStepper.step(1);   // step one step:

25     Serial.print("steps:");

26     Serial.println(stepCount);

27     stepCount++;

28     delay(500);

29 }
步进电机的Arduino库函数的更多相关文章
- 总线SPI的Arduino库函数
来源参考:https://www.cnblogs.com/MyAutomation/p/9348480.html 总线SPI的Arduino库函数 SPI基本知识 SPI:高速同步串行口.是一种标准的 ...
- OneWire总线的Arduino库函数
OneWire总线基本点 One-wire总线是DALLAS公司研制开发的一种协议,采用单根信号线,既传输时钟,又传输数据而且数据传输是双向的.它具有节省I/O 口线资源.结构简单.成本低廉.便于总线 ...
- I2C总线的Arduino库函数
I2C总线的Arduino库函数 I2C即Inter-Integrated Circuit串行总线的缩写,是PHILIPS公司推出的芯片间串行传输总线.它以1根串行数据线(SDA)和1根串行时钟线(S ...
- Arduino库函数中文说明
#define 常量名 常量值 % 取模运算符 String abc / char abc[n] 定义字符串 pinMode(pin,mode); 用于引脚的初始化 mode包括 INPUT ...
- arduino库函数1
https://wenku.baidu.com/view/e657b1f0bcd126fff6050baf.html 的阅读笔记.现在到了 第四十页. setup应该是 在开始 执行一次. 然后 lo ...
- 伺服电机的Arduino库函数
servo.attach(pin) //连接伺服电机的信号线于控制板的引脚,9或10号引脚servo.attach(pin, min, max) servo: a variable of type ...
- Arduino小车学习与研究
信安系统设计基础实践模块 Arduino小车学习与研究 ================== 陈都(20135328) 余佳源(20135321) 莫凡(20135225) ---------- 索引 ...
- Arduino小车学习与研究博客
Arduino小车学习与研究博客 信安系统设计基础实践模块 Arduino小车学习与研究 ================== 陈都(20135328) 余佳源(20135321) 莫凡(201352 ...
- AVR开发 Arduino方法(一) 端口子系统
Arduino UNO R3使用的主处理器ATMega328P上有3个8位的输入/输出端口,它们分别是PB,PC和PD.Arduino IDE提供的Blink示例可以帮助我们了解端口的数字输出功能: ...
随机推荐
- Python办公自动化之Excel做表自动化:全网最全,看这一篇就够了!
文章目录 很多人学习python,不知道从何学起.很多人学习python,掌握了基本语法过后,不知道在哪里寻找案例上手.很多已经做案例的人,却不知道如何去学习更加高深的知识.那么针对这三类人,我给大家 ...
- Mono生命周期小实验
今天在写代码的时候,遇到一个初始化顺序问题,于是做了一个实验,下面记录结果: 情景: 1.在 脚本A中实例化 一个预制体,该预制体挂有脚本B 2.在 脚本A中,获取实例化物体 身上的 脚本B,并且设置 ...
- UNITY3D UGUI学习--canvas
首先从canvas的参数说起走. Canvas Component是UI布局和渲染的抽象空间,所有的UI元素都必须在此组件之下. Render Mode UI的渲染方式,有三种: Screen Spa ...
- 避免nullpointer 空指针
来自知乎: 一般在服务器返回的数据上我们会做数据合法性检测,所以在api文档上需要注明字段的取值范围,然后客户端根据这个去做数据检测,缺段就直接走数据错误的流程,这个很大程度上避免了不少nullpoi ...
- java初探(1)之秒杀的业务简单实现
前言 秒杀的业务场景广泛存在于电商当中,即有一个倒计时的时间限制,当倒计时为0时,秒杀开始,秒杀之后持续很小的一段时间,而且秒杀的商品很少,因此会有大量的顾客进行购买,会产生很大的并发量,从而创造技术 ...
- 详细分析链表中的递归性质(Java 实现)
目录 链表中的递归性质 前言 LeetCode 上关于链表的一道问题 203 号题目 移除链表中的元素 递归的基本概念与示例 链表天然的递归性 小结 链表中的递归性质 前言 在前面的 链表的数据结构的 ...
- 网址中的静态资源 public
客户端浏览器收到的HTML响应内容中如果带有 link img script video audio 等带有src或者href标签时候,这些都是外部链接资源请求url.浏览器会默认自动性的对这些资源 ...
- 写给.NET开发者的Python教程(三):运算符、条件判断和循环语句
本节会介绍Python中运算符的用法,以及条件判断和循环语句的使用方法. 运算符 运算符包括算术运算符.赋值运算符.比较运算符.逻辑运算符等内容,大部分用法和C#基本一致,下面我们来看一下: 算数运算 ...
- TonWeb6.1Linux安装文档
东方通部署文档 东方通安装部署文档 准备文件:开始安装:警告:在安装之前先安装JDK,JDK要求JDK5以上Linux安装:运行安装包sh Install_TW6.1.5.15_Standard_ ...
- axure rp extension for chrome怎么用
1)打开文件(原型图)的resources文件夹>chrome文件夹>将文件axure-chrome-extension.crx拉至谷歌浏览器的扩展程序页面,点击确定添加 2)提示出错时, ...