IdentityServer4专题之七:Authorization Code认证模式
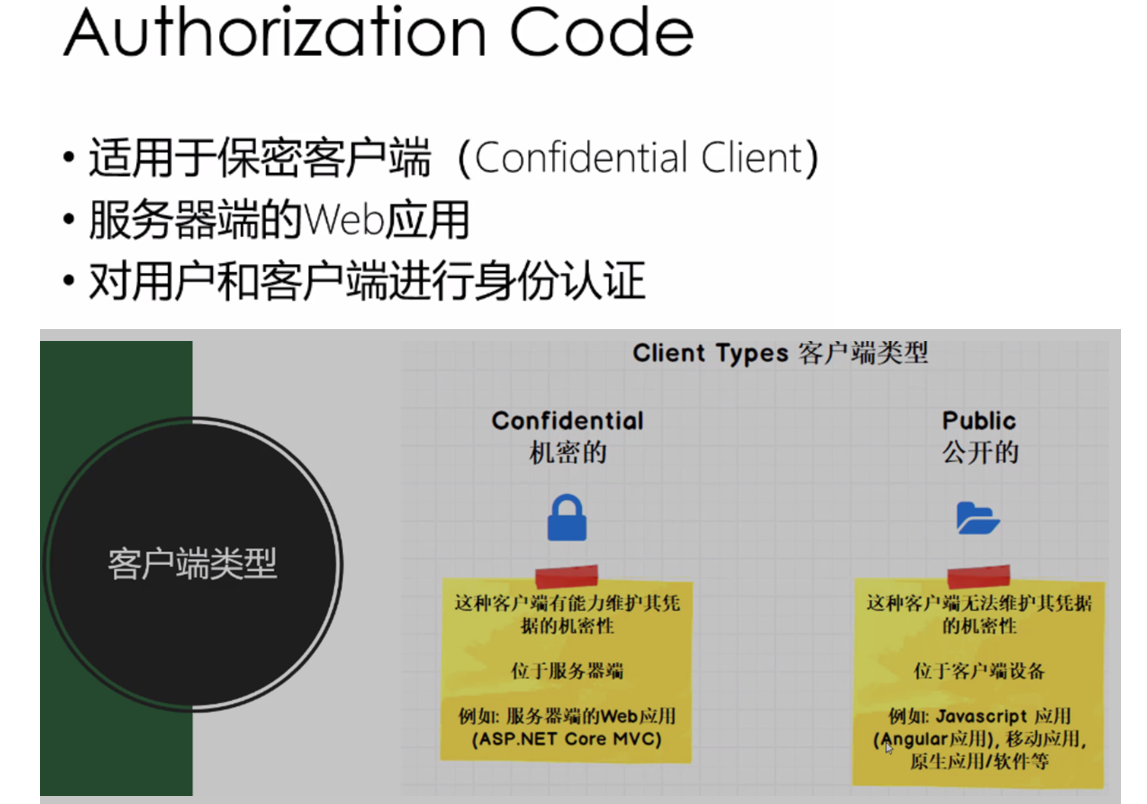
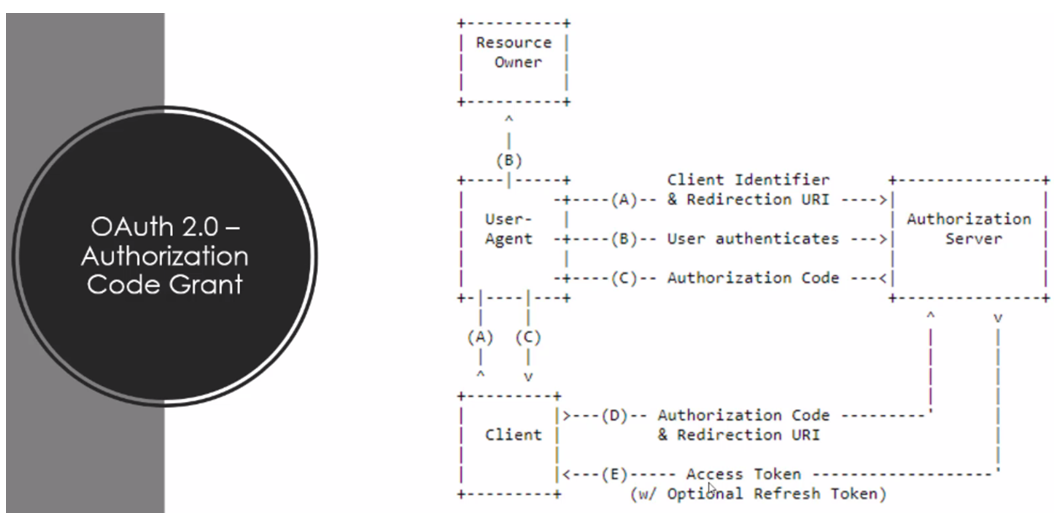
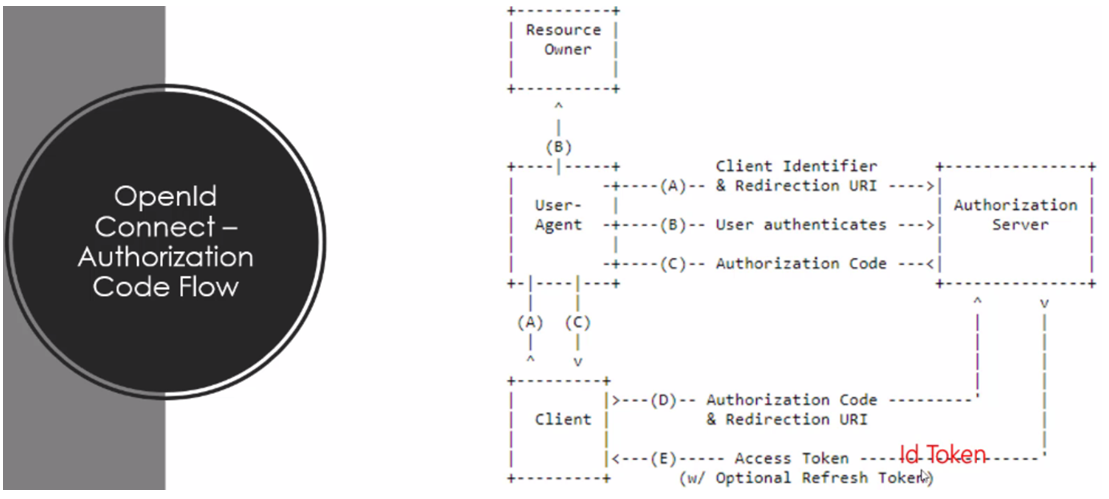
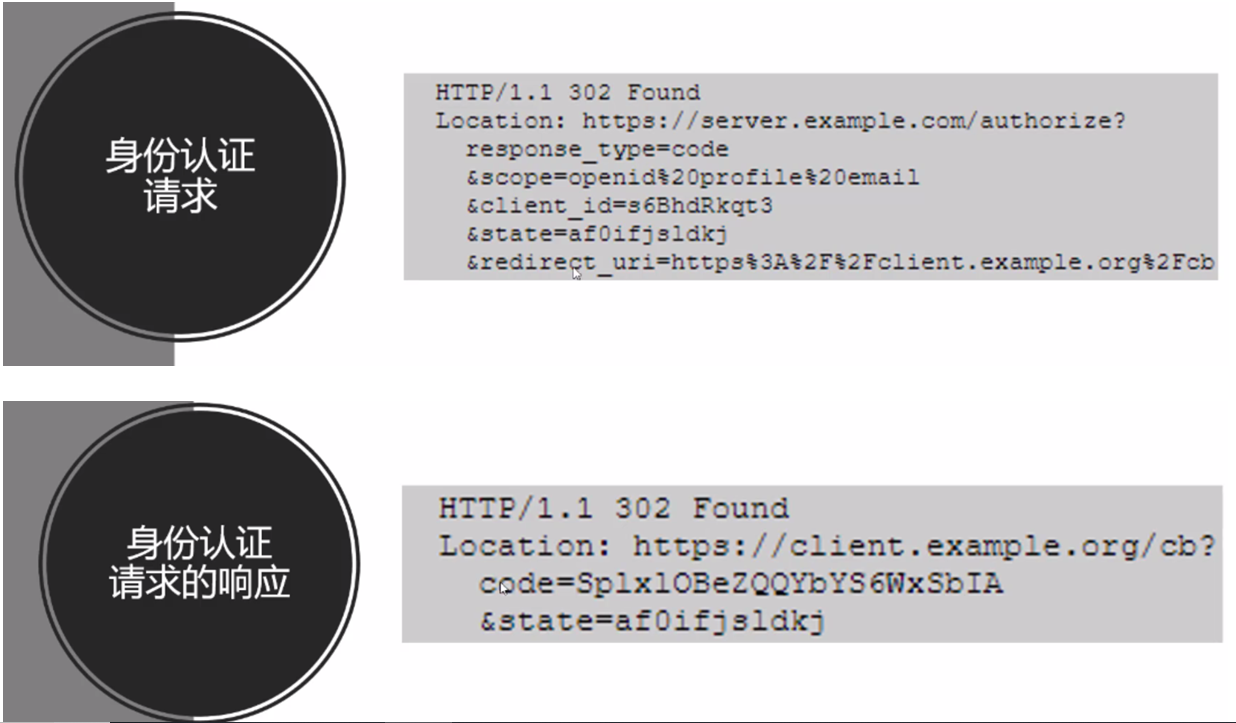

(1)identityserver4授权服务器端
public static class Config
{
public static IEnumerable<IdentityResource> GetIdentityResources()
{
return new IdentityResource[]
{
new IdentityResources.OpenId(),
new IdentityResources.Profile(),
new IdentityResources.Email(),
new IdentityResources.Phone(),
new IdentityResources.Address(),
};
}
public static IEnumerable<ApiResource> GetApis()
{
return new ApiResource[]
{
new ApiResource("api1", "My API #1")
};
}
public static IEnumerable<Client> GetClients()
{
return new[]
{
new Client
{
ClientId="mvc client",
ClientName="ASP.NET Core MVC Client",
AllowedGrantTypes=GrantTypes.CodeAndClientCredentials,
ClientSecrets={new Secret( "mvc secret".Sha256())},
RedirectUris={"http://localhost:5002/signin-oidc"},
FrontChannelLogoutUri="http://localhost:5002/signout-oidc",
PostLogoutRedirectUris={"http://localhost:5002/signout-callback-oidc"},
AlwaysIncludeUserClaimsInIdToken=true,//将用户所有的claims包含在IdToken内
AllowOfflineAccess=true,//offline_access,其实指的是能否用refreshtoken重新申请令牌
AllowedScopes =
{
"api1",
IdentityServerConstants.StandardScopes.OpenId,
IdentityServerConstants.StandardScopes.Profile,
IdentityServerConstants.StandardScopes.Address,
IdentityServerConstants.StandardScopes.Phone,
IdentityServerConstants.StandardScopes.Email
}
}
};
}
}
(2)客户端,还是需要安装IdentityModel库,
在startup.cs的ConfigurServices一节,需要做如下添加:
//关闭默认映射,否则它可能修改从授权服务返回的各种claim属性
JwtSecurityTokenHandler.DefaultInboundClaimTypeMap.Clear();
//添加认证服务,并设置其有关选项
services.AddAuthentication(options =>
{
//客户端应用设置使用"Cookies"进行认证
options.DefaultScheme =CookieAuthenticationDefaults.AuthenticationScheme ;
//identityserver4设置使用"oidc"进行认证
options.DefaultChallengeScheme =OpenIdConnectDefaults.AuthenticationScheme ;
}).AddCookie(CookieAuthenticationDefaults.AuthenticationScheme)
//对使用的OpenIdConnect进行设置,此设置与Identityserver的config.cs中相应client配置一致才可能登录授权成功
.AddOpenIdConnect(OpenIdConnectDefaults.AuthenticationScheme, options=> {
options.SignInScheme = CookieAuthenticationDefaults.AuthenticationScheme;
options.Authority = "http://localhost:5000";
options.RequireHttpsMetadata = false;
options.ClientId = "mvc client";
options.ClientSecret = "mvc secret";
options.SaveTokens = true;
options.ResponseType = "code";
options.Scope.Clear();
options.Scope.Add("api1");
options.Scope.Add(OidcConstants.StandardScopes.OpenId);//"openid"
options.Scope.Add(OidcConstants.StandardScopes.Profile);//"profile"
options.Scope.Add(OidcConstants.StandardScopes.Address);
options.Scope.Add(OidcConstants.StandardScopes.Email);
options.Scope.Add(OidcConstants.StandardScopes.Phone);
// 与identity server的AllowOfflineAccess=true,对应。offline_access,指的是能否用refreshtoken重新申请令牌
options.Scope.Add(OidcConstants.StandardScopes.OfflineAccess);
});
在Confiure一节,app.UseMvc之前添加如下内容:
app.UseAuthentication();
然后,在controller中使用时,按如下方式: 通常需如下引用
using System;
using System.Collections.Generic;
using System.Diagnostics;
using System.Linq;
using System.Net.Http;
using System.Threading.Tasks;
using IdentityModel.Client;
using Microsoft.AspNetCore.Authentication;
using Microsoft.AspNetCore.Authentication.Cookies;
using Microsoft.AspNetCore.Authentication.OpenIdConnect;
using Microsoft.AspNetCore.Authorization;
using Microsoft.AspNetCore.Mvc;
using Microsoft.IdentityModel.Protocols.OpenIdConnect;
using MvcClient.Models;
//获取AccessToken、IdToken、RefreshToken时:
[Authorize]
public async Task<IActionResult> Privacy()
{
var accessToken = await HttpContext.GetTokenAsync(OpenIdConnectParameterNames.AccessToken);
var idToken = await HttpContext.GetTokenAsync(OpenIdConnectParameterNames.IdToken);
var refreshToken = await HttpContext.GetTokenAsync(OpenIdConnectParameterNames.RefreshToken);
var authorizationCode = await HttpContext.GetTokenAsync(OpenIdConnectParameterNames.Code);
ViewData["idToken"] = idToken;
ViewData["refreshToken"] = refreshToken;
ViewData["accessToken"] = accessToken;
return View();
}
//访问Api资源时
public async Task<IActionResult> AccessApi()
{
var client = new HttpClient();
var disco = await client.GetDiscoveryDocumentAsync("http://localhost:5000");
ViewData["disco"] = disco.Error;
if (disco.IsError)
{
ViewData["disco"] = disco.Error;
return View();
}
var accessToken = await HttpContext.GetTokenAsync(OpenIdConnectParameterNames.AccessToken);
client.SetBearerToken(accessToken);
var response = await client.GetAsync("http://localhost:5001/api/values");
if (!response.IsSuccessStatusCode)
{
ViewData["response_error"] = response.StatusCode;
return View();
}
ViewData["response-content"] = await response.Content.ReadAsStringAsync();
return View();
}
从客户端及identityserver4登出时:
public async Task<IActionResult> Logout()
{
await HttpContext.SignOutAsync(CookieAuthenticationDefaults.AuthenticationScheme);
await HttpContext.SignOutAsync(OpenIdConnectDefaults.AuthenticationScheme);
return View();
}
如果登出需要跳转回到客户端应用网站,则需在将IdentityServer4的命名空间IdentityServer4.Quickstart.UI下的AccountOptions类中
public static bool AutomaticRedirectAfterSignOut = true;
这样,从identityserver登出后,将自动跳转到客户应用页面。
IdentityServer4专题之七:Authorization Code认证模式的更多相关文章
- 微信支持的Authorization code授权模式(公众号开发)(开放平台资料中心中的代公众号发起网页授权)
链接:https://blog.csdn.net/ASZJBGD/article/details/82838356 主要流程分为两步: 1.获取code 2.通过code换取accesstoken 流 ...
- OAuth2.0和企业内部统一登录,token验证方式,OAuth2.0的 Authorization code grant 和 Implicit grant区别
统一登录是个很多应用系统都要考虑的问题,多个项目的话最好前期进行统一设计,否则后面改造兼容很麻烦: cas认证的方式:新公司都是老项目,用的是cas认证的方式,比较重而且依赖较多,winform的项目 ...
- OAuth2.0安全设计之Authorization Code
OAuth 2.0 有 4 种认证流程: 授权码模式(authorization code) 简化模式(implicit) 密码模式(resource owner password credentia ...
- IdentityServer4 (3) 授权码模式(Authorization Code)
写在前面 1.源码(.Net Core 2.2) git地址:https://github.com/yizhaoxian/CoreIdentityServer4Demo.git 2.相关章节 2.1. ...
- asp.net权限认证:OWIN实现OAuth 2.0 之授权码模式(Authorization Code)
asp.net权限认证系列 asp.net权限认证:Forms认证 asp.net权限认证:HTTP基本认证(http basic) asp.net权限认证:Windows认证 asp.net权限认证 ...
- 基于OWIN WebAPI 使用OAUTH2授权服务【授权码模式(Authorization Code)】
之前已经简单实现了OAUTH2的授权码模式(Authorization Code),但是基于JAVA的,今天花了点时间调试了OWIN的实现,基本就把基于OWIN的OAUHT2的四种模式实现完了.官方推 ...
- IdentityServer4之Authorization Code(授权码)相对更安全
前言 接着授权模式聊,这次说说Authorization Code(授权码)模式,熟悉的微博接入.微信接入.QQ接入都是这种方式(这里说的是oauth2.0的授权码模式),从用户体验上来看,交互方式和 ...
- OAuth2.0学习(1-4)授权方式1-授权码模式(authorization code)
参与者列表: (1) Third-party application:第三方应用程序,又称客户端(client),如:"云冲印".社交应用. (2)HTTP service:HTT ...
- .Net Core身份认证:IdentityServer4实现OAuth 2.0 客户端模式 - 简书
原文:.Net Core身份认证:IdentityServer4实现OAuth 2.0 客户端模式 - 简书 一.客户端模式介绍 客户端模式(Client Credentials Grant)是指客户 ...
随机推荐
- ES5-bind用法及与以前的apply和call
当我们调用一个函数的时候,函数中的this一般是指向调用者的.但是我们其实可以在调用函数的时候,传入一个对象,让函数中的this指向我们传入的对象,而不是调用者本身. apply,call,bind都 ...
- 吴裕雄--天生自然Numpy库学习笔记:NumPy 从已有的数组创建数组
import numpy as np x = [1,2,3] a = np.asarray(x) print (a) import numpy as np x = (1,2,3) a = np.asa ...
- Nexus-vPC基础实验
一.实验拓扑: 由于条件有限,使用两个N5K做基本的vPC实验,Peer Keepalive Link使用的是两个Nexus 5K的Mgm0接口. 二.配置步骤:1.先构建vPC domain,并在d ...
- Postgresql查询表和表结构
查询表名 SELECT tablename FROM pg_tables WHERE tablename NOT LIKE 'pg%' AND tablename NOT LIKE 'sql_%' O ...
- 判断ie8以下 或者ie9以下
1.各种浏览器下载 http://browsehappy.osfipin.com/ 2.ie8浏览器以下 if(![].map) { // IE8浏览器 alert('ie8浏览器') } 3.ie9 ...
- 秋招落幕,对自己的总结by2018-10-20
在今天阿里沟通offer完毕,正式三方也确定了,一切如梦,想想1月的自己还担心未来的自己会花落谁家,到10月的今天,一切尘埃落地.一直不怎么喜欢总结自己的历程,今天无聊的我也总结一波吧. 准确的说没有 ...
- cnblog 开通啦!
喜大普奔! 终于开通cnblog了!以后有blog都会放这里哦 > o < 希望大家可以关注窝哦.
- PAT T1022 Werewolf
暴力搜索加剪枝~ #include<bits/stdc++.h> using namespace std; ; int a[maxn]; bool visit[maxn]; vector& ...
- Linux系统在IT行业处于什么位置
相信每一位程序员对于linux都不陌生,不管是新入行的小白,还是有着十几年编程经验的大佬,都知道Linux在IT行业中的位置吧! 我是一名Web JAVA开发的小白,对于初入IT行业的小白来说,工 ...
- RESTFul Client入门实例
client.html文件内容为: <!DOCTYPE html> <html> <head> <title>RESTFul Client test p ...
