Android-自定义圆环
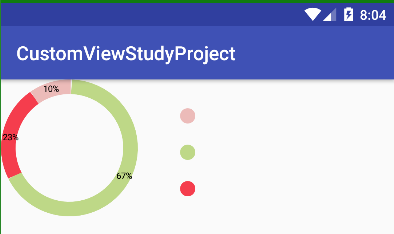
效果图:
布局的代码,指定引用自定义View类:
<!-- 绘制圆环 -->

<LinearLayout

    xmlns:android="http://schemas.android.com/apk/res/android"

    xmlns:myswitch="http://schemas.android.com/apk/res-auto"

    xmlns:tools="http://schemas.android.com/tools"

    android:layout_width="match_parent"

    android:layout_height="400px"

    android:orientation="horizontal">

    <custom.view.upgrade.draw_ring.DrawRing

        android:layout_width="387px"

        android:layout_height="387px"

        />

    <RelativeLayout

        android:layout_width="wrap_content"

        android:layout_height="match_parent"

        android:orientation="vertical"

        android:layout_marginLeft="40dp"

        android:paddingTop="30dp"

        android:paddingBottom="30dp">

        <View

            android:layout_width="16dip"

            android:layout_height="16dip"

            android:background="@drawable/super_financing"/>

        <View

            android:layout_width="16dip"

            android:layout_height="16dip"

            android:background="@drawable/true_financing"

            android:layout_centerVertical="true"/>

        <View

            android:layout_width="16dip"

            android:layout_height="16dip"

            android:background="@drawable/diandian_voal"

            android:layout_alignParentBottom="true"

            />

    </RelativeLayout>

</LinearLayout>
三个小圆点的代码:
<?xml version="1.0" encoding="utf-8"?>

<shape xmlns:android="http://schemas.android.com/apk/res/android"

    android:shape="oval" >

    <solid android:color="@color/ring_test2" />

    <corners android:radius="5dip" />

</shape>

<?xml version="1.0" encoding="utf-8"?>

<shape xmlns:android="http://schemas.android.com/apk/res/android"

    android:shape="oval" >

    <solid android:color="@color/ring_test3" />

    <corners android:radius="5dip" />

</shape>

<?xml version="1.0" encoding="utf-8"?>

<shape xmlns:android="http://schemas.android.com/apk/res/android"

    android:shape="oval" >

    <solid android:color="@color/ring_test1" />

    <corners android:radius="5dip" />

</shape>
颜色值代码:
<?xml version="1.0" encoding="utf-8"?>

<resources>

    <color name="colorPrimary">#3F51B5</color>

    <color name="colorPrimaryDark">#303F9F</color>

    <color name="colorAccent">#FF4081</color>

    <color name="ring_test1">#BED887</color>

    <color name="ring_test2">#F53D4D</color>

    <color name="ring_test3">#ECBBB9</color>

</resources>
注意:我这一版,百分比值与绘制环的百分之多少,是写死的,后续我会更新成动态的绘制的
自定义圆环代码:
package custom.view.upgrade.draw_ring;

import android.annotation.SuppressLint;

import android.content.Context;

import android.graphics.Canvas;

import android.graphics.Color;

import android.graphics.Paint;

import android.graphics.RectF;

import android.os.Build;

import android.os.SystemClock;

import android.support.annotation.RequiresApi;

import android.util.AttributeSet;

import android.view.View;

import custom.view.R;

public class DrawRing extends View {

    // 定义画笔

    private Paint mPaint1;

    private Paint mPaint2;

    private Paint mPaint3;

    private Paint mPaintText;

    @RequiresApi(api = Build.VERSION_CODES.M)

    public DrawRing(Context context, AttributeSet attrs) {

        super(context, attrs);

        mPaint1 = new Paint();

        mPaint1.setAntiAlias(true);

        mPaint1.setColor(context.getColor(R.color.ring_test1));

        // mPaint1.setColor(Color.GREEN);

        //  设置样式为,空心的,这样那园环就出来了

        mPaint1.setStyle(Paint.Style.STROKE);

        // 设置那个圆环的粗细

        mPaint1.setStrokeWidth(40);

        mPaint2 = new Paint();

        mPaint2.setAntiAlias(true);

        mPaint2.setColor(context.getColor(R.color.ring_test2));

        // mPaint2.setColor(Color.RED);

        //  设置样式为,空心的,这样那园环就出来了

        mPaint2.setStyle(Paint.Style.STROKE);

        // 设置那个圆环的粗细

        mPaint2.setStrokeWidth(40);

        mPaint3 = new Paint();

        mPaint3.setAntiAlias(true);

        mPaint3.setColor(context.getColor(R.color.ring_test3));

        // mPaint3.setColor(Color.BLUE);

        //  设置样式为,空心的,这样那园环就出来了

        mPaint3.setStyle(Paint.Style.STROKE);

        // 设置那个圆环的粗细

        mPaint3.setStrokeWidth(40);

        mPaintText = new Paint();

        mPaintText.setAntiAlias(true);

        mPaintText.setColor(Color.BLACK);

        mPaintText.setTextSize(24);

    }

    private int w;

    private int h;

    private final int MOVE_VALUE = 88;

    @Override

    protected void onMeasure(int widthMeasureSpec, int heightMeasureSpec) {

        super.onMeasure(widthMeasureSpec, heightMeasureSpec);

        w = MeasureSpec.getSize(widthMeasureSpec);

        h = MeasureSpec.getSize(heightMeasureSpec);

        setMeasuredDimension(w, h);

    }

    @Override

    protected void onDraw(Canvas canvas) {

        super.onDraw(canvas);

        // 定义一个区域

        // 左边,上边,都给0

        // 右边与下边都给200

        RectF rectF = new RectF(20, 20, 356, 356);

        /*canvas.drawArc(rectF, 0, 241.2f, false, mPaint1);

        canvas.drawArc(rectF, 241.2f, 10, false, mPaint2);*/

        // useCenter:false  代表不花圆心

        // canvas.drawArc(rectF, 此值是开始点, 此值并不是从开始点到此值点 它会记录之前的值自动进行累加,false, mPaint1);

        // 360 * 0.67 = 241.2

        canvas.drawArc(rectF, 0 - MOVE_VALUE, 241.2f, false, mPaint1);

        // 360 * 0.23

        canvas.drawArc(rectF, 241.2f - MOVE_VALUE, 82.0f, false, mPaint2);

        // 360 * 0.10

        canvas.drawArc(rectF, 241.2f + 82.0f - MOVE_VALUE, 36, false, mPaint3);

        canvas.drawText("67%", canvas.getWidth() - 70, (canvas.getHeight() / 2) + 80, mPaintText);

        canvas.drawText("23%", 5, (canvas.getHeight() / 2) - 26, mPaintText);

        canvas.drawText("10%", 116, 34, mPaintText);

       // draw();

    }

    // 可以实现缓慢加载绘制的效果,但没有实际意义,就全部去除了

    /*private int countI;

    private void draw() {

        countI++;

        if (countI < 120) {

            SystemClock.sleep(18);

            invalidate();

        }

    }*/

}
Android-自定义圆环的更多相关文章
- Android自定义View之ProgressBar出场记
关于自定义View,我们前面已经有三篇文章在介绍了,如果筒子们还没阅读,建议先看一下,分别是android自定义View之钟表诞生记.android自定义View之仿通讯录侧边栏滑动,实现A-Z字母检 ...
- Android 自定义View修炼-自定义View-带百分比进度的圆形进度条(采用自定义属性)
很多的时候,系统自带的View满足不了我们功能的需求,那么我们就需要自己来自定义一个能满足我们需求的View,自定义View我们需要先继承View,添加类的构造方法,重写父类View的一些方法,例如o ...
- Android 自定义 View 圆形进度条总结
Android 自定义圆形进度条总结 版权声明:本文为博主原创文章,未经博主允许不得转载. 微博:厉圣杰 微信公众号:牙锅子 源码:CircleProgress 文中如有纰漏,欢迎大家留言指出. 最近 ...
- android 自定义动画
android自定义动画注意是继承Animation,重写里面的initialize和applyTransformation,在initialize方法做一些初始化的工作,在applyTransfor ...
- Android自定义View 画弧形,文字,并增加动画效果
一个简单的Android自定义View的demo,画弧形,文字,开启一个多线程更新ui界面,在子线程更新ui是不允许的,但是View提供了方法,让我们来了解下吧. 1.封装一个抽象的View类 B ...
- Android自定义View4——统计图View
1.介绍 周末在逛慕课网的时候,看到了一张学习计划报告图,详细记录了自己一周的学习情况,天天都是0节课啊!正好在学习Android自定义View,于是就想着自己去写了一个,这里先给出一张慕课网的图,和 ...
- (转)[原] Android 自定义View 密码框 例子
遵从准则 暴露您view中所有影响可见外观的属性或者行为. 通过XML添加和设置样式 通过元素的属性来控制其外观和行为,支持和重要事件交流的事件监听器 详细步骤见:Android 自定义View步骤 ...
- Android 自定义View合集
自定义控件学习 https://github.com/GcsSloop/AndroidNote/tree/master/CustomView 小良自定义控件合集 https://github.com/ ...
- Android 自定义View (五)——实践
前言: 前面已经介绍了<Android 自定义 view(四)-- onMeasure 方法理解>,那么这次我们就来小实践下吧 任务: 公司现有两个任务需要我完成 (1)监测液化天然气液压 ...
- Android 自定义 view(四)—— onMeasure 方法理解
前言: 前面我们已经学过<Android 自定义 view(三)-- onDraw 方法理解>,那么接下我们还需要继续去理解自定义view里面的onMeasure 方法 推荐文章: htt ...
随机推荐
- 黄聪:自定义WordPress前台、后台顶部菜单栏管理工具条的技巧
使用WordPress开发网站项目,很多时候都需要对进行后台定制,今天倡萌主要分享下自定义顶部管理工具条的使用技巧. 注:如无特殊说明,请将下面的代码添加到主题的 functions.php 或者插 ...
- Partition does not start on physical sector boundary
今天给一块硬盘分区,用fdisk按照默认步骤执行,遇到这个问题: [root@bogon ~]# fdisk /dev/sdfDevice contains neither a valid DOS p ...
- ROS使用国内的DDNS服务
未测试.转载余松老师的作品 虽然RouterOS 加入了cloud功能,但最近在配置RB2011的时候发现不好使,更新域名后无法正确解析到我的IP地址,虽然在cloud的public address中 ...
- php删除制定文件及文件夹
php遍历一个文件夹内的所有文件和文件夹,并删除所有文件夹和子文件夹下的所有文件的代码,通过递归方式实现达到清空一个目录的效果,代码简单实用. 用到的函数: scandir($path) 遍历一个文件 ...
- Calendar时间操作
1.Calendar是Java提供的一个util类,在java.util中.我们在开发过程中经常遇到,需要对时间进行处理的方式.而Java中Calendar给我们提供了很好的控制方式. 2.我这里主要 ...
- Autofac框架详解
一.组件 创建出来的对象需要从组件中来获取,组件的创建有如下4种(延续第一篇的Demo,仅仅变动所贴出的代码)方式: 1.类型创建RegisterType AutoFac能够通过反射检查一个类型,选择 ...
- asp.net webapi 自托管插件式服务
webapi问世已久,稀里糊涂的人哪它都当mvc来使,毕竟已mvc使用级别的经验就可以应对webapi. webapi和mvc在asp.net5时代合体了,这告诉我们,其实 它俩还是有区别的,要不现在 ...
- 自定义Hibernate Validator约束
定义注解 实现一个只能输入指定状态的约束条件 import javax.validation.Constraint; import javax.validation.Payload; import j ...
- 测试工具-PICT-微软基于数据项多个取值的正交法用例生成工具
下载 http://download.microsoft.com/download/f/5/5/f55484df-8494-48fa-8dbd-8c6f76cc014b/pict33.msi 这里使用 ...
- springboot 2.0 自动装配原理 以redis为例
当面试管问你springboot 和 普通spring 有什么区别? 您还在回答: 简化了配置 ,内置tomcat 等等 吗 ? 那只是皮毛, 最重要的还是自动化配置.一起来了解一下 第一步: 第二步 ...