Ubuntu 14.04配置虚拟主机
虚拟主机常用于在一个单独的IP地址上提供多个域名的网站服务。如果有人想在单个VPS的单个IP地址运行多个网站,这是非常有用的。在这个教程中,让我告诉你如何设置在Ubuntu 14.04 LTS的Apache网页服务器设置虚拟主机。请注意,这个教程只针对Ubuntu14.04的64位版本。
我不保证它也可以工作在其它更低的Ubuntu版本或者Ubuntu衍生版本(虽然可能过程是类似的)。
方案
在这个教程中,我会使用Ubuntu 14.04 64位 LTS,并搭建2个测试网站分别命名为“unixmen1.local” 和 “unixmen2.local”.我的测试机分别为192.168.1.250/24和server.unixmen.local。你可以根据你的需要更改虚拟域名。
安装Apache网站服务器
安装apache服务器之前,我们来更新一下我们的Ubuntu服务器:
- sudo apt-get update
然后,用下面命令来安装apache网络服务器:
- sudo apt-get install apache2
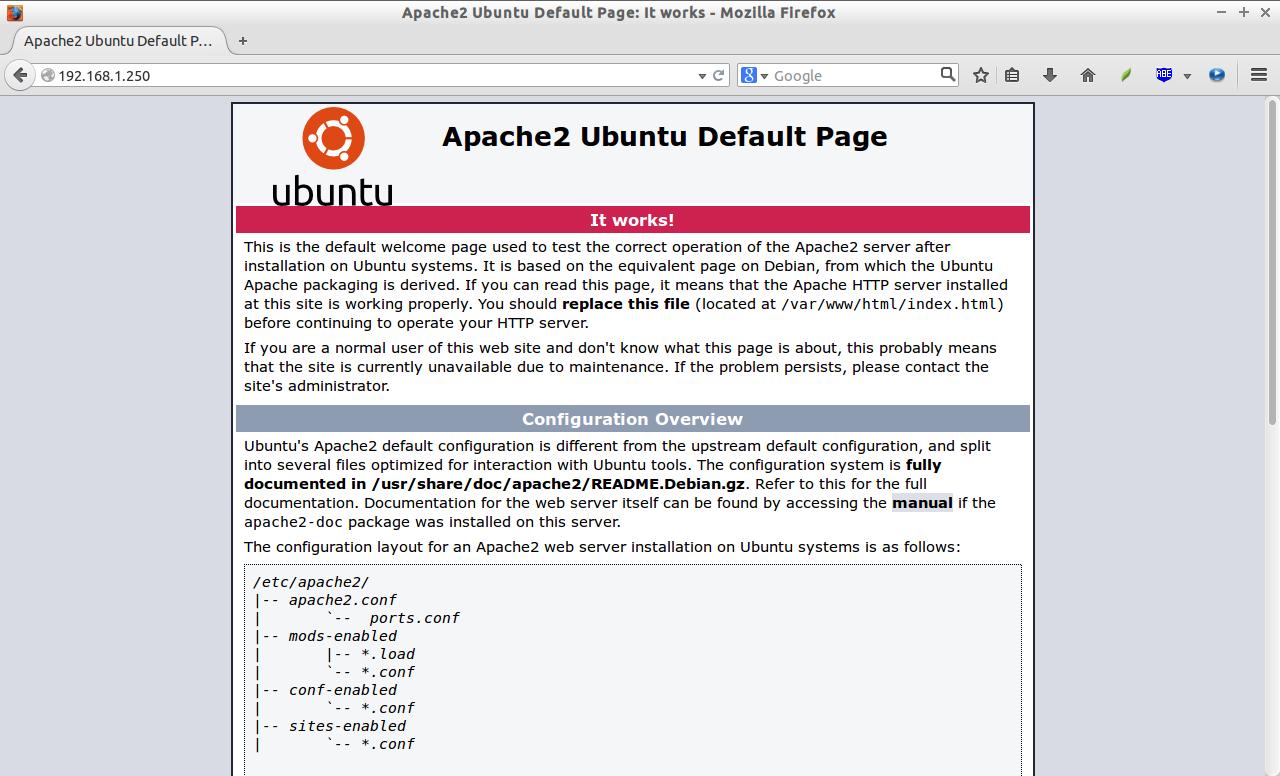
安装apache服务器之后,让我们通过这个URL http://你的服务器的IP地址/ 来测试网站服务器是否正常工作

如你所见,apache服务器已经工作了。
设置虚拟主机
1.创建虚拟目录
现在,让我们继续安装虚拟主机。正如我先前所述,我要新建2台虚拟主机分别命名为“unixmen1.local”和“unixmen2.local”.
创建一个公用的文件夹来存放这两台虚拟主机的数据。
首先,让我们为unixmen1.local这个站点创建一个目录:
- sudo mkdir -p /var/www/unixmen1.local/public_html
接着,为for unixmen2.local站点创建一个目录:
- sudo mkdir -p /var/www/unixmen2.local/public_html
2. 设置所有者和权限
上面目录现在只有root拥有权限。我们需要修改这2个目录的拥有权给普通用户,而不仅仅是root用户。
- sudo chown -R $USER:$USER /var/www/unixmen1.local/public_html/
- sudo chown -R $USER:$USER /var/www/unixmen2.local/public_html/
“$USER”变量指向了当前的登录用户。
设置读写权限给apache网页根目录(/var/www)及其子目录,这样每个人都可以从目录中读取文件。
- sudo chmod -R 755 /var/www/
这样,我们就创建好了一些文件夹来保存网络相关数据并分配必要的权限和所属用户。
3. 为虚拟主机创建示例页
现在,我们给网站增加示例页。第一步,让我们给虚拟主机unixmen1.local创建一个示例页。
给unixmen1.local虚拟主机创建一个示例页,
- sudo vi /var/www/unixmen1.local/public_html/index.html
添加以下内容:
- <html>
- <head>
- <title>www.unixmen1.local</title>
- </head>
- <body>
- <h1>Welcome To Unixmen1.local website</h1>
- </body>
- </html>
保存并关闭文件。
同样的,添加示例页到第二台虚拟主机。
- sudo vi /var/www/unixmen2.local/public_html/index.html
添加以下内容:
- <html>
- <head>
- <title>www.unixmen2.local</title>
- </head>
- <body>
- <h1>Welcome To Unixmen2.local website</h1>
- </body>
- </html>
保存并关闭文件。
4. 创建虚拟主机配置文件
默认情况下,apache有一个默认的虚拟主机文件叫000-default.conf。我们将会复制000-default.conf文件内容到我们新的虚拟主机配置文件中。
- sudo cp /etc/apache2/sites-available/000-default.conf /etc/apache2/sites-available/unixmen1.local.conf
- sudo cp /etc/apache2/sites-available/000-default.conf /etc/apache2/sites-available/unixmen2.local.conf
确保虚拟主机配置文件末尾包含.conf扩展名。
现在,修改unximen1.local.conf文件以符合需求。
- sudo vi /etc/apache2/sites-available/unixmen1.local.conf
使相关的变化直接呈现在unixmen1站点中(译注:以“#”开头的注释行可以忽略。)。
- <VirtualHost *:80>
- # The ServerName directive sets the request scheme, hostname and port that
- # the server uses to identify itself. This is used when creating
- # redirection URLs. In the context of virtual hosts, the ServerName
- # specifies what hostname must appear in the request's Host: header to
- # match this virtual host. For the default virtual host (this file) this
- # value is not decisive as it is used as a last resort host regardless.
- # However, you must set it for any further virtual host explicitly.
- #ServerName www.example.com
- ServerAdmin webmaster@unixmen1.local
- ServerName unixmen1.local
- ServerAlias www.unixmen1.local
- DocumentRoot /var/www/unixmen1.local/public_html
- # Available loglevels: trace8, ..., trace1, debug, info, notice, warn,
- # error, crit, alert, emerg.
- # It is also possible to configure the loglevel for particular
- # modules, e.g.
- #LogLevel info ssl:warn
- ErrorLog ${APACHE_LOG_DIR}/error.log
- CustomLog ${APACHE_LOG_DIR}/access.log combined
- # For most configuration files from conf-available/, which are
- # enabled or disabled at a global level, it is possible to
- # include a line for only one particular virtual host. For example the
- # following line enables the CGI configuration for this host only
- # after it has been globally disabled with "a2disconf".
- #Include conf-available/serve-cgi-bin.conf
- </VirtualHost>
同理,修改第二台主机文件。
- sudo vi /etc/apache2/sites-available/unixmen2.local.conf
使相关的修改在unixmen2 站点呈现出来。
- <VirtualHost *:80>
- # The ServerName directive sets the request scheme, hostname and port that
- # the server uses to identify itself. This is used when creating
- # redirection URLs. In the context of virtual hosts, the ServerName
- # specifies what hostname must appear in the request's Host: header to
- # match this virtual host. For the default virtual host (this file) this
- # value is not decisive as it is used as a last resort host regardless.
- # However, you must set it for any further virtual host explicitly.
- #ServerName www.example.com
- ServerAdmin webmaster@unixmen2.local
- ServerName unixmen2.local
- ServerAlias www.unixmen2.local
- DocumentRoot /var/www/unixmen2.local/public_html
- # Available loglevels: trace8, ..., trace1, debug, info, notice, warn,
- # error, crit, alert, emerg.
- # It is also possible to configure the loglevel for particular
- # modules, e.g.
- #LogLevel info ssl:warn
- ErrorLog ${APACHE_LOG_DIR}/error.log
- CustomLog ${APACHE_LOG_DIR}/access.log combined
- # For most configuration files from conf-available/, which are
- # enabled or disabled at a global level, it is possible to
- # include a line for only one particular virtual host. For example the
- # following line enables the CGI configuration for this host only
- # after it has been globally disabled with "a2disconf".
- #Include conf-available/serve-cgi-bin.conf
- </VirtualHost>
修改虚拟主机文件后,禁用默认的虚拟主机配置(000.default.conf),然后启用新的虚拟主机配置,如下所示。
- sudo a2dissite 000-default.conf
- sudo a2ensite unixmen1.local.conf
- sudo a2ensite unixmen2.local.conf
最后,重启apache服务器。
- sudo service apache2 restart
就是这样。现在,我们成功地配置了apach虚拟主机在我们的Ubuntu服务器上
Ubuntu 14.04配置虚拟主机的更多相关文章
- Ubuntu 12.04 之 虚拟主机的配置
Ubuntu 12.04 之 虚拟主机的配置 (1)打开etc/hosts文件 增加: 127.0.0.1 study.ubuntu.com 127.0.0.1 hello.ubuntu.com 12 ...
- Linux ->> UBuntu 14.04 LTE下主机名称和IP地址解析
UBuntu 14.04 LTE下主机名称和IP地址解析一些相关的配置文件: /etc/hosts: 主机文件.手工配置IP地址和主机名称间的映射.格式为每行一条映射条项: <machine_n ...
- Ubuntu 14.04 配置samba
Ubuntu 14.04 配置samba: 安装略 # vi /etc/samba/smb.conf security = user (在[global]下任意添加) [share] path = ...
- Ubuntu 14.04 配置vsftpd实现FTP服务器 - 通过FTP连接AWS
测试主机:亚马逊AWS EC2 系统:Ubuntu 14.04 想用AWS来做服务器玩,结果发现其不能像简单使用阿里云服务器那样用ftp连接,反正也不熟悉ftp服务器搭建,那就乘这个机会学习一下如何利 ...
- ZH奶酪:Ubuntu 14.04配置LAMP(Linux、Apache、MySQL、PHP)
ZH奶酪:Ubuntu 14.04安装LAMP(Linux,Apache,MySQL,PHP) 之前已经介绍过LAMP的安装,这边文章主要讲解一下LAMP的配置. 1.配置Apache (1)调整Ke ...
- Ubuntu 14.04 配置FTP
配置Ubuntu 14.04的FTP服务,通过Windows远程访问Ubuntu 14.04的同时,可以实现windows和Ubuntu之间的文件交换传输.在多用户环境下,每一个用户都可以通过自己的帐 ...
- Ubuntu 14.04 配置安卓5.1编译环境
Ubuntu 14.04版本 电脑cpu必须是64位 硬盘分配大约100G的空间 1.ubuntu中更新源 $ sudo apt-get update 2.android5.1需要安装openjdk- ...
- Ubuntu 14.04 配置 VNC Server
用putty连接Linux后,如果会话断开,也会终止此会话在Linux执行的任务. 用WinSCP传输文件很方便,目前也只能传输文件. 按照以下步骤以及提示,安装VNC Server, 1.apt-g ...
- Ubuntu 14.04在虚拟机上的桥接模式下设置静态IP
1.虚拟机--->虚拟机设置 将虚拟机设置为桥接模式 2.查看window 网卡以及IP信息 cmd下输入 ipconfig -all 可以看到,我的网卡为Realtek PCIe GBE Fa ...
随机推荐
- 汇编的WEAK关键字
一般来说,这个关键字使用在IMPORT和EXPORT这两个声明段. ////////////////////////////////////////////////////////////////// ...
- boost implicit_cast
在stackoverflow上看到这个帖子, 于是发现了boost::implicit_cast这个小东西. 先来看看这段代码: struct top {}; struct mid_a : top { ...
- The Cheap KD 10 is my best shoe yet
10 years of anything is fairly huge Cheap KD 10, but adding something as great as Flyknit causes it ...
- Python中i = i + 1与i + = 1的区别
+=是对原本的实例做加1运算,l=l+[1]是对l+[1]之后重新把值赋给叫l的变量(和原来的l不同) 区别在于,一个修改数据结构本身(就地操作)b + = 1而另一个只是重新分配变量a = a + ...
- 安装和使用php的mcrypt扩展
程序员们在编写代码程序时,除了要保证代码的高性能之外,还有一点是非常重要的,那就是程序的安全性保障.PHP除了自带的几种加密函数外,还有功能更全面的PHP加密扩展库和. 其中,Mcrypt扩展库可以实 ...
- Kafka(一)
1.安装zookeeper集群 2.下载kafka wget http://mirror.bit.edu.cn/apache/kafka/1.0.0/kafka_2.11-1.0.0.tgz 配 ...
- 3.1.7. Cross validation of time series data
3.1.7. Cross validation of time series data Time series data is characterised by the correlation bet ...
- hdu6127 Hard challenge
地址:http://acm.split.hdu.edu.cn/showproblem.php?pid=6127 题目: Hard challenge Time Limit: 4000/2000 MS ...
- CodeForces - 632E Thief in a Shop (FFT+记忆化搜索)
题意:有N种物品,每种物品有价值\(a_i\),每种物品可选任意多个,求拿k件物品,可能损失的价值分别为多少. 分析:相当于求\((a_1+a_2+...+a_n)^k\)中,有哪些项的系数不为0.做 ...
- PHP jsonencode 已经json中包含 汉字的处理
<?php $arr = array ( 'Name'=>'希亚', ); $jsonencode = json_encode($arr); echo $jsonencode; ?> ...
