mybatis-plus详细使用教程
mybatis-plus使用教程
欢迎关注博主公众号「Java大师」, 专注于分享Java领域干货文章http://www.javaman.cn/jszw/mybatis-plus
什么是Mybatis-Plus
MyBatis-Plus (opens new window)(简称 MP)是一个 MyBatis (opens new window)的增强工具,在 MyBatis 的基础上只做增强不做改变,为简化开发、提高效率而生。
特性
- 无侵入:只做增强不做改变,引入它不会对现有工程产生影响,如丝般顺滑
- 损耗小:启动即会自动注入基本 CURD,性能基本无损耗,直接面向对象操作
- 强大的 CRUD 操作:内置通用 Mapper、通用 Service,仅仅通过少量配置即可实现单表大部分 CRUD 操作,更有强大的条件构造器,满足各类使用需求
- 支持 Lambda 形式调用:通过 Lambda 表达式,方便的编写各类查询条件,无需再担心字段写错
- 支持主键自动生成:支持多达 4 种主键策略(内含分布式唯一 ID 生成器 - Sequence),可自由配置,完美解决主键问题
- 支持 ActiveRecord 模式:支持 ActiveRecord 形式调用,实体类只需继承 Model 类即可进行强大的 CRUD 操作
- 支持自定义全局通用操作:支持全局通用方法注入( Write once, use anywhere )
- 内置代码生成器:采用代码或者 Maven 插件可快速生成 Mapper 、 Model 、 Service 、 Controller 层代码,支持模板引擎,更有超多自定义配置等您来使用
- 内置分页插件:基于 MyBatis 物理分页,开发者无需关心具体操作,配置好插件之后,写分页等同于普通 List 查询
- 分页插件支持多种数据库:支持 MySQL、MariaDB、Oracle、DB2、H2、HSQL、SQLite、Postgre、SQLServer 等多种数据库
- 内置性能分析插件:可输出 SQL 语句以及其执行时间,建议开发测试时启用该功能,能快速揪出慢查询
- 内置全局拦截插件:提供全表 delete 、 update 操作智能分析阻断,也可自定义拦截规则,预防误操作
快速入门
步骤
1、创建数据库和数据库表
(来自官网的例子)
DROP TABLE IF EXISTS user;

CREATE TABLE user

(

	id BIGINT(20) NOT NULL COMMENT '主键ID',

	name VARCHAR(30) NULL DEFAULT NULL COMMENT '姓名',

	age INT(11) NULL DEFAULT NULL COMMENT '年龄',

	email VARCHAR(50) NULL DEFAULT NULL COMMENT '邮箱',

	PRIMARY KEY (id)

);
2、插入表数据
DELETE FROM user;

INSERT INTO user (id, name, age, email) VALUES

(1, 'Jone', 18, 'test1@baomidou.com'),

(2, 'Jack', 20, 'test2@baomidou.com'),

(3, 'Tom', 28, 'test3@baomidou.com'),

(4, 'Sandy', 21, 'test4@baomidou.com'),

(5, 'Billie', 24, 'test5@baomidou.com');
3、新建springboot工程,引入mubatis-plus依赖
<dependency>

    <groupId>com.baomidou</groupId>

    <artifactId>mybatis-plus-boot-starter</artifactId>

    <version>3.1.0</version>

</dependency>
4、application.yml配置mysql数据源
# DataSource Config

spring:

  datasource:

    driver-class-name: com.mysql.cj.jdbc.Driver

    url: jdbc:mysql://localhost/mp_plus?serverTimezone=GMT%2B8&characterEncoding=UTF-8&allowMultiQueries=true

    username: root

    password: 123456
5、使用mybatis-plus
entity
@Data

@AllArgsConstructor

@NoArgsConstructor

public class User {

    @TableId(type = IdType.AUTO) //采用数据库自增

    private long id;

    private String name;

    private int age;

    private String email;

}
mapper接口
// 在对应的Mapper上面继承基本的类 BaseMapper

@Repository

public interface UserMapper extends BaseMapper<User> {

	// 所有的CRUD操作都已经编写完成了

}
springboot测试启动类增加@MapperScan扫描注解
@MapperScan("com.mpstudy.mp.mapper")
测试
@MapperScan("com.mpstudy.mp.mapper")

@SpringBootTest

class MpApplicationTests {

    // 继承了BaseMapper,所有的方法都来自己父类

    // 我们也可以编写自己的扩展方法!

    @Autowired

    UserMapper userMapper;

    @Test

    void contextLoads() {

        List<User> users = userMapper.selectList(null); //条件构造器先不用

        users.forEach(System.out::println);

    }

}
- 测试结果
Closing non transactional SqlSession [org.apache.ibatis.session.defaults.DefaultSqlSession@75023c53]

User(id=1, name=Jone, age=18, email=test1@baomidou.com, createTime=null, updateTime=null)

User(id=2, name=Jack, age=20, email=test2@baomidou.com, createTime=null, updateTime=null)

User(id=3, name=Tom, age=28, email=test3@baomidou.com, createTime=null, updateTime=null)

User(id=4, name=Sandy, age=21, email=test4@baomidou.com, createTime=null, updateTime=null)

User(id=5, name=Billie, age=24, email=test5@baomidou.com, createTime=null, updateTime=null)
日志配置
将我们执行的sql打印出来,方便调试
1、在application.yml中新增配置
mybatis-plus:

  configuration:

    log-impl: org.apache.ibatis.logging.stdout.StdOutImpl //标准输出
2、日志配置完成后,在控制台就会生成相应的日志
Creating a new SqlSession

SqlSession [org.apache.ibatis.session.defaults.DefaultSqlSession@75023c53] was not registered for synchronization because synchronization is not active

JDBC Connection [HikariProxyConnection@688197093 wrapping com.mysql.jdbc.JDBC4Connection@3610f277] will not be managed by Spring

==>  Preparing: SELECT id,name,age,email,create_time,update_time FROM user

==> Parameters:

<==    Columns: id, name, age, email, create_time, update_time

<==        Row: 1, Jone, 18, test1@baomidou.com, null, null

<==        Row: 2, Jack, 20, test2@baomidou.com, null, null

<==        Row: 3, Tom, 28, test3@baomidou.com, null, null

<==        Row: 4, Sandy, 21, test4@baomidou.com, null, null

<==        Row: 5, Billie, 24, test5@baomidou.com, null, null
CRUD详解
1、插入操作
@Test

void insert(){

    User user = new User();

    user.setName("java大师1");

    user.setAge(11);

    user.setEmail("111000@qq.com");

    int insert = userMapper.insert(user);

}
上面的的例子中没有插入用户id,在User类中已经设置了自动,也就是跟着数据库的配置走(数据库中已经设置了自增)
//mybatis-plus支持的主键策略

public enum IdType {

    AUTO(0), // 数据库id自增

    NONE(1), // 未设置主键

    INPUT(2), // 手动输入

    ID_WORKER(3), // 默认的全局唯一id

    UUID(4), // 全局唯一id uuid

    ID_WORKER_STR(5);  //ID_WORKER 字符串表示法
2、更新操作
@Test

void update(){

    User user = new User();

    user.setId(6);

    user.setAge(38);

    int i = userMapper.updateById(user); //传入的是个对象

    System.out.println(i);

}
3、时间戳自动填充
在实际开发中,我们希望所有的创建时间(create_time)和更新时间(update_time)都是自动完成,不需要人为去修改和维护
实现方法有如下两种:
方法一:数据库级别(数据库增加default字段)

方法二:代码级别
编写时间戳自动填充注解
import com.baomidou.mybatisplus.core.handlers.MetaObjectHandler;

import lombok.extern.slf4j.Slf4j;

import org.apache.ibatis.reflection.MetaObject;

import org.springframework.stereotype.Component;

import java.util.Date;

@Slf4j

@Component

public class MyMetaObjectHandler implements MetaObjectHandler {

    @Override

    public void insertFill(MetaObject metaObject) {

        log.info("开始填充");

        this.setFieldValByName("createTime",new Date(),metaObject);

        this.setFieldValByName("updateTime",new Date(),metaObject);

    }

    @Override

    public void updateFill(MetaObject metaObject) {

        log.info("更新填充");

        this.setFieldValByName("updateTime",new Date(),metaObject);

    }

}
在实体类的字段上增加TableField注解
@Data

@AllArgsConstructor

@NoArgsConstructor

public class User {

    @TableId(type = IdType.AUTO)

    private long id;

    private String name;

    private int age;

    private String email;

    //创建时间注解

    @TableField(fill = FieldFill.INSERT)

    private Date createTime;

	//修改时间注解

    @TableField(fill = FieldFill.INSERT_UPDATE)

    private Date updateTime;

}
测试
@Test

void insert(){

    User user = new User();

    user.setName("公众号:java大师");

    user.setAge(2);

    user.setEmail("javadashi@qq.com");

    int insert = userMapper.insert(user);

}
4、删除操作
// 测试删除

@Test

public void testDeleteById(){

	userMapper.deleteById(1);

}

// 通过id批量删除

@Test

public void testDeleteBatchId(){

	userMapper.deleteBatchIds(Arrays.asList(2,3,4));

}

// 通过map删除

@Test

public void testDeleteMap(){

HashMap<String, Object> map = new HashMap<>();

map.put("name","java大师");

userMapper.deleteByMap(map);
5、逻辑删除
相对于物理删除来说,我们需要对数据进行留档,所以需要对删除的数据也要保留,这就要用到逻辑删除
物理删除 :从数据库中直接移除
逻辑删除 :再数据库中没有被移除,而是通过一个变量来让他失效! sfyx = 0 => sfyx = 1
在数据库表中增加sfyx(是否有效)字段
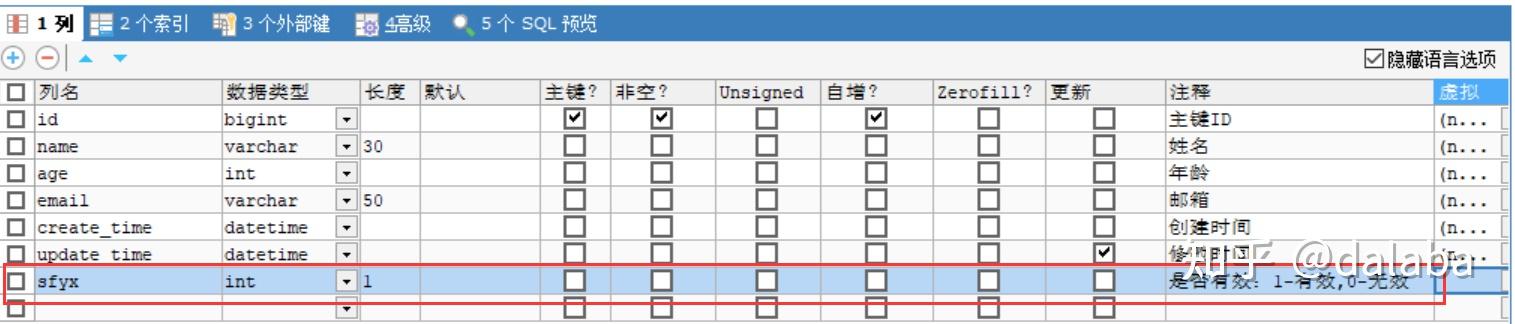
实体类增加属性
@TableLogic //逻辑删除

private Integer sfyx;
配置逻辑删除组件并被springboot所管理
// 逻辑删除组件!

@Bean

public ISqlInjector sqlInjector() {

	return new LogicSqlInjector();

}
修改application.yml增加配置
mybatis-plus:

  configuration:

    log-impl: org.apache.ibatis.logging.stdout.StdOutImpl

  global-config:

    db-config:

      logic-delete-value: 0  //已删除

      logic-not-delete-value: 1  //未删除
测试(看到虽然执行的的delete方法,但是实际的sql是update语句)
@Test

    void testDelete(){

        int i = userMapper.deleteById(2);

    }
Creating a new SqlSession

SqlSession [org.apache.ibatis.session.defaults.DefaultSqlSession@456bcb74] was not registered for synchronization because synchronization is not active

JDBC Connection [HikariProxyConnection@66747889 wrapping com.mysql.jdbc.JDBC4Connection@4dd90166] will not be managed by Spring

==>  Preparing: UPDATE user SET sfyx=0 WHERE id=? AND sfyx=1

==> Parameters: 2(Integer)

<==    Updates: 1
6、分页查询
配置分页拦截器
@Bean

public PaginationInterceptor paginationInterceptor(){

    return new PaginationInterceptor();

}
使用Page对象
@Test

void testPage(){

    Page<User> page = new Page<>(1,3);

    userMapper.selectPage(page, null);

    page.getRecords().forEach(System.out::println);

    System.out.println(page.getTotal());

}
7、多表查询
创建VO对象
import com.mpstudy.mp.entity.User;

import lombok.Data;

@Data

public class UserClassVo extends User {

    private String className;

}
UserMapper中增加getAllUsers方法,通过select注解编写sql
@Repository

public interface UserMapper extends BaseMapper<User> {

    @Select("select a.*,b.name as class_name from user a,class b,user_class c where a.id=c.user_id and b.id=c.class_id ")

    List<UserClassVo> getAllUsers();

}
测试
@Test

void testGetAllUsers(){

    List<UserClassVo> allUsers = userMapper.getAllUsers();

    allUsers.forEach(System.out::println);

}
Creating a new SqlSession

SqlSession [org.apache.ibatis.session.defaults.DefaultSqlSession@47f04e4d] was not registered for synchronization because synchronization is not active

JDBC Connection [HikariProxyConnection@843410864 wrapping com.mysql.jdbc.JDBC4Connection@5f5827d0] will not be managed by Spring

==>  Preparing: select a.*,b.name as class_name from user a,class b,user_class c where a.id=c.user_id and b.id=c.class_id

==> Parameters:

<==    Columns: id, name, age, email, create_time, update_time, sfyx, class_name

<==        Row: 2, Jack, 20, test2@baomidou.com, null, 2021-09-20 18:05:06.0, 0, 小二班

<==        Row: 3, Tom, 28, test3@baomidou.com, null, 2021-09-20 18:04:27.0, 1, 大一班
8、多表分页查询
创建VO对象
import com.mpstudy.mp.entity.User;

import lombok.Data;

@Data

public class UserClassVo extends User {

    private String className;

}
UserMapper中增加getUsersByPage方法,通过select注解编写sql
@Repository

public interface UserMapper extends BaseMapper<User> {

    //传入IPage对象和QueryWrapper条件构造器

    //sql通过${ew.customSqlSegment}去解析构造器内容

    @Select("select a.*,c.name as class_name from user a left join user_class b on a.id=b.user_id left join class c on b.class_id = c.id " + "${ew.customSqlSegment} ")

    IPage<UserClassVo> getUsersByPage(IPage<UserClassVo> page,@Param(Constants.WRAPPER) QueryWrapper wrapper);

}
测试
@Test

void testGetUsersByPage(){

    Page<UserClassVo> page = new Page<>(2,2);

    QueryWrapper<UserClassVo> wrapper = new QueryWrapper<>();

    wrapper.likeRight("a.name","java");

    userMapper.getUsersByPage(page,wrapper);

    page.getRecords().forEach(System.out::println);

}
Creating a new SqlSession

SqlSession [org.apache.ibatis.session.defaults.DefaultSqlSession@f438904] was not registered for synchronization because synchronization is not active

JDBC Connection [HikariProxyConnection@766089249 wrapping com.mysql.jdbc.JDBC4Connection@62cba181] will not be managed by Spring

 JsqlParserCountOptimize sql=select a.*,c.name as class_name from user a left join user_class b on a.id=b.user_id left join class c on b.class_id = c.id WHERE a.name LIKE ?

==>  Preparing: SELECT COUNT(1) FROM user a LEFT JOIN user_class b ON a.id = b.user_id LEFT JOIN class c ON b.class_id = c.id WHERE a.name LIKE ?

==> Parameters: java%(String)

<==    Columns: COUNT(1)

<==        Row: 3

==>  Preparing: select a.*,c.name as class_name from user a left join user_class b on a.id=b.user_id left join class c on b.class_id = c.id WHERE a.name LIKE ? LIMIT ?,?

==> Parameters: java%(String), 0(Long), 2(Long)

<==    Columns: id, name, age, email, create_time, update_time, sfyx, class_name

<==        Row: 6, java大师, 38, javadashi@qq.com, null, 2021-09-20 18:04:29.0, 1, 小二班

<==        Row: 7, java大师, 11, javadashi@qq.com, null, 2021-09-20 18:04:29.0, 1, 大一班

<==      Total: 2
10、条件构造器
说明:
QueryWrapper(LambdaQueryWrapper) 和 UpdateWrapper(LambdaUpdateWrapper) 的父类
用于生成 sql 的 where 条件, entity 属性也用于生成 sql 的 where 条件
注意: entity 生成的 where 条件与 使用各个 api 生成的 where 条件没有任何关联行为
支持:allEq,eq,isNull等等,具体见:条件构造器 | MyBatis-Plus (baomidou.com)
- 测试
@Test

void testWrapper01(){

    // 查询name不为空的用户,并且邮箱不为空的用户,年龄大于等于12记录

    QueryWrapper<User> wrapper = new QueryWrapper<>();

    wrapper.isNotNull("name").isNotNull("create_time").gt("age",12);

    List<User> users = userMapper.selectList(wrapper);

    users.forEach(System.out::println);

}

@Test

void testWrapper02(){

    // 查询年龄18到24之间的记录

    QueryWrapper<User> wrapper = new QueryWrapper<>();

    wrapper.between("age",18,24);

    List<User> users = userMapper.selectList(wrapper);

    users.forEach(System.out::println);

}

@Test

void testWrapper03(){

    // 名字中带java的记录

    QueryWrapper<User> wrapper = new QueryWrapper<>();

    wrapper.likeRight("name","java");

    List<User> users = userMapper.selectList(wrapper);

    users.forEach(System.out::println);

}
11、性能分析插件
实际工作中,可能会遇到sql慢的一些情况,通过性能分析插件,可以定位到慢的sql和其运行时长
导入插件
@Bean

@Profile({"dev"}) //开发环境运行

public PerformanceInterceptor performanceInterceptor(){

    PerformanceInterceptor interceptor = new PerformanceInterceptor();

    interceptor.setFormat(true); //格式化sql

    interceptor.setMaxTime(20);  //设置超时时长,单位毫秒

    return interceptor;

}
application.xml设置为dev开发模式
# DataSource Config

spring:

  profiles:

    active: dev
测试(日志最后1行显示超时报错)
org.mybatis.spring.MyBatisSystemException: nested exception is org.apache.ibatis.exceptions.PersistenceException:

### Error querying database.  Cause: com.baomidou.mybatisplus.core.exceptions.MybatisPlusException:  The SQL execution time is too large, please optimize !

### The error may exist in com/mpstudy/mp/mapper/UserMapper.java (best guess)

### The error may involve com.mpstudy.mp.mapper.UserMapper.getUsersByPage

### The error occurred while handling results

### SQL: select a.*,c.name as class_name from user a left join user_class b on a.id=b.user_id left join class c on b.class_id = c.id WHERE a.name LIKE ? LIMIT ?,?

### Cause: com.baomidou.mybatisplus.core.exceptions.MybatisPlusException:  The SQL execution time is too large, please optimize !
12、代码自动生成器
dao、entity、service、controller自动生成
AutoGenerator 是 MyBatis-Plus 的代码生成器,通过 AutoGenerator 可以快速生成 Entity、
Mapper、Mapper XML、Service、Controller 等各个模块的代码,极大的提升了开发效率。
导入依赖
<dependency>

    <groupId>com.baomidou</groupId>

    <artifactId>mybatis-plus-generator</artifactId>

    <version>3.1.0</version>

</dependency>
代码生成
import com.baomidou.mybatisplus.annotation.DbType;

import com.baomidou.mybatisplus.annotation.FieldFill;

import com.baomidou.mybatisplus.annotation.IdType;

import com.baomidou.mybatisplus.generator.AutoGenerator;

import com.baomidou.mybatisplus.generator.InjectionConfig;

import com.baomidou.mybatisplus.generator.config.DataSourceConfig;

import com.baomidou.mybatisplus.generator.config.GlobalConfig;

import com.baomidou.mybatisplus.generator.config.PackageConfig;

import com.baomidou.mybatisplus.generator.config.StrategyConfig;

import com.baomidou.mybatisplus.generator.config.po.TableFill;

import com.baomidou.mybatisplus.generator.config.rules.DateType;

import com.baomidou.mybatisplus.generator.config.rules.NamingStrategy;

import java.util.ArrayList;

import java.util.HashMap;

import java.util.Map;

//代码自动生成器

public class CodeGenerator {

    public static void main(String[] args) {

        //构建一个 代码自动生成器 对象

        AutoGenerator autoGenerator = new AutoGenerator();

        //1、全局配置

        GlobalConfig gc = new GlobalConfig();

        String oPath = System.getProperty("user.dir");//得到当前项目的路径

        gc.setOutputDir(oPath + "/src/main/java");   //生成文件输出根目录

        gc.setOpen(false);//生成完成后不弹出文件框

        gc.setFileOverride(true);  //文件覆盖

        gc.setAuthor("ryan");// 作者

        gc.setServiceName("%sService");    //去除Service的I前綴

        gc.setIdType(IdType.ID_WORKER);

        gc.setDateType(DateType.ONLY_DATE);

        gc.setSwagger2(true);

        autoGenerator.setGlobalConfig(gc);

        ///2、数据源配置

        DataSourceConfig dsc = new DataSourceConfig();

        dsc.setDbType(DbType.MYSQL);   //设置数据库类型

        dsc.setUrl("jdbc:mysql://localhost:3306/mp_plus?useSSL=false&useUnicode=true&characterEncoding=utf-8&serverTimezone=GMT%2B8");  //指定数据库

        dsc.setDriverName("com.mysql.jdbc.Driver");

        dsc.setUsername("root");

        dsc.setPassword("root");

        autoGenerator.setDataSource(dsc);

        //3、包的配置

        PackageConfig pc = new PackageConfig();

        pc.setModuleName("mp");

        pc.setParent("com.mpstudy");

        pc.setEntity("pojo");

        pc.setMapper("mapper");

        pc.setService("service");

        pc.setController("controller");

        autoGenerator.setPackageInfo(pc);

        // 4、策略配置

        StrategyConfig strategy = new StrategyConfig();

        strategy.setInclude("user","user_class","class"); // 设置要映射的表名

        strategy.setNaming(NamingStrategy.underline_to_camel);

        strategy.setColumnNaming(NamingStrategy.underline_to_camel);

        strategy.setEntityLombokModel(true); // 自动lombok;

        strategy.setLogicDeleteFieldName("deleted");

        strategy.setTablePrefix("tb_"); //去掉表的前缀

        // 自动填充配置

        TableFill gmtCreate = new TableFill("create_time", FieldFill.INSERT);

        TableFill gmtModified = new TableFill("update_time", FieldFill.INSERT_UPDATE);

        ArrayList<TableFill> tableFills = new ArrayList<>();

        tableFills.add(gmtCreate);

        tableFills.add(gmtModified);

        strategy.setTableFillList(tableFills);

        // 乐观锁

        strategy.setVersionFieldName("version");strategy.setRestControllerStyle(true);

        strategy.setControllerMappingHyphenStyle(true);

        autoGenerator.setStrategy(strategy);

        //不加这个会报空指针异常

        InjectionConfig injectionConfig = new InjectionConfig() {

            //自定义属性注入:abc

            //在.ftl(或者是.vm)模板中,通过${cfg.abc}获取属性

            @Override

            public void initMap() {

                Map<String, Object> map = new HashMap<>();

                map.put("abc", this.getConfig().getGlobalConfig().getAuthor() + "-mp");

                this.setMap(map);

            }

        };

        //自定义配置

        autoGenerator.setCfg(injectionConfig);

        // 执行生成

        autoGenerator.execute();

    }

}
mybatis-plus详细使用教程的更多相关文章
- 详细整合教程(Spring+SpringMVC+MyBatis)
详细整合教程(Spring+SpringMVC+MyBatis) http://blog.csdn.net/gebitan505/article/details/44455235/
- SSM框架——详细整合教程(Spring+SpringMVC+MyBatis)【申明:来源于网络】
SSM框架--详细整合教程(Spring+SpringMVC+MyBatis)[申明:来源于网络] 地址:http://blog.csdn.net/u014662268/article/details ...
- Spring+SpringMvc+Mybatis框架集成搭建教程
一.背景 最近有很多同学由于没有过SSM(Spring+SpringMvc+Mybatis , 以下简称SSM)框架的搭建的经历,所以在自己搭建SSM框架集成的时候,出现了这样或者那样的问题,很是苦恼 ...
- SpringBoot整合Mybatis完整详细版
记得刚接触SpringBoot时,大吃一惊,世界上居然还有这么省事的框架,立马感叹:SpringBoot是世界上最好的框架.哈哈! 当初跟着教程练习搭建了一个框架,传送门:spring boot + ...
- SSM框架——详细整合教程
SSM框架——详细整合教程(Spring+SpringMVC+MyBatis) 1.基本概念 1.1.Spring Spring是一个开源框架,Spring是于2003 年兴起的一个轻量级的Jav ...
- gulp详细入门教程
本文链接:http://www.ydcss.com/archives/18 gulp详细入门教程 简介: gulp是前端开发过程中对代码进行构建的工具,是自动化项目的构建利器:她不仅能对网站资源进行优 ...
- (转)springMVC+mybatis+ehcache详细配置
一. Mybatis+Ehcache配置 为了提高MyBatis的性能,有时候我们需要加入缓存支持,目前用的比较多的缓存莫过于ehcache缓存了,ehcache性能强大,而且位各种应用都提供了解决方 ...
- 在虚拟机中安装红旗桌面7.0 Linux操作系统的详细图文教程
本文作者:souvc 本文出处:http://www.cnblogs.com/liuhongfeng/p/5343087.html 以下是详细的内容: 一.安装虚拟机. 安装虚拟机可以参考:在Wind ...
- win8.1系统的安装方法详细图解教程
win8.1系统的安装方法详细图解教程 关于win8.1系统的安装其实很简单 但是有的童鞋还不回 所以今天就抽空做了个详细的图解教程, 安装win8.1系统最好用U盘安装,这样最方便简单 而且系统安装 ...
- 百度在线编辑器UEditor(v1.3.6) .net环境下详细配置教程之更改图片和附件上传路径
本文是接上一篇博客,如果有疑问请先阅读上一篇:百度在线编辑器UEditor(v1.3.6) .net环境下详细配置教程 默认UEditor上传图片的路径是,编辑器包目录里面的net目录下 下面就演示如 ...
随机推荐
- linux笔记-工作
根据进程id或进程名查看端口号 netstat -antup|grep 2073 netstat -antup|grep processName 查看某个端口号是否被占用 netstat -tln | ...
- unordered_map模拟实现|STL源码剖析系列|开散列
博主很久没有更新过STL源码剖析这个系列的文章了,主要是因为大部分STL常用的容器,博主都已经发过文章了,今天博主带着大家把哈希表也模拟实现一下. 前言 那么这里博主先安利一下一些干货满满的专栏啦! ...
- 主机--Host
概念:主机是用于构建应用程序和服务.封装应用资源的对象,负责程序的启动和生命周期的管理,简单来说主机即应用程序. 主机运行:当主机运行的时候,他会将托管在服务容器集合里面注册的IHostService ...
- 创建大量栅格文件并分别写入像元数据:C++ GDAL代码实现
本文介绍基于C++语言GDAL库,批量创建大量栅格遥感影像文件,并将数据批量写入其中的方法. 首先,我们来明确一下本文所需实现的需求.已知我们对大量遥感影像进行了批量读取与数据处理操作--具体 ...
- 小知识:TFA收集日志报错空间不足
今天在某客户环境下分析某节点驱逐的故障,发现有安装TFA,所以使用一键收集包含故障时刻的日志 tfactl diagcollect -from "2020-08-14 03:00:00&qu ...
- 那些年我一直在用的高效开发者工具-Typora
今天跟大家介绍一款我平时一直在用的本地Markdown工具,对比了国内外几款相似工具,Typora简洁.干练.清爽.功能完备特性深深吸引了我.我平时一般用它记录一些学习文章撰写,工作会议内容记录.项目 ...
- Base64编码的优点与缺点
Base64编码是一种将二进制数据转换为可打印ASCII字符的编码方式.它被广泛应用于数据传输和存储,以提升数据的可读性.可传输性和安全性. Base64编码解码 | 一个覆盖广泛主题工具的高效在线平 ...
- Host跨网段的ARP request
写得很清楚的文章:ARP协议在同网段及跨网段下的工作原理 对应的官方ARP文档:RFC 826 对文档的解读:详解RFC 826文档 ARP跨网段进行request包发送,需要先检测自身子网是否与对方 ...
- NC16129 小小粉刷匠
题目链接 题目 题目描述 "lalala,我是一个快乐的粉刷匠",小名一边快活地唱着歌,一边开心地刷着墙",兴致突然被打断,"小名,你今天如果刷不完这一栋楼的墙 ...
- MySQL日志:slow query log
ySQL的慢查询日志可以用来找出执行时间过长的查询语句,并进行针对性的优化. 一.slow log相关参数 以下参数都是动态参数,可以在实例运行时修改. slow_query_log=1 #是否启 ...