PO设计模式-实现移动端自动化测试
开发环境:python 3.6.5 + selenium 2.48.0 + pytest框架 + Android 5.1
工具:pycharm + Appium + Genymotion
测试机型:Samsung Galaxy S6
#需求:设计3个测试用例

#1.实现点击设置->显示->放大镜(查找)->输入内容->点击返回按钮

#2.实现点击设置->更多->移动网络->首选网络类型->2G

#3.实现点击设置->更多->移动网络->首选网络类型->3G
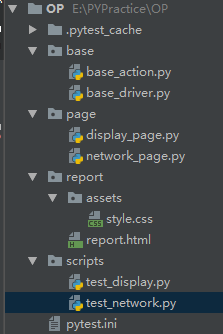
以下是PO模式设计文件目录
实现设计模式前:
import time

from appium import webdriver

class TestSetting:

    def setup(self):

        # server 启动参数

        desired_caps = {}

        # 设备信息

        desired_caps['platformName'] = 'Android'

        desired_caps['platformVersion'] = '5.1'

        desired_caps['deviceName'] = '192.168.56.101:5555'

        # app的信息

        desired_caps['appPackage'] = 'com.android.settings'

        desired_caps['appActivity'] = '.Settings'

        # 解决输入中文

        desired_caps['unicodeKeyboard'] = True

        desired_caps['resetKeyboard'] = True

        # 声明我们的driver对象

        self.driver = webdriver.Remote('http://127.0.0.1:4723/wd/hub', desired_caps)

    def test_mobile_network_2g(self):

        self.driver.find_element_by_xpath("//*[contains(@text,'更多')]").click()

        self.driver.find_element_by_xpath("//*[contains(@text,'移动网络')]").click()

        self.driver.find_element_by_xpath("//*[contains(@text,'首选网络类型')]").click()

        self.driver.find_element_by_xpath("//*[contains(@text,'2G')]").click()

    def test_mobile_network_3g(self):

        self.driver.find_element_by_xpath("//*[contains(@text,'更多')]").click()

        self.driver.find_element_by_xpath("//*[contains(@text,'移动网络')]").click()

        self.driver.find_element_by_xpath("//*[contains(@text,'首选网络类型')]").click()

        self.driver.find_element_by_xpath("//*[contains(@text,'3G')]").click()

    def test_mobile_display_input(self):

        self.driver.find_element_by_xpath("//*[contains(@text,'显示')]").click()

        self.driver.find_element_by_id("com.android.settings:id/search").click()

        self.driver.find_element_by_id("android:id/search_src_text").send_keys("hello")

        self.driver.find_element_by_class_name("android.widget.ImageButton").click()

    def teardown(self):

        self.driver.quit()
实现设计模式后:
公共部分抽取在base文件夹
抽取前置配置:
base_driver.py
from appium import webdriver

def Testbase():

    # server 启动参数

    desired_caps = {}

    desired_caps['platformName'] = 'Android'

    desired_caps['platformVersion'] = '5.1'

    desired_caps['deviceName'] = '192.168.56.101:5555'

    desired_caps['appPackage'] = 'com.android.settings'

    desired_caps['appActivity'] = '.Settings'

    desired_caps['unicodeKeyboard'] = True

    desired_caps['resetKeyboard'] = True

    # 解决输入中文问题

    desired_caps['unicodeKeyboard'] = True

    desired_caps['resetKeyboard'] = True

    # 声明driver对象

    driver = webdriver.Remote('http://127.0.0.1:4723/wd/hub', desired_caps)

    return driver
抽取公共方法:
base_action.py
from selenium.webdriver.support.wait import WebDriverWait

class BaseAction:

    def __init__(self, driver):

        self.driver = driver

    # 显示等待

    def find_elements(self, loc, time=10, poll=1):

        return WebDriverWait(self.driver, time, poll).until(lambda x: x.find_element(loc[0], loc[1]))

    # 定义一个函数,取按钮的元素

    def act_click(self,loc):

        return self.act_title(loc).click()

    # 定义一个函数,取输入框的元素

    def act_text(self,loc,text):

        return self.act_title(loc).send_keys(text)

    def act_title(self, loc):

        by = loc[0]

        value = loc[1]

        return self.driver.find_element(by, value)
页面主体部分:
page
测试用例1:
display_page.py
from base.base_action import BaseAction

from selenium.webdriver.common.by import By

class DisplayPage(BaseAction):

    # 初始化方法

    # 显示按钮

    see_button = By.XPATH, "//*[contains(@text,'显示')]"

    # 放大镜按钮

    search_button = By.ID, "com.android.settings:id/search"

    # 放大镜旁边的输入文本

    search_edit_text = By.ID, "android:id/search_src_text"

    # 返回按钮

    back_button = By.CLASS_NAME, "android.widget.ImageButton"

    #

    # # 定义一个函数,取按钮的元素

    # def act_click(self,loc):

    #     return self.driver.find_element(loc[0],loc[1]).click()

    # # 定义一个函数,取输入框的元素

    # def act_text(self,loc,text):

    #     return self.driver.find_element(loc[0],loc[1]).send_keys(text)

    # def __init__(self, driver):

    #     self.driver = driver

    # 点击显示

    def click_see(self):

        # self.driver.find_element_by_xpath("//*[contains(@text,'显示')]").click()

        # self.driver.find_element(self.see_button).click()

        self.act_click(self.see_button)

    # 点击放大镜

    def click_search(self):

        # self.driver.find_element_by_id("com.android.settings:id/search").click()

        # self.driver.find_element(self.search_button).click()

        self.act_click(self.search_button)

    # 输入文本

    def input_text(self, text):

        # self.driver.find_element_by_id("android:id/search_src_text").send_keys(text)

        # self.driver.find_element(self.search_edit_text).send_keys(text)

        self.act_text(self.search_edit_text,text)

    # 点击返回

    def click_back(self):

        # self.driver.find_element_by_class_name("android.widget.ImageButton").click()

        # self.driver.find_element(self.back_button).click()

        self.act_click(self.back_button)
测试用例2/3:
network_page.py
from selenium.webdriver.common.by import By

from base.base_action import BaseAction

class NetworkPage(BaseAction):

# 抽离元素

    # 更多按钮

    more_button = By.XPATH, "//*[contains(@text,'更多')]"

    # 网络移动按钮

    network_button = By.XPATH, "//*[contains(@text,'移动网络')]"

    #首选网络类型按钮

    first_network_button = By.XPATH, "//*[contains(@text,'首选网络类型')]"

    # 2G选择按钮

    button_2g = By.XPATH, "//*[contains(@text,'2G')]"

    # 3G选择按钮

    button_3g = By.XPATH, "//*[contains(@text,'3G')]"

# 代码精简方式,提取公共元素

    def click_more(self):

        # self.driver.find_element_by_xpath("//*[contains(@text,'更多')]").click()

        # self.driver.find_element(By.XPATH, "//*[contains(@text,'更多')]").click()

        self.act_click(self.more_button)

    def click_network(self):

        # self.driver.find_element_by_xpath("//*[contains(@text,'移动网络')]").click()

        # self.driver.find_element(By.XPATH, "//*[contains(@text,'移动网络')]").click()

        self.act_click(self.network_button)

    def click_first_network(self):

        # self.driver.find_element_by_xpath("//*[contains(@text,'首选网络类型')]").click()

        # self.driver.find_element(By.XPATH, "//*[contains(@text,'首选网络类型')]").click()

        self.act_click(self.first_network_button)

    def mobile_network_2g(self):

        # self.driver.find_element_by_xpath("//*[contains(@text,'2G')]").click()

        # self.driver.find_element(By.XPATH, "//*[contains(@text,'2G')]").click()

        self.act_click(self.button_2g)

    def mobile_network_3g(self):

        # self.driver.find_element_by_xpath("//*[contains(@text,'3G')]").click()

        # self.driver.find_element(By.XPATH, "//*[contains(@text,'2G')]").click()

        self.act_click(self.button_3g)
测试用例1的脚本:
test_display.py
# 获取本地地址

import sys, os

sys.path.append(os.getcwd())

from base.base_driver import Testbase

from page.display_page import DisplayPage

class TestDisplay:

    def setup(self):

        self.driver = Testbase()

        self.display_page = DisplayPage(self.driver)

    def test_mobile_display_input(self):

        # 点击显示

        self.display_page.click_see()

        # 点击放大镜

        self.display_page.click_search()

        # 文本输入

        self.display_page.input_text("hello")

        # 点击返回

        self.display_page.click_back()

    def teardown(self):

        self.driver.quit()
测试用例2/3的脚本:
test_network.py
import os, sys

sys.path.append(os.getcwd())

from page.network_page import NetworkPage

from base.base_driver import Testbase

class TestNetwork:

    def setup(self):

        self.driver = Testbase()

        self.network_page = NetworkPage(self.driver)

        self.network_page.click_more()

        self.network_page.click_network()

        self.network_page.click_first_network()

    def test_mobile_network_2g(self):

        self.network_page.mobile_network_2g()

    def test_mobile_network_3g(self):

        # self.network_page.click_more()

        # self.network_page.click_network()

        # self.network_page.click_first_network()

        self.network_page.mobile_network_3g()

    def teardown(self):

        self.driver.quit()
pytest框架的执行文件:
pytest.ini
注意:因为文件为ini格式,#不被识别为注释标识,请删掉注释部分
[pytest]

#文件路径,和生成报告

addopts = -s --html=./report/report.html

testpaths = ./scripts

#执行的文件名

python_files = test_*.py

#执行文件里面的类

python_classes = Test*

#执行类中的那些方法

python_functions = test_*
PO设计模式-实现移动端自动化测试的更多相关文章
- selenium自动化测试框架之PO设计模式
面向对象的特性:封装.继承.多态.在自动化中一样适用,Selenium自动化测试中有一个名字常常被提及PageObject(思想与面向对象的特性相同),通过PO模式可以大大提高测试用例的维护效率. 传 ...
- Web自动化测试—PO设计模式(二)
PO设计模式要点一:页面类都继承于BasePage 目录结构 ui_auto_test --src --pages --__init__.py --base_page.py --login_page. ...
- 移动端自动化测试-WTF Appium?
手机App分为两大类,原生App(Native App)和混合APP(Hybrid App) 原生App(Native App) 原生App实际就是我们所常见的传统App开发模式,云端数据存储+App ...
- 基于Python Selenium Unittest PO设计模式详解
本文章会讲述以下几个内容: 1.什么是PO设计模式(Page Object Model) 2.为什么要使用PO设计模式 3.使用PO设计模式要点 4.PO设计模式实例 1.什么是PO设计模式 (Pag ...
- Python Selenium设计模式 - PO设计模式
整理一下python selenium自动化测试实践中使用较多的po设计模式. 为什么要用PO 基于python selenium2开始开始ui自动化测试脚本的编写不是多么艰巨的任务.只需要定位到元素 ...
- 移动端自动化测试-WTF Appium
手机App分为两大类,原生App(Native App)和混合APP(Hybrid App) 原生App(Native App) 原生App实际就是我们所常见的传统App开发模式,云端数据存储+App ...
- 移动端自动化测试Appium 从入门到项目实战Python版☝☝☝
移动端自动化测试Appium 从入门到项目实战Python版 (一个人学习或许会很枯燥,但是寻找更多志同道合的朋友一起,学习将会变得更加有意义✌✌) 说到APP自动化测试,Appium可是说是非常流 ...
- appium 移动端自动化测试工具
appium 移动端自动化测试工具 appium 移动端自动化测试工具 appium 是哟个自动化测试开源工具 支持ios和安卓平台的应用 以及web应用和混合应用 appium 是一个跨平台的工具: ...
- appium+python做移动端自动化测试
1 导言 1.1 编制目的 该文档为选用Appium作为移动设备原生(Native).混合(Hybrid).移动Web(Mobile Web)应用UI自动化测试的相关自动化测试人员.开发人员等提供 ...
随机推荐
- 分糖果(BFS)
题目描述 童年的我们,将和朋友分享美好的事物作为自己的快乐.这天,C小朋友得到了糖果,将要把这些糖果分给要好的朋友们.已知糖果从一个人传给另一个人需要1秒的时间,同一个小朋友不会重复接受糖果.由于糖果 ...
- 吴裕雄--天生自然MySQL学习笔记:MySQL简介
MySQL 是最流行的关系型数据库管理系统,在 WEB 应用方面 MySQL 是最好的 RDBMS(Relational Database Management System:关系数据库管理系统)应用 ...
- UML-领域模型-准则
1.是否使用工具维护模型? 在白板上画完草图后,整理到UML工具里去 2.模型中是否要包含“票据”? 不包含,因为,票据用于退货,而本次迭代不涉及退货所以不需要体现. 总结:概念一定在本次迭代需求内的 ...
- [原]排错实战——通过对比分析sysinternals事件修复程序功能异常
原调试debug排错troubleshootprocess monitorsysinternals 缘起 最近,我们程序的某个功能在一台机器上不正常,但是在另外一台机器上却是正常的.代码是同一份,vs ...
- Spring核心实现篇
一.Spring Framework的核心:IoC容器的实现 1.1Spring IoC的容器概述 1.1.1 IoC容器和控制反转模式 依赖控制反转的实现有很多种方式.在Spring中,IOC容器是 ...
- Matlab高级教程_第四篇:Matlab高级函数_关键词:arrayfun
% 定义一个句柄并用这个句柄求值 h = @sin; h(3) % % 命令窗口返回内容 % h(3) % ans = % 0.1411 %定义一个完整句柄,@参数+表达式的形式,并给句柄传参 h1 ...
- opencv+tkinter制作HsvMaster(一)
这两天看opencv-python的HSV色彩空间,在写程序时发现用HSV来提取图像区域是件令人恶心的麻烦事.拿阈值分割做个对比,阈值最多也就一两个参数需要调整:但是HSV需要对三个通道调整上下限,也 ...
- 吴裕雄--天生自然python Google深度学习框架:经典卷积神经网络模型
import tensorflow as tf INPUT_NODE = 784 OUTPUT_NODE = 10 IMAGE_SIZE = 28 NUM_CHANNELS = 1 NUM_LABEL ...
- 大集合List分为多个子集合
批量插入时如果一次插入的对象过多会导致超过mysql限定sql长度,通过命令查看 show VARIABLES like 'max_allowed_packet' ,如果数据太多,就将大集合List分 ...
- c语言中对字段宽度的理解?
/************************************************************************* > File Name: printf.c ...