SimpleSSO:使用Microsoft.Owin.Security.OAuth搭建OAuth2.0授权服务端
目录
前言
OAuth2.0简介
授权模式 (SimpleSSO示例)
使用Microsoft.Owin.Security.SimpleSSO模拟OpenID认证
通过authorization code授权模式申请令牌
通过implicit授权模式申请令牌
通过password模式申请令牌
通过client credentials模式申请令牌
后话
前言
之前有分享这个项目源码及简介,不过因为文字讲解太少,被和谐了。我重新总结下:
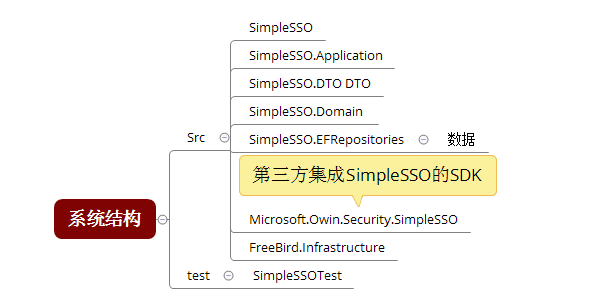
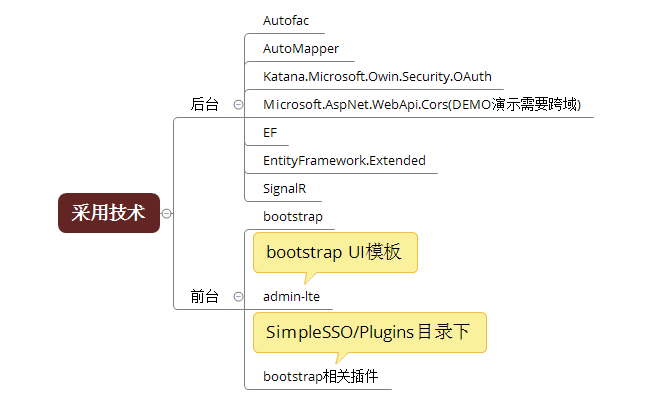
源码:https://github.com/zhoufeihong/SimpleSSO
OAuth 2.0协议:http://www.rfcreader.com/#rfc6749
-------------------------------------------分割线
记得那个酷热的夏天,面试官翘着二郎腿问:“知道单点登录不?”,我毫不迟疑答到:“不就是限制用户只能在一个地方登录吗!”。面试完回家,查资料,也是似懂非懂,COOKIE、跨域、令牌、主站都是些啥玩意! 其实我就是个VS都没摸过几次的毕业生,单点登录这种玩意是不是太高级了。
这次就是写个项目练练手(这两年手生了太多),想到当初在网上找了半天,关于单点登录、OAuth 2.0也没找到个完整的实例(概念、理论倒是比较多),就写了这个项目。分享出来,希望可以给那些对单点登录、OAuth 2.0实现比较困惑的C#开发人员一些帮助。同时项目里面有对于Autofac、AutoMapper、EF等等技术实践方式(当然复制了很多代码,我会尽量把源项目的License放上),希望在这些技术上也可以给你一些参考,项目可以直接运行(用户名:admin密码:123)。
昨天的文章因为文字讲解太少了,被和谐了。不得不佩服博客园管理人员的专业水平,是你们如此细致的工作造就了博客园这么多优秀的文章,也造就了博客园的今天(拍个马屁)。其实我就想贴几张图,你们看到效果后,自己去看代码、敲代码,这样子会比较好些(其实我就是表达能力不好,怕词不达意)。
废话不多说了,这篇文章我简单介绍下:
SimpleSSO授权第三方应用系统获取用户信息(OpenID认证)(类似于我们在新浪上点击QQ快捷登录,采用的授权码模式(authorization code))
SimpleSSO授权基于浏览器应用系统获取用户信息(类似于我们通过微信浏览器点开第三方应用,采用的简化模式(implicit))
第三方系统使用用户名密码申请获取用户令牌,然后用令牌获取用户信息(采用的密码模式(password))
第三方系统申请自己的访问令牌(类似于微信公众号用申请令牌访问自己公众号信息(采用的客户端模式client credentials))
第三方系统刷新用户(本身)令牌(refreshtoken)
OAuth2.0简介
OAuth2.0(开放授权)是一个开放标准,允许用户让第三方应用访问该用户在某一网站上存储的私密的资源,而无需将用户名和密码提供给第三方应用。具体你可以去百度(oauth2.0 阮一峰),文章关于oauth2.0理论的讲解非常到位,网上的理论也非常多,之前没有基础的可以先去脑补下。
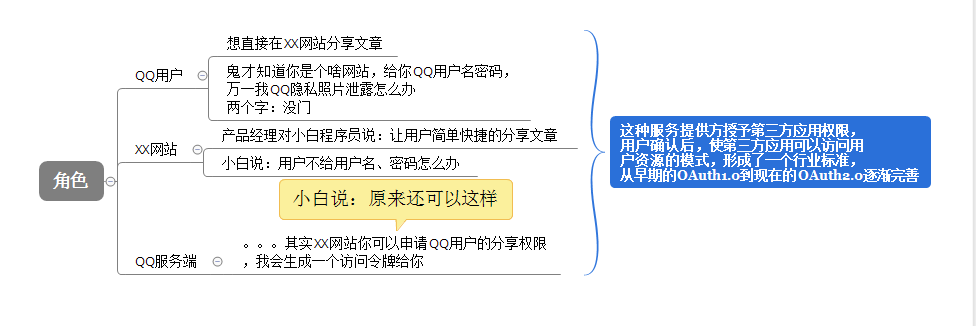
具体场景:QQ用户在XX网站分享文章到QQ空间
剖析:
授权模式 (SimpleSSO授权示例)
前言:
关于授权模式如果不太清楚的建议:去百度(oauth2.0 阮一峰),文章关于对于授权模式的讲解非常到位。Owin.OAuth的基础,可以看看dudu写的在ASP.NET中基于Owin OAuth使用Client Credentials Grant授权发放Token,一篇一篇看下去。
本节主要演示SimpleSSOTest站点通过各种授权模式到SimpleSSO站点申请令牌。如图:

其中SimpleSSO站点为:http://localhost:8550,SimpleTest站点为:http://localhost:6111,后续会用到。
SimpleSSO关于OAuthAuthorizationServerOptions的配置:
  builder.Register(c => new OAuthAuthorizationServerOptions

            {

                //授权终结点 /Token

                TokenEndpointPath = new PathString(EndPointConfig.TokenEndpointPath),

                Provider = new SimpleSSOOAuthProvider(),

                // Authorize授权终结点 /GrantCode/Authorize

                AuthorizeEndpointPath = new PathString(EndPointConfig.AuthorizeEndpointPath),

                //RefreshToken令牌创建、接收

                RefreshTokenProvider = new SimpleAuthenticationTokenProvider()

                {

                    //令牌类型

                    TokenType = "RefreshToken",

                    //刷新AccessToken时RefreshToken不需要重新生成

                    TokenKeepingPredicate = data => data.GrantType == GrantTypes.RefreshToken,

                    //过期时间

                    ExpireTimeSpan = TimeSpan.FromDays()

                },

                // AccessToken令牌创建、接收

                AccessTokenProvider = new SimpleAuthenticationTokenProvider()

                {

                    //令牌类型

                    TokenType = "AccessToken",

                    //过期时间

                    ExpireTimeSpan = TimeSpan.FromHours()

                },

                // AuthorizationCode令牌创建、接收

                AuthorizationCodeProvider = new SimpleAuthenticationTokenProvider()

                {

                    //令牌类型

                    TokenType = "AuthorizationCode",

                    //过期时间

                    ExpireTimeSpan = TimeSpan.FromMinutes(),

                    //接收令牌,同时移除令牌

                    RemoveWhenReceive = true

                },

                //在生产模式下设 AllowInsecureHttp = false

#if DEBUG

                AllowInsecureHttp = true

#endif

            }).As<OAuthAuthorizationServerOptions>().SingleInstance();
其中两个关于OAuth授权的实现类:
令牌生成接收:SimpleAuthenticationTokenProvider
授权总线:SimpleSSOOAuthProvider
授权示例:
1、使用Microsoft.Owin.Security.SimpleSSO模拟OpenID认证(authorization code模式)
1.1、Demo展示:
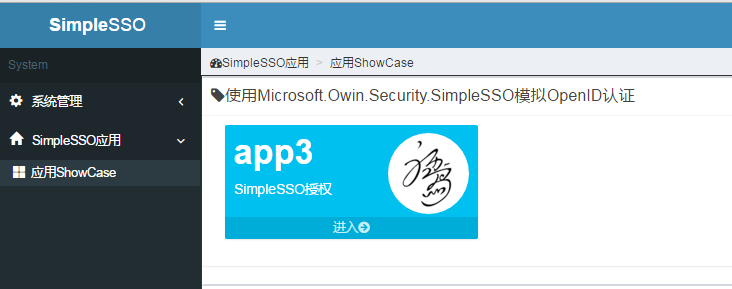
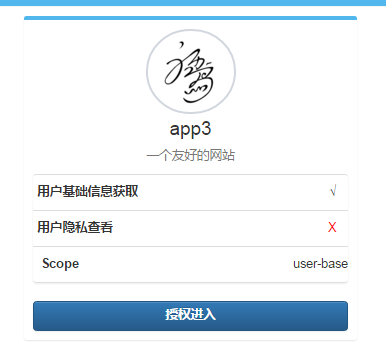

今天新加了Microsoft.Owin.Security.SimpleSSO组件(感兴趣的可以看下Katana项目),主要方便第三方集成SimpleSSO登录。
SimpleTest集成登录需要完成如下代码配置:
    public partial class Startup

    {

        // 有关配置身份验证的详细信息,请访问 http://go.microsoft.com/fwlink/?LinkId=301864

        public void ConfigureAuth(IAppBuilder app)

        {

            // 并使用 Cookie 来临时存储有关使用第三方登录提供程序登录的用户的信息

            app.UseExternalSignInCookie(DefaultAuthenticationTypes.ExternalCookie);

            //simplesso登录集成配置

        var simpleSSOOption = new SimpleSSOAccountAuthenticationOptions

            {

                //客户端ID

                ClientId = "",

                //客户端秘钥

                ClientSecret = "",

                //登录回调地址

                CallbackPath = new PathString("/login/signin-simplesso"),

                //SimpleSSO Token授权地址

                TokenEndpoint = "http://localhost:8550/token",

                //SimpleSSO authorization code授权地址

                AuthorizationEndpoint = "http://localhost:8550/GrantCode/Authorize",

                //使用令牌到SimpleSSO获取用户信息地址

                UserInformationEndpoint = "http://localhost:8550/TicketUser/TicketMessage"

            };

            simpleSSOOption.Scope.Add("user-base");

            app.UseSimpleSSOAccountAuthentication(simpleSSOOption);

            app.UseFacebookAuthentication(

                appId: "",

                appSecret: "");

        }

    }
1.2、Demo请求流程(流程图工具过期了,只能用文字了,省略了很多细节):
1)用户点击“使用Microsoft.Owin.Security.SimpleSSO模拟OpenID认证”下进入按钮,将跳转到http://localhost:6111/login/authsimplesso
2)authsimplesso接收用户请求
1>如果用户已经使用ExternalCookie在登录,注销ExternalCookie信息,获取返回用户信息。
2>当用户未登录,则将http返回状态改为401,并且创建authenticationType为SimpleSSOAuthentication身份验证,SimpleSSOAccountAuthenticationHandler将用户重定向到http://localhost:8550/GrantCode/Authorize?client_id={0}&scope={1}&response_type=code&redirect_uri={2}&state={3}。
SimpleSSOAccountAuthenticationHandler重定向代码:
protected override Task ApplyResponseChallengeAsync()

        {

            if (Response.StatusCode != )

            {

                return Task.FromResult<object>(null);

            }

            AuthenticationResponseChallenge challenge = Helper.LookupChallenge(Options.AuthenticationType, Options.AuthenticationMode);

            if (challenge != null)

            {

                string baseUri = Request.Scheme + Uri.SchemeDelimiter + Request.Host + Request.PathBase;

                string currentUri = baseUri + Request.Path + Request.QueryString;

                string redirectUri = baseUri + Options.CallbackPath;

                AuthenticationProperties extra = challenge.Properties;

                if (string.IsNullOrEmpty(extra.RedirectUri))

                {

                    extra.RedirectUri = currentUri;

                }

                // OAuth2 10.12 CSRF

                GenerateCorrelationId(extra);

                // OAuth2 3.3 space separated

        string scope = string.Join(" ", Options.Scope);

                // LiveID requires a scope string, so if the user didn't set one we go for the least possible.

        if (string.IsNullOrWhiteSpace(scope))

                {

                    scope = "user-base";

                }

                string state = Options.StateDataFormat.Protect(extra);

                string authorizationEndpoint =

                    Options.AuthorizationEndpoint +

        "?client_id=" + Uri.EscapeDataString(Options.ClientId) +

        "&scope=" + Uri.EscapeDataString(scope) +

        "&response_type=code" +

        "&redirect_uri=" + Uri.EscapeDataString(redirectUri) +

        "&state=" + Uri.EscapeDataString(state);

                var redirectContext = new SimpleSSOAccountApplyRedirectContext(

                    Context, Options,

                    extra, authorizationEndpoint);

                Options.Provider.ApplyRedirect(redirectContext);

            }

            return Task.FromResult<object>(null);

        }
3)GrantCode/Authorize接收用户请求
1>如果为可信应用则不需要用户同意,直接生成code让用户跳转到http://localhost:6111/login/signin-simplesso?code={0}&state={1}
2>如果不是可信应用则跳转到http://localhost:8550/OAuth/Grant用户授权页面,用户点击授权时跳转到
4)http://localhost:6111/login/signin-simplesso?code={0}&state={1}请求处理,由SimpleSSOAccountAuthenticationHandler类处理
SimpleSSOAccountAuthenticationHandler代码:
 internal class SimpleSSOAccountAuthenticationHandler : AuthenticationHandler<SimpleSSOAccountAuthenticationOptions>

    {

        private readonly ILogger _logger;

        private readonly HttpClient _httpClient;

        public SimpleSSOAccountAuthenticationHandler(HttpClient httpClient, ILogger logger)

        {

            _httpClient = httpClient;

            _logger = logger;

        }

        public override async Task<bool> InvokeAsync()

        {

            if (Options.CallbackPath.HasValue && Options.CallbackPath == Request.Path)

            {

                return await InvokeReturnPathAsync();

            }

            return false;

        }

        protected override async Task<AuthenticationTicket> AuthenticateCoreAsync()

        {

            AuthenticationProperties properties = null;

            try

            {

                string code = null;

                string state = null;

                IReadableStringCollection query = Request.Query;

                IList<string> values = query.GetValues("code");

                if (values != null && values.Count == )

                {

                    code = values[];

                }

                values = query.GetValues("state");

                if (values != null && values.Count == )

                {

                    state = values[];

                }

                properties = Options.StateDataFormat.Unprotect(state);

                if (properties == null)

                {

                    return null;

                }

                // OAuth2 10.12 CSRF

        if (!ValidateCorrelationId(properties, _logger))

                {

                    return new AuthenticationTicket(null, properties);

                }

                var tokenRequestParameters = new List<KeyValuePair<string, string>>()

                {

                    new KeyValuePair<string, string>("client_id", Options.ClientId),

                    new KeyValuePair<string, string>("redirect_uri", GenerateRedirectUri()),

                    new KeyValuePair<string, string>("client_secret", Options.ClientSecret),

                    new KeyValuePair<string, string>("code", code),

                    new KeyValuePair<string, string>("grant_type", "authorization_code"),

                };

                var requestContent = new FormUrlEncodedContent(tokenRequestParameters);

                HttpResponseMessage response = await _httpClient.PostAsync(Options.TokenEndpoint, requestContent, Request.CallCancelled);

                response.EnsureSuccessStatusCode();

                string oauthTokenResponse = await response.Content.ReadAsStringAsync();

                JObject oauth2Token = JObject.Parse(oauthTokenResponse);

                var accessToken = oauth2Token["access_token"].Value<string>();

                // Refresh token is only available when wl.offline_access is request.

                // Otherwise, it is null.

        var refreshToken = oauth2Token.Value<string>("refresh_token");

                var expire = oauth2Token.Value<string>("expires_in");

                if (string.IsNullOrWhiteSpace(accessToken))

                {

                    _logger.WriteWarning("Access token was not found");

                    return new AuthenticationTicket(null, properties);

                }

                _httpClient.DefaultRequestHeaders.Authorization = new AuthenticationHeaderValue("Bearer", accessToken);

                HttpResponseMessage graphResponse = await _httpClient.GetAsync(

                    Options.UserInformationEndpoint);

                graphResponse.EnsureSuccessStatusCode();

                string accountString = await graphResponse.Content.ReadAsStringAsync();

                JObject accountInformation = JObject.Parse(accountString);

                var context = new SimpleSSOAccountAuthenticatedContext(Context, accountInformation, accessToken,

                    refreshToken, expire);

                context.Identity = new ClaimsIdentity(

                    new[]

                    {

                        new Claim(ClaimTypes.NameIdentifier, context.Id, "http://www.w3.org/2001/XMLSchema#string", Options.AuthenticationType),

                        new Claim(ClaimTypes.Name, context.Name, "http://www.w3.org/2001/XMLSchema#string", Options.AuthenticationType),

                        new Claim("urn:simplesso:id", context.Id, "http://www.w3.org/2001/XMLSchema#string", Options.AuthenticationType),

                        new Claim("urn:simplesso:name", context.Name, "http://www.w3.org/2001/XMLSchema#string", Options.AuthenticationType)

                    },

                    Options.AuthenticationType,

                    ClaimsIdentity.DefaultNameClaimType,

                    ClaimsIdentity.DefaultRoleClaimType);

                if (!string.IsNullOrWhiteSpace(context.Email))

                {

                    context.Identity.AddClaim(new Claim(ClaimTypes.Email, context.Email, "http://www.w3.org/2001/XMLSchema#string", Options.AuthenticationType));

                }

                await Options.Provider.Authenticated(context);

                context.Properties = properties;

                return new AuthenticationTicket(context.Identity, context.Properties);

            }

            catch (Exception ex)

            {

                _logger.WriteError("Authentication failed", ex);

                return new AuthenticationTicket(null, properties);

            }

        }

        protected override Task ApplyResponseChallengeAsync()

        {

            if (Response.StatusCode != )

            {

                return Task.FromResult<object>(null);

            }

            AuthenticationResponseChallenge challenge = Helper.LookupChallenge(Options.AuthenticationType, Options.AuthenticationMode);

            if (challenge != null)

            {

                string baseUri = Request.Scheme + Uri.SchemeDelimiter + Request.Host + Request.PathBase;

                string currentUri = baseUri + Request.Path + Request.QueryString;

                string redirectUri = baseUri + Options.CallbackPath;

                AuthenticationProperties extra = challenge.Properties;

                if (string.IsNullOrEmpty(extra.RedirectUri))

                {

                    extra.RedirectUri = currentUri;

                }

                // OAuth2 10.12 CSRF

                GenerateCorrelationId(extra);

                // OAuth2 3.3 space separated

        string scope = string.Join(" ", Options.Scope);

                // LiveID requires a scope string, so if the user didn't set one we go for the least possible.

        if (string.IsNullOrWhiteSpace(scope))

                {

                    scope = "user-base";

                }

                string state = Options.StateDataFormat.Protect(extra);

                string authorizationEndpoint =

                    Options.AuthorizationEndpoint +

        "?client_id=" + Uri.EscapeDataString(Options.ClientId) +

        "&scope=" + Uri.EscapeDataString(scope) +

        "&response_type=code" +

        "&redirect_uri=" + Uri.EscapeDataString(redirectUri) +

        "&state=" + Uri.EscapeDataString(state);

                var redirectContext = new SimpleSSOAccountApplyRedirectContext(

                    Context, Options,

                    extra, authorizationEndpoint);

                Options.Provider.ApplyRedirect(redirectContext);

            }

            return Task.FromResult<object>(null);

        }

        public async Task<bool> InvokeReturnPathAsync()

        {

            AuthenticationTicket model = await AuthenticateAsync();

            if (model == null)

            {

                _logger.WriteWarning("Invalid return state, unable to redirect.");

                Response.StatusCode = ;

                return true;

            }

            var context = new SimpleSSOReturnEndpointContext(Context, model);

            context.SignInAsAuthenticationType = Options.SignInAsAuthenticationType;

            context.RedirectUri = model.Properties.RedirectUri;

            model.Properties.RedirectUri = null;

            await Options.Provider.ReturnEndpoint(context);

            if (context.SignInAsAuthenticationType != null && context.Identity != null)

            {

                ClaimsIdentity signInIdentity = context.Identity;

                if (!string.Equals(signInIdentity.AuthenticationType, context.SignInAsAuthenticationType, StringComparison.Ordinal))

                {

                    signInIdentity = new ClaimsIdentity(signInIdentity.Claims, context.SignInAsAuthenticationType, signInIdentity.NameClaimType, signInIdentity.RoleClaimType);

                }

                Context.Authentication.SignIn(context.Properties, signInIdentity);

            }

            if (!context.IsRequestCompleted && context.RedirectUri != null)

            {

                if (context.Identity == null)

                {

                    // add a redirect hint that sign-in failed in some way

                    context.RedirectUri = WebUtilities.AddQueryString(context.RedirectUri, "error", "access_denied");

                }

                Response.Redirect(context.RedirectUri);

                context.RequestCompleted();

            }

            return context.IsRequestCompleted;

        }

        private string GenerateRedirectUri()

        {

            string requestPrefix = Request.Scheme + "://" + Request.Host;

            string redirectUri = requestPrefix + RequestPathBase + Options.CallbackPath; // + "?state=" + Uri.EscapeDataString(Options.StateDataFormat.Protect(state));

        return redirectUri;

        }

    }
1>使用code获取令牌
2>获取用户信息
3>SignIn(ExternalCookie)
4>重新跳转到http://localhost:6111/login/authsimplesso,回到1.2-2)
2、通过authorization code授权模式申请令牌
2.1、Demo展示(这个demo请求实际上是可以跨域的):
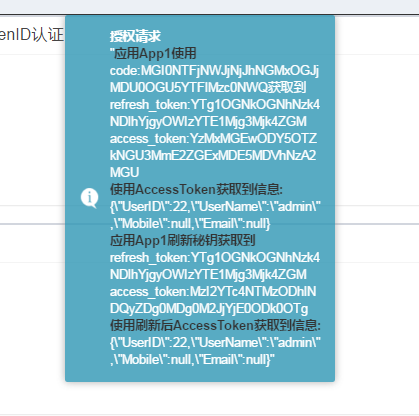
2.2、Demo请求流程
1)用户点击“通过authorization code授权模式申请令牌”下进入按钮,使用div加载url地址http://localhost:8550/GrantCode/Authorize?client_id=1&scope=user-base&response_type=code&redirect_uri=http://localhost:6111/api/Code/App1&state={随机}。如果用户没有登录的情况下请求这个路径,会跳转到登录界面。
2)因为client_id=1应用为可信应用,所以直接生成code,请求http://localhost:6111/api/Code/App1?code=?&state={请求过来的值}
由SimpleSSOOAuthProvider方法AuthorizeEndpoint完成可信应用验证,用户令牌信息注册,SimpleAuthenticationTokenProvider完成code生成
3)/api/Code/App1接收code、state
1)使用code获取Access_Token
2)使用Access_Token获取用户信息
3)使用Refresh_Token刷新Access_Token
4)使用刷新后的Access_Token获取用户信息
/api/Code/App1代码:
        [HttpGet]

        [Route("App1")]

        public async Task<string> App1(string code = "")

        {

            return await AppData(code, "App1", "", "");

        }

 private async Task<string> AppData(string code,

            string appName, string clientID, string clientSecret)

        {

            StringBuilder strMessage = new StringBuilder();

            if (!string.IsNullOrWhiteSpace(code))

            {

                string accessToken = "";

                string codeResult = await AuthorizationCode(appName, clientID, clientSecret, code);

                var obj = JObject.Parse(codeResult);

                var refreshToken = obj["refresh_token"].Value<string>();

                accessToken = obj["access_token"].Value<string>();

                strMessage.Append($"<font color='black'><b>应用{appName}使用</b></font></br>code:{code}获取到</br>refresh_token:{refreshToken}</br>access_token:{accessToken}");

                if (!string.IsNullOrEmpty(accessToken))

                {

                    strMessage.Append($"</br><font color='black'><b>使用AccessToken获取到信息:</b></font>{ await GetTicketMessageData(accessToken) }");

                    obj = JObject.Parse(await RefreshToken(clientID, clientSecret, refreshToken));

                    refreshToken = obj["refresh_token"].Value<string>();

                    accessToken = obj["access_token"].Value<string>();

                    strMessage.Append($"</br><font color='black'><b>应用{appName}刷新秘钥获取到</b></font></br>refresh_token:{refreshToken}</br>access_token:{accessToken}");

                    strMessage.Append($"</br><font color='black'><b>使用刷新后AccessToken获取到信息:</b></font>{ await GetTicketMessageData(accessToken) }");

                }

            }

            else

            {

                strMessage.AppendLine("获取code失败.");

            }

            return await Task.FromResult(strMessage.ToString());

        }
3、通过implicit授权模式申请令牌
3.1、Demo展示:
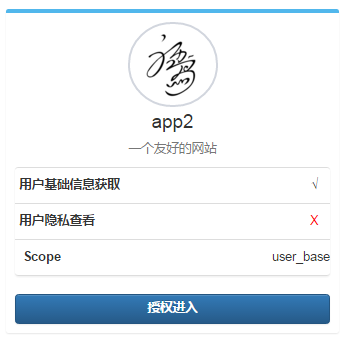
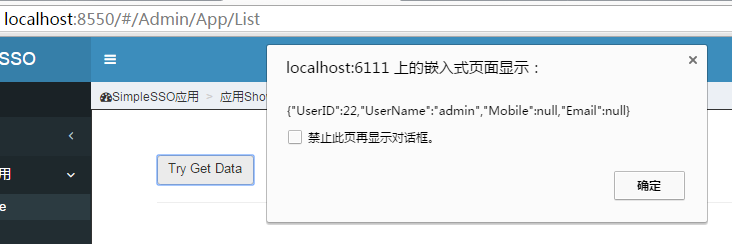
implicit模式是比较特别一种模式,由基于浏览器应用访问用户信息,所以生成的令牌直接为Access_Token,且Url为http://localhost:6111/TokenClient/ShowUser#access_token={0}&token_type={1}&state={2},浏览器端需要通过window.location.hash访问。
3.2、Demo请求流程
1)用户点击""下进入,http://localhost:8550/GrantCode/Authorize?client_id=2&redirect_uri=http://localhost:6111/TokenClient/ShowUser&response_type=token&scope=user_base&state={随机}
2)跳转到用户授权页面,用户授权后,返回http://localhost:6111/TokenClient/ShowUser#access_token={0}&token_type=bearer&state={2}
3)点击Try Get Data,js使用access_token请求获取用户信息。
其中JS代码:
   $(function () {

            $("#get_data").click(function () {

                var hashDiv = getHashStringArgs();

                var token = hashDiv["access_token"];

                var tokenType = hashDiv["token_type"];

                if (token) {

                    var url = "@ViewBag.ServerTicketMessageUrl";

                    var settings = {

                        type: "GET",

                        url: url,

                        beforeSend: function (request) {

                            request.setRequestHeader("Authorization", tokenType + " " + token);

                        },

                        success: function (data, textStatus) {

                            alert(JSON.stringify(data));

                        }

                    };

                    $.ajax(settings);

                }

            });

        });

        function getHashStringArgs() {

            var hashStrings = (window.location.hash.length >  ? window.location.hash.substring() : ""),

           hashArgs = {},

           items = hashStrings.length >  ? hashStrings.split("&") : [],

           item = null,

           name = null,

           value = null,

           i = ,

           len = items.length;

            for (i = ; i < len; i++) {

                item = items[i].split("=");

                name = decodeURIComponent(item[]);

                value = decodeURIComponent(item[]);

                if (name.length > ) {

                    hashArgs[name] = value;

                }

            }

            return hashArgs;

        }
4、通过password模式申请令牌
实现代码:
      [HttpGet]

        [Route("AppPassword")]

        public async Task<string> AppPassword()

        {

            var clientID = "";

            var clientSecret = "";

            var userName = "zfh";

            var password = "";

            var parameters = new Dictionary<string, string>();

            parameters.Add("grant_type", "password");

            parameters.Add("username", userName);

            parameters.Add("password", password);

            _httpClient.DefaultRequestHeaders.Authorization = new AuthenticationHeaderValue(

                "Basic",

                Convert.ToBase64String(Encoding.ASCII.GetBytes(clientID + ":" + clientSecret)));

            var response = await _httpClient.PostAsync(_serverTokenUrl, new FormUrlEncodedContent(parameters));

            var result = await response.Content.ReadAsStringAsync();

            var obj = JObject.Parse(result);

            var refreshToken = obj["refresh_token"].Value<string>();

            var accessToken = obj["access_token"].Value<string>();

            return $"<font color='black'><b>应用App1获取到用户zfh的</b></font></br>refresh_token:{refreshToken}</br>access_token:{accessToken}";

        }
5、通过client credentials模式申请令牌
实现代码:
   [HttpGet]

        [Route("AppclientCredentials")]

        public async Task<string> AppclientCredentials()

        {

            var clientID = "";

            var clientSecret = "";

            var parameters = new Dictionary<string, string>();

            parameters.Add("grant_type", "client_credentials");

            _httpClient.DefaultRequestHeaders.Authorization = new AuthenticationHeaderValue(

                "Basic",

                Convert.ToBase64String(Encoding.ASCII.GetBytes(clientID + ":" + clientSecret)));

            var response = await _httpClient.PostAsync(_serverTokenUrl, new FormUrlEncodedContent(parameters));

            var result = await response.Content.ReadAsStringAsync();

            var obj = JObject.Parse(result);

            var refreshToken = obj["refresh_token"].Value<string>();

            var accessToken = obj["access_token"].Value<string>();

            return $"<font color='black'><b>应用App1获取到</b></font></br>refresh_token:{refreshToken}</br>access_token:{accessToken}";

        }
后话
写的不够清晰,建议看看源码。关于OAuth的实现集中在SimpleSSOOAuthProvider,SimpleAuthenticationTokenProvider类。系统有很多不足的地方,后续我会抽时间迭代出一个稳定版本,这次毕竟只花了几天时间。当然如果您有什么宝贵建议也可以邮件联系我。
SimpleSSO:使用Microsoft.Owin.Security.OAuth搭建OAuth2.0授权服务端的更多相关文章
- Microsoft.Owin.Security.OAuth搭建OAuth2.0授权服务端
Microsoft.Owin.Security.OAuth搭建OAuth2.0授权服务端 目录 前言 OAuth2.0简介 授权模式 (SimpleSSO示例) 使用Microsoft.Owin.Se ...
- 使用DotNetOpenAuth搭建OAuth2.0授权框架
标题还是一如既往的难取. 我认为对于一个普遍问题,必有对应的一个简洁优美的解决方案.当然这也许只是我的一厢情愿,因为根据宇宙法则,所有事物总归趋于混沌,而OAuth协议就是混沌中的产物,不管是1.0. ...
- Spring Security实现OAuth2.0授权服务 - 进阶版
<Spring Security实现OAuth2.0授权服务 - 基础版>介绍了如何使用Spring Security实现OAuth2.0授权和资源保护,但是使用的都是Spring Sec ...
- Spring Security实现OAuth2.0授权服务 - 基础版
一.OAuth2.0协议 1.OAuth2.0概述 OAuth2.0是一个关于授权的开放网络协议. 该协议在第三方应用与服务提供平台之间设置了一个授权层.第三方应用需要服务资源时,并不是直接使用用户帐 ...
- 使用DotNetOpenAuth搭建OAuth2.0授权框架——Demo代码简单说明
前段时间随意抽离了一部分代码作为OAuth2的示例代码,若干处会造成困扰,现说明如下: public class OAuthController : Controller { private stat ...
- nodejs实现OAuth2.0授权服务
OAuth是一种开发授权的网络标准,全拼为open authorization,即开放式授权,最新的协议版本是2.0. 举个栗子: 有一个"云冲印"的网站,可以将用户储存在Goog ...
- zabbix系列(一)centos7搭建zabbix3.0.4服务端及配置详解
1.安装常用的工具软件 yum install -y vim wget centos7关闭防火墙 systemctl stop firewalld.service systemctl disable ...
- 分享一个单点登录、OAuth2.0授权系统源码(SimpleSSO)
SimpleSSO 关于OAuth 2.0介绍: http://www.ruanyifeng.com/blog/2014/05/oauth_2_0.html 系统效果: 登录界面: 首页: 应用界面: ...
- 扩展 Microsoft.Owin.Security
微软在 OWIN 框架中对 OAuth 认证的支持非常好, 使用现有的 OWIN 中间件可以做到: 使用 Microsoft.Owin.Security.OAuth 搭建自己的 OAuth2 服务端, ...
随机推荐
- c#语言规范
0x00 分类 C#语言规范主要有两个来源,即我们熟知的ECMA规范和微软的规范.尽管C#的ECMA规范已经前后修订4次,但其内容仅仅到C# 2.0为止.所以慕容为了方便自己和各位方便查询,在此将常见 ...
- C语言动态走迷宫
曾经用C语言做过的动态走迷宫程序,先分享代码如下: 代码如下: //头文件 #include<stdio.h> #include<windows.h>//Sleep(500)函 ...
- Apache Cordova开发Android应用程序——番外篇
很多天之前就安装了visual studio community 2015,今天闲着么事想试一下Apache Cordova,用它来开发跨平台App.在这之前需要配置N多东西,这里找到了一篇MS官方文 ...
- SMBus set up a 2-byte EEPROM address for read/write
Sequencer Engine spec: http://www.analog.com/media/en/technical-documentation/data-sheets/ADM1260.pd ...
- Web前端需要熟悉大学里【高大上】的计算机专业课吗?
作为一名刚刚大学毕业,进入新的学习阶段的研究生,我必须说大学的专业课非常重要!不管你信不信,事实就是如此! 一.大学学习的专业课非常重要,它决定了我们能走到什么高度 前端的发展非常快,我常常觉得刚刚关 ...
- 用ProGet搭建内部的NuGet服务器
最近团队内部用的一个很简陋的NuGet服务器出问题了,nuget push发包,客户端显示发布成功,服务器上就是没有.懶得再去排查这个问题,早就想换掉这个过于简陋的NuGet服务器,借此机会直接弃旧迎 ...
- 从淘宝 UWP 的新功能 -- 比较页面来谈谈 UWP 的窗口多开功能
前言 之前在 剁手党也有春天 -- 淘宝 UWP ”比较“功能诞生记 这篇随笔中介绍了一下 UWP 淘宝的“比较”新功能呱呱坠地的过程.在鲜活的文字背后,其实都是程序员不眠不休的血泪史(有血有泪有史) ...
- 速算1/Sqrt(x)背后的数学原理
概述 平方根倒数速算法,是用于快速计算1/Sqrt(x)的值的一种算法,在这里x需取符合IEEE 754标准格式的32位正浮点数.让我们先来看这段代码: float Q_rsqrt( float nu ...
- ABP框架 - 介绍
文档目录 本节内容: 简介 一个快速示例 其它特性 启动模板 如何使用 简介 我们总是对不同的需求开发不同的应用.但至少在某些层面上,一次又一次地重复实现通用的和类似的功能.如:授权,验证,异常处理, ...
- Math.random()
Math.random() 日期时间函数(需要用变量调用):var b = new Date(); //获取当前时间b.getTime() //获取时间戳b.getFullYear() //获取年份b ...
