asp.net实现图片在线上传并在线裁剪
1、说明
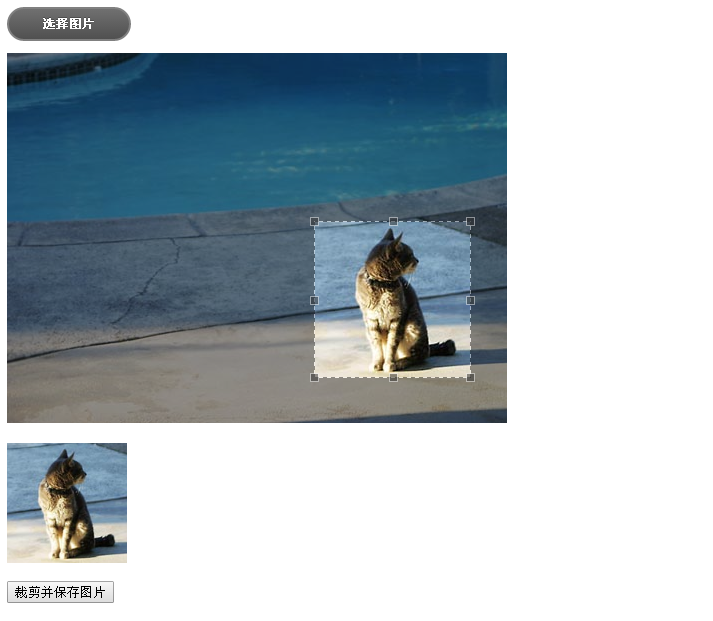
接上一篇文章uploadify实现多附件上传完成后,又突然用到头像上传并在线裁剪。在网上找个众多例子都没有符合要求的,有一篇文章写的不错,就是文旺老兄写的这篇Asp.Net平台下的图片在线裁剪功能的实现,大家可以看一下,写的真不错。我就是在参考了他的代码下,结合uploadify使用一般处理程序实现了这个功能,写下了这篇在asp.net实现图片在线上传并在线裁剪,有点绕口哈,废话不多说,现奉上代码,供同学们交流参考,有什么不对的地方,望请大家多多提提建议,多谢!多谢!
2、组成
首先说明一下代码实现所用到的技术,仅供参考:
开发工具:vs2010
目标框架:.NET Framework3.5
jcrop:Jcrop.js v0.9.12
Uploadify:uploadify-v3.1
Jquery:jquery-1.9.0.js
最后我会将整个Demo上传,如果同学们的电脑上有开发环境可直接打开项目解决方案运行。
3、代码
Default.aspx(测试页面)
<%@ Page Language="C#" AutoEventWireup="true" CodeBehind="Default.aspx.cs" Inherits="ImgJcrop._Default" %>

<!DOCTYPE html PUBLIC "-//W3C//DTD XHTML 1.0 Transitional//EN" "http://www.w3.org/TR/xhtml1/DTD/xhtml1-transitional.dtd">

<html xmlns="http://www.w3.org/1999/xhtml">

<head runat="server">

    <title>在线裁剪</title>

    <link href="Scripts/jcrop/jquery.Jcrop.css" rel="stylesheet" type="text/css" />

    <link href="Scripts/uploadify-v3.1/uploadify.css" rel="stylesheet" type="text/css" />

    <script src="Scripts/jquery.1.9.0.min.js" type="text/javascript"></script>

    <script src="Scripts/jcrop/jquery.Jcrop.js" type="text/javascript"></script>

    <script src="Scripts/uploadify-v3.1/jquery.uploadify-3.1.js" type="text/javascript"></script>

    <script type="text/javascript">

        $(function () {

            var jcrop_api, boundx, boundy;

            $("#file_upload").uploadify({

                "auto": true,

                "buttonText": "选择图片",

                "swf": "Scripts/uploadify-v3.1/uploadify.swf",

                "uploader": "App_Handler/Uploadify.ashx?action=upload",

                "fileTypeExts": "*.jpg; *.jpeg; *.gif; *.png; *.bmp",

                "fileTypeDesc": "支持的格式:",

                "multi": false,

                "removeCompleted": false,

                "onUploadStart": function (file) {

                    $("#file_upload-queue").hide();

                },

                "onUploadSuccess": function (file, data, response) {

                    var row = eval("[" + data + "]");

                    if (row[0]["status"] == 0) {

                        $("#cutimg").html("<img id=\"imgOriginal\" name=\"imgOriginal\" /><div style=\"overflow: hidden; margin-top: 20px;\"><div style=\"width: 120px; height: 120px; overflow: hidden;\"><img id=\"imgPreview\" /></div><br /><input type=\"button\" id=\"btnImgCut\" onclick=\"cutSaveImg()\" value=\"裁剪并保存图片\" /></div>");

                        $("#cutimg img").each(function () { $(this).attr("src", row[0]["message"]); });

                        $("#hidImgUrl").val(row[0]["message"]);

                        $('#imgOriginal').Jcrop({

                            onChange: updatePreview,

                            onSelect: updatePreview,

                            aspectRatio: 1,

                            //maxSize: [120, 120],

                            setSelect: [0, 0, 120, 120]

                        }, function () {

                            var bounds = this.getBounds();

                            boundx = bounds[0];

                            boundy = bounds[1];

                            jcrop_api = this;

                        });

                    } else {

                        alert(row[0]["message"]);

                    }

                }

            });

            function updatePreview(c) {

                if (parseInt(c.w) > 0) {

                    var rx = 120 / c.w;

                    var ry = 120 / c.h;

                    $("#imgPreview").css({

                        width: Math.round(rx * boundx) + "px",

                        height: Math.round(ry * boundy) + "px",

                        marginLeft: "-" + Math.round(rx * c.x) + "px",

                        marginTop: "-" + Math.round(ry * c.y) + "px"

                    });

                }

                $("#hidXone").val(c.x);

                $("#hidYone").val(c.y);

                $("#hidXtwo").val(c.hidXtwo);

                $("#hidYtwo").val(c.hidYtwo);

                $("#hidImgWidth").val(c.w);

                $("#hidImgHeight").val(c.h);

            };

        });

        function cutSaveImg() {

            $.ajax({

                type: "post",

                url: "App_Handler/Uploadify.ashx?action=cutsaveimg",

                data: { strImgUrl: $("#imgOriginal")[0].src, hidXone: $("#hidXone").val(), hidYone: $("#hidYone").val(), hidImgWidth: $("#hidImgWidth").val(), hidImgHeight: $("#hidImgHeight").val() },

                dataType: "html",

                success: function (data) {

                    var row = eval("[" + data + "]");

                    if (row[0]["status"] == 0) { }

                    alert(row[0]["message"]);

                }

            });

        }

    </script>

</head>

<body>

    <form id="form1" runat="server">

    <div>

        <input type="file" id="file_upload" name="file_upload" />

    </div>

    <div id="cutimg">

    </div>

    <asp:HiddenField ID="hidXone" runat="server" />

    <asp:HiddenField ID="hidYone" runat="server" />

    <asp:HiddenField ID="hidXtwo" runat="server" />

    <asp:HiddenField ID="hidYtwo" runat="server" />

    <asp:HiddenField ID="hidImgWidth" runat="server" />

    <asp:HiddenField ID="hidImgHeight" runat="server" />

    <asp:HiddenField ID="hidImgUrl" runat="server" />

    </form>

</body>

</html>

Uploadify.ashx(一般处理程序)
<%@ WebHandler Language="C#" Class="UploadifyUpload" %> using System;
using System.Collections;
using System.Data;
using System.Web;
using System.Linq;
using System.Web.Services;
using System.Web.Services.Protocols;
using System.Web.SessionState;
using System.IO;
using System.Collections.Generic;
using System.Web.UI.WebControls;
using System.Text;
using System.Drawing;
using System.Drawing.Imaging; public class UploadifyUpload : IHttpHandler, IRequiresSessionState
{ public void ProcessRequest(HttpContext context)
{
context.Response.ContentType = "text/plain";
context.Response.Charset = "utf-8"; string action = context.Request["action"];
switch (action)
{
case "upload":
//上传图片
upload(context);
break;
case "cutsaveimg":
//裁剪并保存
cutsaveimg(context);
break;
}
context.Response.End();
} /// <summary>
/// 上传图片
/// </summary>
/// <param name="context"></param>
private void upload(HttpContext context)
{
HttpPostedFile postedFile = context.Request.Files["Filedata"];
if (postedFile != null)
{
string fileName, fileExtension;
int fileSize;
fileName = postedFile.FileName;
fileSize = postedFile.ContentLength;
if (fileName != "")
{ fileExtension = postedFile.FileName.Substring(postedFile.FileName.LastIndexOf('.'));
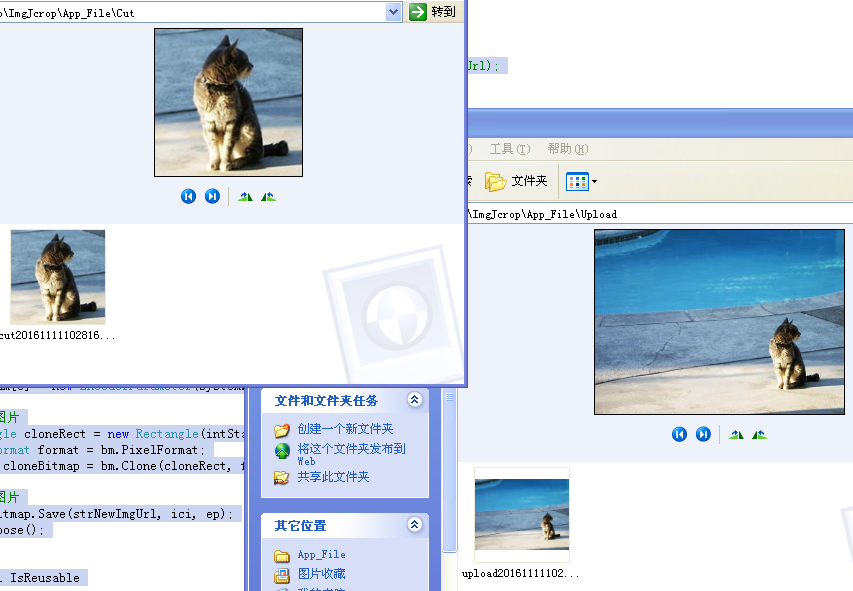
string strPath = context.Server.MapPath("/") + "\\App_File\\Upload\\";//设置文件的路径
string strFileName = "upload" + DateTime.Now.ToString("yyyyMMddHHmmss") + fileExtension;
string strFileUrl = strPath + strFileName;//保存文件路径
if (!Directory.Exists(strPath))
{
Directory.CreateDirectory(strPath);
}
postedFile.SaveAs(strFileUrl);//先保存源文件 context.Response.Write("{\"status\":0,\"message\":\"/App_File/Upload/" + strFileName + "\"}");
}
else
{
context.Response.Write("{\"status\":1,\"message\":\"上传失败!\"}");
}
}
else
{
context.Response.Write("{\"status\":1,\"message\":\"上传失败!\"}");
}
} /// <summary>
/// 裁剪并保存图片
/// </summary>
/// <param name="context"></param>
private void cutsaveimg(HttpContext context)
{
string strImgUrl = context.Request["strImgUrl"];
string strXone = context.Request["hidXone"];
string strYone = context.Request["hidYone"];
string strImgWidth = context.Request["hidImgWidth"];
string strImgHeight = context.Request["hidImgHeight"]; string[] urls = strImgUrl.Split('/');
string str_url = urls.Last(); try
{
string strOldFiel = context.Server.MapPath("~/App_File/Upload/");
string strNewFiel = context.Server.MapPath("~/App_File/Cut/");
string strOldUrl = Path.Combine(strOldFiel, str_url);
string strNewUrl = Path.Combine(strNewFiel, "cut" + DateTime.Now.ToString("yyyyMMddHHmmss") + "." + str_url.Split('.')[1]);
if (!Directory.Exists(strNewFiel))
{
Directory.CreateDirectory(strNewFiel);
}
int intStartX = int.Parse(strXone);
int intStartY = int.Parse(strYone);
int intWidth = int.Parse(strImgWidth);
int intHeight = int.Parse(strImgHeight);
CutGeneratedImage(intStartX, intStartY, intWidth, intHeight, strOldUrl, strNewUrl);
context.Response.Write("{\"status\":0,\"message\":\"裁剪成功并保存!\"}");
}
catch
{
context.Response.Write("{\"status\":1,\"message\":\"裁剪失败!\"}");
}
}
/// <summary>
/// 裁剪图片
/// </summary>
/// <param name="intWidth">要缩小裁剪图片宽度</param>
/// <param name="intHeight">要缩小裁剪图片长度</param>
/// <param name="strOldImgUrl">要处理图片路径</param>
/// <param name="strNewImgUrl">处理完毕图片路径</param>
public void CutGeneratedImage(int intStartX, int intStartY, int intWidth, int intHeight, string strOldImgUrl, string strNewImgUrl)
{
//上传标准图大小
int intStandardWidth = 120;
int intStandardHeight = 120; int intReduceWidth = 0; // 缩小的宽度
int intReduceHeight = 0; // 缩小的高度
int intCutOutWidth = 0; // 裁剪的宽度
int intCutOutHeight = 0; // 裁剪的高度
int level = 100; //缩略图的质量 1-100的范围 //获得缩小,裁剪大小
if (intStandardHeight * intWidth / intStandardWidth > intHeight)
{
intReduceWidth = intWidth;
intReduceHeight = intStandardHeight * intWidth / intStandardWidth;
intCutOutWidth = intWidth;
intCutOutHeight = intHeight;
}
else if (intStandardHeight * intWidth / intStandardWidth < intHeight)
{
intReduceWidth = intStandardWidth * intHeight / intStandardHeight;
intReduceHeight = intHeight;
intCutOutWidth = intWidth;
intCutOutHeight = intHeight;
}
else
{
intReduceWidth = intWidth;
intReduceHeight = intHeight;
intCutOutWidth = intWidth;
intCutOutHeight = intHeight;
} //通过连接创建Image对象
//System.Drawing.Image oldimage = System.Drawing.Image.FromFile(strOldImgUrl);
//oldimage.Save(Server.MapPath("tepm.jpg"));
//oldimage.Dispose(); //缩小图片
Bitmap bm = new Bitmap(strOldImgUrl); //处理JPG质量的函数
ImageCodecInfo[] codecs = ImageCodecInfo.GetImageEncoders();
ImageCodecInfo ici = null;
foreach (ImageCodecInfo codec in codecs)
{
if (codec.MimeType == "image/jpeg")
{
ici = codec;
break;
} }
EncoderParameters ep = new EncoderParameters();
ep.Param[0] = new EncoderParameter(System.Drawing.Imaging.Encoder.Quality, (long)level); //裁剪图片
Rectangle cloneRect = new Rectangle(intStartX, intStartY, intCutOutWidth, intCutOutHeight);
PixelFormat format = bm.PixelFormat;
Bitmap cloneBitmap = bm.Clone(cloneRect, format); //保存图片
cloneBitmap.Save(strNewImgUrl, ici, ep);
bm.Dispose();
} public bool IsReusable
{
get
{
return false;
}
}
}

4、最后奉上Demo
作者:小路 QQ:2490024434
出处:http://www.cnblogs.com/lengzhan/
本文版权归【冷战】和博客园所有,欢迎转载收藏,未经作者同意须保留此段声明,否则保留追究法律责任的权利。
asp.net实现图片在线上传并在线裁剪的更多相关文章
- Html5+asp.net mvc 图片压缩上传
在做图片上传时,大图片如果没有压缩直接上传时间会非常长,因为有的图片太大,传到服务器上再压缩太慢了,而且损耗流量. 思路是将图片抽样显示在canvas上,然后用通过canvas.toDataURL方法 ...
- ASP.NET MVC图片管理(上传,预览与显示)
先看看效果(下面gif动画制作有点大,5.71MB): 题外话:上面选择图片来源于Insus.NET的新浪微博:http://weibo.com/104325017 也是昨晚(2015-07-03)I ...
- 从web编辑器 UEditor 中单独提取图片上传,包含多图片单图片上传以及在线涂鸦功能
UEditor是由百度web前端研发部开发所见即所得富文本web编辑器,具有轻量,可定制,注重用户体验等特点,开源基于MIT协议,允许自由使用和修改代码.(抄的...) UEditor是非常好用的富文 ...
- asp.net+swfupload 多图片批量上传(附源码下载)
asp.net的文件上传都是单个文件上传方式,无法执行一次性多张图片批量上传操作,要实现多图片批量上传需要借助于flash,通过flash选取多个图片(文件),然后再通过后端服务进行上传操作. 本次教 ...
- MVC图片上传、浏览、删除 ASP.NET MVC之文件上传【一】(八) ASP.NET MVC 图片上传到服务器
MVC图片上传.浏览.删除 1.存储配置信息 在web.config中,添加配置信息节点 <appSettings> <add key="UploadPath" ...
- 跟我学Windows Azure 五 使用Cloub Service连接Blob Service完成图片的上传
首先,我们创建一个云服务项目,用来演示我们的blob存储 下来我们修改我们我们云服务的名字 我们需要添加一个空的WebForm的项目 点击完成,我们可以看到我们的解决方案已经添加完成 下来我们需要添加 ...
- ASP代码审计学习笔记 -3.上传漏洞
1.ASP上传过程抓包分析: POST /4.asp HTTP/1.1 Host: 192.168.1.102 User-Agent: Mozilla/5.0 (Windows NT 10.0; WO ...
- 基于vue + axios + lrz.js 微信端图片压缩上传
业务场景 微信端项目是基于Vux + Axios构建的,关于图片上传的业务场景有以下几点需求: 1.单张图片上传(如个人头像,实名认证等业务) 2.多张图片上传(如某类工单记录) 3.上传图片时期望能 ...
- xhEditor实现ctrl+v粘贴word图片并上传
自动导入Word图片,或者粘贴Word内容时自动上传所有的图片,并且最终保留Word样式,这应该是Web编辑器里面最基本的一个需求功能了.一般情况下我们将Word内容粘贴到Web编辑器(富文本编辑器) ...
随机推荐
- OpenGL超级宝典笔记----框架搭建
自从工作后,总是或多或少的会接触到客户端3d图形渲染,正好自己对于3d图形的渲染也很感兴趣,所以最近打算从学习OpenGL的图形API出发,进而了解3d图形的渲染技术.到网上查了一些资料,OpenGL ...
- Solr 排除查询
前言 solr排除查询也就是我们在数据库和程序中经常处理的不等于,solr的语法是在定语前加[-].. StringBuilder sbHtml=new StringBuilder(); shBhtm ...
- 程序猿都没对象,JS竟然有对象?
现在做项目基本是套用框架,不论是网上的前端还是后端框架,也会寻找一些封装好的插件拿来即用,但还是希望拿来时最好自己过后再回过头了解里面的原理,学习里面优秀的东西,不论代码封装性,还是小到命名. 好吧, ...
- 4.Android 打包时出现的Android Export aborted because fatal error were founds [closed]
Android 程序开发完成后,如果要发布到互联网上供别人使用,就需要将自己的程序打包成Android 安装包文件(Android Package,APK),其扩展名为.apk.使用run as 也能 ...
- centos6.3与jexus5.4.4配置支持php(wordpress)
centos6.3与jexus5.4.4配置支持php,并搭建自己的wordpress博客,供那些在Linux平台下想让 php和asp.net一起跑的初学者参考. 1.搭建webserver 首先准 ...
- Android(3)—Mono For Android App版本自动更新(2)
0.前言 这篇博文是上一篇的延续,主要是修改上一个版中的BUG和优化一些待完善的项,也算是结贴,当然还有需要完善的,等日后项目中用到的时候再单独写出来吧,本篇主要写升级改进的部分: 改进1.修复[BU ...
- Asp.Net跨平台:Ubuntu14.0+Mono+Jexus+Asp.Net
Asp.Net跨平台的文章园子里有很多,这里给自己搭建的情况做一下总结,方便以后查看. 参考网站: http://www.linuxdot.net/(Linux DotNET大本营 ) http ...
- lucene 基础知识点
部分知识点的梳理,参考<lucene实战>及网络资料 1.基本概念 lucence 可以认为分为两大组件: 1)索引组件 a.内容获取:即将原始的内容材料,可以是数据库.网站(爬虫).文本 ...
- 《深入理解Java虚拟机》内存分配策略
上节学习回顾 1.判断对象存活算法:引用计数法和可行性分析算法 2.垃圾收集算法:标记-清除算法.复制算法.标记-整理算法 3.垃圾收集器: Serial:新生代收集器,采用复制算法,单线程. Par ...
- 【转】 C#中Finally的一个不太常见的用法
原文地址:http://www.cnblogs.com/listhome/p/3664300.html 最近在看.net BCL 传送门 的源码. 在 System.Collections.Concu ...